Choosing a place for construction
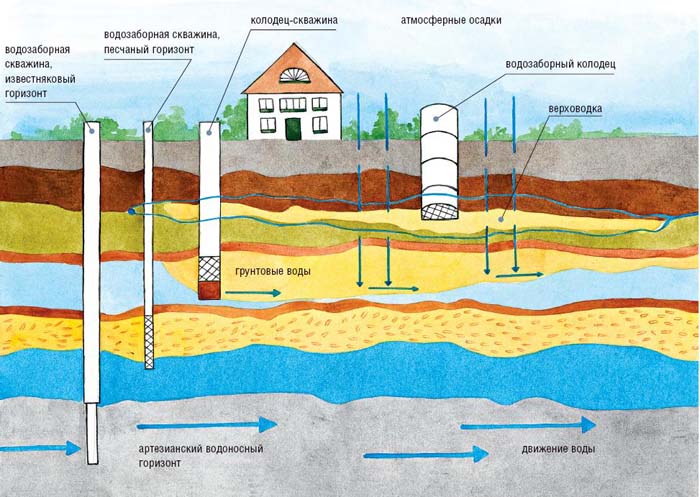
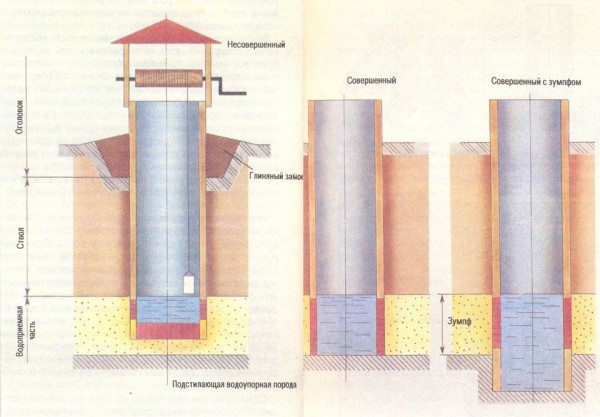
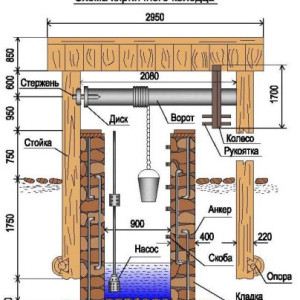
Diagram of aquifer occurrence and types of wells
First of all, it is necessary to find the right place for the construction of the water intake structure and determine its depth. If there are similar structures in neighboring areas, the task is facilitated. To do this, you should talk to your neighbors and ask them for the following information:
- What is the depth of the water intake structure in their area.
- How much water does it give?
- when it was built.
- Features of its use.
When choosing a place for construction, one should be guided by the standard distances from SNiP 30-02-97. According to them, the following minimum distances are allowed between the well and other objects on the site:
- from the foundation of the house to the water intake, the minimum allowable distance is 5 m;
- the minimum distance at which a well can be built from buildings for pets is 4 m;
- to any outbuildings on the site - 1 m;
- trees must be at least 4 m apart;
- at least 1 m retreats from shrubs to the water intake;
- from septic tanks and cesspools to a source of drinking water should be at least 50 m.
According to SNiP, cesspools should not be located above the water intake well.
What material is better to use for well masonry
material and tools
To get started, choose the right construction tool, you will need:
- scapula
- pick hammer
- ordering
- building level
- mortar shovel
- rule
- mooring cord
- plumb line
- stitching
After checking the tool available, you can start laying the well.
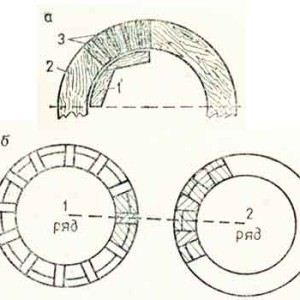
Well brickwork is made of ordinary ceramic bricks; silicate bricks are not suitable for a number of their characteristics. When laying bricks, decide on the method of laying. This can be a way of tychkovy rows or spoon. Proper dressing of seams during brick laying is the key to the strength of the structure.
Brick wells of a round shape are laid in tychkovy rows. A poke is called the short side of a brick, respectively, a spoon - a long one.
It is important to properly lay brick lintels. When laying a lintel, the bricks are laid, narrowing inside and expanding outside
Close the gaps between the bricks tightly with mortar, avoiding voids.
Preparatory work
If you decide to dig a well with your own hands, then before that you need to reconnoiter the soil in order to determine the presence and depth of groundwater. The video in this article shows how water is searched for at the site using drilling.
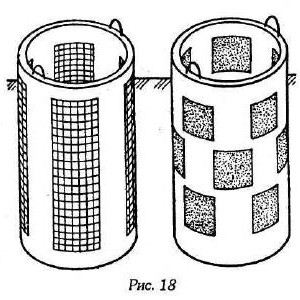
Depending on the depth of the water, different types of wells are used. If the depth is significant, then a more correct solution would be to use a tubular well, since its design is more reliable and is mounted faster than usual, but it will not work out on your own. To do this, you need to drill a well and install a pump with a water filter.
If the depth is not very large, then you can dig a hydraulic mine well. To obtain water without a pump, a special frame is installed. It holds the soil, and does not pollute the water, and also removes the influx of water from the upper layers of the soil, which is not suitable for drinking.
Types of mine wells
Selection and calculation of materials
As a material for walls, you can use not only building bricks, but also stone, but it will be more difficult due to the different sizes of cobblestones. For these works, only clay bricks (for example, ordinary solid ones) and cement mortar are used. No other materials, such as double silicate brick M 150, are suitable for a well for two reasons: they quickly collapse at constant humidity.
In order for the well brickwork to be durable, it is necessary to select bricks without cracks and chips.To calculate the number of bricks for construction, use the formula for determining the area: 2Pi * R * h. where Pi = 3.14. R is the radius, h is the depth of the pit. For example, the calculation of the area for a well 3 m deep with a radius of 0.5 m will look like this:
The standard brick face area is 0.01625 m2, so in our case we need 580 pieces. You also need to take into account the thickness of the mortar, but buy material with a margin for battle (learn also how to build a brick bath with your own hands).
Advantages and disadvantages of water wells
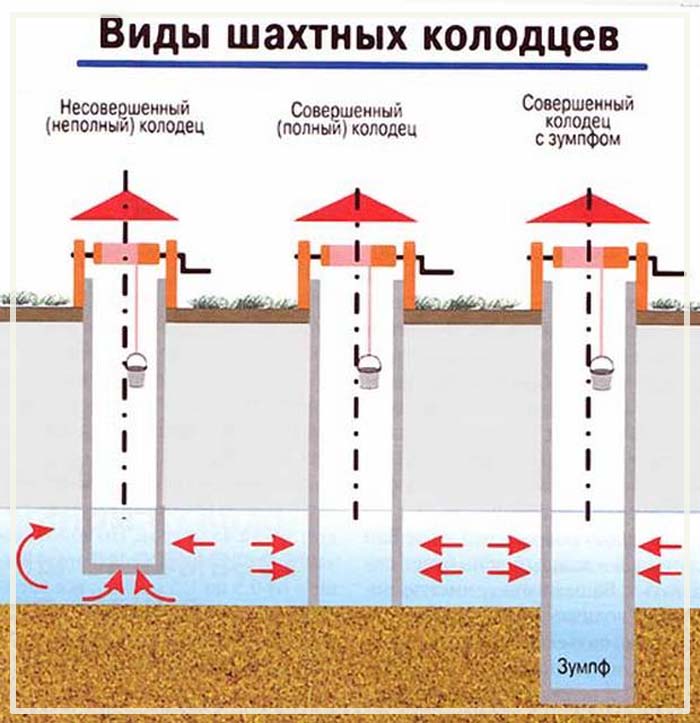
Types of shaft wells depending on the depth
The advantages of such water intake facilities include the following:
- Long service life. Reinforced concrete or plastic construction can last half a century.
- Compared to the cost of a well installation, the cost of constructing a mine structure is much lower.
- The dimensions of such water intakes make it easy to clean them. In addition, the impressive diameter makes it possible to use any deep-well pumps for building a water supply system at home.
- You do not need to obtain any building permits to install a water well. It is enough just to register the building.
However, these water intake structures also have disadvantages:
Digging a deep hole requires significant physical effort. Depending on the depth of the aquifer, the water may not be suitable for drinking (does not meet the requirements of SNiP for drinking water). Such water can only be used for household needs and watering the garden. In order for your well to produce high-quality drinking water, you need a good filter device. This will incur additional costs. If the waterproofing of the structure is performed poorly, then over time, surface and groundwater can enter the trunk and pollute the clean drinking water in it.
That is why, when installing a structure, it is so important to carefully perform a waterproofing and sealing of joints.
Stone water well
The material for the construction of wells is not only wood. Wells made of stone and concrete last 2-3 times longer than wooden ones. In addition, there is less fungus and mucus on smooth walls of inorganic origin, and they are easier to clean. So the higher cost is well worth it.
Natural stone (sandstone or limestone) is hewn. The inner surface must be flat or concave. Unlike brick wells, the stone is not uniform in size. Therefore, all masonry is accompanied by hewing a stone in order to chop off the ledge and give it the desired shape. The stones themselves must be clean, without cracks, weighing 30-40 kg. Scaling can be done with a conventional hammer or with heavier tools. First, the stones are laid out in heaps according to size, then they are laid without mortar, they are checked whether they are well selected, then they are disassembled and laid again, already on the mortar. It must be remembered that more mortar is required when building a stone well than when building a brick one, since the stones are uneven and there are more gaps between them. If the stones are different in size, then they are laid in layers.
A layer of small ones is placed on the large ones, and then the small ones are covered with large ones. The masonry should be even not only from the inside, but also from the outside, since when the well is lowered, which will inevitably happen, the protruding stone can catch on the ground and the masonry will be torn. Riding water will flow into the well through the gap formed. In the worst case, the well will be destroyed. The thickness of the walls of the masonry can be from 30 to 50 cm, depending on the depth of the well.
The most difficult moment in the construction of stone wells is to strengthen the masonry with reinforcement and a bunch of seams. The bottom of the pit must be leveled. Three frames are made in advance.The lower one should be made of a more durable material, since it will bear the entire weight of the stone. It can be metal, concrete or durable wood. It should be 10-15 cm thick, it depends on the strength of the material. Metal, for example, can be thinner, and wood can be thicker. On the outer diameter, it should be 5-6 cm wider than the masonry, on the inside it should coincide with the masonry. If the frames are wooden, then they are made from several layers of boards, fastened with long and bent nails from the back. The second and third frames may be thinner and smaller in diameter. All frames are fastened together with reinforcement (metal rods). The rods must be very rigidly fixed in the frames.
For this, rods with threaded ends are used, and they are attached to the frames with nuts and washers. First, the assembly of the lower and middle frames is carried out on the ground, then the structure is lowered into the pit. The entire structure in the mine must be secured with boards or logs. A layer of mortar is laid on the lower frame and the masonry is raised to the middle frame. Before reaching the middle frame 8-10 cm, reinforce the reinforcement and the upper frame. Then the stone is laid up to the upper frame. In order for the masonry to be perfectly even, a template can be made, which can be either in the form of a ring or in the form of a half ring. But its diameter should be 1 cm smaller than the masonry itself, for free movement inside it. If the water supply to the well is lateral, then it is necessary to leave several holes for inserting filters into them. It is immediately necessary to fix metal brackets in the masonry so that you can go down into the well to clean it.
Well construction
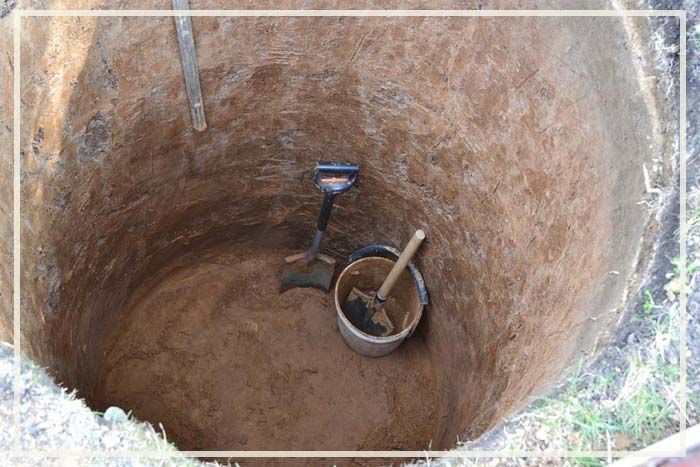
Digging a hole for a mine type well
We start building a well by digging a hole. At the same time, its diameter should be half a meter larger than the diameter of the rings. This is necessary for the installation of a compacting backfill of sand and gravel around the perimeter of the structure.
Rings with a diameter of 100 cm and a height of 25-50 cm are considered optimal for a mine structure. Larger structures are difficult to lower and turn on their own (without the use of equipment). To facilitate digging and arranging a well, a tripod is installed above the pit. With its help it is convenient to raise the earth and lower concrete rings.
Digging the trunk and installing rings
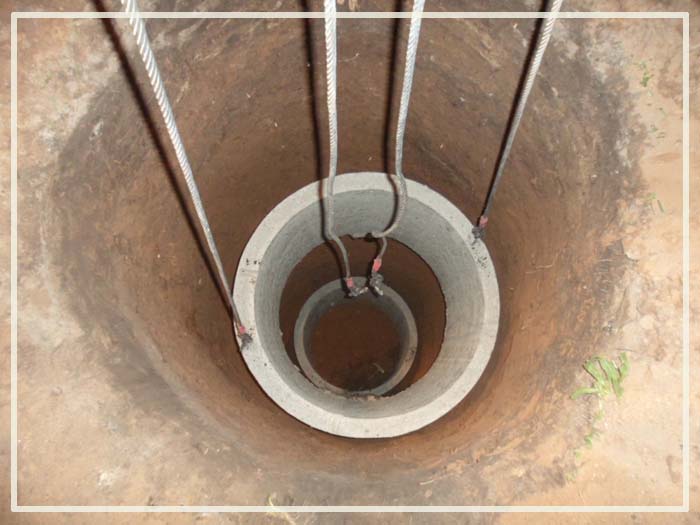
Laying reinforced concrete rings in a well pit
Work is carried out in this order:
- It is more convenient to dig a hole with a shovel with a short handle, since the space is very cramped. Having dug a hole 50 cm deep, the first ring is mounted. A winch is used to raise and lower it. Under its own weight, the ring will gradually sag.
- Having dug out another 25 cm in depth, they mount the next ring. Between themselves, the rings are connected with metal brackets.
- Thus, they continue to work on digging the pit and installing rings until they reach the aquifer - the bottom of the pit begins to fill with muddy water. This usually takes 5 to 7 days.
Water intake and filter construction
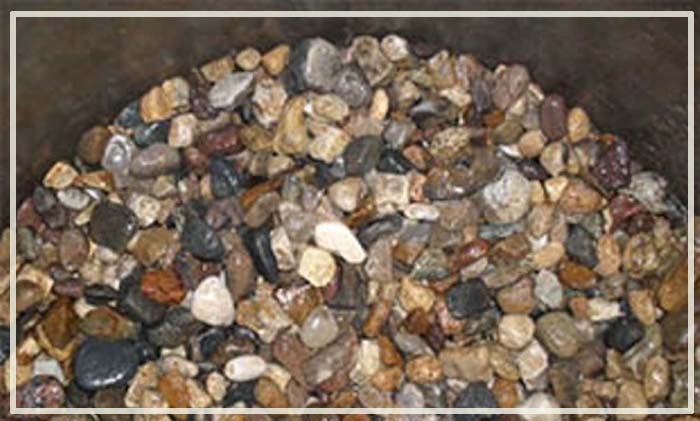
An example of a water filter made from river pebbles at the bottom of a well
According to SNiP, all wells must be equipped with a filter. This will effectively purify the water and make it drinkable. For the bottom filter device, do the following:
- Pump out muddy water from the bottom of the well.
- Deepen the bottom of the pit by 150 mm. Well level the surface and remove dirt.
- Then clean river sand is poured to the bottom. The layer height is 250 mm.
- A layer of crushed stone or gravel 200 mm high is made from above.
- The last layer will be large washed gravel. Its height is 200 mm.
Waterproofing
The requirements of SNiP provide for the mandatory installation of external and internal waterproofing of the shaft of a mine well. To seal the joints between reinforced concrete rings, you can use special compounds, liquid glass, or prepare a mixture of PVA glue and cement.
For better penetration of the mixture, first all the seams are coated with a liquid adhesive solution, and then a thicker mixture is applied with a spatula.
External waterproofing is needed to protect against the ingress of melt water, precipitation and perched water. The outer surface of the concrete rings is treated with penetrating waterproofing. Sometimes for these purposes two layers of roofing material coated with mastic are used. Some masters use polyethylene film for external insulation. She is wrapped around the head of the structure.
A trench 1.5-2 m deep and 50 cm wide is left around the upper rings, into which clay is tightly compacted. Having risen to the level of the earth's surface, a clay castle is built with a slope from the walls of the well. This will allow precipitation not to collect at the structure. For more effective waterproofing, a blind area is concreted around the head.
headroom
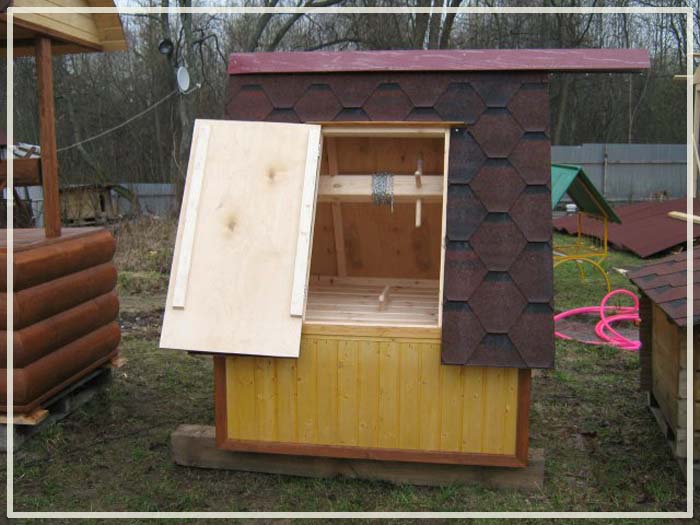
An example of a wooden cap to protect a well shaft
According to SNiP, the head of the well must be at least half a meter high. Usually it is made from the same concrete rings, but to increase the aesthetic appeal, the structure is lined with stone, brick, plastered or sheathed with timber.
When installing the head, do not forget about such important points:
- To keep the water clean, equip the roof with a good overhang.
- It is better to hang a lock on the door in the roof. This will protect your curious children from falling down the well.
Technology and performance features
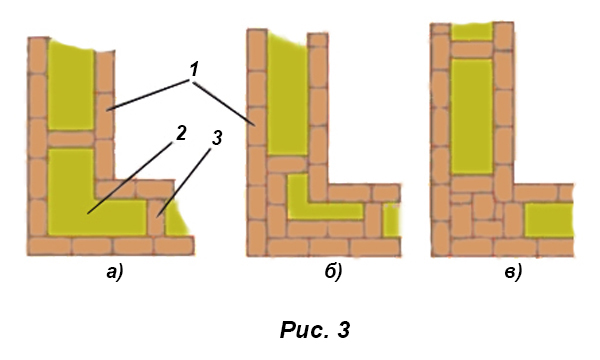
a)-c) Three options for laying the corner of the building 1. External and internal walls of the well. 2. Opening filled with insulation. 3. Vertical jumpers (diaphragms). Horizontal jumper (reinforcing mesh or reinforcement).
As already noted, the complexity of well masonry is somewhat higher than usual, but it is not difficult to master it with experience as a bricklayer. With little experience, it is advisable to arm yourself with a detailed ordering drawing
This is especially important at the initial stage. An example of fragments of such a drawing is shown in Fig.
2.
Here in fig. 2a shows a diagram of odd, and in Fig. 2b - even rows of masonry. To ensure a reliable connection between the walls, a horizontal jumper is laid after every sixth row. For this purpose, a reinforcing mesh is usually used (see Fig. 2c).
In the same figure, they are indicated by numbers:
- The outer and inner walls of the well.
- Opening filled with insulation.
- Vertical bridges (diaphragms).
- Horizontal jumper (reinforcing mesh or reinforcement).
The laying of vertical lintels must be securely tied with the longitudinal walls. Their thickness can be 1-3 horizontal rows. The greater the thickness of the jumpers, the stronger the structure, but the thermal insulation worsens. Instead of brick, it is possible to select jumpers from reinforcing pins with a thickness of 6-8 mm. For reliability, their ends are bent.
Corners can also be laid out in different ways. The device of several of its variants is shown in Fig. 3. Numerical designations here are the same as in fig. 2. Brief characteristics of these options:
- the option with only two parallel walls (a), the most economical, but also the least durable;
- the option with a thickening of the outer walls (b) requires more building materials, but the strength of the masonry increases;
- the option with a continuous layout of the corner (c) is the most durable, but also the least economical.
At least two rows of bricks under window openings should be solid. In addition, in these cases, it is desirable to reinforce the brick walls with a reinforcing mesh. When the laying of the outer walls is completed, a reinforced concrete reinforcing belt is usually poured over the last row.
This is especially important when it is planned to build a brick pediment.
As already noted, for all its merits, the well structure is not its most durable option. Therefore, in order to hold a fairly heavy brick gable, the presence of a reinforcing belt is highly desirable.
And one more important note.Like any brickwork in winter conditions, a well should be done with a doubling of the number of reinforced joints that provide reinforcement of the brickwork, and using the appropriate mortar.
The backfill inside the wells must be absolutely dry, not containing frozen inclusions. It is also desirable to use additional liners from dry cinder blocks.
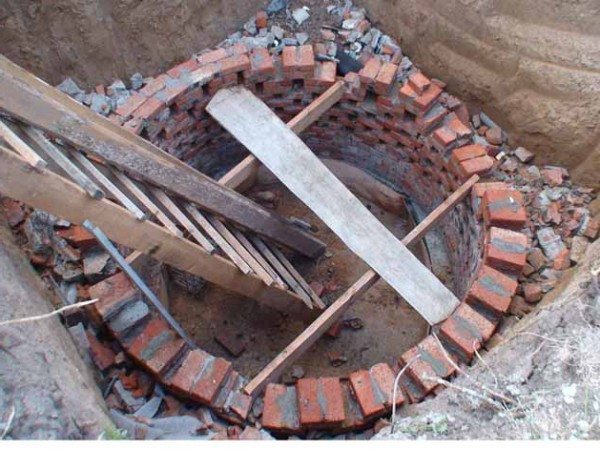
brickwork technology
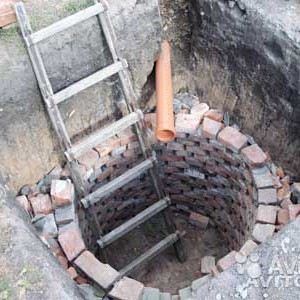
well laying steps
Before laying a brick well, a concrete base 10-15 cm thick is laid. The soil under the base must be carefully leveled. Be sure to use a level checker.
Carefully check that the bottom of the well is horizontal. Make three round frames, the diameter of the upper one is 1 meter, increase the size of the lower frames proportionally. The two upper frames are made of wood, the lower frame is made of metal.
To be sure of the correct shape of the future well, make a template. With the help of hooks, it is attached to a brick row and the laying of a brick well will take place calmly and confidently.
general sectional diagram of the well
When using the template, even without professional skills, you will definitely complete all the work.
When laying, gradually raise the template to the next level of the row. To strengthen the brick layer, lay reinforcement every five rows. Lay reinforcement at a distance of 20-25 mm from the edge of the masonry.
Make sure that in the process of work, the brickwork does not rest against the intermediate frame. Frames must stand vertically and horizontally, their installation is checked by special devices. Check the level regularly throughout all work with a plumb and level. Position the brickwork 50 mm behind, lay the area between the masonry and the frame with a mortar, pour crushed stone to save and strength the mortar.
When laying, consider the following points:
-
- Freshly laid mortar should be carefully compacted so that there are no gaps and voids. Then you need to compress the frame, for a snug fit to it.
- If water is supposed to enter from the side holes, at the bottom of the masonry, provide small holes in advance for fixing the filters, filtering occurs due to the insertion of porous concrete.
- Both on the outside and on the inside of the brickwork, you need to apply a layer of plaster. For the outside, it is necessary to take into account the dimensions of the pit in which the brickwork is made by the well. For the inner wall - the final diameter of the well. The solution is taken at the rate of 1:1 or 1:2 and is produced quickly, the longer the solution is idle, the weaker the plaster is in consequence.
well diagram example
- When laying a rounded well, a gradual narrowing is made towards the upper part of the structure. To do this, the transition from the lower to the upper part of the well is made with a gradual overlap of up to 3 cm. The narrowing is carried out on three sides of the well, leaving the fourth side sheer along the entire height of the masonry. On this side, running brackets are provided. They are built into a brick wall in the course of work in a checkerboard pattern and form a staircase. For a long service life, staples, before embedding them in the brick wall of the well, are painted with waterproof paint.
Never forget about the rules for operating a well. Sometimes there is a need to clean the well and it is necessary to go down into the mine. Before performing such manipulations, be sure to check the air in the well for the presence of carbon dioxide. To do this, lower the lit candle into the well. If the flame does not go out, then you can safely descend into the mine. Otherwise, within 20-30 minutes, the well must be ventilated with an exhaust fan.
Carefully protect children's access to the well. The well must always be closed with a special cover. To prevent children from playing and getting debris into drinking water. How the well is arranged, see in more detail at:
Our recommendations:
- LED paving slabs
- Red brick walkways
- Paving slab production technology
- Masonry of brick wells
The sequence of masonry
With at least minimal experience, the brickwork of the outer walls should not cause serious difficulties. Competent calculation, accuracy and strict order of the technological process are required:
- First, the first two continuous rows of bricks are laid on the foundation on top of the waterproofing. The first row is often made tychkovym. This will be the base of the well.
- Vertical jumpers are laid out at the right distance from each other.
- The selection of jumpers is carried out so that there are floor beams above them. Vertical jumpers should be arranged every 0.5-1.17 m.
- Adjacent walls should be connected with wire bundles.
- The laying of window and door openings, as well as the last few rows, should be continuous.
- Waterproofing is laid on top of the last layer.
For low-rise construction, well masonry is an ideal option. In this case, the optimal selection of a combination of material consumption, labor intensity and quality of thermal insulation is ensured. Its main drawback is that after the construction is completed, it is almost impossible to replace the insulation.
General construction technology
Brick wells are of two types: round and rectangular (square). Before laying, you need to make markings along the radius or extreme points. The width of the pit should be a few centimeters wider than the masonry.
Before laying, you need to make a foundation of concrete, its height depends on the depth and the presence of groundwater.
Instructions for the construction of a brick well
Round walls are laid out with bonded masonry so that small edges form a round surface inside. At the bottom there should be a working chamber, with a larger radius than the mouth of a brick well. For its formation, you need to shift each new row by 1.5-3 centimeters. Thus, the expansion of the well below will be due to the overlap on the walls. For square wells, you need to make laps only on three sides, and the fourth side will be flat for mounting the stairs.
The ladder is made of U-shaped metal pipes (brackets). which are installed during laying in the wall.
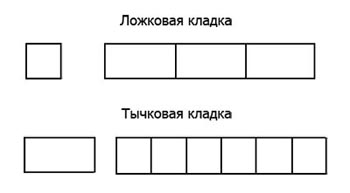
Bonded and spoon masonry
For masonry reliability, you need to shift adjacent rows by ¼. In addition, it is reinforced and plastered. Do not spare the mortar at the seams, especially outside. For additional protection of the brick from moisture and greater durability, it can be treated with penetrating waterproofing.
Note! When digging deep holes, you need to pay special attention to strengthening the walls. The deeper you dig, the greater the chance of the ground collapsing
To avoid this, it is recommended to strengthen the soil every 1 meter with temporary wooden rings.
Even the smallest brick well masonry requires at least one helper. One person works with masonry - the second delivers bricks, makes mortar.
Masonry from below
If the well is more than 5 meters deep, then laying is usually done from below.
To do this, markings are made at the bottom of the pit with pegs and the wall thickness is determined. Usually it is 1 or 1.5 bricks. Too thin walls can collapse due to ground movement, and the masonry will collapse.
Anchor frame
For safe operation, you need to make 3 round frames: 1 main reinforced concrete and 2 additional wood. The thickness of the main frame should be 5-10 centimeters more than the masonry, and the additional ones should be with the same diameter relative to the masonry. Holes for fittings are made in the main frame along the entire diameter. Metal rods are inserted into them, which will strengthen the walls. Additional frames are put on top of the reinforcement and screwed with nuts (see photo above).As the walls are laid, they will rise, and eventually completely removed.
Masonry at the bottom of the pit
- Water is pumped out from the bottom and laying begins along the reinforcing cage. The most important thing here is to maintain the evenness of the walls, this is especially difficult to do in high structures. To do this, you can make a round template for verification before starting work.
- In this case, one must not forget to shift each new row relative to the previous one so that the seams do not intersect. The seams are sealed with cement-crushed stone mortar. At the end, the walls are plastered from the inside.
Masonry from above
Masonry from above is more difficult for beginners, and here you can not do without the help of an experienced bricklayer. This method is used for both small and deep wells, when built using monolithic technology.
- The principle of the technology is to lower the masonry on a pre-prepared reinforced concrete base. It has a metal frame (the so-called reinforcing knife).
- Unlike masonry from below, reinforcement is immediately cemented into the concrete base, and not installed in drilled holes.
- When the foundation is ready, laying is done using the technology of a monolithic well. At the same time, plastering from the outside occurs immediately. Gradually, the walls go down, by removing the soil under them.
Well device
When constructing wells, you must adhere to some rules:
- determine the location of the future well
- take into account the time of year for digging
- observe safety precautions at work
A place for a well well must be chosen in advance. It is not recommended to place a well near residential buildings. Groundwater will erode the soil, and this will lead to settlement of the house or building near the well. The most optimal location of the well from a residential building is 15-20 meters. Also, the well should be located away from sources of alleged pollution: drain pits, cemeteries, stockyards, fields with possible leaks of pesticides. Poisons that have entered groundwater have an extremely negative effect on the human body, while not changing the taste of water.
The distance of the well from potential sources of pollution is 25-30 meters.
The most favorable time of the year for digging a well is early autumn. The groundwater level is the lowest, which will allow you to dig a well a little deeper than the expected water level.
Experts do not recommend building wells if the water is too high to the ground surface. So you run the risk of being left without water during the hot period. Too deep water intake can result in unusable water. The recommended depth of a well well is 10-20 meters. There are times when drinking water remains at a depth of 50 meters, but it's not worth the risk.
Shaft well device
In the design of such wells, three main parts can be distinguished:
- The water inlet is the lower part of the structure. It is used to filter and collect water.
- The shaft is the underground part of the shaft of the structure, located above the water intake. It reliably protects the structure from collapse and preserves the quality of drinking water, without letting the perch into the water intake.
- The head is a part of the structure located above the ground. The main purpose of this part is to protect the water intake from dust, debris, surface sedimentary water and freeze protection during the cold season. The head is necessarily protected by a roof.
Concrete water well
For the construction of concrete wells, you can use both ready-made rings and self-made concrete, which is an artificial stone made from a mixture of cement, water and aggregate. The filler can be sand, gravel, crushed stone. Aggregate grains should be of different sizes, since smaller grains fill the voids between large ones. This increases the strength of concrete and avoids overspending of cement.The aggregate must be clean, free of impurities. Concrete with reinforcement placed in it is reinforced concrete, which is an order of magnitude stronger.
Strength depends directly on the brand of cement. In addition, the strength of concrete depends on the consistency (amount of water) and compaction. It must be borne in mind that during the manufacture of concrete, the mass decreases in size. Therefore, dry materials must be taken in quantity more than it is supposed to prepare concrete. First, sand and cement are mixed, then crushed stone or gravel is added, and only after that water is added.
The wall thickness of a concrete well depends on the depth. In a shallow well, this is 10-15 cm. The mold for the manufacture of concrete rings is made of two cylinders. At home, it is easier to make them from planed boards. First, two wooden rings of the same diameter are made, which are installed and fixed vertically one above the other. Rings on the inner and outer diameters are sheathed with boards, but so that the nails can be easily pulled out. Then the boards are fastened with metal strips or wire. And also outside and inside are fastened with a strong frame.
Nails are pulled out and rings are taken out. Reinforcement is inserted during the pouring of concrete. At least two rods are bent and left protruding above the surface of the "lugs" for which it will be possible to lower the ring into the shaft. Concrete wells are much easier to build than stone ones. The rings are fastened with brackets, for which holes are left in the rings in advance. The brackets can be fastened with nuts and washers or welded. A tarred hemp or rope is placed between the rings. The formed seams are plastered. To prevent the plaster from spilling out, recesses can be made in the still wet concrete. The head should well protect the well from precipitation and dust. A well-compacted layer of oily clay and a blind area of boards are placed around the head.
New materials:
- Faulty and damaged water pipes
- Sewerage in the bath - advice from professionals
- Search for a source of water supply on the site
- Well cleaning methods and causes of its failure
- Abyssinian tubular well for individual use
Previous materials:
- The device of the sewer system inside the house
- Recommendations for installing a heated water floor
- Key well in the country and its device
- Types of submersible pumps - features
- Water closet - how to build a toilet in the country
Next page >>
Concrete rings or bricks
- A simpler and more profitable way to build a well is to build walls from reinforced concrete rings. If desired, you can even do all the work yourself, despite their heavy weight, using levers.
- Another advantage in favor of reinforced concrete rings is the high speed of construction, there is no need to wait for the solution to solidify.
- Brick wells are well suited for areas with a high level of groundwater, up to 4 meters deep. Its price will be higher than concrete rings, but the brick will be easier to deliver and lay alone, without hired workers.
Note! When erecting brickwork, it is necessary to protect the area around the well from the effects of precipitation. Long rains can provoke a collapse of the soil in an unfinished pit