Shower cabin for giving from polycarbonate design options
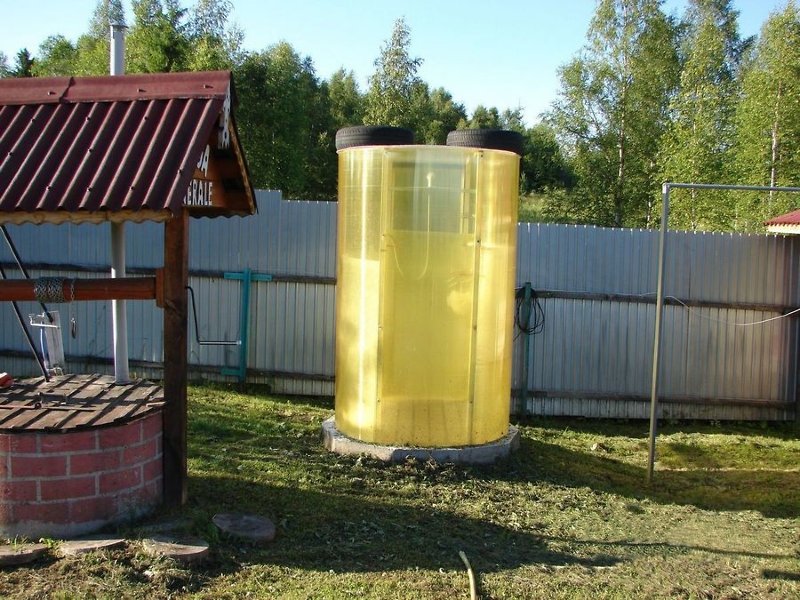
Cellular polycarbonate is quite flexible and easy to work with, so when inspired, you can create almost any shape out of it. A rounded shower cubicle in a cheerful yellow color will only require an appropriate frame shape, but will become a decoration of the landscape and an object of admiration for neighbors.
But most often, a practical straight-line design is still chosen, which does not require extra effort during construction:
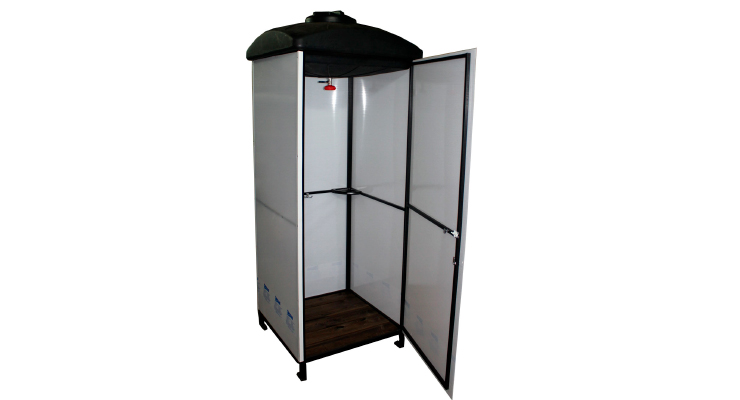
- One-section shower - a simple summer shower, consisting of a single cubicle, usually square in shape. The standard size is 1X1 m, but if there are overweight people in the family, their interests should be taken into account and the interior space should be increased. The height is calculated in such a way that the tallest member of the family does not reach the watering can with his head.
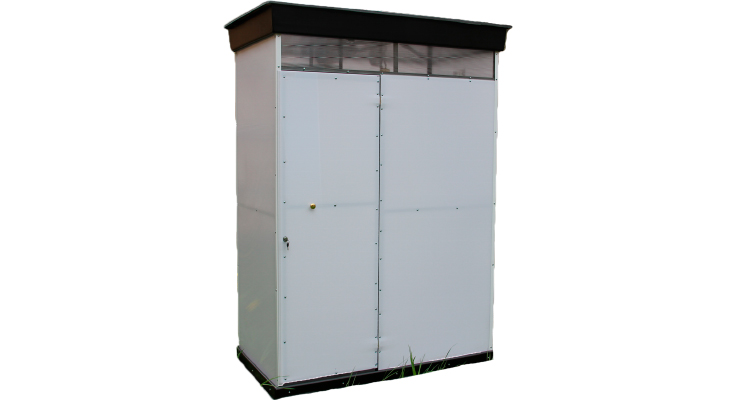
- A two-section shower for a summer residence made of polycarbonate - with a dressing room and a shower room itself. A section is added to the main room where a person can undress and leave things. The locker room is built either the same size as the shower room, or a slightly shorter length. In a family where everyone has an average build, a space of 0.6x1 m will suffice.
Whether there is a need for a locker room with a shower room made of polycarbonate for a summer residence, it's up to you. This design increases ease of use, but also increases the cost of building materials.
Do you need a door
It is not necessary to make a door at the entrance, and often summer residents prefer to install a shower curtain. This solution makes swimming in windy weather inconvenient, although it facilitates manufacturing. In a two-section shower, the dressing room is separated only by a curtain.
What is this material
What is polycarbonate? This is a modern building material, which is based on synthetic polymers. Special granules are processed by extrusion, sheets are formed at the exit. They can be both monolithic and honeycomb - with voids that are separated by stiffeners.
The product has certain characteristics and advantages that have made polycarbonate a leader in its segment. Therefore, in our time, do-it-yourself polycarbonate showers are becoming more and more common in summer cottages and beyond.
Advantages
Of the strengths of polycarbonate, we note:
- High levels of strength. The production technology, together with the raw materials used, provides excellent impact resistance characteristics, which make it possible to withstand the vagaries of nature, certain mechanical influences, and a large load in the form of adhering snow;
- The material is light. Compared to tempered glass used for shower enclosures, polycarbonate weighs about six times less. Therefore, the entire shower room, equipped with heating and a dressing room, will not have a strong impact on the foundation, it will not be necessary to strengthen the base as it happens with glass counterparts;
- Excellent plasticity. The sheets are bent, which allows you to make a shower in the country of any shape and design;
- Resistance to temperature extremes is another indisputable plus for polycarbonate. The material feels comfortable both at -40 and at +120 degrees Celsius;
- Cellular polycarbonate can provide additional sound and heat insulation for your cabin. This is due to voids with air in the products. In this component, polycarbonate is two times superior to tempered glass;
- The safety indicator for giving plays an important role, therefore it is reasonable and correct to choose polycarbonate;
- Products are not afraid of ultraviolet radiation, chemicals, because of them you can make a shower room even in the open air;
- Ease of installation at minimal financial cost.
Calculation of dimensions
The draft design is of great importance in construction.The owner of the summer cottage must decide on the general appearance and dimensions of the summer shower structure and separately with each of its elements:
- booth;
- Door;
- dressing room;
- water tank;
- water supply system to the tank;
- used water drainage system;
- foundation;
- frame;
- threshold at the entrance to the washing department;
- location of bath accessories;
- location of lamps.
Of fundamental importance in determining the dimensions of the summer shower are the dimensions of the washing booth. The recommended height is 2.2–2.5 m, and the width and length are about 1 m each. However, when designing the dimensions of both the booth and the changing room, one should be guided by the size of the shower users and the possibility of their joint stay in any of the departments.
After creating a draft design, it is necessary to calculate the quantity and cost of materials, and then make appropriate adjustments to the project.
 To obtain the desired shower from polycarbonate, you should carefully follow the scheme for its construction
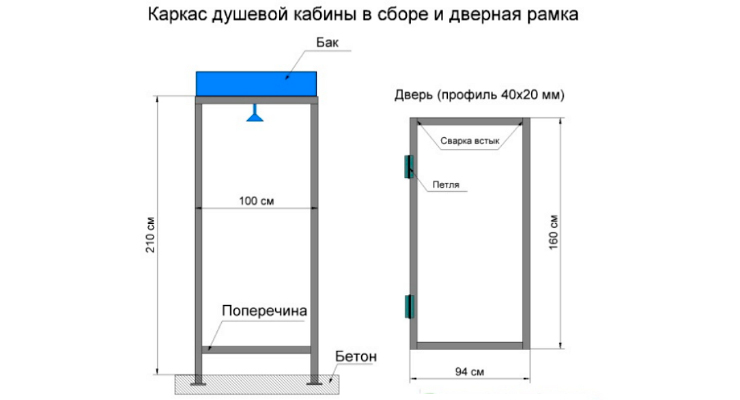
Assembling a shower cabin with your own hands from polycarbonate for a summer residence
To assemble a shower cabin with your own hands from polycarbonate, you will need to acquire the following materials:
1. Metal corners - 4 pcs. by 2 m.
2. Metal corners - 12 pcs. 1 m.
3. Sheathing sheets - 3 pcs. with dimensions 2x1 m.
4. Sheathing sheet - 1 pc. with dimensions 1.2x1.2m.
5. Adjustable curtain rod - 1 pc.
6. Pallet or wooden blocks 3x1.5 cm (optional) - 1 pc.
A do-it-yourself shower cabin is assembled from polycarbonate in this order:
1. Four meter lengths are welded to each other so that a square is formed.
2. Four two-meter racks are welded to the corners of this square.
3. Horizontal meter lengths are welded to the tops of the racks.
4. In the middle of the height of the vertical supports, the remaining segments are horizontally welded.
5. We drill holes to the vertical corners along their entire length at a distance of 7-10 cm.
6. We apply the sheathing sheets to the walls of the frame and screw them with bolts, which are fixed on the reverse side with nuts.
7. We carry out the same manipulations with the upper part of the frame, thereby creating a roof.
8. On the side of the structure that is not covered by the sheathing, we install a cornice at the desired height. We adjust its length and firmly rest against opposite corners.
9. We install a pallet inside the building, if the choice fell on it.
10. If you prefer a wooden grate, then we collect it. We lay two pieces of bars horizontally at some distance from each other. We lay other segments on top of them across, which will be fixed with wood screws.
11. We hang a curtain, install a tap and supply water.
Stages of creation
- Project creation.
- Arrangement.
- Giving all-season.
- Tank selection.
- Heating.
- Drain.
Let's consider each stage separately.
Project
It will be much easier to build a country shower with a special dressing room or with heating on your own if you have a schematic drawing. Do it on paper or on a computer - whichever is more convenient for you.
- Highlight the main components - the tank, the booth and the drain. All other elements (heating system, dressing room equipment, shelves, hangers) depend directly on the master and his wishes.
- Put on the diagram the location of the cabin on the territory of the cottage, taking into account the possibility of supplying water, organizing a drain and connecting electricity.
- Cabin parameters are selected based on the tallest and largest member of the family. The standard cabin has a height of 2.5 meters and an area of 1 by 1 meter. When equipping a shower changing room, allocate 1 by 0.7 meters for it. But you can do more, it's up to you.
Arrangement
- Take wooden posts, treat them with antiseptics and water-repellent compounds. Make markings on the selected site, place the columns at the corners of the site.
- Assemble the frame using a metal profile or wooden blocks.There are ready-made designs that you just need to connect. Place the base on the bottom of the frame. Usually pallets are used for this.
- The slopes are mounted on the poles. They will become the basis for lags. Logs are laid at a small interval so that water has the opportunity to exit into the drainage system. At the same time, gaps in the floor create a certain discomfort in autumn and winter, as they create a draft. Experts recommend making a floor with a drain pipe.
- If you are going to equip the shower with a locker room, be sure to provide a threshold. He will not allow water to go beyond the permitted boundaries.
- When mounting the door, make sure that it closes tightly, but when the humidity rises, it will not swell or jam.
All season
- When planning to use the cabin throughout the year, it makes sense to additionally insulate it. To do this, polystyrene foam plates are mounted between the walls of the frame and covered with films for protection;
- You can carry out interior decoration at the request of the master. Today, PVC panels, wallpaper, oilcloth, linoleum and more are used for this. The main thing is that the material is resistant to moisture;
- When choosing cladding polycarbonate, focus on products with a thickness of 8 to 16 millimeters. Lay cellular polycarbonate of a transparent type on the roof, and matte on the walls.
https://youtube.com/watch?v=cAEo9DaIiAk
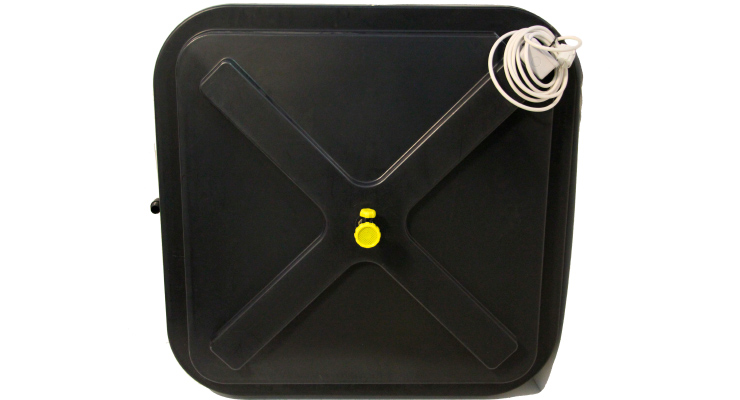
Tank
For shower cabins, installation of a container with water is provided. Its volume is chosen based on the number of shower users. The best material is metal or plastic.
- It is recommended to take the form of a flat plastic container if simple heating from the sun is planned. It is easy to install, mount, but in winter you will definitely have to cover it.
- Metal counterparts are harder to install and transport, plus they require attention. But heated water will retain heat for a longer time.
Heating
A heated shower is the dream of any summer resident, which is not difficult to realize.
The usual heating is the use of solar energy. It is relevant if they plan to use the country shower only in the summer. Otherwise, in spring or autumn, the water will not be heated.
A sheet of foil or a mirror serves as hand heating. Install these elements from the north, then the reflective rays will be directed to the tank.
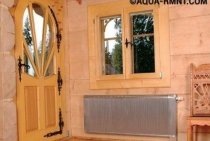
The capital shower room is equipped with heating based on a heating element
Here it is better to divide the tank into two containers or use two separate tanks - for cold and hot water.
When choosing an electric heating method, take into account that with a power of 2 kW, it will take 1.5 hours to heat 50 liters of water.
https://youtube.com/watch?v=n2mE2720zBI
Drain
If it is possible to connect to a centralized sewer, there will be no problems with draining. If not, then you will have to equip a septic tank and drainage. Their choice largely depends on the type of soil and groundwater.
Stick to simple rules:
- The drain hole should be twice as large as the volume of the tank on the shower;
- The soil layer at the inlet-outlet of water from the cabin should be covered with a layer of cement, roofing felt or other waterproof material.
You can see for yourself that you can make a heated shower room or a full-fledged locker room with your own hands. This will require high-quality polycarbonate and a well-thought-out project. Whether you implement it yourself or entrust it to professionals is a secondary issue.
Preparatory Steps
Paramount in the implementation of a summer shower is the creation of a preliminary project in the form of a drawing, which should reflect its overall components: a shower stall, a dressing room, a threshold, etc. This will allow, in accordance with the dimensions, to determine a rational location.
A polycarbonate shower for faster heating of water in a container should be placed on a well-lit area that is not blown by the winds. It is desirable that the platform be elevated, which will simplify the removal of used water.It is also necessary to provide options for supplying water to the shower tank.
 A polycarbonate shower should be located in a well-lit area, for quick water heating
The following tools and fasteners should be provided in advance:
- grinder with a set of nozzles;
- welding machine and electrodes;
- electric drill with drills for working with metal;
- anticorrosive paint;
- jigsaw;
- hand saw;
- metal corners;
- self-tapping screws.
Make sure that the cutting part of the tools is in good condition and correctly sharpened.
This is interesting: how and what is the best way to cut polycarbonate at home.
Shower installation
The installation process consists of the following operations:
- creation of a foundation (filled, brick, pile, columnar);
- construction of the cabin frame, locker rooms;
- floor arrangement;
- installation of a water tank;
- installation of a water supply system in the tank;
- installation of a drainage system;
- fixing polycarbonate panels to the frame;
- production and installation of doors;
- production and installation of the threshold;
- installation of lamps;
- arrangement of places for placing bath accessories.
Frame installation
The framework represents the rigid design intended for a covering by sheets. The material for the construction of the frame of the shower cubicle and changing room is wood or metal.
 It is best to use metal for a polycarbonate summer shower frame
Metal structures have higher strength and a longer service life, although when working with them, welding is required, and their cost is higher.
It is much easier to work with wood, but such structures are short-lived - to protect them from moisture, they need to be impregnated with special compounds, and then periodic maintenance should be carried out.
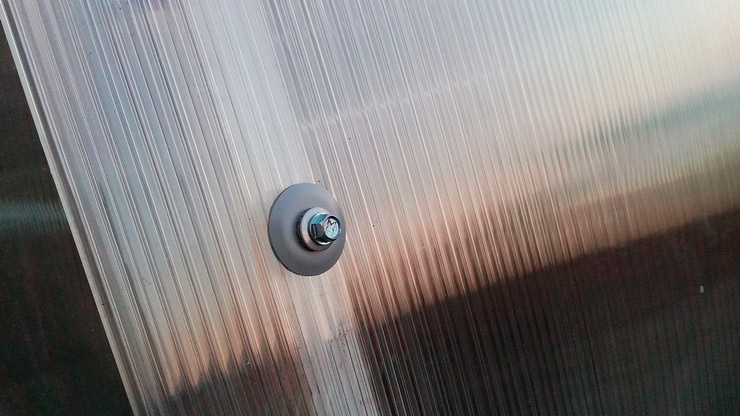
Fasteners for polymer panels
Pre-cut to size polycarbonate sheets are alternately placed in the right place of the frame, after which holes for thermal washers are drilled in certain places with a drill or cutter. A sheet and a washer are fastened with special screws, on which a decorative cap is then installed.
This is important: how to choose and fix thermal washers for polycarbonate.
Installation of polycarbonate panels is carried out from the outside of the frame, so the fasteners are not visible from the inside.
 Most often, self-tapping screws and special washers are used to fasten polycarbonate sheets to the summer shower frame.
The joints of sheets with bare honeycombs must be sealed with silicone sealant or so-called additional strips. Open cells are closed with an end profile.
Water tank installation
With the help of fixing fittings, the water tank is mounted on special supporting places on the roof of the shower cubicle.
The rate of heating of water in the tank depends on:
- material. The plastic tank does not rust, is light, cheap, safe to work with electrical appliances, but does not withstand shock and low temperatures. Metal - more durable, but prone to corrosion.
- The volume, which is selected at the rate of 40 liters per person, but not more than 200 liters, which forces the frame to be made more durable.
- Forms. A flat parallelepiped is preferable, since it has the largest area of heating by the sun.
- Heating method.
 When using a 200l+ tank for an outdoor shower, it will be necessary to strengthen the frame
But for heating, it is more efficient to place an electric heater in the cavity of the tank, which requires the installation of a pump, a water level and temperature controller.
Commissioning
At the final stage are carried out:
- Installation of a metal or plastic pallet in the cabin to increase the comfort of taking water procedures, and it is also possible to use smoothly planed boards.
- Insulation of a sealed shower from the inside with moisture-resistant thermal insulation such as expanded polystyrene.
- The construction of a dressing room, if one was not previously planned.
- Installation of stairs.
- Installation of doors in the openings of the shower cubicle and changing rooms.
And now that all the work is done, welcome to freshen up!
What is under the feet of the base and drain options
For comfortable bathing, it is necessary to ensure the outflow of water so as not to stand in a puddle of water. The base of the shower stall can be made in the following ways:
- Wooden lattice pallet. The simplest design, in which the drain goes directly to the ground, and the pan is simply above the resulting puddle. To speed up the absorption of water, it is worth equipping a gravel-sand cushion under the shower, 1 m deep.
- Metal shower tray. Not a bad option, but requires the provision of a drain, the options for which we will discuss below.
- Concrete base. In this case, the water drain can be located in the center, with its output through the pipes. The second option is to concrete the base with a slight outward slope so that the water flows naturally into the drainage prepared nearby.
Leaving water to simply soak into the ground is wrong, as this is a slow process, which creates conditions for the development of mosses, mold and mosquitoes. It is rare to bring wastewater to the central sewer in country houses, so they get out of the situation as follows:
- Drainage well from tires. In the prepared pit at the bottom, a gravel-sand cushion is arranged, on which 6-8 car tires are laid vertically with rubber cut in several places. The drain pipe starts at the level of 3-4 tires from the surface.
- Drainage well from a metal or plastic barrel. An old, worn-out barrel will do, the bottom of which should be cut with petals and turned outward - this will prevent it from being pushed out of the ground in winter. Drill or cut drainage holes in the walls and wrap the barrel with geotextile so that they do not become clogged with earth.
- Drainage ditch. A drain pipe with multiple holes is led into a prepared ditch filled with sand and gravel. The deeper and wider the ditch, the better the drainage. The drainage pipe cannot be laid near trees with a developed root system, as over time it grows roots and becomes non-functional.
All drainage options do not work well in clay and loamy soils, so if possible, deepen it to the sandy layer. Often, owners who equip country shower cabins made of polycarbonate do not make it difficult for themselves, and bring water directly under large trees. Well, if you want to reuse water, read about how to arrange a sewer septic tank in this publication.