Insulation of a viewing hole in the garage
If you spend a lot of time in the garage, then you will most likely have heating. To warm up faster and faster, it makes sense to insulate the pit. EPS (extruded polystyrene foam) is best suited for these purposes. It withstands significant loads, is not afraid of dampness, does not rot, fungi and bacteria do not multiply on it.
The thickness of the EPS to create a tangible effect is from 50 mm. Lay it between the soil and the wall of the pit. Then from the outside-inside the pit will look like this:
- waterproofing film;
- EPPS;
-
wall.
Expanded polystyrene can also be laid under the screed at the bottom of the inspection hole. A reinforcing mesh is usually laid on top of it, and then concrete is poured.
Best Answers
Terminator-5:
The fact is that not every place is suitable for a cellar device. If your cellar is flooded with groundwater, then it means that you need to either fill it up or you will have to wage an unequal struggle with the forces of nature. You will have to make a concrete glass, mount an effective supply and exhaust ventilation. And all the time you have to fight for existence, otherwise it will flood, it will be damp. A real cellar, arranged according to all the rules, does not require special attention. It is dry, cool, potatoes are stored until August. And all because all the basic rules were followed during the construction of the cellar.
Alexander Ionkin:
concrete it up, or you can still surround it with a tree
not vicious:
betonate, then buy hydro insulation for pools two or three times with a brush around the perimeter and the floor should help
Borya Bonev:
I doubt that concrete installation will help in your case, although it must be done so that the walls do not crumble, as well as waterproofing, because waterproofing can only be done inside and it will not work ((((
I would complete the walls in this hole. I made a recess on the floor, also concreted (sumpf), the sumpf can be covered with a grate (made of wood, metal) and water would be pumped out of the sump with a small pump. The cost of the pump and all the electricity is not higher than 3000 rubles. The pump will turn on by itself when the sump is filled in and turn off accordingly
Nikolay Todorov:
Even if it was concreted, it would still be poured in order to prevent groundwater from penetrating, it is necessary to perform waterproofing during construction, but you didn’t do it, and now it’s too late what’s inside is useless, so the option with a pump is the most suitable for you
Expert answers
Cu chemist:
basement waterproofing
alexander violin:
Fill the floor in the pit with zeolite
Lyokha from St. Petersburg:
drainage pump? No, have not heard!
Alexei:
submersible pump
Monk Fraile:
Set the pump to automatic. Dig a well under it to accumulate water and put it there. Waterproofing is expensive, and sometimes it is not clear where the water comes from.
Miley:
Groundwater can only be stopped by reinforced waterproofing of the walls and floor of the basement. It will need to be made from rolled waterproofing materials, for example, Bikrost, glued on pre-applied bituminous mastic. In addition to insulation work, it will be necessary to arrange drainage around the garage by dumping water into a drainage well, and from there, it will be possible to periodically pump it out with a pump. At the same time, the groundwater level will decrease, and the basement will be dry.
Artem Kiselev:
sump and drainage pump
Maxim Noritsyn:
pump-pit-dampness will be all the same
Dmitry Sosnovskikh:
where is the water from? a friend has a garage in a swamp, fell asleep the fuck and flooded it, made a small deck to crawl
::p:::w:::i:::o:::::::::::$:::e::
Fill it with sand, no way water will appear, the water has the same level of standing. Waterproofing in the pit is not for long. My dad has meth in my garage. the caisson welded and fixed it with the walls of the pit.1m is enough to sit on a chair. And on the Internet, there’s definitely nothing sensible in the pits, they copy-paste the same stupid article.
KATIA:
sand, with a shovel
Ivan Baranchuk:
Sand with a rammer.
Grandfather Au:
why? make the flooring from the boards and that's it, what if you need it later? or arrange a cellar there
g..ka:
first, pump out and see the situation, there is a threat that then the water will rise to the floor level. It is better to make a withdrawal now than when the hole is already closed.
Dimensions of the inspection hole in the garage
You will not find strict recommendations on the size of the pit for the garage. They are based mainly on the parameters of the machine and their own height. The dimensions of the garage pit are selected from the following considerations:
- The width should be sufficient to make it comfortable for you to work in it. At the same time, it is limited by the distance between the wheels of the car - each wheel must have room to maneuver. On average, the width of the inspection pit is from 80 cm or more.
- Its length depends on the length of the car. Add 1 meter to the size of the car. This is enough for comfortable work.
-
The depth is calculated depending on your height: your height + 10-15 cm. In this case, you don’t have to worry about hitting your head. If you need long-term work with your hands up, you can knock down a special stool of low height and stand on it. You can raise the floor a little more in the viewing hole due to wooden ladders.
This is far from dogma. Everyone does as he sees fit. Some deep holes seem uncomfortable and they make them almost exactly in height, and sometimes even lower - 1.5 meters. If you take into account the clearance of the car, from the floor of the pit to the bottom of the car you get about 1.7-1.8 meters. You can do that too.
Another point in length. Sometimes a long hole cannot be made. Then it is made about half the length of the car, driving it in front or behind, depending on which part of the car needs to be inspected or repaired.
Now about where to place the pit in the garage. Usually it is slightly shifted to one of the walls, leaving a wide side for installing equipment, storing spare parts, etc. At the same time, there should be at least 1 meter from the edge of the pit to the nearest wall.
This is all parameters
Just note that we were talking about the final dimensions of the pit. When marking the pit, you will need to add thickness to the walls, and dig deeper to the height of the floor screed (if you do it)
Protection of walls and floors in the basement from the inside
When waterproofing a garage from the inside from groundwater, two types of protection are used:
- injection (penetrating);
- coating.
For waterproofing the floor, hydrophobic materials (roofing material, mastic, etc.) are used, on which a concrete screed is then poured. If gaps in the floor were noticed before work, then the screed is performed after the fittings are installed. It will not allow materials to deform. At the joints and the floor, you can install a betonite cord - it will swell and prevent moisture from entering the room.
The wall in the garage is leaking, what should I do?
If you are interested in how to waterproof a wall in a garage, then things are a little more complicated here.
 The most effective waterproofing method is the use of penetrating materials.
But this will require special equipment for pumping the composition into pre-made holes in the wall. The method is quite expensive and time-consuming, therefore, coating materials are more often used to protect the walls of the basement in the garage.
Such compositions contain polymers that, when solidified, form a durable moisture-proof layer. But before that:
- walls must be thoroughly cleaned of dust, dirt;
- dry work surfaces;
- if the walls are made of blocks, embroider the walls by 5-10 mm. and fill the gaps formed with a coating material;
- apply the composition in a continuous layer on the walls.
The compositions "Penetron", "Hydrohit", "Maxil", etc. are in demand.
Methods for waterproofing a viewing hole
Often, with poor hydroprotection, water collects in the inspection hole. To prevent this from happening, it is necessary to use penetrating waterproofing. It is possible to protect the pit from the penetration of groundwater without digging.
 For the safety of expensive equipment, a normal microclimate in the room is needed.
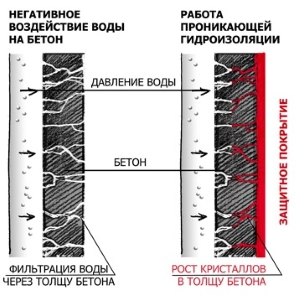
Penetrating waterproofing is a ready-made composition, which, when mixed with water and then applied to a wet surface, forms crystals as a result of a chemical reaction, filling the capillaries of concrete. Processing with such a mixture is the best solution in terms of price and quality in a ready-made inspection pit, if the waterproofing was not thought out in advance. So you can process the basement, foundation, cellar, walls, roof. This method is economically feasible for buildings that are not new. Penetrating mixtures are applied as follows:
- Solution preparation.
- Preparation of the treated surface: consists in removing the film to open the pores of the concrete.
- Water saturation of the treated area: necessary to ensure the process of diffusion of the chemically active components of the solution into the pores of the concrete.
- Application of the solution: on small areas it is applied with a brush, roller, spatula.
The mixture can be applied in several layers, and after it dries, the walls can be treated with plaster waterproofing in 2 layers.
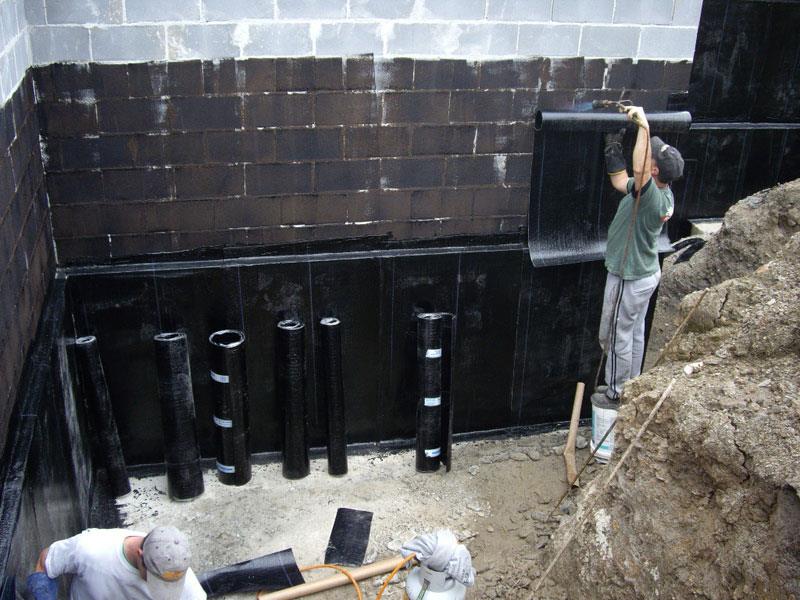
 Waterproofing the inspection pit at the service station using penetrating materials of the Penetron system
In addition, the isolation of individual sections can be carried out by injection with special gels. There are many technologies for creating monolithic or prefabricated structures using penetrating materials based on polyurethanes. They can also be filled with concrete monoliths, on which cracks have formed.
Inspection pit drainage
If pumping out water is not possible, then an excellent solution would be to build a drainage system around the perimeter of the garage (inspection hole).
The basic elements of the drainage system are:
- perforated pipes with a diameter of 100 mm - 110 mm, which are located around the perimeter of the basement (pit, garage, and so on);
- pit for draining water (drainage well, connection to the sewer system, and so on).
Additionally you will need:
- sand;
- crushed stone;
- geotextile.
The manufacturing process of the drainage system is as follows:
- a trench is dug around the perimeter of the basement, garage or viewing hole, taking into account the slope necessary for the natural flow of water;
- a drainage well is dug;
- the bottom and walls of the trench are covered with geotextile, which prevents the ingress of earth from the hole in the pipes and is a kind of filter;
- the bottom of the trench is covered with a layer of rubble;
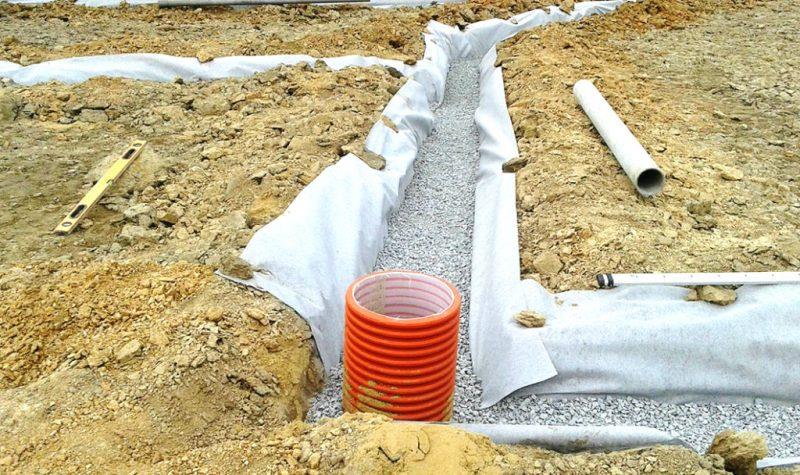
Trench and well preparation
- pipes are laid;
- pipes are inserted into the drainage well or drainage is connected to the sewer system;
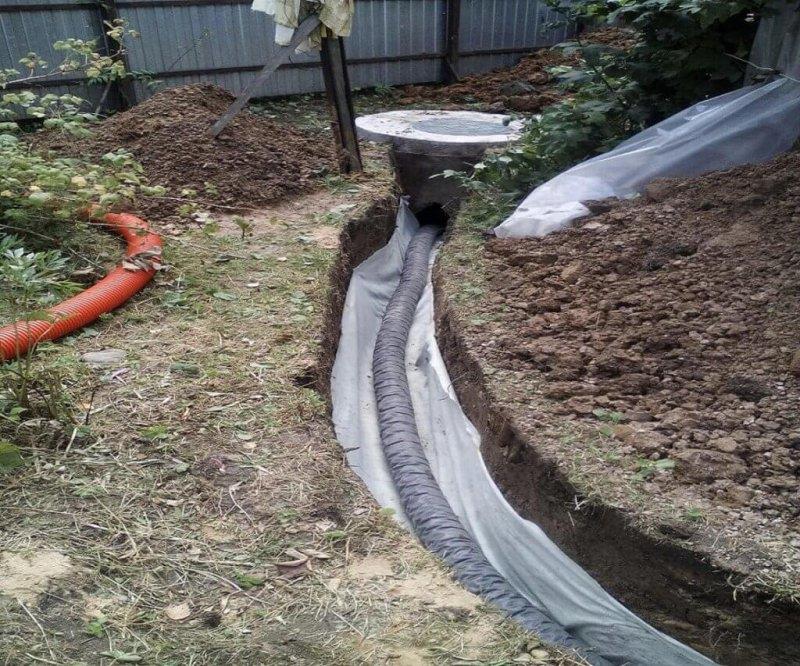
Laying and connection of drainage pipes
- top of the pipes is backfilled with crushed stone, covered with geotextiles and the trench is backfilled with a sand mixture.
The benefits of drainage are:
- complete independence from electricity;
- the possibility of equipping the system throughout the site. For example, if there is water in the basement, and in the garage, and in the house, and in the cesspool, then a single system will help to cope with all problems at once;
- the possibility of installation by hand.
Among the disadvantages are:
- the need for excavation, which can lead to damage to the landscape;
- the need for constant maintenance of the drainage well.
Why you need to fill up a cellar or a pit in the garage
By filling up a hole in a garage, cellar, the car owner will receive the following benefits:
- Warming. To carry out repair work in a concrete pit, shivering from the cold, is an unpleasant prospect. The material used for backfill will provide thermal insulation, therefore, it will not be cold in the pit.
- Protection of tools against corrosion.Tools stored in a garage cellar can become corrosive if there is no backfill. In the cold, condensation forms on them, leading to the formation of rust.
- Protection of products from decay. If you store food in the cellar of a garage, you need to take care of protection from dampness and fill the hole with suitable material.
- Ground water protection. Backfilling makes it possible to prevent the penetration of groundwater into the cellar (the waters rise in the spring).
Pit waterproofing
If the water pit in the garage is in a hard-to-reach place and there is no way to drain or install an automatic water pumping system, then waterproofing is the only solution.
Material selection
Waterproofing can be equipped:
coating materials, which include bitumen mastic, cement mixture, polymer-based mixture, liquid glass, liquid rubber, and so on.
Coating waterproofing materials are characterized by low cost, ease of installation and resistance to various chemical compounds. However, it is quite difficult to achieve complete waterproofing with such materials;
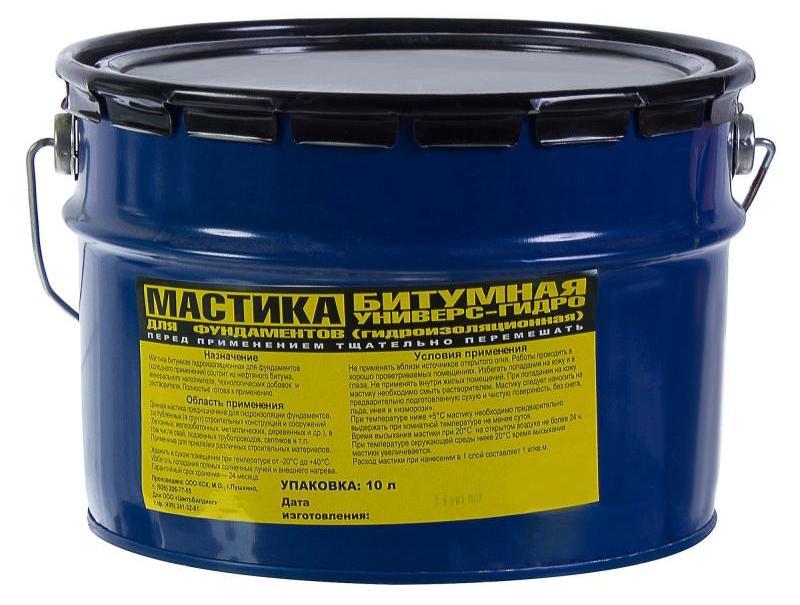
Bituminous mastic to protect the foundation
In most cases, coating materials are used to seal seams, joints and cracks formed on structures before applying other types of waterproofing materials.
pasting materials (roofing felt, fiberglass, hydroisol, and so on). Such materials better protect the pit from moisture penetration, but are easily destroyed by any mechanical action.
To increase the service life of pasting insulation, it is recommended to additionally plaster the walls of the pit;

Material for adhesive insulation
penetrating compounds (Gibropeks, Penetron and so on). When interacting with calcium, liquid solutions crystallize, forming a uniform and reliable protective layer that is not subject to destruction even under mechanical stress. The only drawback is the high cost.
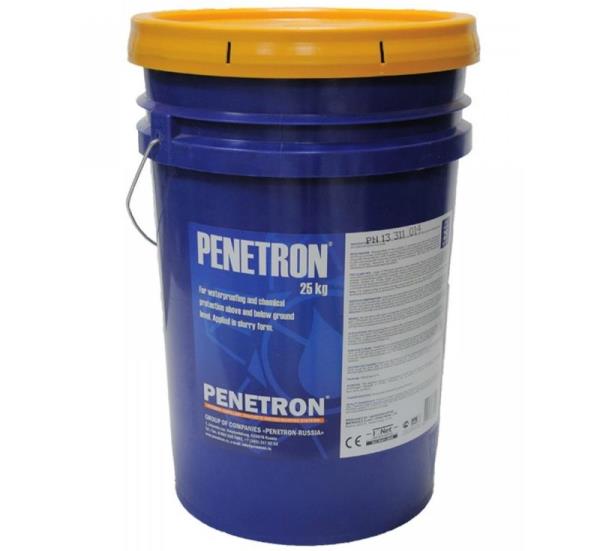
Means for arranging penetrating basement insulation
Insulation Arrangement
What to do to get a reliable waterproofing layer? The work is done in the following order:
- cleaning walls and floors from earth and other types of pollution;
- sealing seams and cracks with any material belonging to the category of coating insulation;
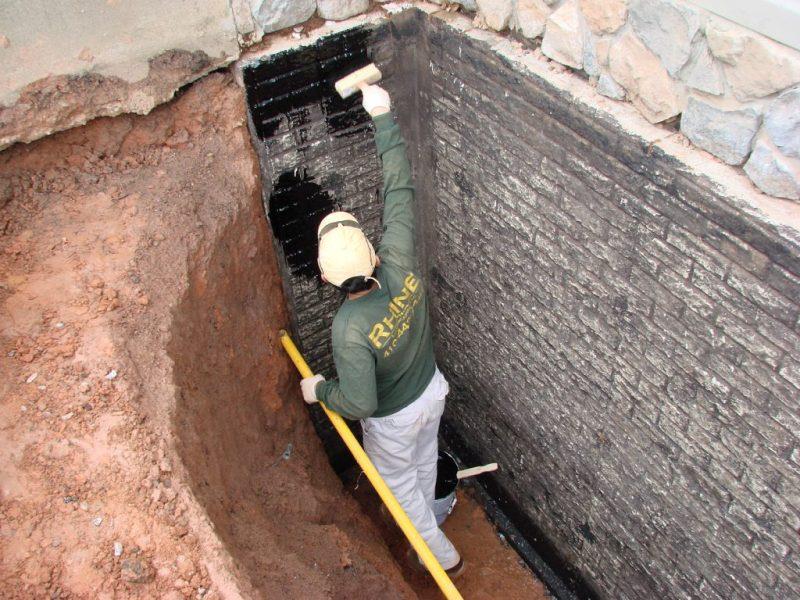
Treatment of cracks, seams and other surfaces with coating materials
- pasting with roofing material (any other material) or applying penetrating compounds;
Insulation with adhesive materials
- plastering (if gluing materials are chosen as the main waterproofing material).
You can learn more about the waterproofing of the viewing hole by watching the video.
Thus, there are several ways to get rid of water in a garage inspection hole, a water collection pit located on a personal plot or basement. Which one to choose? It's up to each owner to decide. Drainage and an automatic pumping system can be installed at any stage of construction or use, and it is more expedient to equip waterproofing during the initial construction of a structure.
How to make a viewing hole in the garage
After you have decided on the dimensions and what material the walls will be made of, what thickness they will be, you can start marking the pit. This can be done using pegs driven in around the perimeter. The second option is to pull the twine / rope between the stakes driven in at the corners. According to the markup, we begin to dig a pit. The earth is usually taken out and temporarily stored near the gate.
From brick: step by step photo report
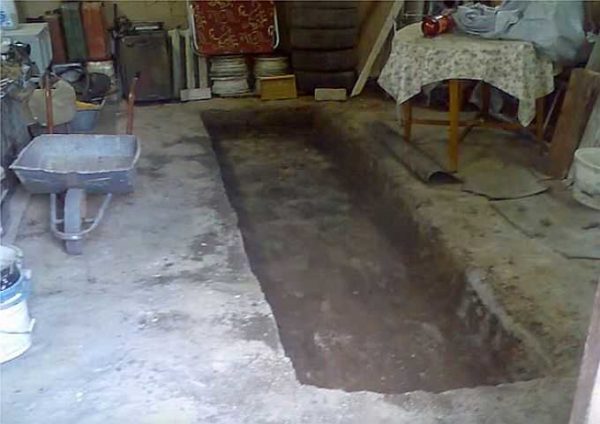
Started digging a ditch
Along with excavation, monitor soil moisture. If you have reached the design depth (required + floor screed thickness), but there is still no moisture, you can do without waterproofing.Those who do not want to take risks can be advised to immediately lay the film.
We level the walls. It is not necessary to achieve ideal geometry, but there should not be noticeable humps and pits. We also level the bottom of the pit, ramming, compacting the soil well. Usually a manual rammer is used. A layer of crushed stone is poured at the bottom (two times 5 cm), each layer is also carefully rammed. Next comes a layer of sand. It is enough 5 cm. The sand is moistened, rammed to a high density - so that the foot is not imprinted. Next, lay the waterproofing film.
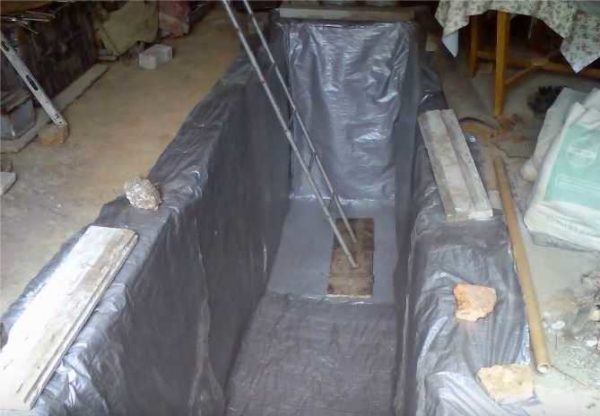
We line the bottom and walls with a waterproofing film
We level it well, tucking it into corners. We lay the panels with an overlap of 15 cm, which we glue with double-sided tape. So that the edges do not roll, we press with improvised materials - boards, stones.
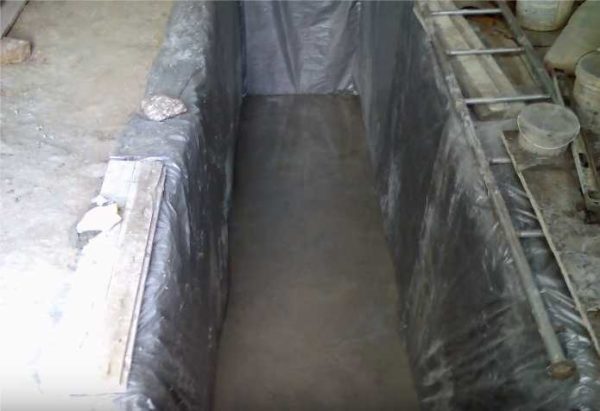
We lay a layer of insulation on the bottom, on it - a reinforcing wire mesh. We fill all this with concrete grade M 200. The layer thickness is at least 5 cm. To make it easier to navigate when laying, we make marks on the film by which you can control the layer thickness.
If you use Portland cement M 400, the proportions will be as follows - cement 1 part, sand - 3, crushed stone of medium and fine fraction - 5 parts.
An inspection pit is being built in the garage: the floor is filled with concrete
We are waiting for several days until the concrete gains 50% strength. The exact time depends on the temperature. If it is around + 20 ° C, you will have to wait 5-6 days. If +17°C it's already two weeks.
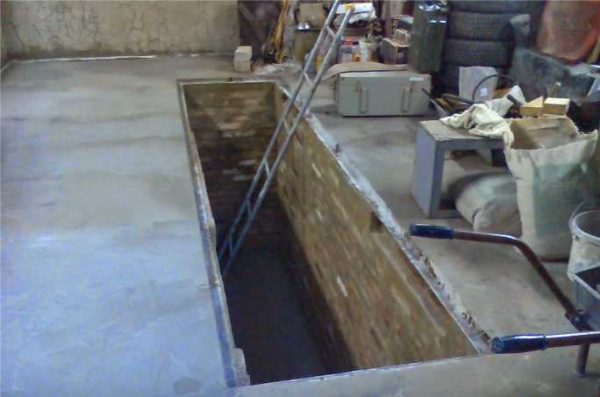
Let's start laying out the walls. It was decided to do in half a brick. We used used bricks, about 850 pieces went (pit size 4.2 * 0.8 * 1.7 m). Up to the level of the elbow, the walls were laid out in a circle.

We build walls in brick
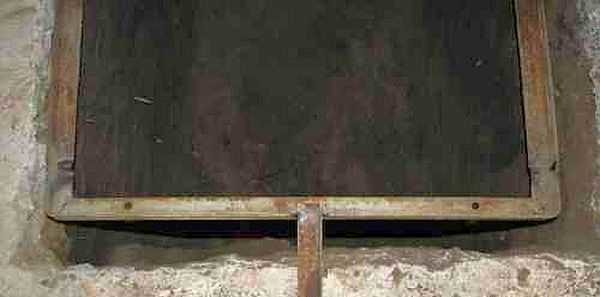
At the level of 1.2 meters from the floor, it was decided to make a niche for the instrument. Its height is 3 rows of bricks, the top is covered with a processed board.
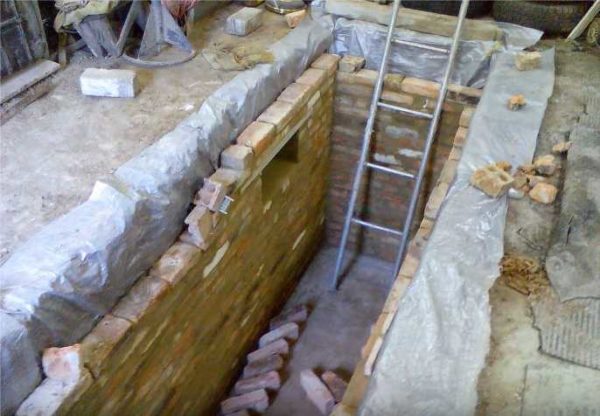
How is a niche made in a hole
In order not to have to lay out a brick niche, a metal insert is inserted. Welded box, suitable in size.
metal box
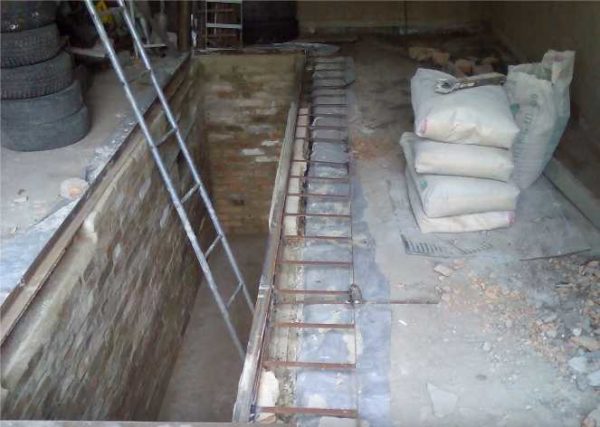
Further, the walls were driven out almost to the level with the garage floor. Part of the walls was replaced by two sections of channels. Jacks rest against the bottom if necessary. A metal corner with a shelf of 50 mm is laid on the top row, the thickness of the steel is 5 mm.
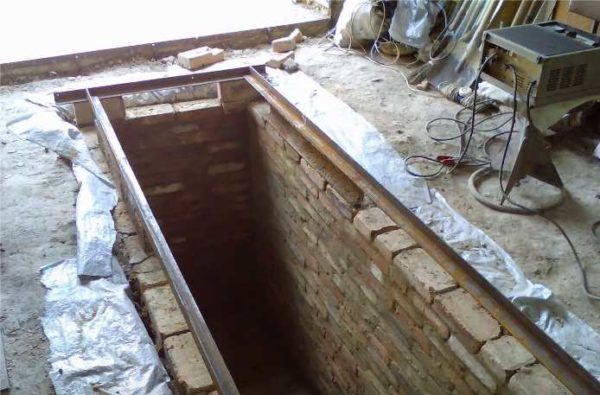
Channel on both sides of the inspection pit in the garage
The corner is unfolded so that one of its shelves is hung down, the second covers part of the upper surface of the brick. So that the wall does not collapse under load, mortgages are welded to this corner, which are then connected to the reinforcing belt of the concrete floor in the garage.
Corner laid welded mortgages
Further, preparatory work was carried out on the installation of a concrete floor and it was poured with concrete.
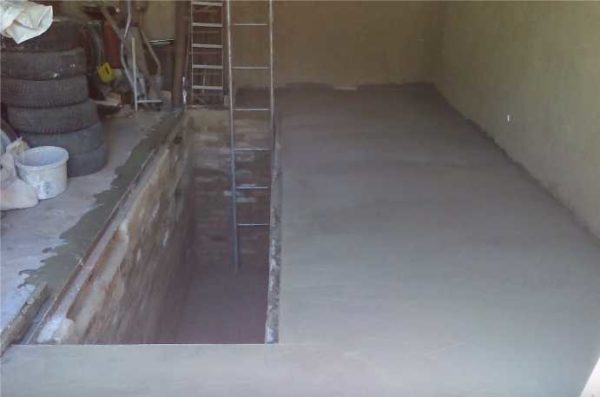
Filling the floor in the garage - the level of concrete at the top edge of the corner
The second side is concreted
Features of the manufacture of concrete walls
When casting concrete walls, it is necessary to make a formwork. It is easier to make it from sheet material - building moisture-resistant plywood with a thickness of 16 mm or more, OSB. They knock down shields of the required size, strengthen them with bars on the outside. They are necessary so that plywood or OSB does not bend under the pressure of concrete. First put the outer parts of the formwork. If the walls of the pit are even, there will be no problems. You just lean them on, put them straight.
Then the internal formwork panels are exposed. Between them there must be a distance of at least 15 cm. So that during the pouring process the walls are not deformed, spacers are placed between them.
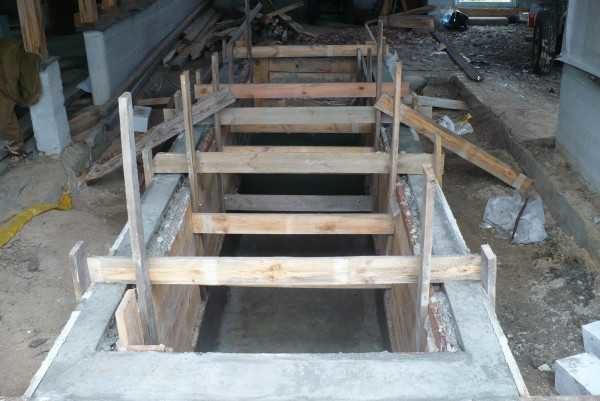
An example of formwork for a concrete inspection pit in a garage
Filling is desirable to carry out at a time. Filled portions must be bayoneted or treated with a submersible vibrator for concrete. Remove the formwork after two or three days. After that, you can install a corner with welded embedded rods (strips) and proceed with pouring the floor.