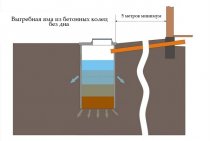
Excess water on the site and a linear method of drainage
The type of future structure and the implementation of the entire infrastructure depend on this parameter. Standing melt and rain water, high are the main reasons for the washing out of the fertile soil layer, washing away the foundations of buildings and poor harvest, and sometimes the death of the entire garden as a whole. Therefore, measures to divert water from the site should be thought first of all.
It is especially important to install a drainage system in areas with clay soil structure.
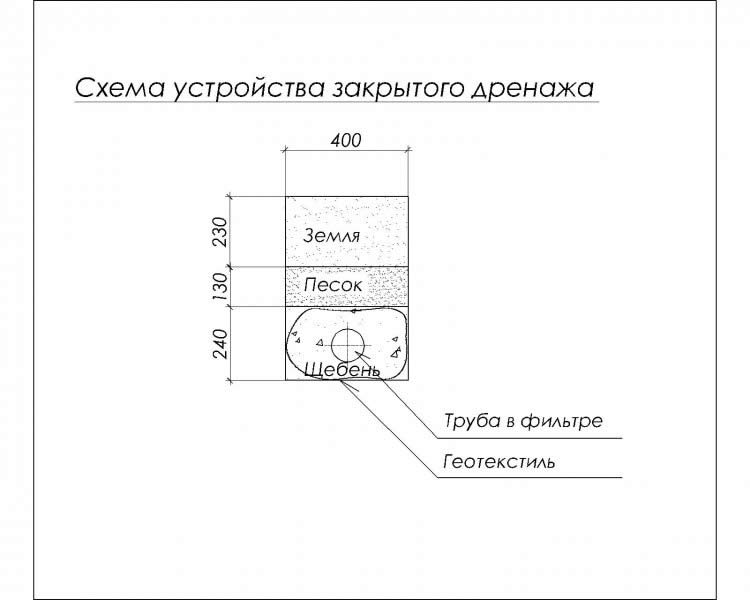
Scheme of the closed drainage device.
Drainage is a system of underground channels that work to remove excess moisture from the site. There are two types of drainage: soil and deep. At the same time, the removal of surface water during heavy rainfall can be done using open drains dug around the entire perimeter of the cottage, the width of the channels is 40-50 cm and the depth is 70-80 cm.
Then, from the drainage channels, water enters the gutter near the site. In order to prevent the fertile soil layer from being washed out, the garden line must be separated from the water flow. Proper installation of drainage depends on the natural slope of the land in the country. In the absence of a topographic plan with elevation marks, the slope is determined by the direction of water runoff. When the site slopes deep into the cottage, it is necessary to dig a longitudinal ditch towards the garden, and a gutter along the fence.
Drainage device.
When water stagnates on flat areas of a summer cottage, on which there is no slope, the task becomes more complicated, since the water does not go anywhere naturally. In this situation, you need to create a more complex drainage system. If it is inappropriate to use open ditches, a drainage system with closed grooves can be equipped. Linear drainage is a system of gutters connected to a sand trap. The sand trap is a reservoir for settling small debris and soil particles. The water collector is installed directly into the trench on the cement mortar, and the sand trap is placed at the lowest collection point of the system.
After that, the drainage channels are marked and laid. To avoid excessive clogging of channels and sand traps, they are covered with gratings, which can be removed if necessary to clean out debris. The organization of a slope for drainage is as follows: creating a soil slope, using a gutter with a structural slope, or creating a stepped drainage by laying drains in a cascade.
Methods for draining the site with your own hands
There are many different factors that affect the occurrence of waterlogging, as well as several degrees of flooding. For example, a special relief or type of soil can lead to waterlogging, when water does not have the opportunity to drain over the site due to the natural slope. In this case, such a slope must be done manually, carefully calculating the trajectory. Additional land may be required to backfill the excavations. There is also an option that water stagnation occurs due to heavy clay soil.
Then, if it is impossible to pour the earth, it is necessary to do drainage. Thanks to drainage, you will be able to dry the swamp in your area. If you still have to build drainage systems, then you simply cannot do without knowledge about this system, accurate calculations and planning. To make your life easier, you can contact us. We can perform any work related to draining the soil for a fee. Of course, you can do everything yourself, but in this case you need to be 100% sure of your calculations.
A reservoir is created at the lowest point of the cottage, from which water enters the drainage system.This reservoir can serve a variety of purposes: it can be used for watering, or perhaps as a decorative element of your garden with ornamental plants.
The essence of drainage of the site is to divert water from its territory. The best situation is when the site has its own water outlet, but there are various obstacles to this. For example, the location of a summer cottage is lower relative to others, or when there are barriers in the form of some buildings or a fence at the place of flow near the water. The way out of this situation can be a centralized collection of water. It can be arranged using a system of channels and ditches.
Ditch water needs to drain somewhere. The place of flow must be determined already in place, looking at the position of the adjacent areas. The drain is made below the level of ditches and channels.
When it has a relatively flat surface and a pronounced slope, then the drain is arranged parallel to the fence and placed as low as possible. The width of the drain should be up to half a meter, its depth - up to a meter, and the length - about two to three meters. The excavated earth must be evenly spread over the lowest places on the site.
Throughout the year, you need to regularly compact the gutter with various garbage, construction waste is perfect. It must be carefully compacted, adding more and more garbage, until the ditch reaches the lower level of fertile soil. After that, near the filled ditch, they create the same one, which becomes, as it were, an addition to the previous one.
The excavated soil from the newly created additional drain is rammed into the previous one. By doing the same steps, you will become the owner of a high-quality drainage system that will work throughout the site. Then what is the point of creating drainage at the highest point of the site? This is up to you, because the meaning of such a ditch is for those whose site is not the first, that is, another one can be located above, then such a ditch will catch the water of this site and not let it through your territory.
All of the above can be summed up. For proper and high-quality drainage of your site, the best way out is to combine several methods. That is, to fill up the ground, equip drainage and create a network of channels and drain ditches. But how to drain the area without drainage? There is another way that has not been discussed. This is a biological method, the essence of which is to grow special plants that consume a lot of moisture.
Drying system
Focusing on the height of plants, you can determine the depth of groundwater.
Instead of a large-scale system, point drainage can be organized. To do this, holes are prepared throughout the site with a depth of 2 m. The distance between the holes is 6 m. In most cases, it is enough to drain only some areas of the site, but this depends on the specific conditions.
The bottom of the holes is covered with the same mixture of gravel and sand. Sections of the drainage pipe are wrapped with coconut fiber (geotextile) and inserted vertically into the wells. The bottom of the segments also needs to be plugged with geotextiles. Choose a pipe of such a diameter that your drain pump can freely pass through it. The diameter of the hole also depends on the diameter of the pipe wrapped with geotextile - it should be about 10 cm larger.
Such a system requires regular participation of the owner. On average, once every 1-2 weeks, you will need to take a drainage pump, place it in each well and pump out water. The work is easy and takes little time.
Helpful Hints
Here you will find answers to the most popular questions from readers regarding land reclamation and drainage facilities.
- What material is best to fill the area?
For a rise of 20-30 cm with a small area, fertile soil can be used. If a meter-long layer of backfill is required, the base is made of compacted sand, secondary crushed stone or broken brick is placed in the middle (for drainage), and soil is laid on top.On beds and lawns, you can do without crushed stone, paths and platforms are sprinkled with excavated soil instead of soil. Experts believe that it is better to place the earth from the site down. This prevents heavy gravel from sinking into light sand or light sand from sliding off loam.
- Are asbestos or used steel pipes suitable for closed deep drainage?
It is better to use special drainage pipes for draining groundwater with ready-made holes and wrapped with geofabric. Other product options quickly become clogged, and the drainage fails. As a last resort, asbestos-cement pipes with a diameter of at least 100-150 mm are taken. For water to enter them, holes are drilled or cuts are made, in order to avoid silting, they are wrapped with geofabric.
- What material can be used for drainage instead of gravel?
In open systems, it can be replaced by viscous brushwood. Bundles with a diameter of 30 cm are formed as follows: large branches are placed in the center, and small twigs are placed outside. Moss is laid over the laid knittings. On peat soils, such a system remains operational for up to 20 years.
- Is it possible to carry out an artificial lowering of the groundwater level?
To reduce the level of excess moisture to 5 m, a wellpoint installation is used. It includes a ground vacuum manifold for water discharge, pumps to reduce pressure in it and vertical pipes, at the ends of which wellpoints are located. Sometimes expensive complexes with injector water lifts are used, which can increase the depth of groundwater up to 20 m.
- Is it necessary to make a drainage well?
The well is convenient in that water can be taken from it for irrigation or other needs. At the top there is a pipe from which water flows out when the container is full. If there is free space on the site, the role of a catchment reservoir can be played by a small pond, the bottom of which is covered with crushed stone and a sand and gravel mixture. Moisture-loving plants can be planted around the drainage reservoir, and a recreation area can be equipped.
Sewage pits and ditches
Many owners choose a fairly simple way to solve the problem of draining areas by digging drains and ditches. The arrangement of a cone-shaped pit is carried out as follows: at the lowest point, you need to dig a pit up to 100 cm deep, up to 200 cm wide at the top and 55 cm at the bottom. The dehumidification system is quite efficient, since excess moisture can be discharged into sewers without the use of additional funds.
The process of arranging sewers is more laborious, but no less effective. Ditches are dug along the entire perimeter of the territory - the depth and width is 45 cm. The walls are made at an angle of 25 degrees. The bottom is laid out with a brick battle or gravel. The main disadvantage of ditches is their gradual shedding, so it is worthwhile to clean and strengthen the walls with boards or concrete slabs in a timely manner.
Types of groundwater
Few people know that the level of groundwater can vary significantly even during the same year. Usually, this level reaches its minimum values in winter, when the ground freezes completely and is inaccessible for water penetration. In the spring, when heavy snowmelt begins, the groundwater level rises, because the soil during this period is literally oversaturated with moisture, and moisture in such a significant volume just serves as a source of groundwater saturation.
A couple of types of groundwater are often considered - perched water, that is, the so-called local groundwater and non-pressure, that is, external groundwater.
The first usually occurs at depths of half a meter to three meters and can be located in patches, often in significant depressions or between soil layers. It is interesting that in a drought, for example, at the height of summer or too frosty in winter, perched water can disappear partially or completely.Naturally, as soon as the rains start again, or the snow begins to melt, that is, the soil moisture rises, the top water will return to its original place.
If you reveal the composition of the perch water, it turns out that there it is usually fresh with a minimal presence of minerals and can even be toxic to plants.
The second option is free-flowing waters, they can lie at a depth of one to five meters, and often this is a constant phenomenon, from which the gardener cannot escape. It is these waters that give gardeners the main inconvenience, since they are replenished by melting snow, rain, if there is a lake, river, stream or even a stream nearby (as mentioned above). They can feed non-pressure water and artesian wells, as well as condensate, which we also already wrote about.
 The most common location of aquifers
Choice of method
There are several ways to dry out an area. Before choosing any particular one, you need to consider the following points:
- Soil permeability in the area.
- Dimensions and shape of the pit.
- Required water level.
- The period for which it is necessary to drain the land from groundwater.
- The presence of buildings and structures of various kinds on the site.
- Direction of groundwater.
Natural drainage system.
It is possible to organize surface drainage of groundwater. In this case, groundwater through the slopes and the bottom of the pit will penetrate into the drainage ditches, and then transported to the pits, from which they will be pumped out using pumps. When organizing such a system on fine-grained soils, a mixture of sand and gravel is used to fill the drainage ditches.
It is possible to organize the discharge of groundwater without the use of pipes. Deep trenches are being dug. They must be filled with filter material. Most often, coarse-grained sand, gravel is used for this. The material is covered with several layers of different fractions. In addition, peat must be used. It will protect the backfill from contamination.
Decorative pool for collecting atmospheric water from a personal plot^ 1 - water-loving plants; 2 - covering the site and paths with natural stone; 3 - pool bowl; 4 - bench; 5 - weeping willow; 6 - boulder stones; 7 - water filling pipe (fountain); 8 - plate-steps.
The device for pipe removal of groundwater is organized using polymer pipes with a perforated surface. The pipe is laid in the ground below the freezing level. Along it, holes are made to collect water.
If it is necessary to lower the groundwater level by 3-5 m, light wellpoint systems are usually used. Such a system is based on a pipe with a wellpoint at the end.
It connects to a vacuum manifold and a pump. If it is necessary to lower the groundwater level by a large amount, such installations are arranged in several tiers.
Wellpoint installations may include ejector water lifts. Ejectors are driven by the action of a jet of water, which is pumped by a collector. With the help of such installations, it is possible to lower the groundwater level by 20 m.
Step-by-step instruction
In order to organize a traditional drainage system, you will have to do a lot of earthwork and invest a lot of money. However, all this allows you to get a semi-automatic system. In a couple of weeks, water will collect by itself in a drainage well, as it accumulates, the owner will pump it into a ditch, storage tank or nearby free area such as a forest, field, ideally a natural reservoir
It is important that the water level in the drainage well does not exceed the desired groundwater height at the site. Otherwise, the water simply won't drain.
Scheme of the soft drainage device.
However, most owners, in order to save money, use a different method of organizing groundwater drainage.It is more profitable, but less efficient, than the traditional drainage system. When choosing this method, you need to be prepared for high labor costs during operation.
To install a groundwater drainage system, you need to prepare the following:
- Shovels for digging trenches.
- Wheelbarrow.
- Construction level and rail.
- Hacksaw.
- Drainage pipes, fittings and couplings.
- Manual rammer.
- Wells for drainage.
- Crushed stone, sand, geotextiles.
First, along the site, you need to dig parallel trenches at a distance of 4-6 m from each other. The specific step depends on the density of the soil. If the soil is heavy, trenches should be done with a smaller step. Choose a location for the drainage well. The entire system must be made with a smooth slope in the direction of the well so that water flows into it by gravity. Use a building level to check the slope.
Scheme of closed drainage.
The ends of the trenches located below the level must be connected to each other with a new trench and taken to the drainage well. The new trench should also be sloped towards this well. If you can’t connect them according to this scheme, you will have to arrange several drainage wells.
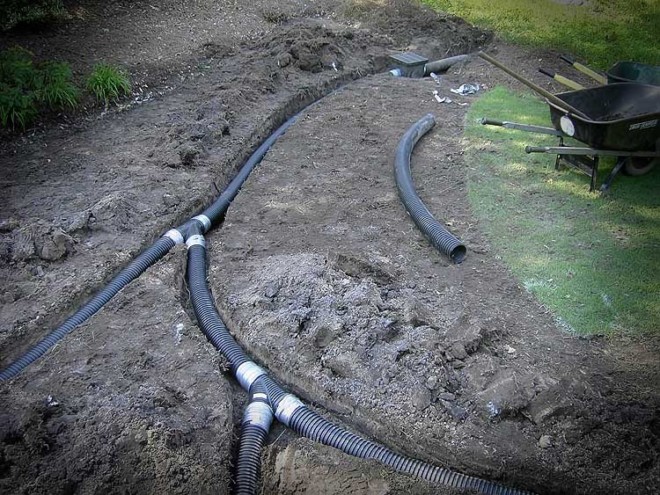
The bottom of the trenches is covered with a mixture of gravel (crushed stone) and river sand. A layer of 30-50 mm thick will suffice. Drainage pipes are being laid. As a rule, polymer pipes with holes along the length are used. To prevent these holes from clogging during operation, the pipes must be wrapped with geotextile. You can also use a more durable analogue of geotextile - coconut fiber.
After laying the pipes, the trenches must be filled to the top with a mixture of gravel and sand. Everything must be arranged so that the pipes do not come into contact with the soil. They need to be surrounded on all sides with a mixture of gravel and sand.
Water drainage
Before you start designing a system for draining groundwater, you need to decide where they will be discharged. Several options are available to choose from.
Diagram of a drainage reservoir.
A storage system can be organized. This is the best option for regions with large seasonal fluctuations in humidity. For example, during a damp spring, water will accumulate, and in a dry summer it will be used for irrigation. Groundwater will be collected in specially designed containers. They can be left on the surface or buried if desired. Water can also be collected in an artificial reservoir, but this requires more serious material and labor costs.
If your village has a common water runoff system, it makes sense to organize the drainage of groundwater into such a system. If there is free territory around the site, water can be diverted there, but in most cases this is not practical.
Scheme of laying drainage pipes.
If there are no options for water drainage, it will have to be accumulated. For this, special tanks are brought to the site. As the tanks fill up, a sewer machine is called and they are released.
Quite often, site owners combine several methods. For example, in the spring they accumulate water in tanks, use it for irrigation in the summer, and divert what is not useful in the fall.
As a rule, the need for groundwater diversion appears only on loamy and clayey soils. Sandy soils themselves perform the function of drainage.
We improve the composition of the soil
Soil with close standing groundwater, and especially swamp soil, is usually quite poor, and if you manage to dry it out, you still have to improve it before you plant plants in this area. In addition, the soil needs to be checked for pH: it is possible that the soil in the area is highly acidic. Then, before winter, you will need to add from 300 to 400 g of lime per square meter or the same amount of chalk, carefully dig everything up, and measure the pH level again in the spring, and do this until the soil becomes neutral.
Further, ideally, on top of the existing soil, you need to pour imported soil. Thus, you raise the site and increase its fertility.
Further, the site needs to be dug up by mixing the soil and adding dolomite flour in the amount of 300 g per hundred square meters of land. Before planting seedlings (if planting is in the spring, then autumn fertilization is just ideal) you need to add 250-300 g of wood ash per square meter, a bucket of humus and a teaspoon with a pea of superphosphate and potassium sulfate (all this is for digging , even if you have to dig the site again).
The use of pits and ditches
Plot with a functioning drainage system.
Many summer residents solve the problem of draining the site with the help of a system of main pits and ditches. Pits are arranged quite simply. It is necessary to dig holes 80-100 cm deep, 2 m wide at the surface and 50 cm at the bottom. They are prepared at the lowest points of the land. The system is very simple, but quite effective. All excess water from the site will be collected in these pits.
Organizing a ditch system is a little more difficult. The most commonly used method is based on open drainage ditches. With their help, the site will be drained from spring meltwater.
Along the perimeter of the land, ditches should be dug with a width and depth of 40 cm or more. The walls of such ditches should be sloping by about 20-25 °. In organized garden partnerships, the arrangement of such diversion ditches, as a rule, is a mandatory requirement of the administration. Among the shortcomings, one can single out the fact that the earthen walls of the ditch will gradually crumble. In addition, they will be clogged with various small debris, aquatic plants often appear in them.
Scheme of drainage wells.
To strengthen the walls, concrete slabs or wooden boards are usually used. Also, a pallet made of metal or concrete can be laid at the bottom of the ditch. Clogs and plants will need to be disposed of regularly. This can be done with an ordinary shovel. In most cases, a common drainage ditch serves as a water intake. She settles down along the road.
A slightly less popular way is the so-called. French drainage. Similar ditches with sheer walls are created on the site and filled with gravel or stones. There are several options for arranging such drainage: you can dig shallow ditches with groundwater runoff into a well, or make a ditch as deep as a natural layer of sand, and the water will go into it. A pit with sides of 1-1.2 m will act as a well of such a system. The well can be closed and open. It can be filled with broken bricks or coarse gravel. Among the advantages of such ditches, one can single out the fact that they do not “bloom” and do not become clogged, however, after a while they can become clogged with soil washed out by water. And in this soil, plants will begin to sprout. Cleaning such ditches requires more effort compared to the previously discussed ordinary drainage ditches.
A more expensive way to drain a site is to create a closed drainage system. It is arranged using asbestos-cement or clay pipes. Pipes can be laid out in a herringbone pattern or in a straight line
It is important that the site has a slope sufficient for the natural runoff of water. Such a system is well suited for a site with a high level of groundwater.
It is usually combined with drains to drain from the base of the house. However, the device of such a system requires appropriate experience, and it is quite difficult to make it yourself.
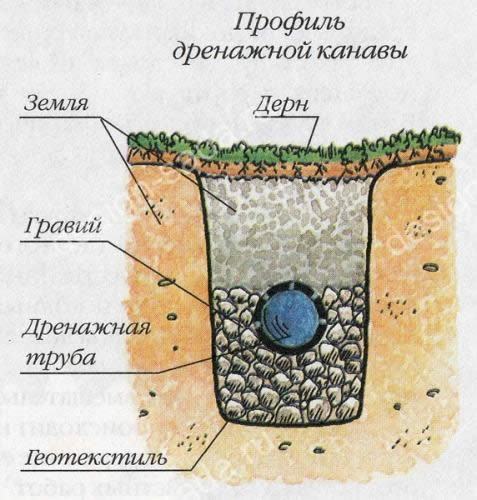
Drainage trenches
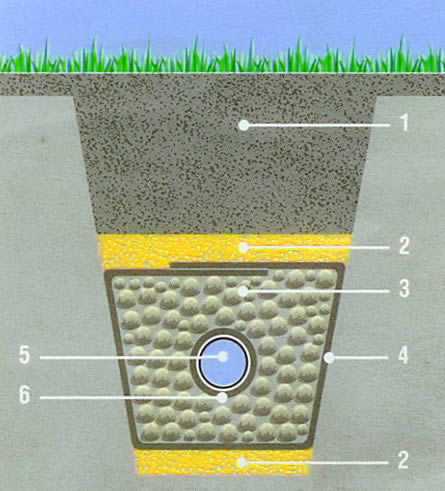
Scheme of the drainage trench: 1. Fertile soil. 2. Sand. 3. Crushed stone of a large fraction. 4. Geotextile (darnite). 5. HDPE pipe D = 90 mm. 6. Winding the HDPE pipe with geotextile.
After the trenches have been dug, work begins on laying geotextiles.An important point in this process is that the geotextile should not consist of fabric materials, as water must pass freely through it. For this, materials such as dornite and interlining are used. Geotextiles have unique properties that allow them to be used for filtration purposes.
Due to its excellent drainage characteristics, it, in turn, does not contribute to the washing out of small soil particles into the drainage reservoir, which allows maintaining a fertile soil layer. Geotextiles significantly increase the life of the drainage system. This membrane cuts off soil particles washed out by water, as a result, they form an additional natural barrier without interfering with water drainage. Due to the huge number of pores per unit area, geotextiles practically do not clog and can serve for a long time.
The next layer consists of loose coarse-grained materials: expanded clay, crushed stone, broken brick or concrete. The thickness of this layer should be at least 5 cm. This combination simplifies the design of the drainage system and minimizes water erosion of the soil on the slopes of the site.
The next step is the laying of drainage pipes with the required angle of inclination. After that, the pipes are filled with the selected bulk material and wrapped with geotextiles. You should get a “sleeve” consisting of an outer layer formed by geotextiles, a middle layer of crushed stone and a center of pipes. On top of this, the remainder of the trench is covered with sand with surface laying of the soil.
Making closed drainage
How to make a deep drainage system on the site with your own hands? For the correct performance of the work it is necessary:
- develop a scheme of the drainage system;
- prepare all the necessary materials and tools;
- install the system according to the recommended technology.
Schema Design
The initial stage of the construction of drainage in a garden plot is the design of a future drainage system. The scheme is developed taking into account the following requirements:
- the distance from the drainage pipe to the foundation of the building must be at least 1 m;
- before the fence (fences) it is required to leave at least 0.5 - 0.6 m;
- the depth of the trench intended for laying pipes should be more than 1 - 1.2 m, and near fruit trees and shrubs from 1.6 to 1.75 m;
- the minimum width of trenches is 0.35 m;
- the distance between adjacent trenches should be at least 10 m;
- it is not recommended to lay pipes in places where cars and other equipment pass;
- in places where the direction of the pipeline system changes, where pipes converge or diverge, it is recommended to install manholes.
Drainage scheme
According to the scheme, the number of pipes, manholes and other elements of the system is determined.
Preparation of materials and tools
To equip drainage for draining the land with your own hands, you will need to prepare:
drainage pipes with a diameter of 100 - 110 mm for conducting central highways and 50 - 60 mm for prefabricated drains;
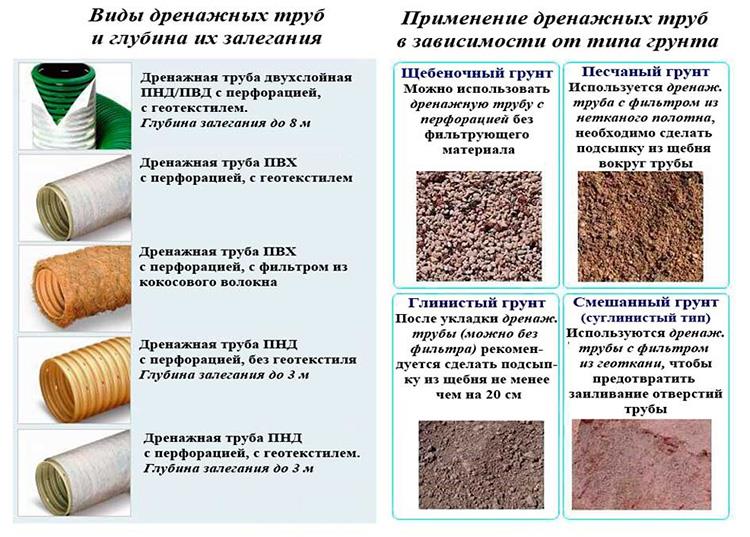
Types of drainage pipes and their scope
- fittings for pipeline assembly: elbows, tees, connecting elements and so on;
- manholes (you can purchase ready-made plastic structures or make equipment yourself, for example, from concrete rings);
- prefabricated or drainage well made of plastic or concrete rings;
- geotextile or any other filter material necessary to protect pipes from clogging;
- sand;
- fine gravel.
To complete the work you will need:
- pipe cutter (you can use special scissors for cutting plastic pipes or a hacksaw);
- drill (when installing wells from concrete rings, a puncher is additionally required);
- marking tools: tape measure, wooden pegs;
- building level;
- shovel (it is recommended to prepare a bayonet and shovel shovel to facilitate the work);
- pipeline assembly tools.When using threaded fittings, wrenches will be required, when assembling the system by welding, welding equipment, and so on.
System gasket
The laying of the drainage system of the site is carried out according to the following scheme:
- garden marking. In accordance with the drainage project of the territory, the locations of drainage pipes, manholes, collection tanks, and so on are determined. For clarity, certain places are recommended to be marked with wooden pegs;
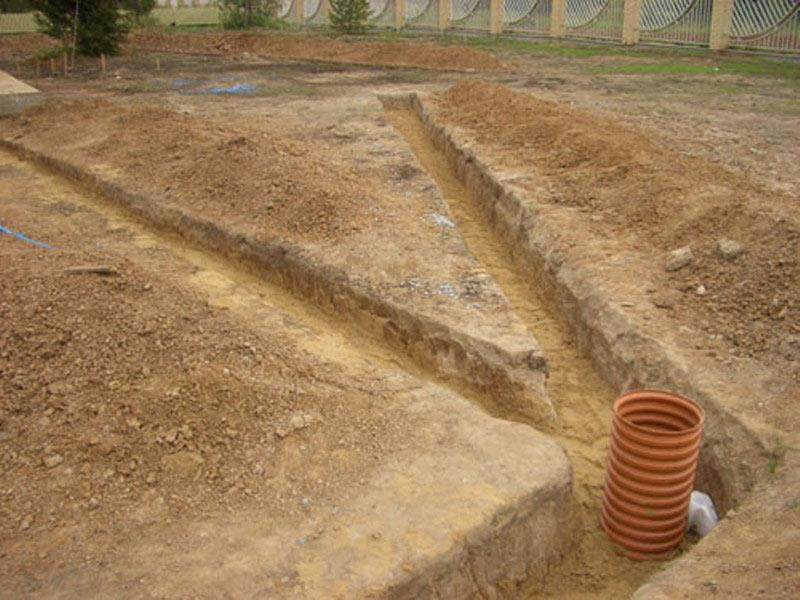
- digging trenches and pits for the location of wells;
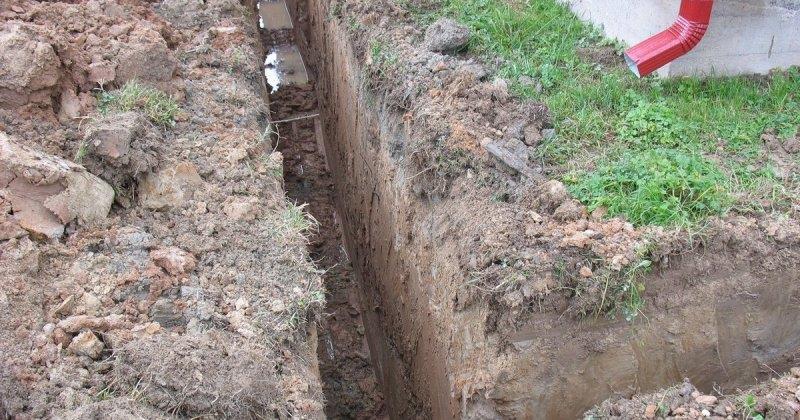
Preparation of trenches for pipes and wells
When carrying out earthworks, the slope of the trenches should be taken into account to ensure gravity flow. If there is no natural slope on the site, then digging trenches should be carried out in compliance with a slope of 0.7 ° - 1 ° per 1 meter of length.
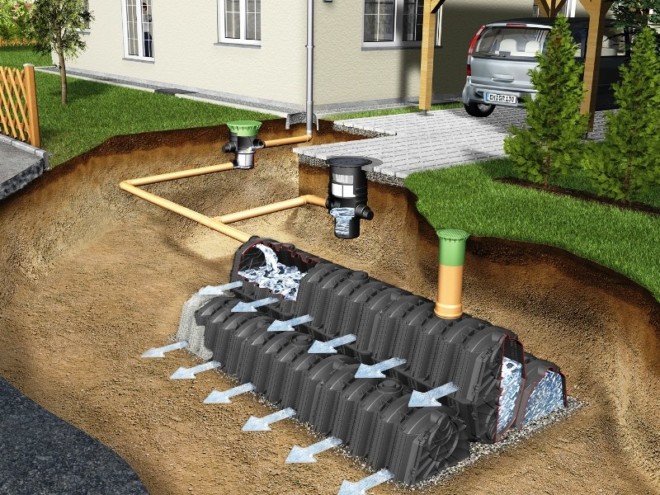
- collection tank installation. It is recommended to lay a layer of sand (approximately 20 cm) and a layer of gravel (approximately 30 cm) on the bottom of the well, which will allow for additional filtration of wastewater before disposal.
If it is assumed that the water from the collection tank will be pumped out forcibly, then the laying of sand and gravel can be neglected;
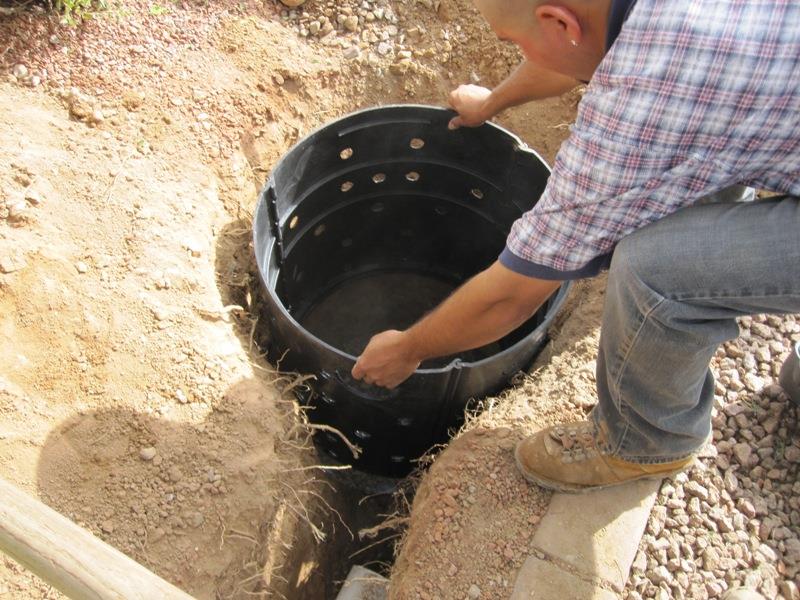
Installation of a drainage well for the collection and disposal of wastewater
- installation of manholes;
Installation of a well to monitor the state of the system
- closing the trenches with a sand cushion (a layer of 20 - 25 cm is enough);
- laying of protective material (geotextile);
- backfilling of prepared trenches by 25 - 30 cm with a layer of gravel;
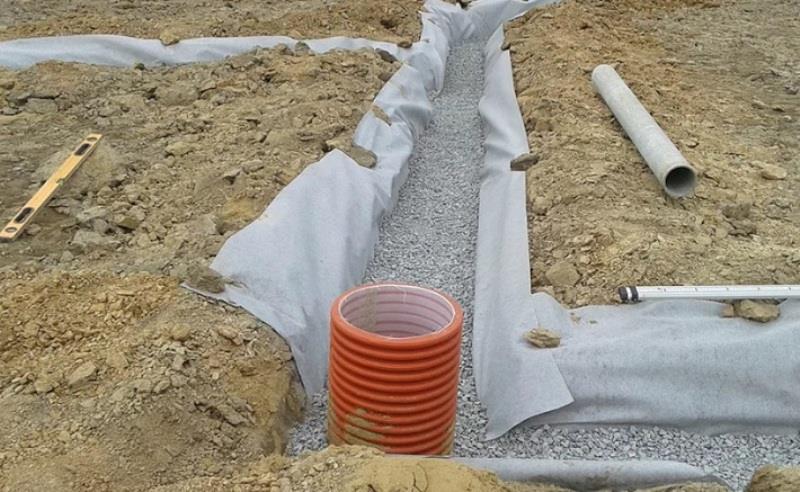
Preparing trenches for laying pipes
- pipeline assembly and installation. Connection of pipes to the collection (drainage) tank;
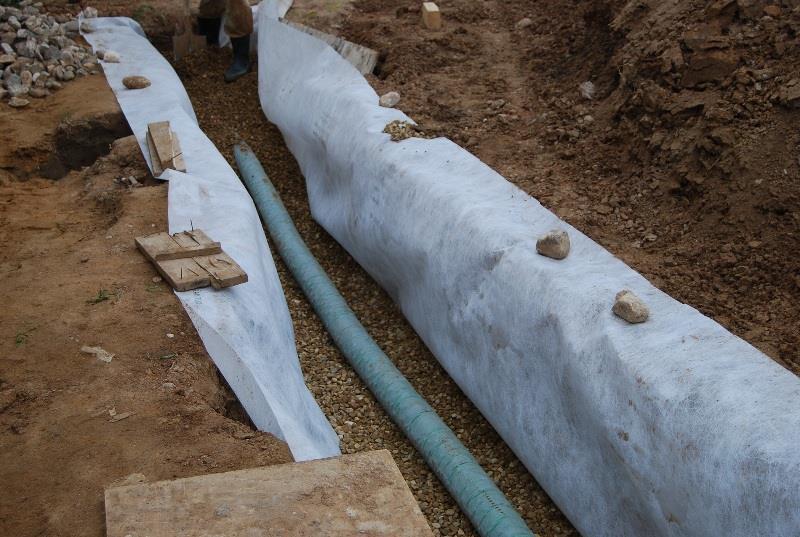
Laying a drainage pipeline
- pipe protection from above. To do this, the pipes are covered with a layer of gravel and covered with filtration material. It is recommended to additionally equip a layer of sand on top of the pipes;
- backfilling and compacting the soil;
- decoration (if necessary).
For more information about laying deep drainage, see the video.
To extend the service life and maximize the drainage of the site, the drainage system is recommended to be periodically cleaned of debris and flushed. Global cleaning of the system should be carried out at least once every 10 - 12 years.
Plot lifting
Even if deep drainage did not help to completely get rid of the negative manifestations of GWL, you will have to deal with the planning and backfilling of a site with a high level of groundwater.
This method is expensive, but provides a real and lasting effect. Regardless of the elevation of the site, the work plan is approximately the same.
- Territory planning. A detailed plan of the site is drawn up with the designation of the level of heights, the location of the surface aquifer, the thickness of the fertile layer. This will help determine where, how much and what exactly to add. If the geology of the area is complex (bogginess is combined with a high GWL, there is a clay layer or voids), it is better to entrust the planning to a specialist.
- Demolition of old buildings (if any).
- Site clearing. It is freed from vegetation, debris, roots are uprooted.
- Laying the drainage system (if it does not already exist). Dumping alone will not solve the problem of excess moisture. It still needs to be removed in a closed or open way, as described earlier.
- Site clearing. A low strip foundation is laid around the territory so that the poured material is not washed away by rains. After the concrete hardens, layer-by-layer dumping of materials (10-15 cm each) is carried out. Each layer is compacted with a vibrotamper. After laying all the lower layers, they withstand a couple of weeks for natural shrinkage by 2-3 cm, only then comes the turn of fertile soil. So that the layers do not mix, they are separated by geotextiles.
Closed and open drainage systems
Modern drainage systems allow you to quickly and effectively get rid of excess fluid in the area. Simple drainage consists of a pipeline and a water receiver.A stream, lake, river, ravine or ditch can be used as a water intake.
The drainage system is equipped from the water intake to the land plot, observing the optimal distance between its main elements. On dense soils with a high content of clay, the distance between individual drains should be 8–10 meters, on loose and heaving soils - up to 18 meters.
open drainage
The open or French drainage system is a shallow ditches, the bottom of which is filled with fine gravel and stones. Such drainage is arranged quite simply: a ditch of small depth is dug out with the discharge of effluents into a drainage well or a deep trench to the level of the sand layer, which is used as a drainage cushion.
A drainage well measuring 1×1 m can have a closed and open design, its bottom is filled with gravel of the middle fraction and brick breakage. Such structures do not clog, but are filled with soil, which is washed out with water. For this reason, draining this type of well is much more difficult than an open gutter.
Closed drainage
A technically sophisticated device that will quickly remove excess water and prevent it from stagnation. The arrangement of closed drainage is carried out using pipes made of clay or asbestos cement with laying in a certain order - in a straight line or herringbone. Closed-type drainage is suitable for areas located on a slight slope, which provides a natural flow of water.
Closed drains are often combined with drainage systems that allow water to be carried away from the base of the house.