Availability of additional functions
Modern shower heads have long ceased to be just sprayers. To increase the level of comfort during the adoption of water procedures, these elements are often equipped with additional options.
In an effort to increase the level of comfort and increase the functionality of the device, manufacturers do not stop improving the design of watering cans.
Additional features include:
- Changing the spray mode. This function allows you to independently adjust the pressure mode, forming rain or massage jets.
- Water saving. For this purpose, a valve is installed on the body of the device, which mixes air into the water jet. This function allows, depending on the mode, to save up to 60% of water.
- Mineralization. For this, the devices are equipped with mineral elements such as tourmaline, germanium or shungite. Water, passing through the minerals, dechlorinates and becomes softer.
- Backlight. The effect of light therapy is achieved due to the glow of the LEDs built into the body.
- Turning off the water supply. This function is performed by a button that shuts off the water supply. The function is convenient in that it eliminates the need to monitor the constant regulation of the water temperature, even if the shower spout is blocked through the mixer.
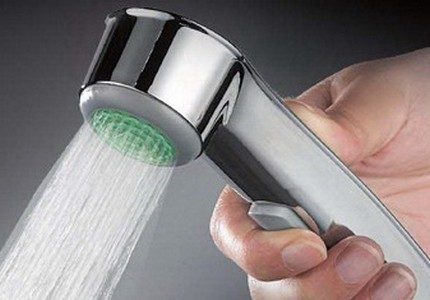
Many people know about the ability of color to influence the well-being of a person. For example: green relaxes, red - gives a charge of vivacity, and yellow - tones and improves mood. Specialists have developed a whole method of treatment with light of a different spectrum. And leading manufacturers also did not miss this moment. Today on sale you can find models with backlighting.
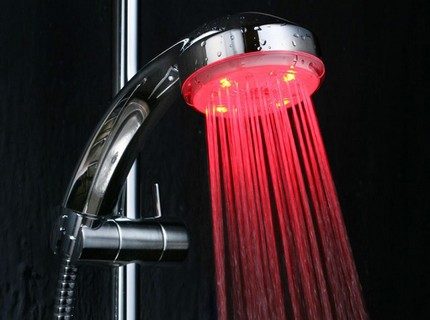
To turn on the backlight, it is not required to “power” the device from electricity; a small generator built into the middle of the device is responsible for this task
The generator built into the body of the device is able to generate energy due to the water flow that occurs when the shower is turned on. You can fix such a watering can on a bar or rack.
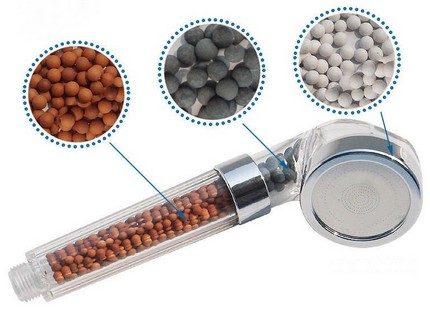
In addition to the main purpose of stabilizing the pH to neutral, watering cans with minerals lower the hardness of water and remove chlorine from it.
Watering cans with minerals are equipped with a multi-stage filter that softens and gently purifies the water. The water coming out of the holes of the nozzle becomes aerated and ionized, and the bubbles running through the body give real bliss.
How to disassemble a shower head
Before starting the process, prepare the necessary tools:
- screwdriver;
- a paper clip, wire or a regular needle;
- rag;
- soldering iron;
- mini drill or screwdriver with a small drill;
- knife.
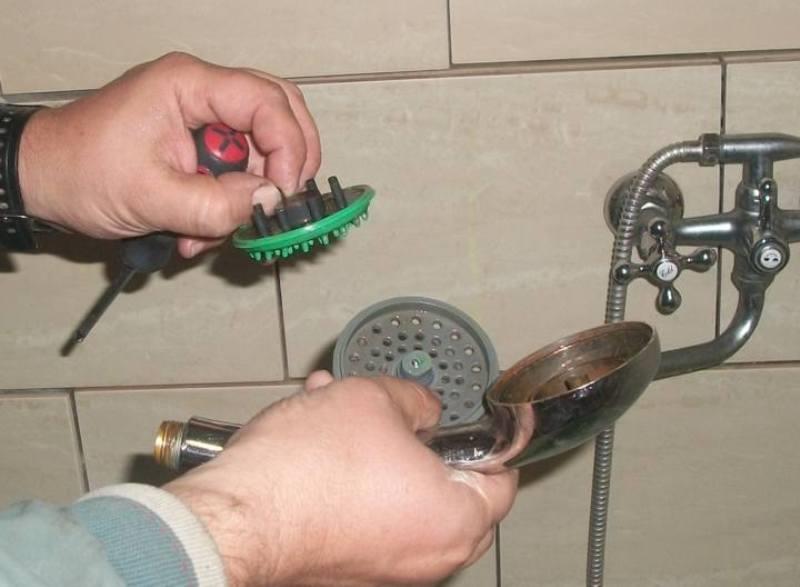
The first thing to start with is the analysis of the shower head itself. It should be borne in mind that if you have an old shower system, then the divider will simply unscrew. If the design is modern, then there is a self-tapping screw, closed with a decorative plug. Therefore, it needs to be removed.
- Take any sharp object (awl, knife) and pry it over the edges. If there is a recess designed for this, there will be no problems. Otherwise, you'll have to fiddle around a bit.
- Then, using a screwdriver, unscrew the existing screw and take the diffuser to the side.
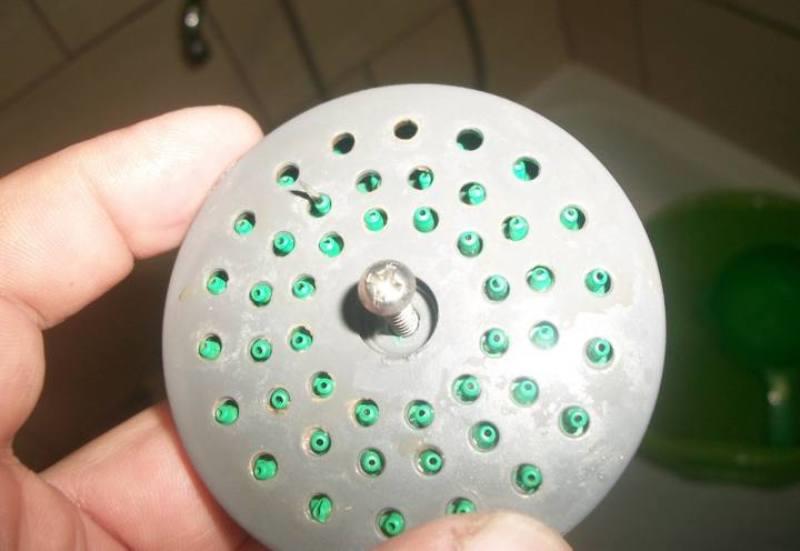
- Next, you need to clean the holes in the shower head. Everything is elementary - for this, a needle or a paper clip was needed, which needs to be straightened.
- After completing this process, rinse everything with water under pressure.
If there is limescale on the rubber, you can wipe these places with a regular rag.
After the structure is completely disassembled, all parts should be thoroughly rinsed under water and assembled in the reverse order.
You can assemble the structure. At the same time, do not forget about the rubber gasket between the divider and the watering can itself, or rather its body.
But in this way you can only disassemble a system that has been operated relatively recently. What if you have had it for several years? The self-tapping screw in this case will not unscrew. It will simply crumble, and in the end there will be nothing to cling to with a screwdriver. But there is a way out here too.
- Take a drill and drill a hole in the center of the self-tapping screw (diameter about 2 mm). You can wiggle the drill a little. Thus, you will get a cone-shaped gap.
- Turn on the soldering iron and, after waiting for it to heat up, attach it to the self-tapping screw. The plastic around will begin to soften. And here is the most important thing: until everything has cooled down, insert a screwdriver into the oval and unscrew the screw.
- Everything can be cleaned and put back together.
Only an important nuance - prepare a new self-tapping screw according to the size of the previous one. It can be found at any hardware store.
Following the above recommendations, you can easily carry out such an event with your own hands. And with the money saved from self-repair, buy something for the bathroom (you can’t buy a lot, but a rug on the floor will come in handy anyway). Good luck!
Share this helpful article:
http://bezsantexnika.ru
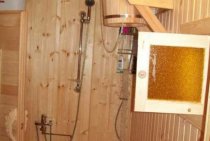
Watering cans general information
Before proceeding with the repair and cleaning of the device, I would like to draw your attention to the varieties and some features of the use of watering cans. Differ in the presence of:
Differ in the presence of:
- stationary watering cans;
- the presence of a flexible shower hose.
The first option, in turn, is ceiling and wall types. The second involves 2 ways of fastening:
If there is limescale on the rubber gaskets, then they must be wiped with a regular rag.
- By means of brackets fixed permanently on the wall.
- With the use of fittings - special brackets in which shower heads are installed, and the device itself is fixed with a vertical fixed bar. At the same time, it is possible to adjust the height.
Both options, where a flexible hose is present, allow the shower head to change the angle of inclination and rotate around its axis. This enables the desired direction of the water jet. At the same time, if necessary, you can simply remove the watering can (for example, you need to wash the walls, tiles, or it’s just more convenient to take a shower).
Also, some have watering cans that do not have wall mounts. They just lie in special forks on mixers. But using such a shower design is not always convenient (you need to keep it constantly).
Ceiling and wall stationary watering cans are non-removable and have a device for supplying water in the walls, while mixers are installed in a place where it is most convenient and practical when using.
We clean the watering can from hard limescale
You can do it in two ways - simple and more complex. You probably have a natural question: why resort to a more complicated method? It's simple - this option will allow you to better clean the watering can from dirt. We will consider both cleaning options, you can choose the one that you like best.
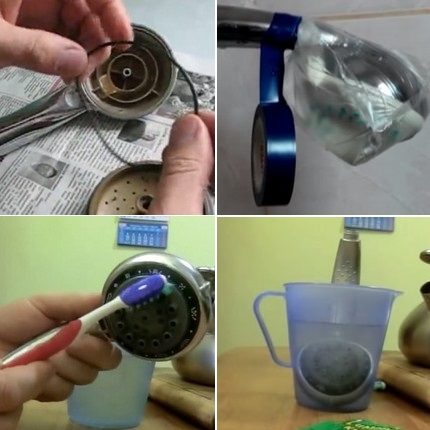
How to descale your shower head without resorting to harsh chemicals that can easily damage your plumbing. There is, of course, a way out. For this, ordinary table vinegar is suitable. It is able to effectively cope with limescale without damaging the surface of the watering can.
So, the first method is the easiest, in most cases it will work when your shower head is not disassembled. Yes, this happens, because the design of the soul can be non-separable.
For cleaning you will need:
- 9% table vinegar;
- a small plastic bag;
- tape or duct tape.
Take a bottle of ordinary table vinegar and a plastic bag.
In the question of how to clean the shower head from limescale, there is one nuance - the amount of vinegar used.If it is too small, then you will not be able to achieve an acceptable result.
The amount of vinegar depends on the diameter of the mesh. The most common diameter is 60 mm. 300 g of liquid will be enough. Install the body of the watering can on the holder, which is attached to the wall. Make sure that the whole structure is held firmly. Then pour vinegar into a plastic bag and put it on a watering can.
The next step is to secure the bag to the holder with electrical tape or tape.
We leave the structure for the whole night. In the morning you will be pleasantly surprised: the mesh will be completely free of limescale.

Problems and Solutions
So, what to do if the shower switch on the mixer is broken, in each of the cases described above? Let's move on to the typical problems of each type of switch.
Suberic
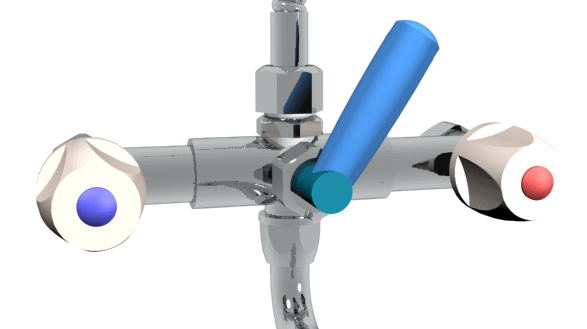
Faucet with cork switch.
As already mentioned, these products are extremely fault-tolerant. However, they also have two diseases.
Leak on the plug stem
Uneven wear of the plug or body
The solution is the same as in the previous case. Viscous silicone grease will facilitate the rotation of the handle and fill in the roughness of the rubbing surfaces
Button
What does the repair of a switch with a gander and shower mode look like for a push-button design?
She has three typical faults:
- The switch does not hold water: it enters the gander and the shower at the same time. The reason is uneven wear or complete destruction of the rubber valve. It is treated only by replacing it or, if the corresponding spare part is not available for sale, by completely replacing the mixer.
- The button spontaneously returns to its original state after being pressed with a small pressure of water. The reason is an excessively tight return spring. It is enough to bite off one or two turns of the spring - and the mixer starts to work absolutely normally.
The return spring is clearly visible in the photo.
- Finally, if the shower switch on the mixer is leaking, the reason is the wear of the sealing ring. It again changes to a new one; rings, as a rule, are included in gasket sets for repairing domestic mixers. The price of a set rarely exceeds 20 - 30 rubles.
Hint: if the pushbutton switch is equipped with a gland nut, instead of a rubber seal, a thread of graphite gland can be laid under it.
With a keg
Here are the diseases of this design:
The water does not shut off on the gander or shower.
The reason is the wear of the gaskets or, which happens much more often, the destruction of the bolt fixing one of them. The problem, as you might guess, is eliminated by replacing the gasket or bolt.
Useful: it is easy to cut the gasket with your own hands from the old chamber from the truck wheel.
The switch does not turn to the extreme positions.
The reason is the wear of the keg or guides in the mixer body: due to the large gap between them, the keg rises skewed and wedged.
Repairing a faucet shower switch usually comes down to replacing the keg; a temporary solution to the problem may be the installation of improvised guides from pieces of aluminum wire in the mixer body.
In the event of a leak along the stem, the rubber seal is again changed or the stuffing box is stuffed.
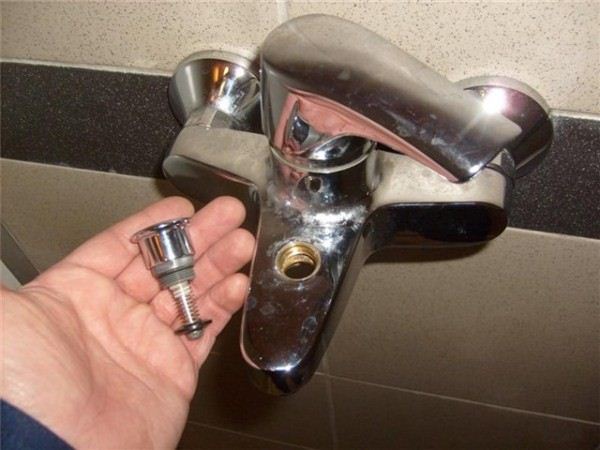
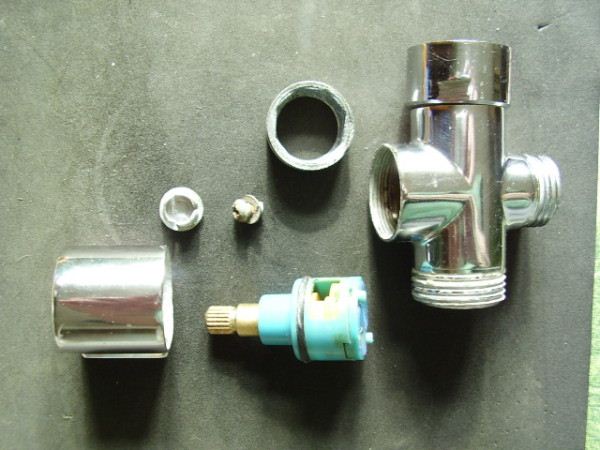
A beginner may have a reasonable question: how to remove the shower switch on the mixer if the keg does not want to leave the case?
The sequence of operations is important here.
- After unscrewing the fixing screw, remove the switch lever.
- We turn off the gland (if any).
- We take out the eccentric.
The eccentric will not allow you to remove the keg while it is in the mixer body.
- We unscrew the nut on the mixer body under the shower hose.
- We're filming a goose.
- We push the barrel through the hole in the mixer body from the bottom up.
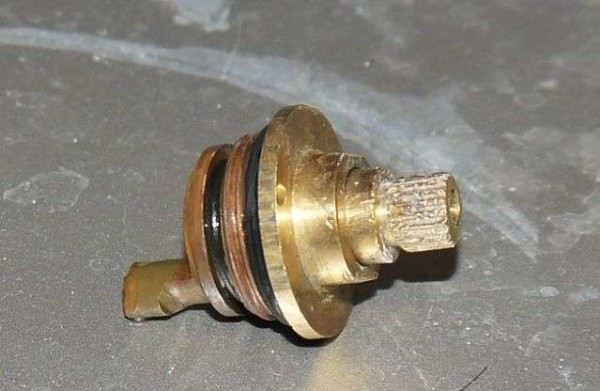
Ceramic
How do I repair a shower diverter that can handle a full turn?
Of modern mixers, these are the most fault-tolerant; the author cannot recall any of their failures due to natural wear and tear.
Problems can arise only when two circumstances coincide:
- Lack of filters at the entrance to the apartment or house. When repairing a water supply line, scale or coarse sand can get into it, which sooner or later will end up in the mixer.
- Significant physical strength of the owner in the complete absence of common sense. If you try to turn a cartridge jammed with scale by force, the result will be a little predictable: either one of the ceramic plates or the plastic retainer holding it will break.
The repair instructions in this case are also quite predictable: the destroyed cartridge is replaced by a new one. For replacement, it is enough to remove the handle and the fixing nut.
This is what the cartridge looks like.
Parsing the watering can
To clean the shower head as much as possible, it is recommended to remove and disassemble the plumbing fixtures.
Currently widely used:
- ordinary watering cans;
- products with the ability to switch operating modes.
Dismantling a standard watering can
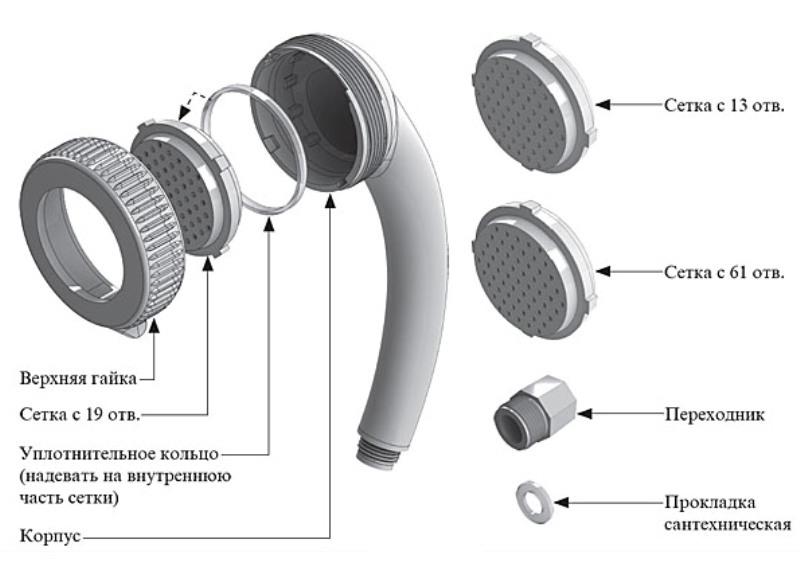
An ordinary shower head consists of elements such as:
- body of the device;
- rubber gasket for tightness;
- diffuser;
- fixing bolt;
- decorative cap.

Constituent elements
To disassemble a shower head from Grohe or another manufacturer that is not equipped with various operating modes, you must:
- Disconnect the shower head from the shower hose. As a rule, the procedure can be performed by hand, without the use of tools. However, with prolonged use of plumbing equipment, the fixing nut may “stick”. In this situation, an adjustable wrench is required to disconnect;
Disconnecting from the hose
- using a screwdriver or other sharp object, remove the decorative plug from the fixing bolt located in the center of the diffuser;
Decorative cap for fixing bolt
- unscrew the bolt;
fixing bolt
- remove diffuser.
Final disassembly of the device
Some, more modern models of watering cans are equipped with a fixing nut instead of a mounting bolt. In this situation, disassembly of the equipment is carried out in the following way:
- loosening the fixing nut;
- removal of the diffuser and sealing ring.
How to disassemble a shower head with a fixing nut
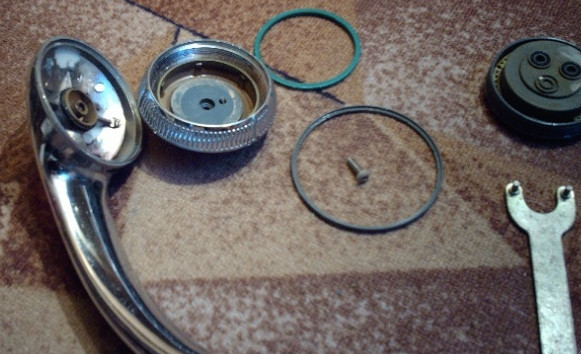
Disassembly of the multi-mode watering can
Multi-mode watering cans consist of elements such as:
- frame;
- mode switching device;
- external switch;
- sealing rings.
Device with multiple operating modes
To disassemble the watering can with the switch, you must:
- disconnecting the equipment from the shower hose (more on the operation process described earlier);
- using a special key supplied with the equipment, the fixing bolts located on the diffuser panel are loosened;
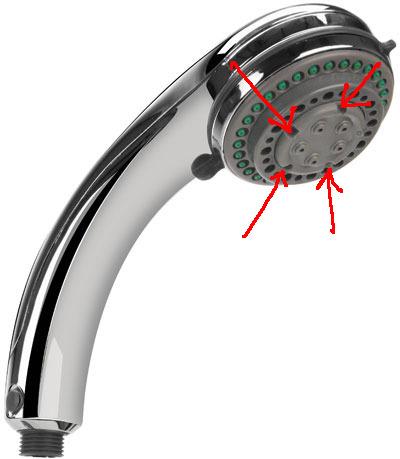
Mounting bolt locations
In the absence of a special key, you can use scissors or other sharp objects.
- successive removal of diffusers that determine the mode of operation of the equipment;
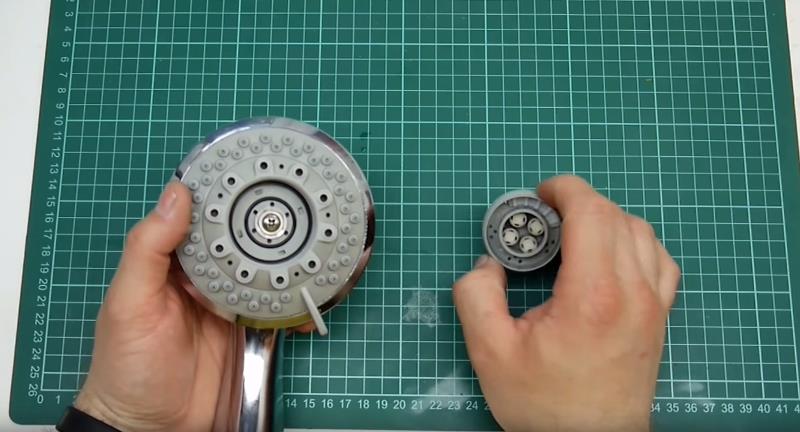
Deleting elements responsible for the mode of operation
- removal of the main part of the device, fixed with a fixing bolt;
- removal of the decorative trim and sealing ring.
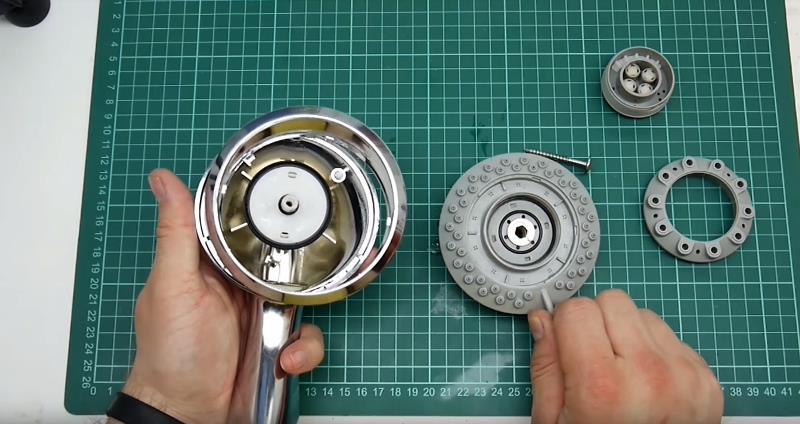
Final parsing
The description and principle of operation of the multi-mode watering can is presented in the video.
Watering can installation and care
There is nothing complicated in disassembling and installing a shower head with a switch. We will consider the sequence of actions using the example of replacing a conventional classic nozzle.
To install or shower head, you will need a set of tools:
- wrench;
- pliers;
- metal brush;
- FUM tape.
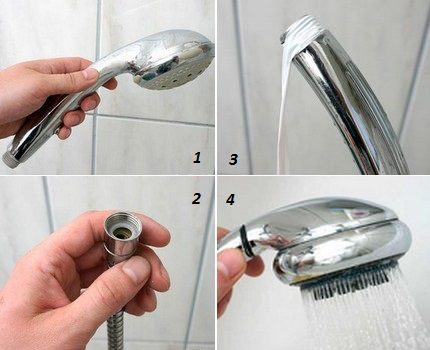
The sequence of actions:
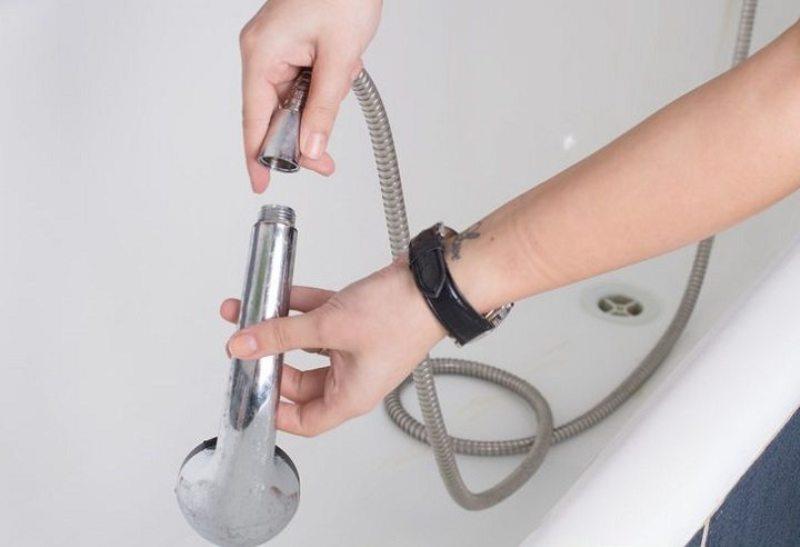
- Unscrew the leash. To do this, use a wrench or pliers to loosen the nut connecting the watering can to the hose. Without applying excessive force, completely unscrew the nut and remove the nozzle.
- Clean the fastening thread with a metal brush.Lime deposits and rust must be completely removed.
- Install a new watering can. Having wound a plumbing winding on the thread of a new watering can in several layers, they screw the nozzle by making a couple of turns. The connection is “stretched” with an adjustable wrench or pliers.
- Check system performance. When water is supplied at the junction, no leaks should occur.
The process of disassembling the watering can is shown in detail in the video:
If the installed nozzle still leaks, the structure will have to be re-unwound and windings added to the thread.
The tightness of the connection is achieved by wrapping the threads with FUM tape or any other sanitary winding
In the future, when it becomes necessary to clean the device from limescale, you need to disassemble the device. To do this, using a knife, you need to pick up the plug in order to remove the mesh from the center. After its removal, the screw holding the mesh will open. The screw slot must be cleaned of scale and salt.
The nozzle can be immersed in a dense plastic bag filled with a solution and wrapped with electrical tape, or else dipped into a deep cup for a while
After removing the screw, the mesh is disconnected from the body, trying not to tear the gasket, and the disassembled elements are washed with table vinegar. The elements should be left in the solution for 12-15 hours. After removing the nozzle, the exfoliated scale remains to be cleaned with a brush with hard bristles, and then assemble the structure.
The video clearly demonstrates the intricacies of the shower tube cleaning process:
Regardless of the type of model chosen, key attention should be paid to the quality of the product. To protect yourself from low-quality products, purchase plumbing accessories in specialized salons and stores
You will get the opportunity at the stage of purchase to consult with experts regarding the features of plumbing and use the services of a centralized service.
How to Fix a Shower Switch: Common Problems and Solutions
This article focuses on how the bathroom faucet is repaired: the shower switch is a rather vulnerable part of its design. We have to get acquainted with the main types of switches, their typical malfunctions and how to eliminate these malfunctions.
One of the switches.
How to disassemble a shower head with a do-it-yourself switch
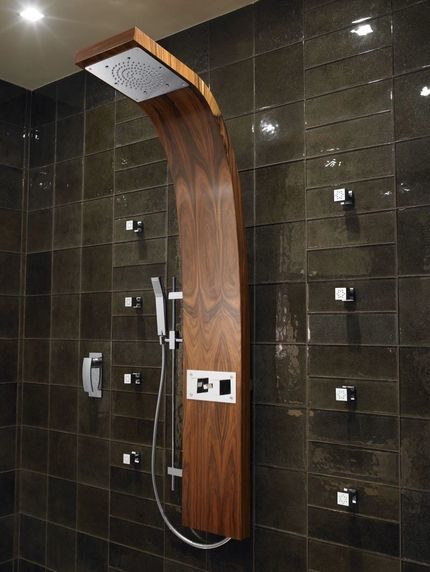
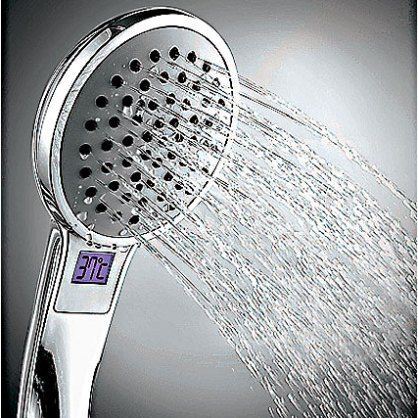
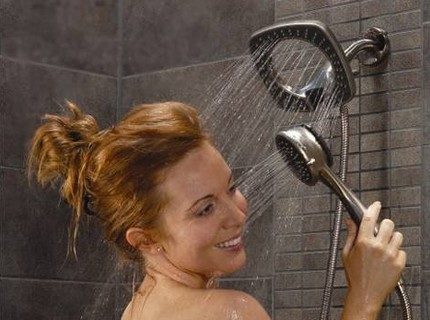
The shower in today's accelerated world is the basis of human hygiene. For comfortable adoption of water procedures, the use of a watering can is required. But at present, a conventional shower, based on the distribution of water flow into several jets, is gradually becoming a thing of the past. Its place is occupied by multi-mode watering cans, the flow of water in which can be adjusted and modified to create comfortable conditions when washing.
The advantages of such devices:
- Multi-variant water supply: normal mode, massage, comfortable.
- Saving water, it is enough to choose the option with the minimum required supply.
- Ease of installation - connecting shower equipment with a switch is similar to connecting with a conventional one.
Watering can device with switch
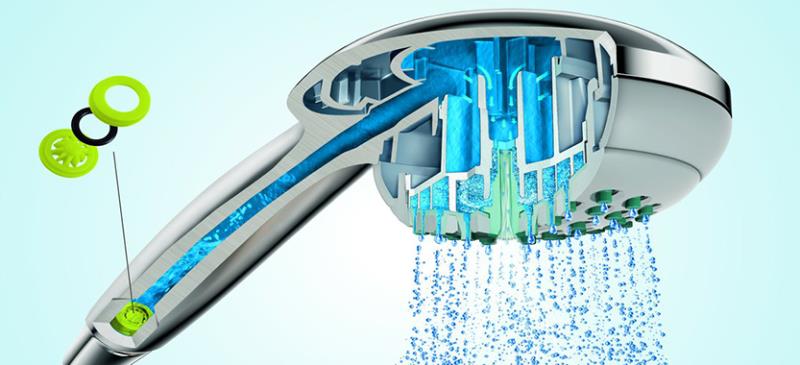
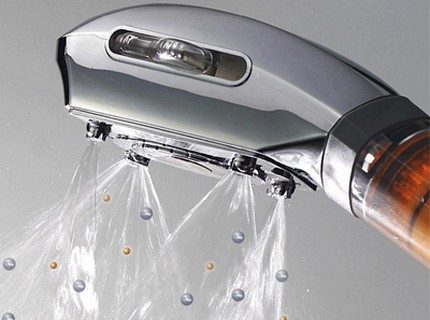
This watering can is usually a body made of hard plastics, inside of which there is a rounded structure equipped with several concentric flow swirlers. At the same time, each of them works on its own mode. The swirlers are installed in the body according to the “matryoshka” principle and, with rare exceptions, are united by a common body.
The flow force can increase or decrease depending on the diameter of the swirler and the section of the chamber openings. This achieves a different pressure of the water flow at the outlet of the chamber.
Outside, the water supply chamber is closed with a mesh, which also affects the formation of the jet: for example, intermittent or with the addition of air bubbles. This is achieved by using various kinds of artificial barriers and movable flow dividers.
Disassembly step by step instructions
To work, you will need a Phillips screwdriver, an adjustable or gas wrench No. 1, a special pin wrench for disassembling the shower head. Often this key is supplied in a set. In the absence of it, you can do it yourself or use improvised items.
When disassembling the shower body on your own, it is recommended to be extremely careful, set aside small parts and structural elements separately. When dismantling the rubber gaskets, they must be handled with extreme care to avoid damage. Do not forget about the presence of a spring in the housing.
So the algorithm is the following:
Turning off the shower, removing the watering can from the flexible hose. This is done quite simply: the nut at the junction with the hose is unscrewed. Before doing this, you must turn off the shower mode on the mixer.
In order to disassemble the watering can with the switch, you need a special key. If you look closely at the diffuser mesh panel, then on the central circle you can see 3-5 recesses intended for dismantling. The panel is unscrewed from right to left. You can unscrew the central panel of the shower grid with a special key, if it is not available, you can use scissors with rounded ends for this purpose. But it is best to use a key, this will keep the mesh surface intact, without scratches and defects.
After removing the central panel, under it you can see the swirler box, which is fixed in the center with a screw. Unscrew it with a Phillips screwdriver.
Remove the concentric circles of the shower grid, switch
Pay special attention to movable baffles and flow baffles that may be located under the diffuser. When opening the grid, they must be carefully removed
Then we take out the swirler from the watering can. Pay attention to the rubber gaskets, they must be handled very carefully.
Under the swirler is usually a switch spring. Removing the housing must be done carefully, in order to avoid its loss.
The swirler box can be one-piece, not subject to repair, or detachable, with 2-3 plastic latches, in which case opening the box is not recommended. The latches are quite weak and may not withstand the application of brute force. Less common is a screw connection.
Assembly after repair or replacement of parts is carried out in the reverse order: the swirler body is inserted, the screw is tightened, concentric mesh diffusers are installed, the central panel is twisted. After that, the watering can is connected to a flexible hose.
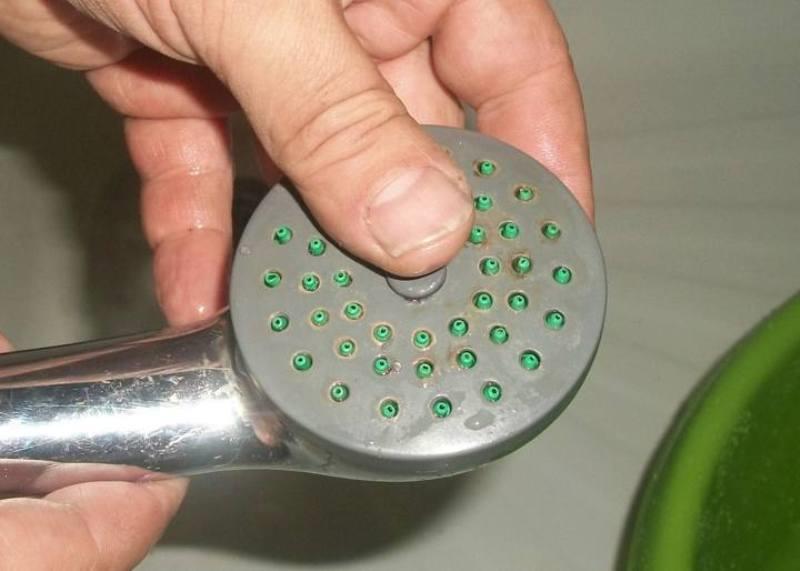
After disassembly, be sure to rinse the holes in the mesh from the inside, usually during the use of the shower, the so-called water stone forms in them - a coating of mineral elements and rust found in tap water.
Variety of nozzle options
There are many options for showerheads. The most popular are four types of models: for an overhead shower, from the tropical rain series, for a hygienic shower and models with an aeration function.
With one type of model, the shower can turn into a real pleasure, with another - into a normal everyday procedure.
The choice depends on the tasks assigned to this element of plumbing. Although aesthetes are of the opinion that the main thing in such a simple subject is beauty, since it is designed to inspire.
Overhead shower head
The main advantage of watering cans for an overhead shower is the free hands of a person taking water procedures.

Models of this sample are permanently attached to a permanent place and it is no longer possible to change their position at the time of use.
Watering cans in the form of an overhead shower are of two types:
- hinged version - mobile models equipped with a flexible hose or rigid tube, which are fixed to a wall or rack;
- built-in models - a stationary version of nozzles that are fixed to the ceiling with the ability to adjust the height.
Ceiling models are more often chosen for arranging shower stalls.
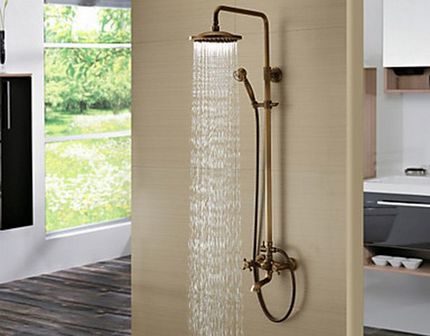
A watering can with a wall-mounted hose is considered the most preferred option in terms of practicality.
Wall models are available in two versions. In the first version, they are connected to a hose, which allows them to be used as "manual" models. In the second case, the installation is fixed to a chrome-plated pipe, which makes it possible to change the angle of inclination and, if necessary, turn the structure to the left and right.
Tropical rain nozzle
Tropical rain showerheads are the most popular type of shower system today. This type of device is equipped with many small nozzles, thanks to which the effect of heavy rain is created. For this, structures are suspended directly from the ceiling, and communications are hidden in strobes.

For this type of shower, large nozzles are used, so that water drops do not fall on individual parts of the body, but cover it completely.
The mode of operation and the intensity of "rain" in the range from light drizzle to a downpour "wall" is conveniently adjusted using a lever-type toggle switch.
So, for example, for washing the head, you can turn on a soft stream, and then for a body massage - a harder pressure.

Due to the large size of the structure, the effect of real rain is achieved, and due to its stationary placement, freedom of movement is ensured.
Many models are additionally equipped with a mode mixing function, using which you can create intricate configurations.
Models of shower heads with aeration
This type of watering can is a great option for residents of high-rise buildings. The principle of operation of the devices is quite simple: water seeps through microscopic holes located on the body, which at the same time mixes with oxygen at the time of passage. The number of such spray holes can reach more than two and a half hundred.
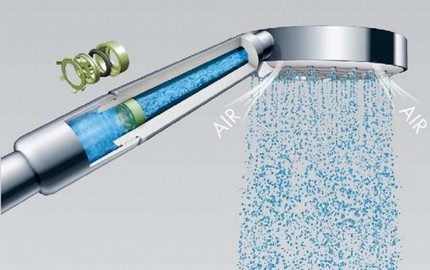
The water jet that has passed through several grids becomes lighter and softer at the exit, in some cases it may even have foam
The aerator built into the device performs several functions at once:
- partially purifies water from chlorine and impurities present in it;
- makes the jet smoother and more orderly;
- saturates the jet with oxygen;
- helps to save water consumption up to 30%.
Manufacturers claim that a watering can equipped with an aerator helps save up to 10 liters of water in one water procedure.

The air-saturated aerated jet allows you to give the real magic of SPA to ordinary water treatment.
Among the advantages of this type of device is the low noise level, since extraneous sounds are not created during the operation of plumbing. Such models are equipped with a wall mount. They can be fixed on racks and rods.
Watering can for hygienic shower
With proper preparation, even small children can use such devices, freely adjusting the water temperature that is comfortable for the hygiene procedure.
The device can be installed directly on the equipment itself or on the wall. A is connected through a faucet in the bidet or through a direct connection to the sink. To fix it to the wall, special holders are used.
Economical water saving options
Such models are equipped with a regulator built into the body, which, when the pressure in the water supply changes with the help of a valve, partially shuts off the water supply. In addition to the shutoff valve, the device can be equipped with an aerator function.
Thanks to the activation of the aerator and the use of the shut-off valve, it is possible to reduce the water supply, saving its consumption by up to 35%
Devices of this type often have three modes of operation:
- The first is the maximum, at which a tight jet is formed.
- The second is medium, which forms a soft pressure of water for a leisurely shower.
- The third is a "blizzard", which gives a minimum flow of water.
The water-saving nozzle that comes with the watering can is designed for a water consumption in the range of 6-9 liters.This means that the water consumption per minute will not exceed 9 liters, while the consumption of a standard watering can averages 15-20 l / min.

The “blizzard” mode of operation is most often used when performing hardening procedures and when taking a contrast shower
In more expensive models, a system is provided that is responsible for automatically increasing the water pressure when the pressure in the system drops. By installing a water-saving showerhead, you can solve two problems at once: get a stable water flow and provide enormous savings.
Conclusion
We hope that the above simple recommendations will help the reader in solving everyday problems. As usual, this article can become an additional source of information.
http://hydroguru.com
- this is an indispensable attribute of not only apartments, but also houses and cottages. Even in rural houses, people arrange a summer shower, which allows not only to wash, but also to cheer up and freshen up. The watering can on the shower allows you to soften the pressure of the water jet and get a massage effect. More pressure will give a tonic effect, and a weaker one will help you relax before going to bed. With frequent use of the shower, it is not uncommon for the watering can to become clogged or, on the contrary, begins to leak. In this case, the first thing that comes to mind is to change the spare part, but this is not always justified and it is not always possible to buy a new watering can. To solve this problem, information on how to disassemble and repair a new watering can is useful.
There are different designs of shower heads, but in general, the technology for disassembling the watering can look like this.
1.
Disassemble the shower head, starting with unscrewing the nozzle. Usually, all elements of this part are fastened with small bolts, so you need to use a screwdriver to unscrew them.2.
After unwinding the watering can, it is disassembled into elements and the nozzle with holes for water is cleaned - it is usually clogged with limescale, which interferes with the normal flow of water even with good pressure. Sometimes when disassembling low-quality products, a problem may arise, for example, The bolts are stuck and can't be unscrewed.
3.
That is why, when choosing equipment for the shower, it is important to choose reliable and trusted manufacturers. The best are products of German and Italian manufacturers.
4.
If the watering can needs to be disassembled only because of limescale, then you can resort to a simpler method. Water is poured into the pan, a teaspoon of citric acid is added there, brought to a boil and a watering can is lowered there - after a few minutes the limescale will quickly come off and all that remains is to rinse the part under running water.5.
There are also non-separable models of shower heads. If you try to disassemble such a product, it will simply break. Such watering cans are disassembled only for repair and before that it is necessary to study the attached instructions.6.
If the malfunction of the watering can is that it is leaking (water starts to spout not from special holes, but from the junctions with the hose or from under the nozzle itself), then in this case the situation can also be corrected. In this case, the watering can must be removed, dried well and put a rubber gasket in the leaking place, and then pour liquid glue there and wait until it dries.7.
If the cause of the malfunction is that the nozzles of the watering can are clogged with limescale, then these holes must be cleaned. You can use blowing or thin wire. But you need to act carefully, because the material has become brittle due to temperature changes and can easily break. The best option for cleaning is still wire.
The shower in today's accelerated world is the basis of human hygiene. For comfortable adoption of water procedures, the use of a watering can is required. But at present, a conventional shower, based on the distribution of water flow into several jets, is gradually becoming a thing of the past.Its place is occupied by multi-mode watering cans, the flow of water in which can be adjusted and modified to create comfortable conditions when washing.
The advantages of such devices:
- Multi-variant water supply: normal mode, massage, comfortable.
- Saving water, it is enough to choose the option with the minimum required supply.
- Ease of installation - connecting shower equipment with a switch is similar to connecting with a conventional one.