What causes a toilet cistern to leak and what to do
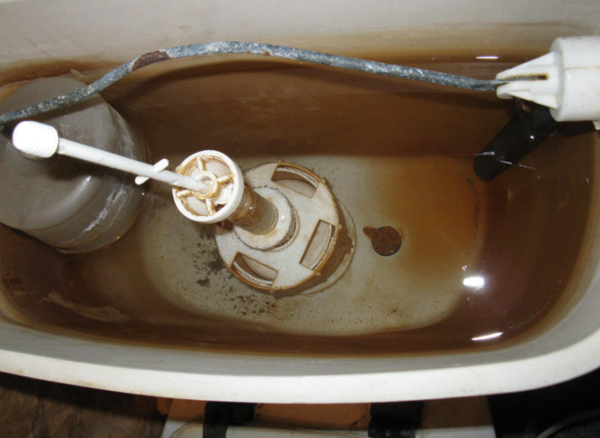
Do-it-yourself toilet repair work is possible, because the design device is quite simple. The toilet bowl scheme provides a bowl and a tank. But most often, breakdowns are observed in the tank.
The drain tank operates on the principle of a water seal. Its system includes levers, a seal and a float. After draining, the water enters the tank again and a shut-off valve is activated at a certain point.
Signs of a tank problem:
- Liquid constantly enters the tank;
- Water flows from the tank into the toilet;
- To flush the house, you need to press the flush button several times;
- The flush lever does not work at all;
- The toilet is leaking;
- Lots of noise when draining.
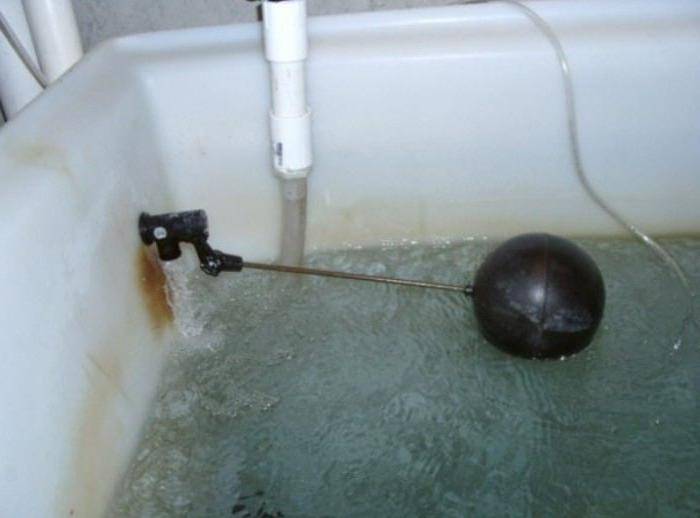
The main thing is to correctly determine the cause of the breakdown, and repair is not at all difficult. With a constant flow of liquid into the tank, the reason lies in the skew or displacement of the float. This breakdown is eliminated quite simply - you need to install the parts in the right place.
Shutting off the water supply is easy with a wrench. Often, inspecting the float helps to find out the causes of the leak. If the float is damaged, water flows into it and the element becomes heavier.
It is quite easy to repair a float. It is necessary to remove the element and pour out excess liquid from it. The chip should be repaired and reconnected to the system. But such a repair will last only the first time, then you will need to completely change the broken part. The resulting chips are sealed with heated polyethylene.
Causes of water leakage from the tank into the toilet
Tank defective:
- Overflow. The set of water should stop at a certain time (when the float is raised 2.5 cm below the pipe), but there are a number of reasons why this does not happen: the gasket in the tap is deformed; the gasket is poorly pressed; the pin is rusted or deteriorated; cracked valve inside the tank.
- The lever has moved out of place.
- Rusty steel bolt or cracked plastic bolt.
- Hardening of the pear rubber (when the rod is raised, the pear also rises; if the rubber hardens, the pear does not take the desired shape and sits incorrectly).
- If the plumbing is new, then leakage is possible due to improper assembly.
- Malfunction in the cuff (water flows between the tank and the bowl).
- Weak fastening of bolts and nuts (connection of the tank to the toilet shelf).
Also read our article, which will tell you in detail how to clean the rust in the toilet bowl. A malfunction of the drain bowl is a rare occurrence, the main reason for this can be called improper fastening of the toilet bowl to the floor or wall.
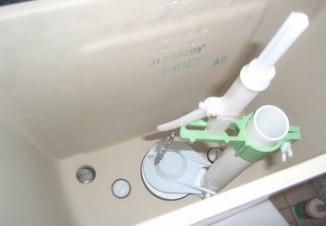
Components of a toilet bowl
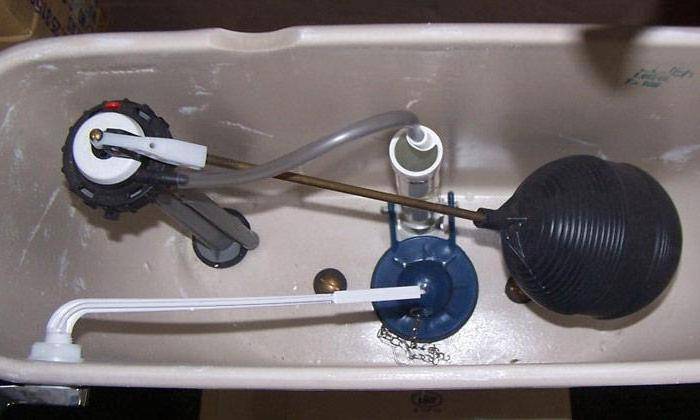
All tanks consist of almost the same elements. They differ only in the mechanism of descent of water. It can be represented by one or two buttons, as well as a lever. Important details of the tank are:
- Fill valve. It keeps the water at a certain level.
- Float. Closes the supply valve (when there is enough water).
- Drain mechanism. It is equipped with an overflow system.
- Overflow. It regulates the maximum water level.
The descent is made either manually or by buttons. At the same time, the drain valve opens, allowing water to pass through, and the float drops. The two-button tank has a more complex structure. However, it saves water due to the possibility of partial draining. Also today there are toilet bowls with a lower connection of communications. They are used when lateral connection is not possible.
The device and features of the tank
To repair a toilet tank, you need to have a very good idea of what elements it consists of and how it works. The market offers a wide variety of models. Let's consider the most common.
Designs of popular models
The most common types of toilet cisterns are designs combined with a bowl (compact) and suspended. The first are convenient in that during installation it is not necessary to mount a special exhaust pipe.
And secondly, a stronger pressure is created, due to which the toilet bowl is better cleaned.
The disadvantages of hanging cisterns include more noise when flushing, and additional elements complicate the design, which increases the risk of breakage.
However, in general, they are no less convenient and practical than fused with a bowl, so they are very common in modern apartments.
Now that aesthetics is becoming as important a criterion for choosing plumbing as convenience, many apartment owners have begun to install installations.
The drain tank of this model is mounted on the wall, and it becomes invisible. For flushing there is a special button on the panel.
Because of the hidden installation, such a design is a little more difficult to repair if something happens to it.
Triggers can also vary, and the convenience and durability of operation often depend on this.
For closed drain tanks, water release buttons are most often used, but there are designs with chains or levers that are installed for suspended models.
Mechanical triggers are designed so that the water drains as long as the button is pressed, while automatic triggers work even after a single short press. Breakdowns in the mechanisms of the first type are less common, but the difference is still not fundamental, because. Both types are pretty reliable.
As for the material, the most common models are ceramic and plastic, although in some apartments you can still find cast-iron rarities to this day.
Plastic and faience cisterns are very convenient, rarely burst. Usually the cause of their failure is mechanical damage or manufacturing defects.
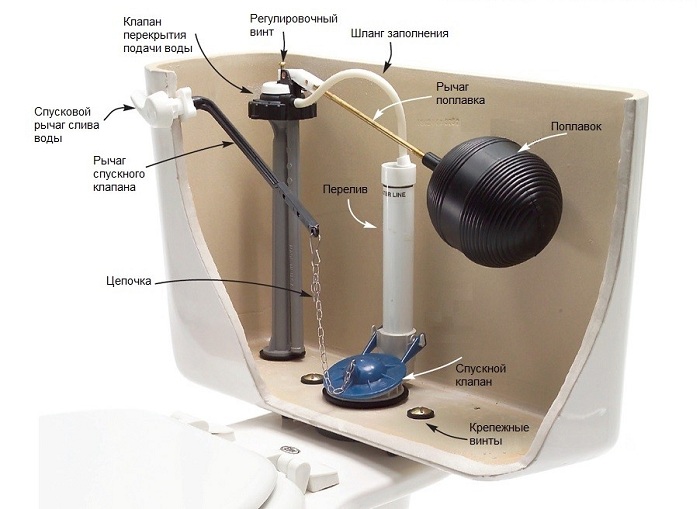
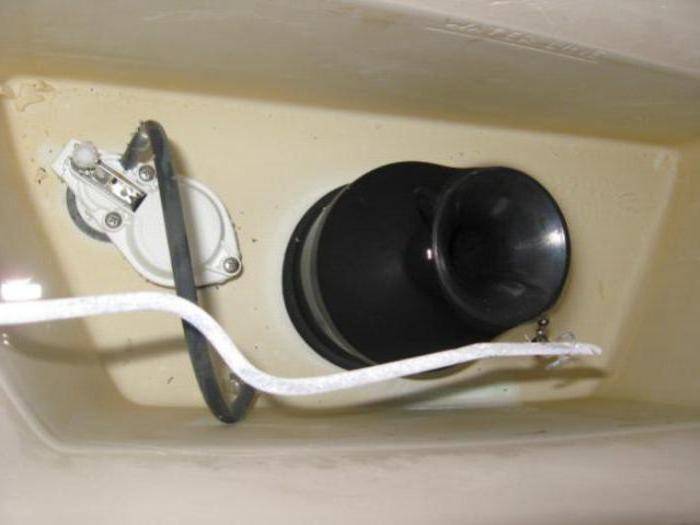
The main parts of the drain device
A drain tank of any design consists of a bowl, a filling valve, a drain and overflow mechanism. The bowl is a durable container in which water accumulates to flush the toilet.
It rarely fails, but if it does, the tank has to be replaced. Repair can only be a temporary measure until the owner chooses a new model. The valve is designed to regulate the water level in the drain tank. It is equipped with a special float that acts as an indicator of the amount of water.
The float is attached to the valve with a brass rod. In modern models, the valve is located at the very bottom of the drain bowl, and in obsolete models, on the side.
The drain and overflow system is a fitting with start buttons. Most often, the entire mechanism is made of plastic, it works when you press the water release button. The drain system is connected to the overflow mechanism to prevent water from spilling out of the bowl. The excess is drained into the sewer, and this process is regulated using a float valve.
The video shows a step-by-step diagram of disassembling the tank into separate parts:
The principle of operation of fused and wall models
The cisterns connected to the toilet bowl are activated when the trigger button is pressed and the water drains until the button is released.
When the drain valve is open, the overflow mechanism is closed.
When the water level drops to the minimum, the float valve opens and the valve closes. This is because the indicator float drops to the bottom of the bowl. When the tank is completely empty, and the float is at the bottom, water begins to fill the bowl. It enters the tank until the float rises to its original place. At this point, the valve shuts off the water supply.
Wall models work on a slightly different principle. The functions of the drain bowl are performed by a special siphon in the form of a corrugated tube. When the trigger is pressed, water flows out through the open part of the tube.
When the water level drops, the float valve opens and the tank begins to fill until the indicator float returns to its place. When the float rises, the float valve closes, preventing liquid from overflowing.
A detailed explanation of the design and principle of operation of the drain tank from a specialist:
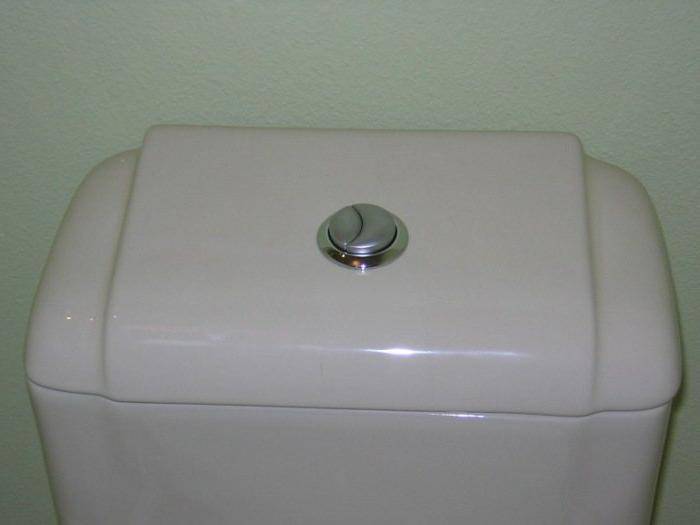
What to do if the toilet cistern with a button is leaking
First of all, check the position of the switch. After all, the button can sink in its shaft due to jamming of the stem or weakening of the return spring, as a result of which the drain cover will lock in the “open” position.
Button repair involves the following steps:
- Removing the cover.
- Removing the sticky switch.
- replacing the spring or the entire button.
- The centering of the seat - it should be located immediately under the hole in the cover.
- Reassembly - return to the place of the cover and button.
What to do if condensate flows from the tank?
This happens if very cold water flows into the container, and an excessive level of humidity is observed in the toilet room. But you can eliminate this problem by providing pipe heating or increasing the ventilation rate of the toilet room.
The latter way is more preferable, since it guarantees the elimination of perspiration on the outer walls of the tank without energy costs. After all, to increase the multiplicity, you need to expand the exhaust hole or mount a pressure unit there - a fan.
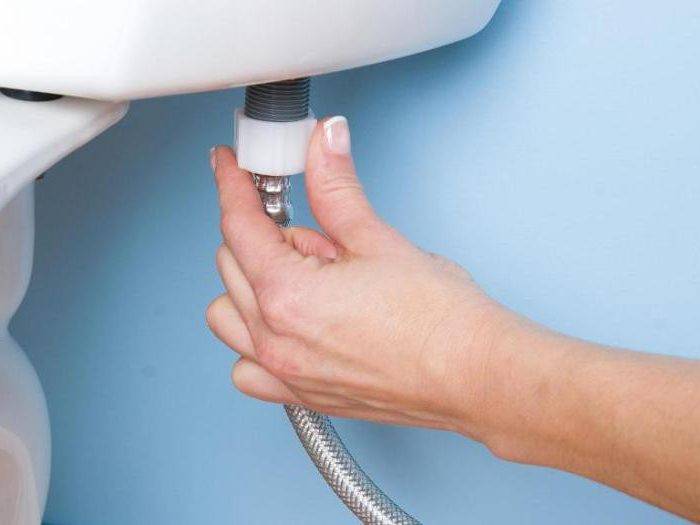
What to do if the junction of the tank with the water supply drips?
In this case, you will have to replace either the hose connecting the toilet to the water supply, or the float valve (faucet). After all, the cause of the drip may be a crack in the hose pipe or valve fitting.
However, before that, you should try to screw the nozzle onto the fitting as tightly as possible. After all, the cause of the leak can be an elementary depressurization of the joint. But do not overdo it, because in the process of intensively “winding” the nozzle onto the fitting, you can break the thread on the still intact part.
Draining problems
If, after pressing the drain button, the toilet bowl flows, then it is necessary to check the drain structure. This usually indicates a check valve problem. She is easily resolved. You need to grab it with your hand and press a little. It's most likely a tight fit.
It is important to replace the old gasket with a new one.
When the drain button is displaced, a gap is formed between the valve and the hole, resulting in a leak. We need to fix the design. It is necessary to return the button to the correct position and tighten the fasteners holding the tank. The toilet cistern flows when the outer nut holding the bottom is loose. In this case, the tightness is broken. This is eliminated by replacing the gasket or nut. With minor violations, you can use a regular sealant.
Water flows between the tank and the toilet what to do in this case
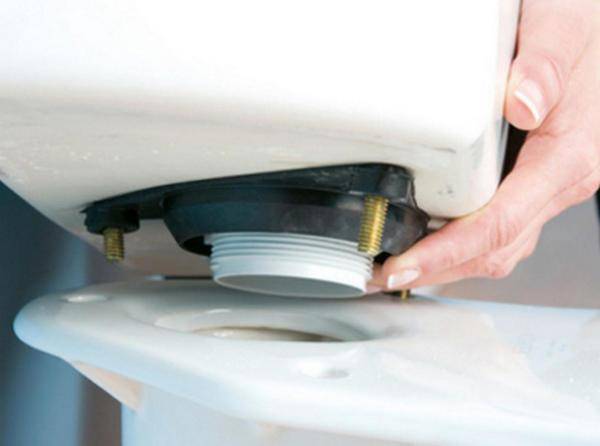
Leaks in the junction area of the tank with the toilet bowl occur due to depressurization of the joint due to deformation of the seal - a rubber gasket. Therefore, such a leak can only be eliminated by replacing the gasket located between the tank and the toilet shelf.
To do this, you will have to do the following:
- Turn off the water supply to the tank by shutting off the nearest water valve.
- Drain the water from the tank by sinking the lever, open the lid and remove the remaining water with a kitchen sponge.
- Loosen the nut on the drain - it is located under the drain valve hatch.
- Remove the screws holding the cistern to the toilet shelf.
- Remove the tank from the seat.
- Loosen the locknut holding the drain.
- Remove the drain from the tank.
- Replace gasket.
- Secure the drain assembly with locknuts.
- Place the tank on the shelf.
- Fix it with screws.
In addition, a leak between the cistern and the toilet bowl when draining can be caused by a rusted bolt that secures the container to the bowl, or a crumbled seal that seals the bolt hole.
Of course, in this case, you will have to replace both the bolt and its seal by doing the following manipulations:
- Turn off the water and drain the liquid from the tank.
- Unscrew the bolts and remove them from the mounting hole.
- Insert new bolts into the holes, after putting sealing washers on them, and tighten them by screwing on the nut protruding from the shelf.
The cost of laying is about 200 rubles.
The cost of a set of bolts is from 50 to 300 rubles.
The cost of replacing bolts and gaskets is 1200-1400 rubles.
In some cases, a leak between the shelf and the tank can be eliminated by simply tightening loose bolts. To do this, fix the nut on the outlet with a wrench and tighten the fasteners with a screwdriver.
However, be careful - sanitary ware is not as durable as it seems. One has only to squeeze the bolt a little, as a crack will appear in the bottom of the tank. Therefore, do not abuse this advice - it is better to change the gaskets.
Fastening the gasket between the tank and the toilet
Gasket is one of the most popular fasteners. The advantages of such a part are obvious: small size and reliability of fastening. But there is also a minus - a little pressure. To wash off the drains for the tank to work, you need a lot of water.
Types of gaskets:
- In the form of a guitar;
- round;
- Invoice.
The replacement is pretty fast. First, all communications are turned off. From the tank you will need to drain the water and disconnect from the bowl. To do this, simply unscrew the bolts.
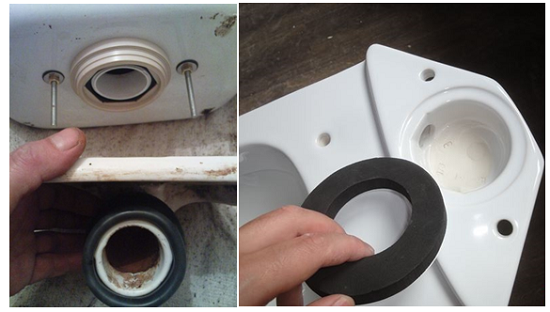
The rubber seal needs to be replaced. To increase sealing, use silicone sealant. You can apply a gasket or mount in a special hole.
There may also be a gasket between the bowl and the toilet. It all depends on the chosen toilet model. This element acts as a shock absorber. This minimizes possible damage between porcelain and faience.
Modern toilets come mostly without gaskets. From the tank to the bowl is a solid monolith. Using such a toilet is simple and convenient, but the cost of the device is quite high.
Plumbing device
An integral part of such plumbing is a drain tank. If problems arise with the toilet itself, it is hardly worth starting a conversation about repair, because if the bowl is leaking, sooner or later you will have to dispose of it, no matter how much plasticine you spend on it, but if the toilet bowl is leaking, then it is quite possible to repair .
The devices of such a device are approximately the same. Any plumbing drain tank with a button consists of the following basic elements:
- porcelain container;
- Liquid level regulator;
- Drain mechanism;
- Overflow.
We will not consider the principle of operation of the drain tank separately, but we will focus on possible malfunctions and how to fix them on our own. The most common operational problems are:
- Faulty button operation;
- The toilet bowl is leaking;
- Increased noise level during filling;
- Continuous water supply;
- Constant flow of water into the toilet;
- Untimely descent of water.
If you encounter one of the above problems, first of all, you need to find out the possible causes of the breakdown.
Main reasons
To understand why the toilet bowl is leaking, you need to open its lid and carefully examine the inside. Most often, water is drained through the overflow hole, which is associated with improper operation of the float valve. During operation, the rubber gasket hardens and cannot tightly cover the hole. Also, cracks sometimes form in the valve body. This is typical for plastic parts. If, under normal condition, the gasket is not pressed into place, then this may be due to unevenness of the lever, cracks in the float, destruction of the stud that holds the lever to the valve. Also, the problem will appear when the hole in which the pin is located is deformed.
How to fix a leak between the tank and the toilet
If there is a leak between the tank and the toilet, then the reason is the depressurization of the device. Most likely, the problem is the deformation of the seal, a special rubber gasket. To fix the problem, you will need to replace the gasket.
Gasket replacement steps:
- First, shut off the water supply;
- The liquid from the tank will need to be drained, possible residues are also removed;
- Under the descent hatch there is a drain nut, it should be loosened;
- Then you should remove the tank by unscrewing the corresponding nuts at the place of fastening;
- You will also need to unscrew the drain;
- Next, you need to replace the gasket;
- Then reinstall all parts in place.
But the old rusty bolt that holds the container to the bowl can also be the cause of the problem. Next, you need to replace the damaged part. Also, the water is first shut off and the water is drained. Bolts will need to be removed and replaced with new ones. Sealing washers are required.
Sometimes you can only tighten loose bolts. To do this, just fix the element with a key and turn it with a screwdriver. But you need to be careful not to ruin the ceramic bowl. That is why it is better to replace parts, and not constantly twist.
Leaks through overflow
Before fixing the problem, first check the valve and float. Most likely, there was a displacement or distortion of the lever. The reason may be the presence of liquid in the float. In this case, you need:
- Remove the float and drain the water from it.
- Let it dry and seal any cracks with epoxy.
- Put the float back.
When the toilet cistern flows due to the float valve, the following manipulations must be done:
- Empty the tank.
- Disconnect the fitting from the water supply.
- Remove lever and retaining nuts.
- Remove valve.
- Install the new part and secure it.
- Turn on the water supply and check the quality of the drain.
If there are problems with the siphon membrane, then it will have to be updated:
- Drain all water. Tie the float arm to any fixed part (bar, additional board).
- Remove the nut securing the tank and flush pipe.
- Loosen the nut at the bottom of the tank. Disconnect the siphon and pull it out.
- Install a new membrane and return all elements to their place.
How to fix a leak in the toilet bowl with a faulty shut-off valve
In this case, you can try to disassemble the drain valve and adjust the degree of pressure of the hatch to the drain pipe by sharpening the end of the latter. However, this recipe is associated with a lot of labor and does not always help.
Therefore, it is better not to even undertake repairs, but simply replace the entire drain assembly, proceeding as follows:
- We disconnect the toilet room from the water supply manifold or simply turn the central valve near the meter.
- Flush the water into the toilet, open the lid and remove the remaining liquid with a sponge, squeezing it directly into the toilet bowl.
- We unscrew the fixing screws, remove the tank from the shelf.
- We dismantle the sealing gasket, unscrew the lock nuts holding the drain assembly.
- We dismantle the old node and insert a new one, bought in advance, in its place.
- We fix the assembly with lock nuts from the new kit and mount a new gasket.
- We put the tank on the shelf, insert new or old bolts into the holes.
- We fix the tank on the toilet shelf.
- We connect the water and check the tightness of the new drain mechanism.
As you can see: the problem is solved by fairly simple manipulations with box or adjustable wrenches.
At the same time, the cost of a new drain mechanism ranges from 400 to 4000 rubles, and sometimes even more.
Work on replacing the drain mechanism will cost you 1600-1800 rubles.
What to do if the toilet is leaking from the bottom
If the tank is leaking from below, then the siphon membrane needs to be replaced. The same operation should be done if the water is not washed off for a long time.It is quite easy to complete this process.
Membrane replacement sequence:
- First, a crossbar is installed instead of a tank lid;
- A float is connected to the crossbar;
- All liquid should be drained from the tank;
- The nut that fastens the pipe to the tank will need to be unscrewed;
- The siphon nut is also loosened;
- Then the siphon is removed;
- After that, the membrane is removed and replaced;
- Then install all the extracted parts.
When the flush lever is not working, the thrust is repaired. The broken part is removed and replaced with a new one. For this, a homemade element from a wire is suitable. Over time, you can buy new traction.
But most often the tank passes water due to the wear of the gasket between the toilet bowl and the tank. There is a constant flow of water in the bowl, which reminds of itself with yellow spots. The worn element should be replaced with a new one. To begin with, they turn off the water and disconnect the flush tank from the toilet, then unfasten the drain. With this part, they go to a plumbing store and buy a similar one.
When the tank is leaking, you need to check the correct water level. To remove excess fluid, there is a special tube. It should be moved below.
Repair

What to do if a malfunction is found? First you need to inspect the float for faults. If the float lever is skewed, water will not linger in the tank (it will be recruited and immediately flow out). If distortions are found, open the lid and simply adjust the lever: install it horizontally, 2.5 cm lower from the pipe entry into the tank.
The float itself should be flat and empty. There should be no water inside. If water is found inside the float:
- Take it out and drain the water.
- Remove the hole through which water enters (heat the plastic or wrap the float with a plastic bag).
- Attach the float back and watch it (whether water is drawn inside).
Such measures are temporary. At the first opportunity, you should buy and install a new float.
Draining water after repeated actions with a lever or button indicates a malfunction of the siphon membrane.
We install the crossbar in place of the cover.
The float arm must be fixed to the crossbar.
Empty the tank completely.
The tank with the flush pipe is connected by a nut, it must be unscrewed.
Carefully loosen the siphon nut and remove it.
The defective membrane should be removed and a new one installed in its place (remember that they differ in diameter and size!)
Assemble all tank parts in reverse order.
In order not to interfere with a noisy set of water, you can make a special silencer:
- Prepare flexible or plastic tubing.
- It should be installed in the tank in a vertical position, relative to the level. It should be located next to the inlet to the float valve.
- Check that the lower end of the tube must be hidden by water.
If even the installed muffler does not save you from noise, this indicates the need to install a stabilizing float valve. Such a valve will regulate the level of water inflow. Valve installation mechanism:
- Empty the tank.
- Disconnect the float valve from the pipe.
- Release the float valve.
- Unscrew the nuts that fix the lever and remove the valve.
- Install and secure the new valve with fixing nuts.
- Reattach the float arm.
- Fill the tank with water and set the lever at a distance of 2.5 cm from the water pipe.
Leakage of water at the bottom (place of attachment to the toilet), indicates damage to the gasket. This seal is located in the place where the tank is attached to the toilet bowl. Replacing the gasket requires complete removal of the tank:
- Turn off the cold water tap and drain all the water from the tank.
- Remove the top cover and find two bolts on the bottom of the tank (the nuts are on the opposite side). Loosen the bolts and pull out.
- Remove the tank and remove the damaged gasket, replace it with a new one.
- Assemble the tank in reverse order.
If, after removing the tank, it turned out that the gasket was not damaged (and not pressed through), this may indicate a poor attachment of the tank to the toilet. After assembly, it is necessary to tighten the nuts on the bolts (on the back of the tank). If the problem persists, you may need to use a special clamp to fix it. When tightening the bolts, strong distortions and the application of large forces should be avoided.
When carrying out any repair of the drain tank, it is necessary to clean it from rust and remove dirt, dust in the places where the bolts and gaskets are attached. How to fix the tank is shown in the video:
How to fix internal leaks
Such leaks are called internal when the tank passes water into the toilet bowl. In this case, the floor remains dry, but water flows uncontrollably into the sewer.
Such a breakdown cannot cause a “flood” in the apartment, but it will affect utility bills. Although the water drips only a little, a fairly large volume can leak out during the day.
Overflow tube adjustment
Most often, the reservoir float is faulty: it does not completely close the drain hole. Sometimes it happens that the overflow pipe is incorrectly adjusted or the drain mechanism itself is damaged.
The easiest way is to check if the overflow tube is adjusted correctly. To do this, the tank is opened, and the tube is slightly raised. If water overflows into the tube, then the cause of the malfunction is in the float valve.
If not, you just need to adjust the float by slightly bending the lever.
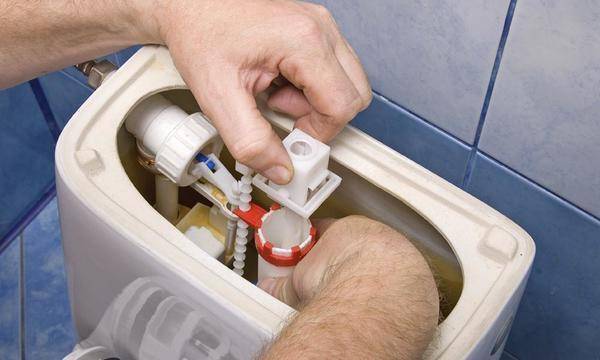
Minor repair of the drain mechanism
To repair the float, unscrew the plastic nut that secures the tank to the toilet. Here is a rubber part that is responsible for blocking the water.
It must be removed and thoroughly washed, removing all dirt from the place where it was. After that, the gum is installed again and the operation of the tank is checked.
If, after cleaning the gum, the toilet cistern no longer leaks, then the repair can be considered complete. If the water is still flowing, then the part will have to be replaced with a new one.
You can buy it at any hardware or hardware store.
How to replace the rubber, you can learn from the video instructions:
Valve problem - what to do?
Sometimes the toilet cistern leaks due to the fact that the drain valve does not completely shut off the water. This happens if debris gets into the tank or the device itself is broken. In the first case, it is enough to simply clean the container by removing dirt from under the gum.
If the usual cleaning did not help, you will have to change the valve rubber, because. it dries out over time and can no longer fit snugly to the drain. As a temporary measure, you can simply turn it over to the other side.
A broken valve needs to be replaced. How to do this is described in detail in the video:
Minor problems with the cistern
With plumbing fixtures, the most unexpected problems can arise. Some of them do not affect the comfort of operation, but cause minor troubles.
For example, the tank may simply make too much noise when filling and interfere with a night's sleep. If the toilet is noisy, you can put a muffler (flexible plastic tube) or a stabilizing float valve with a special chamber.
If you have already had to repair the tank, try to immediately think about how you want to improve its work, and perform all the necessary manipulations in one go.
Whatever the reasons why the toilet cistern was leaking water, after repair, it is imperative to properly adjust the operation of the float and overflow system.
This will help prevent future leaks.
Draining problems
If, after pressing the drain button, the toilet bowl flows, then it is necessary to check the drain structure. This usually indicates a check valve problem. She is easily resolved. You need to grab it with your hand and press a little. It's most likely a tight fit.
It is important to replace the old gasket with a new one.
When the drain button is displaced, a gap is formed between the valve and the hole, resulting in a leak. We need to fix the design. It is necessary to return the button to the correct position and tighten the fasteners holding the tank. The toilet cistern flows when the outer nut holding the bottom is loose. In this case, the tightness is broken. This is eliminated by replacing the gasket or nut. With minor violations, you can use a regular sealant.
Exhaust valve
Description
Water in the toilet leaks even with a partially filled tank. If you turn off the valve on the supply, after a while it is completely emptied.
Cause
Why is water flowing in the toilet in this case? The reason is obvious - the outlet valve does not hold water. The rubber seal or bulb is loose on the brass or plastic seat.
Solution
Start by cleaning the saddle of debris and deposits. This is easy to do with a regular sponge. If this operation did not help, the further depends on the design of the reinforcement.
Pear
Try to lightly press the bag to the saddle. Has the leak stopped? Then the simplest solution is to weight it with additional weights. Having shut off the water, unscrew the pear from the stem (they are connected by a regular, right-hand thread) and put a massive nut or coupling on the stem; then put the pear in place.
A more radical solution is to replace the pear with a new one.
When choosing a replacement, pay attention to its correct shape and elasticity.
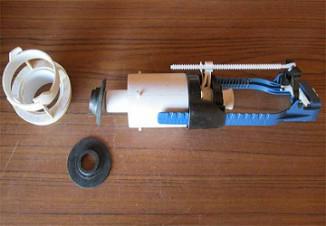
O-ring
If water is leaking from a toilet with modern plastic fittings, the O-ring will need to be replaced.
- Shut off the valve on the supply line.
- Turn the entire outlet valve with overflow counterclockwise and pull it towards you.
- Replace the gasket with a new one. The old gasket is removed, and the new one is put on with minimal effort.
- Replace the valve and turn it clockwise until secure.
Features of repairing toilet bowls with different flushing systems
In modern tanks, water can go down in different ways. Therefore, the repair of such toilets is slightly different. They understand quite simply. But the push-button system requires careful handling. Before disassembling the one-button toilet, it is necessary to turn off the water, drain its remnants, unscrew the plastic nut and remove the lid. The next steps depend on the type of failure. If the toilet bowl with the button is leaking, you need to draw some water into it, inspect the float and, if necessary, correct it.
One-button design problems:
- Water is not washed off when the button is pressed. This may be due to a broken mechanism between it and the drain valve. This part is usually replaced with copper wire or a new valve is installed.
- Flow through overflow. The height of the float and overflow is adjustable. To do this, the nut is unscrewed and the level of the part changes.
- Constant flow into the bowl. Most likely the gasket has failed. Therefore, the entire valve will have to be replaced. It is necessary to unscrew the nut at the bottom of the tank, remove it and install a new element.
Repairing a two-button toilet is practically no different from its one-button counterpart. If the water does not drain, then the integrity of the elements is checked (they are straightened or replaced with copper wire). Leaks can be caused by an incorrect position of the drain valve. In this case, the height of the float or overflow changes.
Tanks with a bottom water connection are equipped with a special membrane valve, problems with which may arise due to low water pressure. If it is constantly supplied at low pressure, it will be necessary to replace the diaphragm with a rod element. Quite often, the toilet bowl flows in the area of the inlet valve. He is constantly in the water. Therefore, insufficient tightness leads to breakdowns. Repair of a system with a lower connection is carried out in stages. First, turn off the water, remove the lid. Then they fix the problem according to the above algorithms.