We select a convenient design
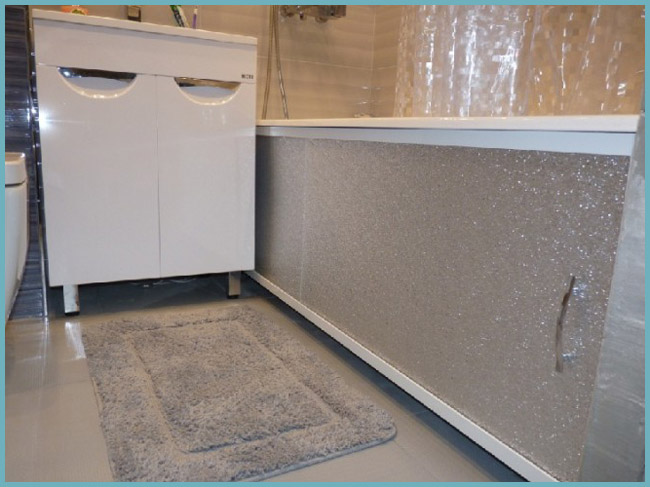
Screens consist of a frame (most often aluminum) and panels. They can be deaf or equipped with doors for access to communications and items stored under the bathroom.
There are also models with removable panels, they are usually installed under acrylic bathtubs.
The advantages of blind panels are high aesthetics and durability. A smooth surface can be decorated in any way or left plain.
It will look nice regardless of the presence or absence of additional decor. With no moving parts, these bath screens last much longer.
The disadvantages of deaf stationary structures include the inconvenience that occurs in the event of breakdowns in the plumbing system. To access it, you will have to remove the entire panel.
This takes a long time, which can cause problems if a leak has formed and water accumulates under the bath.
Designs with doors are more practical than deaf ones. The doors themselves can be hinged or sliding. Both options have their own advantages and disadvantages.
In most cases, bathroom owners opt for sliding models.
Swing doors open and close conveniently, providing access to the shelves with the necessary little things.
However, a screen with such doors should not be chosen for a small area bathroom. Open, they take up useful space and make it difficult to manipulate the elements of the plumbing system.
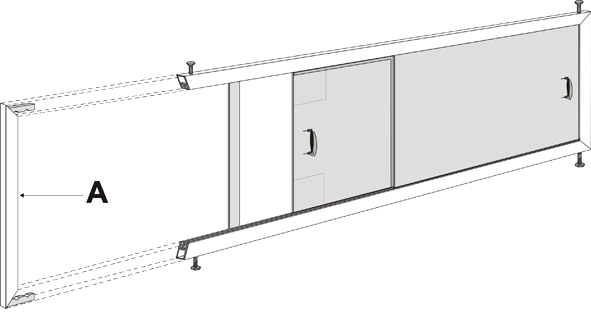
The doors of the sliding screens under the bathtub open by sliding along the rails
When buying such a system, special attention should be paid to the quality of the metal
The stronger it is, the longer the bath screen will last. It is better to give preference to steel or aluminum.
There are models with plastic frames. They are less reliable, but quite suitable for apartment owners who are not going to store frequently used items such as washcloths, towels, shampoos, hygiene products, household chemicals under the bathroom.
If the doors are needed only for access to communications, then you can buy a plastic system.
Preparatory work
A sliding screen under the bathroom, installed independently, is a multifunctional invention that provides the interior with attractiveness, the bathroom - additional protection, and comfortable storage of household chemicals for the owner of the bathroom. But such an element of the interior of the bathroom will be convenient in operation and durable only if its installation was carried out without errors and with high quality.
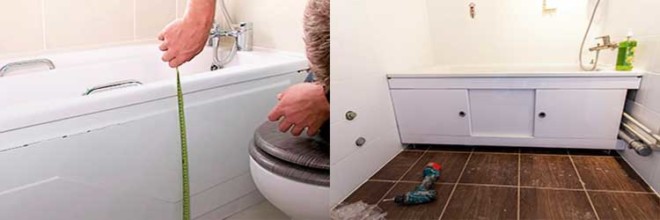
Installing a screen under the bath with your own hands begins with the acquisition of the screen itself. You can purchase a design that is designed for a standard rectangular bowl, or you can find a design for a curved bowl. It all depends on the bathroom itself, installed in your bathroom. Characteristics of models of sliding screens that are present in a wide range in the domestic plumbing market today are described in the table.
| Construction length, cm | Construction height, cm | Screen material | Number of bowl legs, pcs |
| 150 | 50 | Plastic (PVC) | 2 |
| 160 | 52 | Metal | 3 |
| 170 | 54 | Aluminum | 4 |
You can also make such a design yourself, but this will take more time and effort. Yes, and experience in such matters must be present, otherwise the result of the work may not be as good as it should be.
When all the tools and the screen itself are prepared, you can proceed to the preparatory work. Clear your bathroom of unnecessary interior items so that they do not act as an obstacle to comfortable work.
Do-it-yourself screen manufacturing and installation
Many of our compatriots are used to doing everything in the house on their own. This can be considered a peculiar feature of the national mentality, since the desire to personally participate in home improvement is associated with masculinity.
Such craftsmen can mount a screen under the bath with their own hands.
The video details how you can make a blank screen with a technical niche. Gypsum board was chosen as the material of the panel, finishing - facing tiles.
The range of screens for bathtubs is huge. In such a variety it is very easy to get lost. If you have difficulty choosing and installing the correct model, seek the advice of an experienced technician.
This is much more reliable than learning from your own mistakes.
Bathroom sliding screen options
When choosing materials for sliding screens, manufacturers start from their level of reliability, moisture resistance and safety.
The most simple and inexpensive is the construction of plastic and a durable aluminum frame. It will be very durable and will serve you for many years.
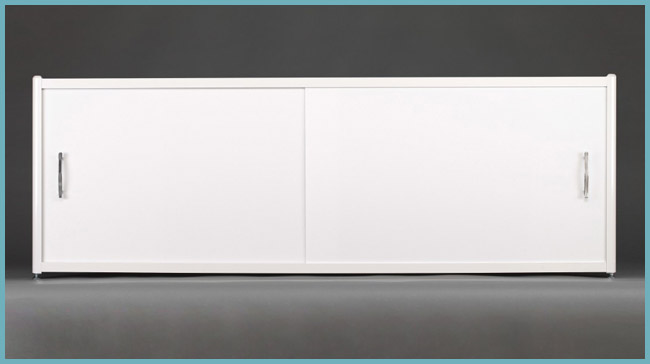 Sliding plastic screen
Sometimes these screens are made of glass. They are not only safe and high quality, but also incredibly beautiful. The frame is made of steel or aluminum. Often you can find sliding screens made of frosted or transparent glass, with various patterns, textures, patterns and even backlighting. They will be wonderfully combined with a glass sink and a mirror stand. The following illustrative photo will show you the bathroom glass sliding screen in all its glory.
 Bathtub glass screen
Screens are also made from such moisture-resistant and reliable material as MDF. They will look no less impressive, but will help you save some money.
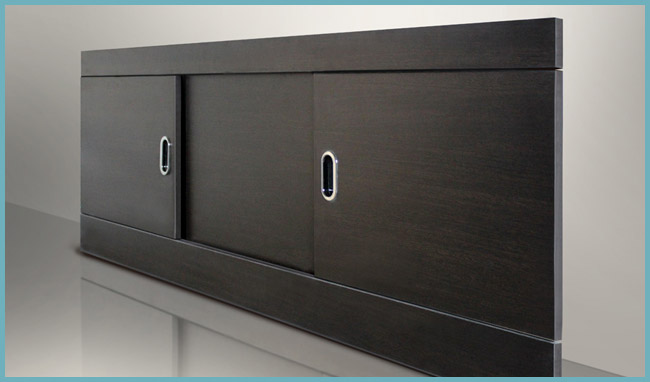 MDF sliding screen
Less commonly, mirrors are used as a material for sliding screen panels. They are less practical, but very decorative. In addition, they will help to visually expand the space of a small room.
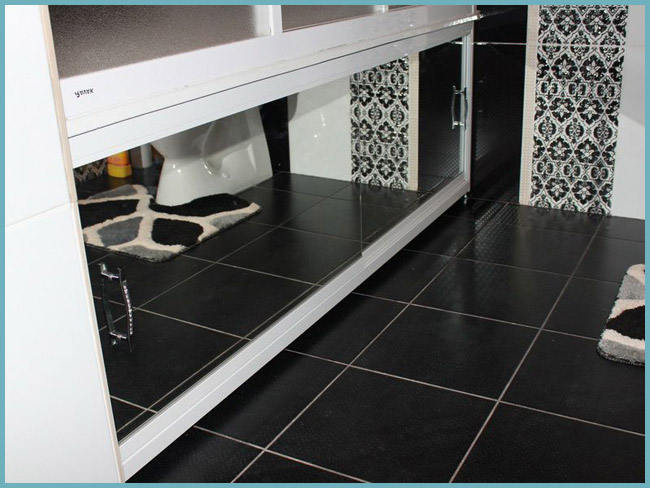 Mirror screen
Subtleties of screen selection
Before buying a bath screen, you need to think in advance which model is best suited. In this case, several criteria must be taken into account at once:
- functionality;
- price;
- durability;
- complexity of installation;
- appearance.
If the screen is needed only to close the unsightly view of communications, you should pay attention to simple removable models or stationary products with a hidden hatch. If the active use of free space under the bathroom is expected, the screen must have doors
The most convenient are products with sliding doors - this is a universal option for rooms of any size. Swing doors are convenient to use only in a spacious bathroom.
All fittings must be made of corrosion-resistant material, otherwise the screen will lose all its attractiveness very soon. It should be noted that plastic fittings wear out faster and are less durable, while parts made of galvanized steel retain their qualities throughout the entire period of operation. When buying, be sure to check the quality of fastening of all elements, the smoothness of the doors and the fit to the frame.
If the repair has not yet been completed, and the exact parameters of the screen cannot be calculated, you should purchase a model with the ability to adjust. Such products have a slightly higher cost, but there are no problems with installation and fitting. But it is best to choose a screen after finishing work is completed, when it is possible to accurately measure and choose the best option.
The decorative design of the screen should correspond as much as possible to the interior of the bathroom in terms of color and texture.In small rooms, mirror screens look very good: the reflective surface visually makes the room more spacious. Photo printing or drawing on the front panel must also correspond to the general style of the interior, otherwise it will not be possible to achieve a harmonious combination. For example, a floral print screen can be very pretty on its own, but it looks out of place in a nautical-themed bathroom. Here, the image of waves, marine life or pebbles on the beach is more suitable. If there are a lot of bright contrasting details in the room, it is better to choose a solid color screen, and vice versa, a model with a large color pattern is perfect for a bathroom in soothing colors.
Installing a purchased screen
When choosing a purchase model of a sliding screen, the following factors should be considered:
- the functionality of the purchased product;
- its cost and service life;
- complexity of installation and design.
In cases where the screen is intended only to hide communications laid under the bathroom, you can get by with the installation of stationary hinged or removable panels equipped with a hidden hatch. The most versatile and easy-to-use option is a screen product with sliding doors, the installation of which will be discussed later.
Necessary tools and spare parts
Before installing the screen under the bath, you should take care of preparing the tool, which must include:
- hacksaws for wood, plastic or metal, used to fit ready-made screen blanks;
- a drill with an impact function or a puncher, necessary for punching mounting holes in the walls;
- a hammer and a set of screwdrivers, as well as a marking set (chalk, twine, level).
In addition, to fix the frame elements, you will need special fasteners (sometimes it comes with the purchased product). After that, it is necessary to check the entire kit, which, in addition to panels, should include ready-made racks and aluminum rails. In addition, plastic plugs, a set of hardware, handles with fasteners and instructions for installing the product are usually attached to it. She should be guided in the process of installing a purchased screen.
Assembly (fixing parts)
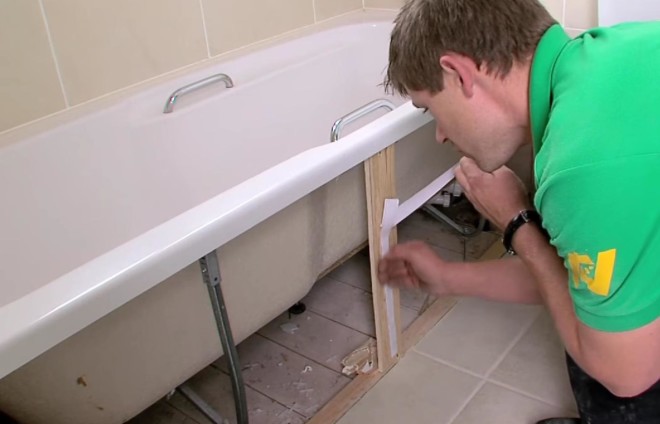
According to the attached instructions, the installation of the screen structure is carried out in stages.
First, both guides are laid on a flat plane so that their grooves are facing inward. After that, racks are placed on top and across them with simultaneous alignment of both mounting holes. Then, in these holes, the self-tapping screws applied to the kit are slightly baited, twisted so that the racks are fixed in the desired position.

Upon completion of fixing the frame, sliding doors are carefully inserted into the grooves of the profiles, after which the entire structure is adjusted in height, and then the hardware on the racks is fully tightened and the plugs are inserted into the ends. At the next stage of assembly, handles are screwed to the doors, and legs are inserted into the support posts and slightly screwed
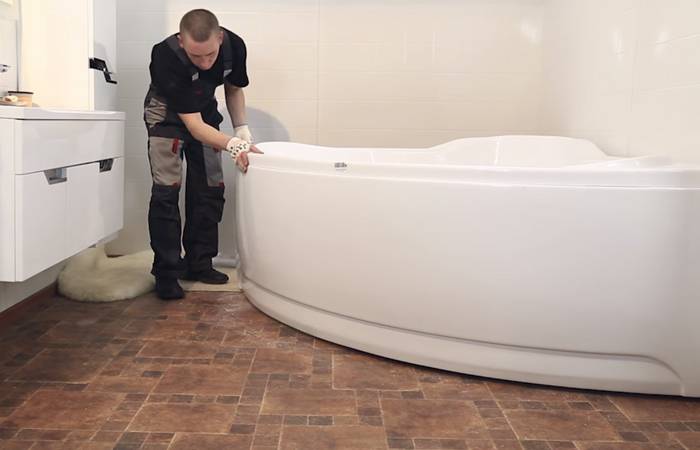
After that, you should raise the entire assembled structure and bring the upper cut under the side of the bath, aligning its edges vertically
At the next stage of assembly, handles are screwed to the doors, and legs are inserted into the support posts and slightly screwed. After that, you should raise the entire assembled structure and bring the upper cut under the side of the bath, aligning its edges vertically.
Upon completion of this operation, it remains only to unscrew the legs until they stop, after which the assembled fence should be securely fixed in place.
When assembling a structure with end walls, all these operations are repeated for each of the sides of the bath, after which all three elements are attached to the support posts using suitable hardware.
https://youtube.com/watch?v=u0M3t4gP2GA
Installation process
So, the screen is selected, all the necessary tools and materials for its installation are collected - you can safely proceed to the installation process. In order to get a high-quality result, it is necessary to strictly follow the simple algorithm recommended by experts:
- marking attachment points with a level;
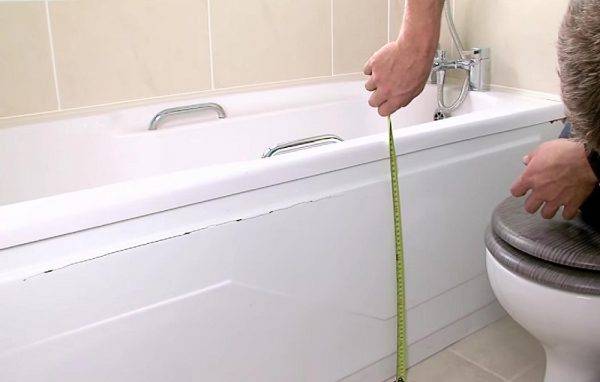
- taking necessary measurements;
-
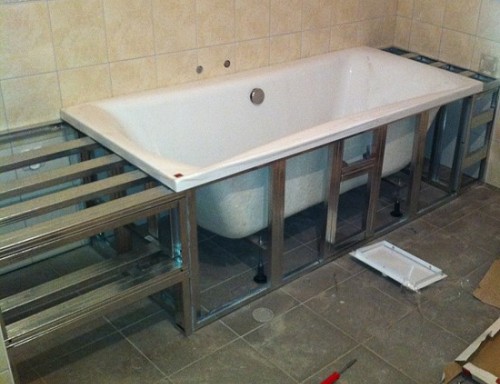
production of a screen frame from a metal profile
Metal profile frame
- fixing the frame elements, respectively, with the markup;
- cutting panels from a suitable material;
- fixing the panels on the frame;
- carrying out facing works.
Screen installation
The subtleties of installing frames
If you chose a drywall screen, then the frame in this case is made of a metal profile. It is worth remembering that the more complex the screen design is, the more time and effort it requires to install it. To install a screen with doors, it is necessary to mount a W-shaped profile on the frame. After that, two panels are cut out so that they slightly overlap each other. These will be sliding doors. The last step is to insert them into the profile and screw the doors.
If the door is hinged, then its installation, respectively, is done differently. It can be made with your own hands from acrylic material, plastic, drywall and a metal profile, and then fixed in the right place on special loops. In order for the screen to have the desired rigidity, use construction foam by placing it between the edge of the tub and the top of the frame.
It is easy to make sure that installing a screen under the bath is not difficult, all that is needed is to purchase the appropriate option and acquire the appropriate tool, and then strictly follow the instructions.
Screen installation
The side screen of acrylic bathtubs is often sold separately. For rectangular structures, the side part can be made independently, for example, from drywall, followed by tiling. In this case, the screen is set at an angle for the convenience of placing the legs in the process of doing some kind of work on the bathroom. For the same purposes, in its lower part, in the middle, an opening is left with a width of 200 - 300 mm and a height of 100 - 150 mm.
Such protection will be difficult to manufacture for corner products. Therefore, it is advisable to purchase a standard screen along with the bathroom. It comes with grips, stops and spring-loaded legs. This kit does not provide structural rigidity.
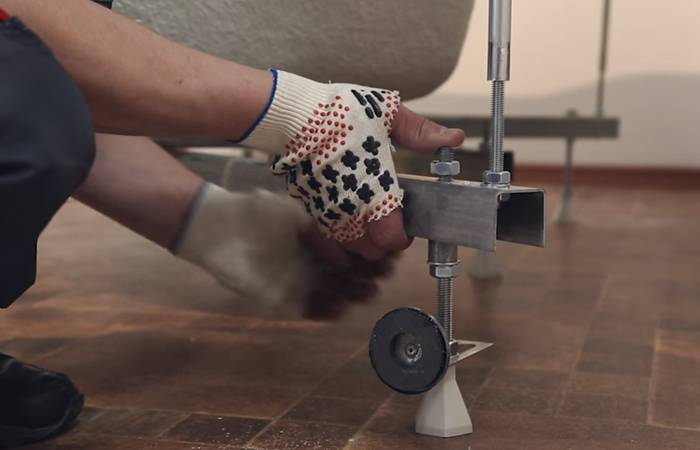
Consider one of the options for strengthening the screen
Attach metal grips and stops to the bathtub and the wall in such a way that, resting against the stops and grips, the screen is flush with the tub in an upright position.
Install the feet into the mounting holes of the side protection. Prepare a timber in the amount of 6 pcs. with a height corresponding to the height between the edges of the screen.
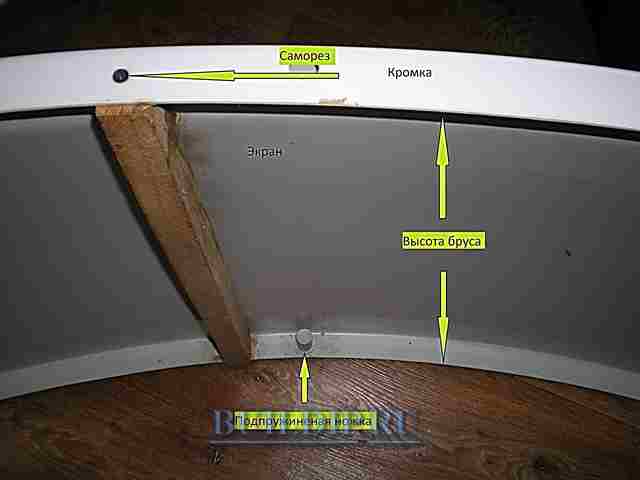
Photo of fixing the screen of an acrylic bath.
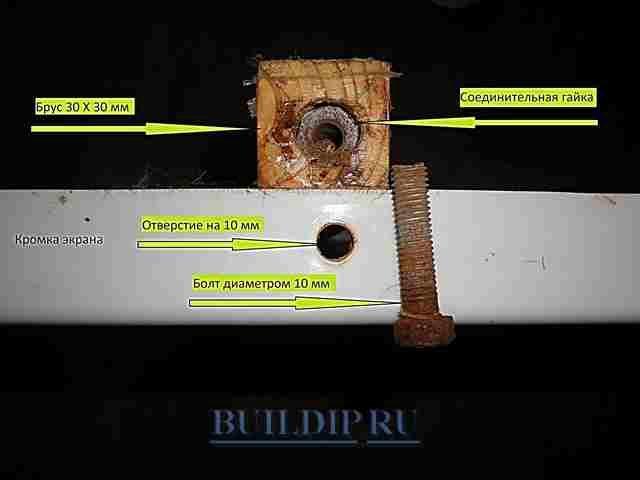
In the four prepared elements in the side, make a hole with a diameter of 14 mm and a depth equal to the height of the connecting nut. Since the nut must fit snugly into the wood, the hole should not be reamed.
Wooden products with nuts will serve as additional support legs, others serve as fittings.
Drive the connecting nuts into the beam. On the side parts of the protection, mark the holes for attaching wooden elements to the screen. The beam must be positioned in this way: without holes on the sides, and the other four parts should be evenly distributed over the protection, taking into account the existing legs.
In places where the board without connecting nuts will be placed, on both sides of the screen collar, make holes in the middle with a diameter of 4 mm and ream to place the screw head on the same level with the product.
At the installation points of the bar with nuts in the upper part of the protection, make holes of 4 mm with a countersink, and on the opposite side, a hole with a diameter of 10 mm.
Place wooden elements tightly in the screen and fix them with screws and bolts in accordance with the purpose. Install the protection in its place, spread it with bolts installed in the additional support legs, between the floor and the side of the bath.
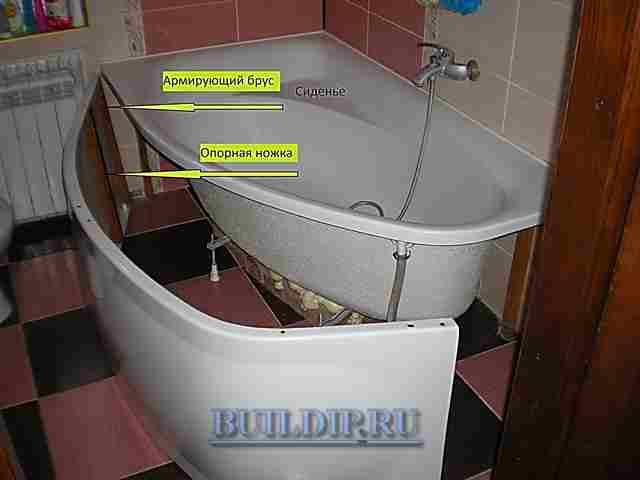
Photo of fixing a corner acrylic bathtub.
How to install a screen under the bath with your own hands analysis of installation technology
For those who decide to make a screen under the bath with their own hands, there are many options for solving this problem. Such structures perform a number of functions: they mask communications, improve the design of the bathroom, form a place to store household chemicals, etc. The home master has a great opportunity to implement creative ideas, because installing a screen under the bath is an exciting activity.
What screen options are popular today?
Screen design can be very different. You can make it:
- deaf;
- with sliding doors;
- with a hinged door (or two);
- with shelves;
- with pull-out block;
- removable, etc.
The bath screen looks stylish and makes the bathroom more functional.
Finding out how to install the screen under the bath, you need to choose the right model. The design is chosen depending on the characteristics of the room. For a spacious room, you can install a screen under the bathtub with shelves that are mounted on its front surface.
It is better to make such a design removable, because because of the shelves, access to the communications located under the bathroom can be somewhat difficult. The most functional screen under the bathroom for a small room is a device with sliding doors.
A blank screen is a very simple, but least practical option, since if it is necessary to repair communications, it will have to be completely dismantled.
An even easier way to hide the unsightly surface of the bathtub and the space below it is with curtains. An ordinary pipe is mounted under the side, on which a non-woven fabric of suitable sizes is suspended. Unfortunately, ease of execution is the only advantage of this option. Such a screen is short-lived and does not look very presentable.
The screen itself can be made of different materials, for example:
- plastic;
- drywall;
- thin sheet of painted metal;
- MDF;
- acrylic, etc.
Brickwork is a more time-consuming way to make a bathroom screen, but it's worth noting that it's one of the most reliable and durable options. Most often, after installation of the structure, it requires additional finishing. This provides excellent opportunities to improve the design of the bathroom.
For example, in a small room, it makes sense to install a mirror screen under the bath, which will visually expand the space. A stylish tile bath screen is a standard option for an all-tiled bathroom.
In a small room, a bathtub mirror screen is more than appropriate.
Mosaic is an excellent choice for finishing structures with a curved surface. A good tile adhesive will simplify the process and help make it as creative as possible.
Please note: When choosing the type of screen, you need to think about the possibility of getting close to the edge of the bath. To do this, you can leave a small gap below, only 50-70 mm
Another way to solve the problem is to make a small bevel on the vertical surface. This option is acceptable if the screen is lined with ceramic tiles.
Visually, the installation procedure for a drywall screen with a niche for legs is demonstrated in this video:
The procedure and features of mounting the screen
A general description of how to make a bath screen might look like this: 1. Mark the attachment points using a level.2. Make the necessary measurements.3. Make a screen frame from a metal profile.4. Fix the frame elements according to the markup.5. Cut panels from suitable material.6. Attach the panels to the frame.
7. Perform facing work.
How to install on corner models
For corner baths, most often, fastening is provided not with self-tapping screws, but with special magnets and metal plates. Such magnets are initially attached to the legs of the font.
STEP 1. Height adjustment. Just as in the case of a rectangular model, we adjust the height of the legs based on the screen parameters.
STEP 2. How to fix the plates? On the reverse side of the panel, in places where the magnets will abut, we glue the metal plates from the kit onto double-sided tape or silicone sealant. During drying, you can fix them with ordinary tape.
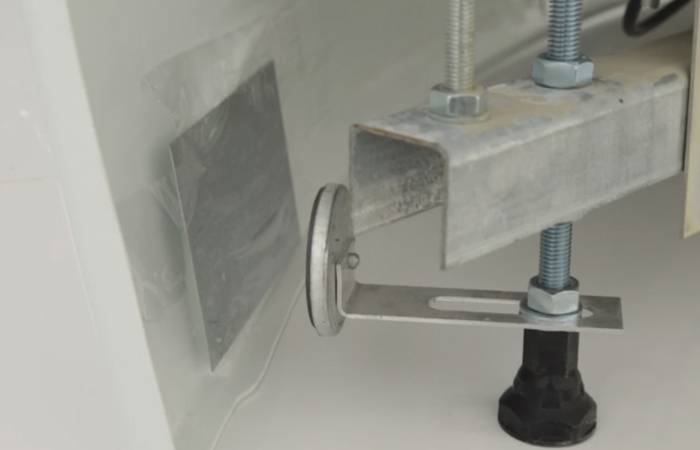
STEP 3. Installation. We attach the front panel and check that the magnets grab the metal plates.
This mounting option is convenient in that the question: how to remove the screen and then put it back on does not arise. Everything is extremely simple, you need to make a little effort, pulling the panel towards you, you can just as easily return it to its place. The previous method is not so simple, there you will first need to unscrew the screws.
What types of screens are there
Now you can buy screens for bathtubs of any design and made of any material. Manufacturers of decorative panels connect experienced designers to the design of models.
They develop original designs that can fit into even the most sophisticated interior.
For the manufacture of screens, plastic, metal, MDF, polystyrene, drywall, polyvinyl chloride, and acrylic are used. Patterns, plot pictures (photo printing), decorative elements can be applied to the surface of the product.
Often there are models of combined materials.
Glass and mirror screens look very original. They are used not only for their intended purpose, but also for modeling the space of bathrooms.
For such panels, not ordinary glass is used, but organic glass, because. it better resists mechanical damage and shock.
When choosing a material, you should pay attention to its strength, resistance to moisture and high temperatures. A quality model can last for decades.
Good performance implies a higher price for the design, but this is the case when the investment is fully justified.
Types of screens by structure
Screens, as a rule, come in two standard sizes in length: 1.5 m and 1.7 m. Height can be 506, 550 or 560 mm. The height is adjustable with legs.
Screens in their structure can be as follows:
- Ordinary screens - plastic panels enclosed in a frame with certain dimensions;
- Universal screens - plastic panels are enclosed in an aluminum frame, which can be reduced in length. This allows you to install the screen where the sewer pipes pass;
- Screens without end frames;
- End screens - cover the end of the bathroom.
These screens are not expensive. You can buy, or you can make a sliding screen under the bath with your own hands. As a frame (frame), you can use plastic guides, which are attached with liquid nails.
Plastic panels are inserted into these guides.
Advice!
To stiffen the screen, it is better to take three panels.
The screen is ready. All components can be purchased at the nearest construction supermarket or on the market.
We make a frame for the screen with our own hands
I offer another option for making a screen with your own hands:
Again, we make a frame for the screen from the ceiling profile. We fix the profile under the side of the bathroom with the help of wooden bars, which are installed vertically along the height of the bathroom. The bars need to be lined between the floor and the bathroom.
Then we fasten the profile to the wall, also with the help of wooden bars on self-tapping screws.
The frame is ready.
Now you need to glue the plastic guides into this profile. And already insert the content of the screen into them.It can be plastic, plexiglass, gypsum panels, vinyl lining. In general, everything that is at hand.
We take two panels and cut them to fit the screen. Insert into guides.
Note!
For the convenience of opening the screen, you can stick handles on both panels.
Screen types
The screen consists of a solid frame and a panel attached to it. The frame is made of aluminum or steel, in budget models - of a solid polymer. The range of these products is very wide, especially in terms of decorative design. There are monophonic models, with photo printing, various textures and shapes.
By design, the screens are:
- sliding;
- removable;
- deaf stationary;
- with hinged and hinged doors;
- with shelves;
- with technological hatch.
The screen canvas can be either solid or lattice. The second option improves air exchange, which eliminates the appearance of mold and unpleasant odors from under the bath.
Most of the factory models are equipped with adjustable legs, and the gap formed between the floor and the bottom edge of the screen allows you to comfortably stand close to the bath. The standard length of products is 1.5-1.7 m, height - from 50 to 60 cm, but other sizes are also very widely represented.
For the manufacture of screens, materials with increased water resistance are used - plastic, organic glass, MDF and moisture-resistant drywall. Each type of screen has certain pros and cons that affect the choice of model.
| Screen view according to the material of manufacture | pros | Minuses |
|---|---|---|
| Affordable price, a huge variety of textures and colors, ease of installation. The plastic screen is easily cleaned of soap deposits and other contaminants, does not deform, and retains an attractive appearance for a long time. | Low mechanical strength, poor resistance to chemicals and abrasives | |
| Plexiglas screen always looks very unusual and impressive. There are options in matte and mirror versions, with a corrugated surface, painting and other decor. The material is strong, durable, highly resistant to abrasion and detergents | Large weight, high cost, more complex installation compared to plastic screens | |
| Relatively low price, large selection of colors, easy installation. Such screens are easily cleaned from dirt, do not require special care, and are suitable for any interior. | Limited sizes, short service life, prone to warping | |
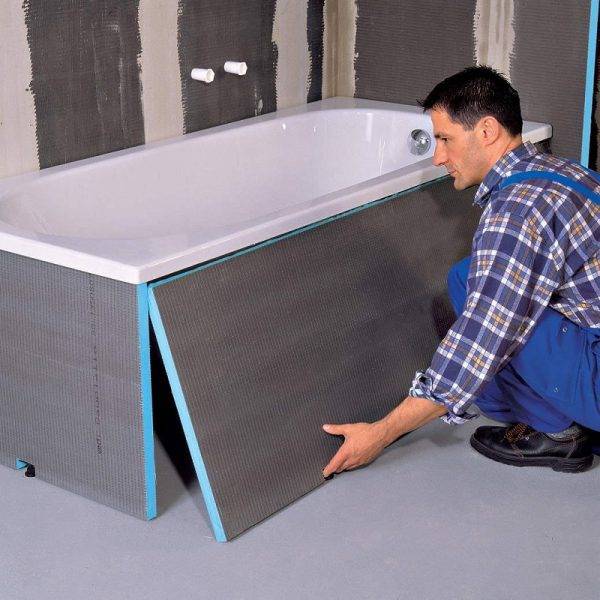
| The most popular option for homemade screens. Drywall can be easily adjusted to any size and shape of plumbing, is lightweight, has a long service life | The installation process takes longer, the screen requires mandatory decoration with decorative materials |
Installing most screens requires the construction of a frame around the perimeter of the bath. The frame is usually assembled from aluminum profiles, less often from wooden bars.
For lightweight plastic screens, such a frame is not needed, since the product is attached to the side of the bath. Sometimes the space under the bathroom is covered with brickwork, which is faced with tiles or mosaics. It is recommended to make an emergency hatch in the masonry in case of repair of communications, so that you do not have to break everything. Such a screen looks good and is highly reliable, but it requires more time and effort to install, excludes the possibility of rational use of free space under the bathroom.
Screen from lining
Clapboard is a strong and durable material, so it is often used to install a screen under the bathroom. It will provide maximum protection for communications and at the same time make the room more attractive in appearance.
In stores you can find two types of lining, suitable for installation on a bath:
- plastic;
- wooden.
Lining made of natural wood must be pre-treated with a special water-repellent composition. If this is not done, then the wooden screen installed under the bathtub will quickly become unusable due to the humid climate of the room - or, even worse, it can lead to the spread of mold or fungus.

Plastic lining in this respect is more convenient. It is not afraid of moisture, and in all respects it is in no way inferior to wood. The method of mounting any lining is practically no different from the option with plastic panels. The starting frame must also be prefabricated. Wooden rails can be used instead of metal ones, but it is not recommended - this material is not very suitable for the humid climate of the bathroom. Self-tapping screws are used to secure the sheets.