Independent creation of a deflector
The cost of this device starts from 1000 rubles, the upper mark is much higher. The feasibility of self-manufacturing and installation is not worth explaining.
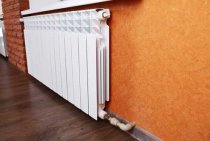
A chimney convector is a good alternative to radiator heaters. It has a lot of advantages and has a simple device. It is not difficult to do it yourself.
Do-it-yourself chimney deflector is preferably assembled from galvanized steel. But she, recently, found a replacement in the form of metal, which is covered with a protective polymer layer or simple enamel. In cases where the chimney does not come into contact with hot streams of combustion products, it can be made of plastic (Read the article about in addition to this material
).
Video: instructions for creating a do-it-yourself chimney deflector
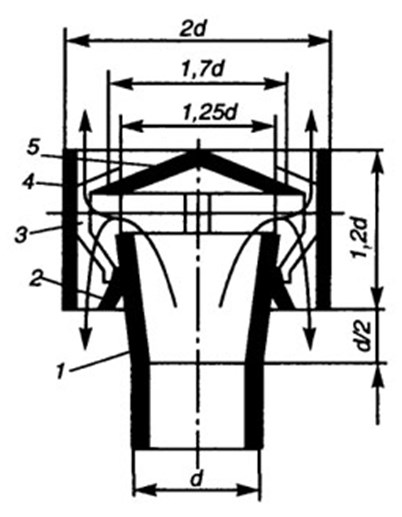
Before proceeding with the creation of the deflector, it is necessary to make a drawing on which all dimensions of the future product will be applied. When choosing a size, you should start from the diameter of the chimney pipe. This value will determine the height of the chimney itself and the width of the diffuser. There is a table with standard ratios of the dimensions of the chimney and deflector:
To make a do-it-yourself chimney deflector, drawings are best done in full size. Scale confusion can significantly delay the manufacturing process.
Necessary tools that will be required for work:
- Drawing set. Measuring tape, marker, ruler.
- Metal shears, wooden hammer, rivet device.
- Drill and drills of various diameters.
Stages of work
First you need to choose the type of metal for the manufacture of the deflector. After that, after completing the calculations and making sure that they are correct, you can begin to cut out the details of the chimney from metal. The reamer of the diffuser body must be rolled up in the shape of a plate, then, through the drilled holes, fasten the ends with rivets.
The upper and lower cones are riveted, after which fasteners are installed on the lower cone to connect the device to the chimney pipe. We encourage you to learn more on our website.
To install the chimney on the gas duct, it is better to remove its upper module. Using a workbench, the structure is mounted, then installed in place.
Material for making a fungus for a ventilation pipe
To make the fixture more attractive, it can be painted to match the color of the roof covering. Since black steel products look unattractive, it is customary to decorate them with forged elements. Unfortunately, steel models have a significant drawback - their high weight, so this option is not suitable for all roofs.
On sale you can find fungi made of copper and alloy steel, which are durable, but at the same time have a high cost. Therefore, the choice of material from which this product is made largely depends on the financial capabilities of the owner of the house. You can purchase a ready-made pipe fixture on the market or do it yourself, which is quite within the power of home craftsmen.
How to make a fungus on a pipe with your own hands
Making a chimney cap yourself is not an easy task. If you do not have much experience in this area, you can first transfer the drawing to a sheet of cardboard, cut it out and think about ways to connect and fasten it. After the picture becomes more or less clear, you can cut out the parts from the metal and start assembling
It is very important to measure the chimney accurately and strictly adhere to the measured values during manufacture.
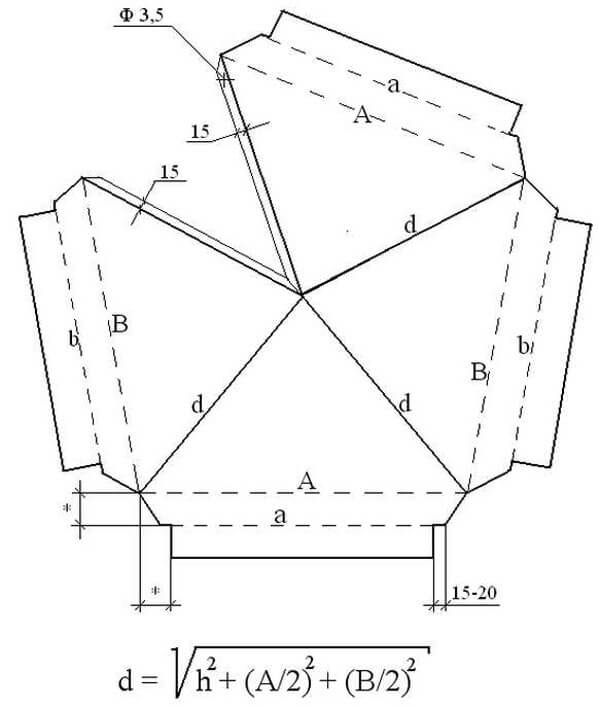
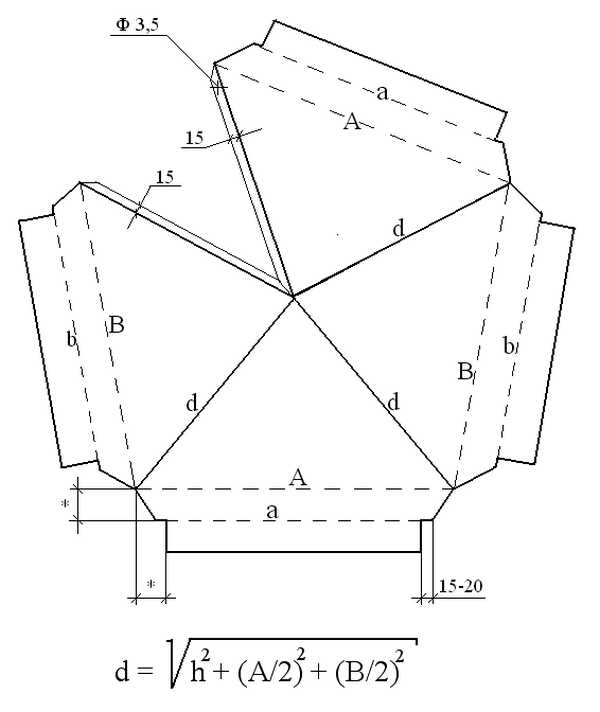
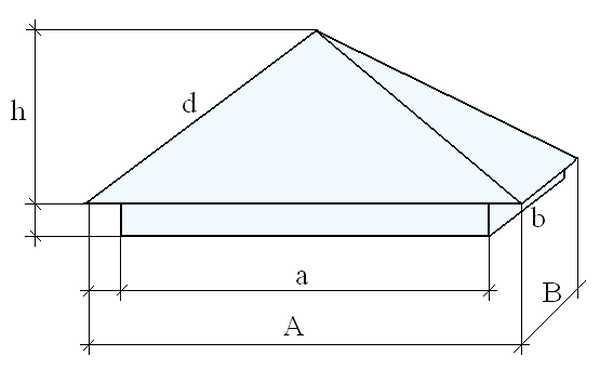
Here is one of the drawings of a chimney in the form of a small pitched roof. The angle is determined by the formula, which is indicated on the first sheet.
Chimney cap drawing
Chimney cap drawing
The procedure is as follows:
- Put the metal blank on the table face up, in the place indicated on the drawing, drill a hole with a diameter of 3.5 mm.
- Bend the part along all dotted lines by 90 o. For this, it is better to use a sheet bender. Then the lines will be clear, without dents. If there is no such device, you will have to use improvised means: fix a piece of the corner on the workbench with the shelf up. To be able to bend the entire (or almost entire) line at once, you can use a bar.
- Bend the part along the lines "d". The angle is determined experimentally: you should get a solid cap. The design should be even, without distortions (put it on the table to check). If everything “converged”, mark a point on the lower stiffener with a marker through the drilled hole, mark the future hole, then drill.
- Connect the cap and fix with a 3.2mm rivet.
- On the lines "a" and "b" bend everything so that you can install the legs.
- On the outer perimeter of the pipe, make the base of the cap from the corners. Position the corners so that one edge rests on the masonry, and the second is on the side. Prepare the "legs" for the cap. Everything is connected by welding.
- The finished base must be cleaned, coated with an anti-corrosion compound, then painted in several layers with exterior paint.
- Connect the cap to the base.
If making a square chimney seems difficult to you, maybe this option will be easier. Its implementation will be quite simple if you have a piece of bent sheet metal of the right size. If there is a regular sheet, you can bend it on a special device (usually tinsmiths have it).
Do-it-yourself chimney
The order of work is as follows: prepare the base of the cap from the corner according to the results of measurements of your chimney. Position the corner so that the structure holds well: one rib rests on the edge of the chimney, the other covers it from the outside. Make the legs that will support the cap and connect it to the base. Make them strong enough so that they can withstand wind loads and withstand snow masses. Treat all parts with an anti-corrosion compound and paint. Assemble the structure into a single whole. The collection method depends on the material.
Here is an example of how to make a deflector for a metal pipe. The author of this video has it installed on a basement ventilation pipe, although a similar design can be used on a metal pipe from a solid fuel boiler.
In this video, the manufacture of a conventional umbrella for a pipe.
You are always welcome)) And how to fix the cap depends on the material of the pipe. Judging by the fact that the scan is only for square or rectangular, you have a brick pipe. If so, you can fasten the weather vane to the dowels, but more often. And not in a seam, but only in a brick. If the winds are strong, you can make the lower part, which will be put on the pipe, wide and beat the fasteners not in one row, but in a checkerboard pattern: from top to bottom. If you did not guess with the material - unsubscribe.
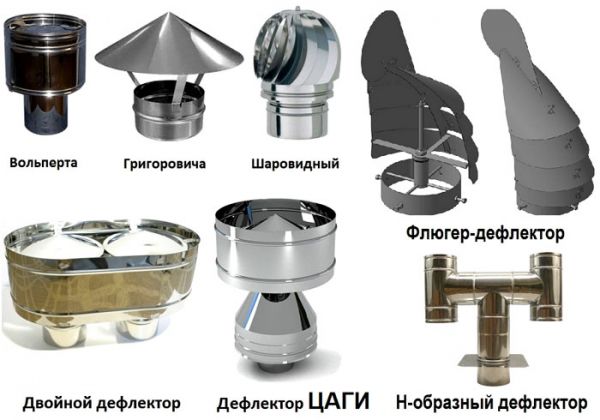
Types of caps for the chimney
The shape of the chimney must correspond to the cross section of the pipe.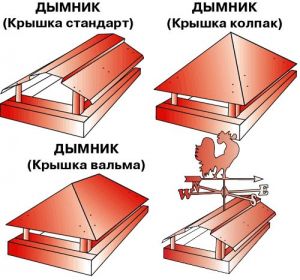
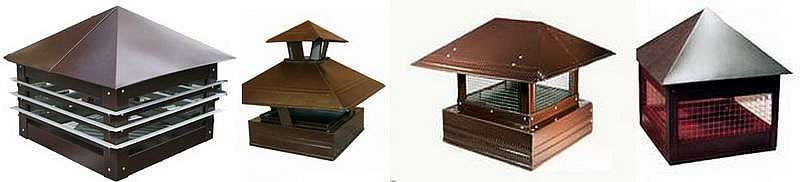
Thus, chimney caps can be:
- round;
- square;
- rectangular.
The main options for chimney designs:
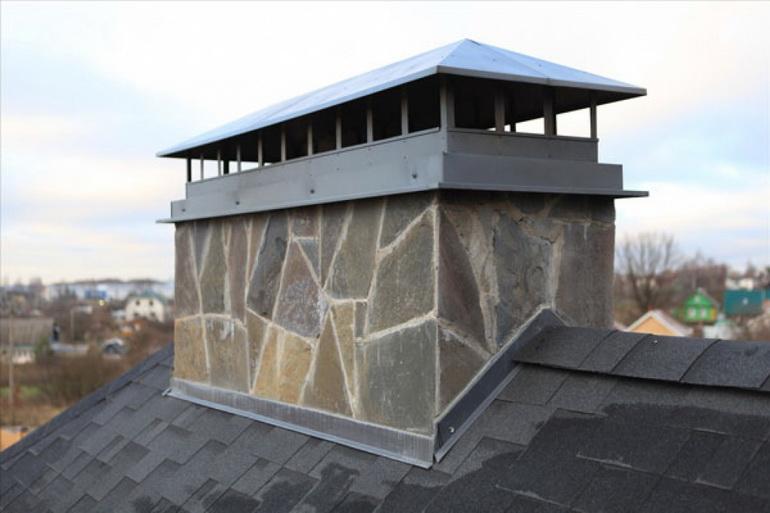
- cap-house with a hipped roof;
- house with a gable roof;
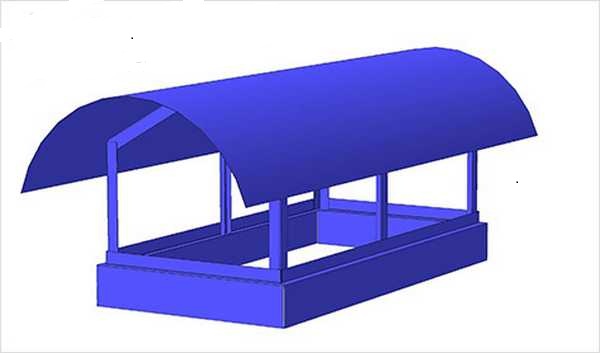
- chimney with a semicircular roof;
- a cap with a cone-shaped umbrella;
- with a flat umbrella.
Chimneys can be equipped with additional elements:
- spark arrester;
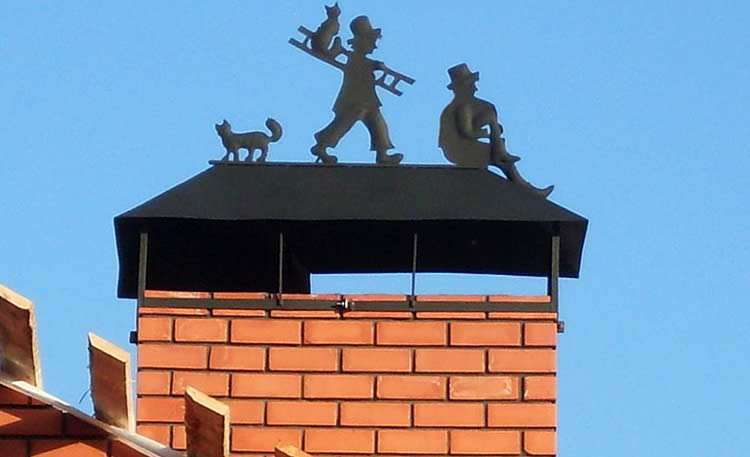
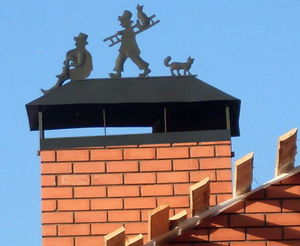
- forged ornament;
- weathervane and so on.
If the spark arrester is a purely functional element, then openwork forging is necessary to give the cap an original and attractive look. It also serves as a protection against debris and birds, but a regular grill will cope with these tasks. The weather vane not only shows the direction of the wind and acts as a decoration - thanks to its presence, the draft in the pipe increases.
Manufacturing materials
For the manufacture of chimney caps are used:
- sheet galvanized steel;
- stainless steel;
- copper.
Pipe heads made of galvanized steel are well tolerated by aggressive environmental influences, they are practical and do not lose their color under the sun's rays for a long time. They can be additionally covered with a colored polymeric material (polyester).
On sale you can find such caps of any color, this allows you to choose a shade that will be in harmony with the color of the pipe and roof. Stainless steel is a higher class material, products made from it will be more durable.
Copper is the most durable material for a chimney cap. If properly installed, such a chimney will last more than a hundred years. Copper caps are well combined with gutters and other elements made of this metal, as well as with a roof made of natural tiles.
Over time, the head made of this metal will not only not lose its appearance - on the contrary, it will be covered with a noble patina.
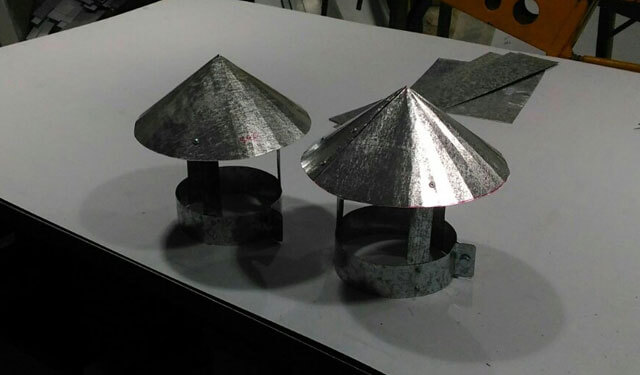
Self-made fungus for the pipe
First of all, you should prepare consumables and tools, including:
- wooden or rubber mallet;
- metal sheet 10 mm thick;
- marker;
- scissors for metal work;
- ruler;
- metal corner 50 mm wide and 1 meter long;
- a pair of gloves.
Before starting work, you need to make a drawing on a sheet of cardboard and try on the workpiece.
The sequence of actions in the manufacture of a fungus on a ventilation pipe will be as follows:
- A rectangle of a certain size is measured on a metal sheet and cut off.
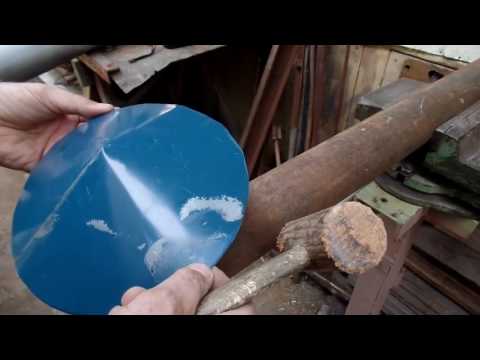
- To make a blank for a round lid with a cut edge, you need to cut a circle from a rectangle and cut off a 45 degree corner to the center.
- The edges of the plate are bent with a mallet.
- The workpiece is given a bend of a sloping shape. To do this, you can use the corner of the desktop or the surface of the iron corner.
- The workpiece is connected along the fold lines and processed with a mallet.
- To eliminate shape errors, it is necessary to walk the workpiece on a flat surface. Now the hat is ready.
- For the base, you also need to cut a rectangle. To know its length, take measurements from the pipe and add a few spare centimeters. The ends of the workpiece are processed with a mallet. Give the plate a cylindrical shape and connect the ends.
- From the remnants of a metal sheet, 3 - 4 legs are made, folding the segments in half. Holes are drilled at their ends, then the legs are bent from below.
- Holes are drilled in the cap at regular intervals and the legs are attached with rivets.
- Try on the cap to the base and use a marker to mark the places for rivets. Having drilled holes, fasten the design of the fungus with rivets.
Before proceeding with the final assembly, it is necessary to make sure that the cap is even by placing the cone on the most even surface. Before painting the product, before connecting the elements, the workpiece is cleaned, primed, coated with an anti-corrosion agent. The coloring composition for outdoor work is applied in 2 - 3 layers.
DIY manufacturing
Before you make a fungus on a pipe with your own hands, you need to choose a model. For novice craftsmen, standard cap schemes are recommended.
The work will require:
- sheets of steel;
- scissors for working with metal raw materials;
- ruler or measuring tape;
- sheet benders;
- markers;
- sheets of cardboard;
- welding tool, etc.
The protective fungus is mounted in several stages:
- measurements;
- drawing up a product drawing;
- transferring data to a metal sheet;
- creation of blanks;
- assembly.
Work begins with measuring the dimensions of the chimney and developing drawings of structural elements on a sheet of cardboard or thick paper. Up to 5 mm must be added to the standard dimensions for comfortable placement of the product on the pipe.
After checking the accuracy of the measurements, the data is transferred to the material, the lines are marked with a marker. Metal scissors cut blanks for the product.
Elements are placed on a flat surface. The sheet bender sequentially forms the lines marked on the canvas, up to the angle required by the design (average 90 °). At the connection points, 3 openings are made at a distance of about 15 cm. The elements are fixed with rivets.
Brackets are made from metal sheets. Elements are welded to the umbrella and apron. The joints are treated with a primer for metal.
At the end, the cap is covered with an anti-corrosion compound and paint in 1-2 layers. The design is dried for 1.5-2 hours and attached to the base of the pipe.
Master class from the Country master how to make a cap for a chimney
 Watch this video on YouTube
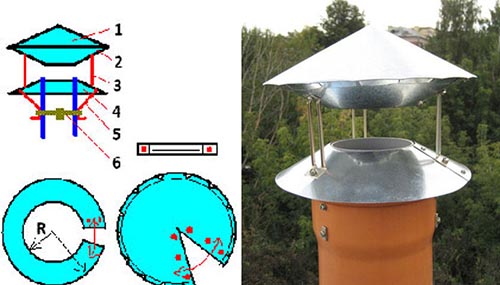
The principle of operation of the cap on the chimney pipe
- The air flow, hitting the walls of the upper cylinder, goes around it from all sides.
- The air jet, sliding over the surface of the cylinder, wraps up, thereby sucking in the smoke coming out of the pipe.
- The movement of air inside the pipe becomes more intense, therefore, the draft increases.
- When wind flows are not in a horizontal position, but in a vertical or at an angle, the weather vane also helps to increase traction. Wind currents penetrate the upper cylinder through the gap and suck the smoke into the chimney.
- With a low wind, vortices form under the cap of the weather vane, which slow down the exit of smoke.
High-quality and competent organization of draft in the chimney system is, first of all, not only the safety of people living in the house, but also a prerequisite for the correct operation of the heating system. Therefore, it is worth taking the time to make and install a chimney umbrella with your own hands. This simple device will help not only organize the correct operation of the heating system, but also eliminate weak draft in the pipe.
How to choose
When choosing an exhaust hood, you need to proceed from the functions for which it will be intended.
When choosing a ventilation umbrella, you should pay attention to the following characteristics:
- Dimensions. To select the size, proceed from the fact that the width is 10 centimeters more than the surface for which it will be installed.
- Room temperature. When choosing, it is worth considering the temperature of the vapors and gases entering the chimney. On this point, it is better to take the advice of a specialist.
- Air consumption. This indicator is calculated from the indicators of the volume of the room, power and the number of installed stoves. Prepare this data before buying and voice it to a specialist.
- Air speed and resistance. The air exchange of the umbrella should be from 0.8 to 1.5 meters per second. If the speed indicator is lower, this will significantly reduce the quality of work.
When choosing, pay attention first of all to the type of umbrella that you need (see above), and already when buying and manufacturing, proceed from this parameter
Form and function
The main tasks of the cover on the chimney:
- Increase in air draft;
- Protection against accidental flying of birds into the pipe;
- Preservation of the chimney masonry;
- Protection from snow and rain.
For your information: the use of a cap increases the efficiency of the chimney by almost 20 percent.
Tops differ in geometry of shapes and sizes. Their varieties are due to the style of the facade of the house and the peculiarities of the weather vagaries of the area.
- Umbrella (cover) - protect the pipe from the penetration of rain and snow. They can be made in the form of a wind vane, a flat cover or a gable cover.
- Drip - removes moisture from the walls of the pipe and stops the appearance of frost.
Caps are made from materials that are resistant to the destructive effects of weather phenomena. This product is fixed in a very inaccessible place, so it is better not to save money and purchase stainless steel or sheet copper.
Some features of the use of caps:
- The semi-circle shaped deflector is more suitable for European design;
- An umbrella with a flat top will look organically on an Art Nouveau cottage;
- A wind vane with a weather vane installed can be equipped with a damper that will make the pipe work efficiently even in the absence of wind;
- Vane with gable top promotes intensive ventilation;
- Caps with a movable roof make it easy to clean the chimney.
Installing a protective apron around the pipe
 To ensure that the junction of the roof deck to the chimney system is airtight, an apron is installed on the roof slope. Rather, two are installed: internal and external. The inner one is under the finish roof deck and the outer one is above. A waterproofing salary is necessary so that melt water does not get into the attic and into the house.
A metal sheet with a height of 40-45 cm is required. A flexible lead or aluminum tape is suitable, which is easily cut with scissors for metal. On the pipe at a height of 20 - 25 cm from the rafters, a line is marked on all four sides, which will be parallel to the rafters. A strobe 1.5 cm deep is laid along this line around the entire perimeter. It can be sawn with a grinder, then washed with a saw cut or blow off the sawdust.
The arrangement of a metal apron begins with the bottom wall of the pipe. Take a piece of sheet 15 cm longer than the width of the pipe wall. To enter the gate, bend the sheet along the edge by 1 cm at an angle of 90º to one side and after 20 - 25 cm bend the rest at an angle of 90º to the other side, use the remaining 20 cm for overlapping under the roof covering. Thus, leakage will be excluded. Do this on all four sides. Fill the edges of the additional elements inserted into the strobe with heat-resistant sealant.
After the roof finish has been installed, you can equip the outer apron. It is more necessary as an aesthetic element. Therefore, a material is selected for it that will be in harmony with the roof. Rolled products with a polymer coating are easy to pick up both in color and quality. An apron for a round chimney can be purchased at the store; it can be metal with adjustable sizes and silicone (rubber), which is easily adjustable due to the elasticity of the material. Manually making a roof passage is even easier than making a chimney cap.
Such a structure can only be attached to the roof system. since shrinkage at home can play a cruel joke and prematurely disable either the pipe or the apron. It is necessary to put on a collar with an elastic heat-resistant laying on a pipe.
Flaps for chimney pipe  How and from what to make umbrellas on the chimney pipes Header on the chimney Installing the chimney on the roof
How to choose a cap
Most often, for brick pipes, heads with a hipped roof are used, and for round pipes - chimneys with cone-shaped umbrellas
However, it is worth paying attention to other options. For example, a cap with a gable pommel better protects against snow
IMPORTANT!
The shape of the chimney cap is not so important. In order for it to fully fulfill its functions, the main thing is to choose the right size for it. The overhangs of the umbrella should protrude several centimeters from all sides beyond the outer perimeter of the pipe.
If you want to ensure that leaves and other debris, as well as birds, do not get into the pipe, you must opt for a cap with a mesh located under the umbrella. The role of the grid can be performed by artistic openwork forging, such heads not only cope with the tasks assigned to them, but also have a wonderful appearance.
- Painted chimneys are not suitable for wood stove pipes, as the paint from them quickly fades.
- Heads with sealed double caps are more tolerant of hot air, while double-deck models allow for better airflow.
- A hood with a deflector will provide the best draft and thus increase the heating efficiency.
- If you install a tip with a hinged cover on the pipe, it will be easy to clean.
When choosing a cap, you need to find a model that not only looks good, but also harmoniously combines with the rest of the elements of the roof and the house in general and fits well into the exterior of the building.
Types of different caps
Buildings with a pronounced modern look are suitable for flat-roofed caps, and for most standard "classic" brick houses, a cap with a four-pitched, gable or semicircular top is the best choice.
To correctly choose the size of the cap umbrella for a brick pipe, you need to measure its length and width. If there is an extension in the upper part of the chimney, the umbrella should also cover it, which means that it is necessary to focus on the dimensions of the outer perimeter of such an extension. The base of the cap should be put on the chimney easily, but at the same time it should sit tightly, in order to find the necessary dimensions of its long and short sides, 4-5 mm must be added to the length and width of the pipe.
Installing the deflector
 Its effectiveness has been proven by many owners of houses and cottages who have used this model. Despite the fact that the price of such products can reach up to $ 140 for standard designs, the demand for them remains constant.
In order not to overpay, you can independently manufacture the described device. The whole process will take no more than 3 hours. It all depends on the skills of the collector. At the first stage, a drawing is created, after which blanks are made. Next comes the assembly of the device and its installation on the chimney, followed by fixing.
Before drawing the drawings, you should calculate the diameter of the outlet pipe and the diameter of the cap
It is also important to measure the height of the deflector itself. To avoid mistakes at this point, special formulas will help:
- height=1.6-1.7 x diameter;
- diffuser width=1.2−1.3 x diameter;
- cap width=1.7−1.9 x diameter.
 After drawing the contour of the blanks on paper, you can proceed to the creation of blanks from metal. It is better to take stainless or galvanized steel, the thickness of which varies from 0.5 to 1 mm.
After preparing the pattern for metal, you can proceed to the assembly stage of the product. This will require a drill, riveter or welding. If the latter option is preferred, maximum care must be taken so as not to burn through the deflector section.
The cap is fixed on the base with legs, which are drawn on paper in the same way and subsequently cut out of a stainless steel sheet. When all these stages are completed, only the most crucial moment remains - installation on the chimney.
Drill holes in the pipe to secure the deflector. Rivets are fixed. After that, it is necessary to check whether the installed device has a slope in different directions. Mounting the clamp will be required if the deflector is loose. If the pipe is not made of brick, this option will come in handy. If we are talking about a ceramic pipe, then you will have to use special adapters.
European cap
This model is more designed to prevent the formation of condensate and has a rounded appearance. This type of chimney can be made independently using a steel sheet and hand-made holders.
How to make a European cap:
They take a standard metal sheet and gently bend it around the pipe, you can directly along the contour of the chimney.
They remake the spoons for which the cap will hold directly on the pipe. It is best to do this with a special machine or ask a familiar welder
You can also make transverse cuts that do not go to the end, and carefully bend the strips with pliers.
These cuts do not have to be transverse.It is allowed to use longitudinal strips if the piece of metal is quite long
A rectangle is cut along the edges and the tails are left in the center. After that, the sheet is folded in the shape of a semicircle and the tails are pressed with a clamp.
Gently bend the legs.
It is allowed to use a conventional chimney clamp to mount such a cap on the pipe.
To make a European cap, you only need a piece of sheet metal and a grinder disc.
Making a visor
You can make a cap on the chimney pipe with your own hands
The drawings will help you navigate this, but it is important to comply with all the parameters indicated in it. First of all, you need to determine the external dimensions of the head
An umbrella will be fixed here. Following this, you need to sketch a sketch depicting the future design. To do this correctly, you need to consider the following points:
- the diameter of the product must be 10 cm larger than the dimensions of the pipe so that the edges protrude from all sides up to 50 mm;
- slope angles should vary from 30 to 45 degrees;
- from the chimney cut to the fungus, the minimum height should be 100 mm.
The umbrella is the traditional solution. There are other design options:
- rotating weather vane;
- deflector.
 The latter makes it possible to increase traction through wind pressure. Thanks to him, a vacuum is created in the cylindrical body, where the smoke channel passes. In calm weather, this device retains all its positive qualities. At the same time, it reduces the traction force in the pipe, due to which an increased resistance is formed at the exit of combustion products.
A weather vane of a semi-cylindrical shape is often called by the people a "sycophant", as it turns with the wind. It is mounted on a special bearing and consists of several components. This is one of the best options, but there are doubts about the reliability of the bearing, and the price of such a design is high. It is especially good to put such a model on a round chimney, as it protects the mouth of this device from atmospheric precipitation and blowing.
To make a chimney to the visor with your own hands, it is better to use painted or galvanized metal, the thickness of which is not less than 0.5 mm.