Features of the choice of control automation
Electrical installation has several types. The choice of a connection scheme through an automatic type humidity and temperature controller is most justified. The system turns out to be fully automated thanks to humidity sensors installed in those places on the roof where snow and melted ice most often accumulate. The automatic control unit and self-regulating cables result in high system efficiency and energy savings. It can be connected via an air sensor or thermostat. Such a system uses only one parameter in its work - air temperature. And the probability of ice formation is no longer taken into account. Manual connection is the cheapest way, but requires constant attention and monitoring of weather conditions.
Roof and gutter heating is a relatively inexpensive and high-quality option for protecting a building in difficult climatic conditions and seasonal weather changes.
Why does ice accumulate
The causes of ice formation relate to external and internal factors:
- Frequent temperature changes. This leads to the fact that the layer of snow that was already lying could melt, after the temperature dropped, it froze and was covered by the next one.
- Failure to comply with the angle of the roof slope. It should be calculated in accordance with the climatic features of a particular area.
- Uncleaned drain channels. In autumn, the gutters could be covered with foliage. It clogs the holes, which prevents the outflow of water.
- Insufficient insulation of the attic space.
- The presence of an attic. When using the attic as a living space, steam is released, in addition, this leads to an increase in the temperature of the flooring. This causes the snow to melt and the water to freeze in the cold.
- Irregular roof cleaning.
 What threatens the icing of drains
The gutter heating system is usually installed in conjunction with the heating of some sections of the roof. This type of device has the following tasks:
- Removal of icicles and frozen influxes on the roof.
- Prevention of roof deck rot due to moisture accumulation.
- Release of holes from congestion for the passage of fluid.
- Prevention of sudden changes in temperature, which can damage some materials.
- Reducing the weight of the overlying sediment layer to reduce the load.
- Extending the life of the flooring and the entire truss system.
- Roof cleaning automation.
 Mounted usually together with roof heating
Features of heating gutters at home
The heating of the roof and gutters depends on many factors, which include:
- type of electrical cable;
- type of roof
- climatic conditions of the region.
We will talk about the types of heating cable a little later, now we will determine what main types of roofs exist and how this can affect the installation of an anti-icing system.
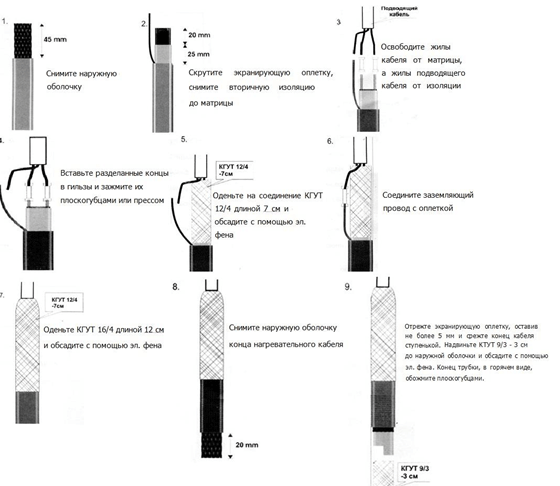
The structure of the cable for heating the drain.
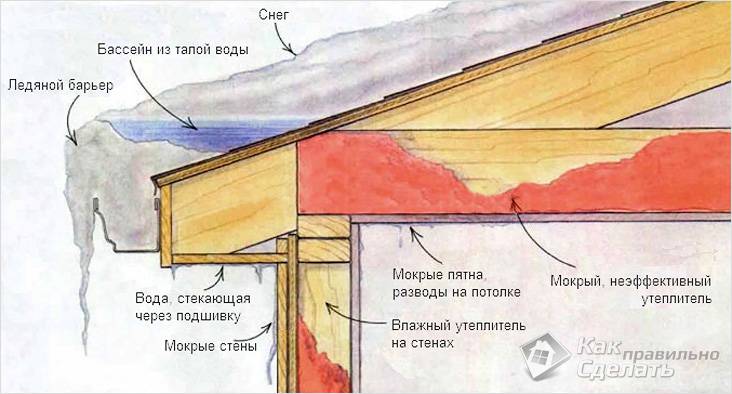
A warm roof is characterized by a lack of insulation, which causes the formation of ice growths. Such roofs melt the snow even at sub-zero temperatures, after which the water flows down to the cold edge and freezes. That is why for this type of roof, additional laying of heating sections along the very edge with loops is necessary. The width of such loops is from thirty to fifty centimeters, the specific power of the system varies from two hundred to two hundred and fifty watts per square meter.
Heating of a cold roof and gutters is somewhat different. These roofs are well insulated and often have a well-ventilated attic space.For such roofs, only heating of drains is installed with a linear power of twenty to thirty watts per meter, while the power should gradually increase to sixty to seventy watts in parallel with an increase in the length of the drain. All cables must be equipped with a special protective device for disconnection.
Also, a feature of heating gutter systems and roofs is the careful planning of the length and location of cables, the possibility of laying the system with your own hands. This takes into account the length of the valley, all parts of the system, the running footage of downpipes, their required number. For one hundred - one hundred and fifty millimeters of the gutter, approximately thirty - sixty watts of power per linear meter is needed, for a gutter with a width of one hundred and fifty millimeters, the calculated power under standard weather conditions is two hundred watts per square meter.
Cable types for gutters
To heat the roof, various types of cable are used, which can be laid with your own hands after calculating the system and sections. Two types of cable are used: resistive and self-regulating.
A resistive cable has a lower cost and availability, its principle of operation is as follows: a conductive metal core is heated due to the internal resistance supplied to the electric current. Heating gutters by this method is quite simple, the operation of the system is not complicated and expensive. Among the advantages it should be noted:
- low cost;
- lack of starting currents at startup;
- presence of constant power.
Although the latter characteristic can be a serious drawback, since the need for heat is specific to different areas, some of them can overheat, while others simply do not have enough heat.
Do-it-yourself system installation with resistive cables is simple, the cable can be laid along gutters and pipes or wrapped around them.
A more preferable option is to lay a zonal resistive cable, which has a special nichrome heating filament. At the same time, the linear power of the cable does not depend on the length, it can even be cut if necessary.
Heating drains with a self-regulating electric cable is more reliable, but the price of the system is much higher, and the cable itself has a limited shelf life due to the gradual aging of a special heating self-regulating matrix. The advantage of such a system for heating gutters is that the cable being laid can change its resistance, that is, the heat generated corresponds to exactly the level that is needed at the moment.
It is believed that laying self-regulating systems is more economical to use, simple and reliable. Therefore, you can look at the cost of such systems from different manufacturers and choose the option that best suits your budget.
Share this helpful article:
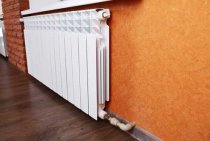
Heating of gutters and gutters
The main reason for the inoperability of the building's drainage system during the cold season is the accumulation of ice in the gutters and downpipes.
If the roof is cold, that is, it does not have large heat losses, and there is no melting of snow on the roof itself, then laying the heating cable in the gutters and downpipes is enough to solve the problem of icing.
Cable selection
Linear power is selected based on the diameter of the downpipes and the width of the gutters. Of less importance is the material of the drainage system - plastic warms up a little worse than metal - more power is needed. Table No. 1 shows the average values. For difficult conditions - altitude, wind load - the power should be increased, if there is little ice, then the power can be reduced.
Table No. 1: Selection of a heating cable for heating gutters and drains
|
Pipe diameter/ Gutter width |
less than 100 mm | 120-150 mm | 150-160 mm | 200 mm |
|
Required linear power per area |
30-40 W/m | 50-60 W/m | 60-100 W/m | 80-120 W/m |
| Heating cables
X number of threads |
Raychem GM2-X x 1
HeatTrace GT-2 x 1 Nelson SLT2 x 1 Nexans DeFrost Pipe 20 x 1 |
Raychem GM2-X-C x 1
Nelson LT-28-jt x 1 Nelson CLTR-28-JT x 1 Nexans DeFrost Pipe 30 x 1 FreezStop 25K x 1 |
GM2-X-C x 1
LT-210-jt x 1 DeFrost Pipe 30 x 1 FreezStop 25K x 2 |
GM2-X-C x 2
LT-28-jt x 2 LT-210-jt x 2 DeFrost Pipe 30 x 2 FreezStop 25K x 2 |
Resistive cable should be used with caution in these areas, as it, unlike self-regulating, is not resistant to local overheating
And gutters and gutters are just those areas where foliage and dirt accumulate.
It is also more profitable to use a self-regulating cable because during installation inside the drainpipe it saves a lot of energy when dry.
And now we will analyze in detail the installation of a heating cable in various parts of the building's drainage system:
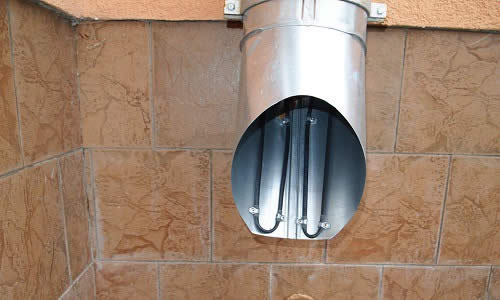
Downspouts
In any downpipe there is always an upward flow of air. In fact, the drainpipe works like a blower. When installing a heating cable inside the drain, the air flow even increases slightly. Therefore, it is necessary to perform reinforcement, namely, to lay additional loops at the mark and around the water intake funnel. Thus, it turns out that for each drainpipe an additional 1.5-2 m of heating cable will be required.
If you study the manufacturers' guidelines, they say that if the height of the drain is less than 4 m, then the cable can be lowered inside it without additional devices. However, our experience shows that in order to increase the service life of a heating cable, it is necessary to fix it on a cable so that the mechanical load is carried not by the cable itself, but by the cable. It is also desirable to protect the cable at the point of exit from the pipe with a metal lining.
Internal gutters
In the case of internal downpipes, it turns out that most of the downpipe is located in a warm room. Therefore, in most cases, it is sufficient to heat the upper part of the pipe, i.e. lower the heating cable from above to the ceiling, to a depth of 0.8-1.5 m, and additionally heat a small area around the funnel. It is convenient to do this by attaching the cable to a metal mesh. The weak point is also the exit from the pipe (it works like a blower). In this case, the power supply is supplied from below: the heating cable is inserted into the pipe through a clamp with a gland. True, supplying power from below and above to the same pipe is quite labor-intensive, which in some cases (height less than 8 m) can negate the savings in the footage of the heating cable.
Hanging gutters
On the horizontal sections of the drainage system of the building, the heating cable is fixed every 0.3-0.5 m using pieces of mounting tape. The tape itself is attached to the gutter using rivets (on a metal gutter) or self-tapping screws (plastic gutter). Cable power is selected according to table No. 1. If there is a weather station, the moisture sensor is also installed in the gutter.
Sloping gutters
Branching
In order to simplify the power supply subsystem with a large number of gutters and drainpipes, branching nodes are used:
This is interesting: Do-it-yourself shepherd dog booth - drawings and dimensions of the aviary, how to do it?
Choosing a heating cable manufacturer
To ensure maximum functionality and reliability of expensive roof heating systems, it is necessary to use only original components from manufacturers with a solid business reputation. Monitor supplier compliance with this requirement. Savings at the stage of purchasing cables and other elements during their operation most often result in additional costs for the repair of failed sections. And, on the contrary, a high-quality cable can significantly save on energy costs.
The right choice of heating cables is not enough for the full functioning of electric heating. In addition, competent installation of the system is required.Only companies specializing in this type of work and officially representing the cable manufacturer should be trusted with the installation. In this case, the proper experience of specialists, a responsible and competent approach to carrying out calculations and direct installation of equipment are guaranteed.
Important nuances when choosing a heating cable
The ideal option for organizing and performing work on the arrangement of roof heating systems and gutters is the participation in the process of one specialist capable of:
- design the system taking into account the technical and operational conditions;
- select accessories;
- manage the installation.
It is desirable that the specialist has a certificate from the manufacturer
The presence of certificates for cable roof heating systems is a guarantee of their uninterrupted and long-term functioning.
Pay attention to the power of the proposed heating cable. If this indicator exceeds 50 watts per linear meter of the product, you should not immediately agree
As a rule, designers of heating systems make such proposals for reinsurance, or the fastening of the heating cable does not provide effective heat transfer to the heated surface. In this case, the cost of buying a cable of too high power is not justified.
The more power the cable has, the more expensive it is. And the power consumption will be approximately 2 times higher than required for the efficient operation of the system. It turns out that most of the heat will be spent on heating the air, which means that almost half of the cost of paying for electricity will be in vain. In addition, leaves, dirt, dust, etc. can get under the heating cable during operation, as a result, efficiency will decrease significantly. When using our unique Raychem cable heating systems, such problems are eliminated.
Significantly affects the functionality of the system and the choice of other components, in particular the control unit. Such devices should be selected individually for each project. It is also necessary to specify the mode of operation of the heating system, depending on the type and other features of the roof.
When designing anti-icing, many factors must be taken into account, in particular, to determine:
- exit points of power cables to the roof;
- installation locations of junction boxes and thermostat;
- roof areas where heating is required (valleys, junctions, etc.);
- problem areas and defects of the drain, taking into account the functioning of the heating system (gutter slopes, non-rolled pipe funnels, etc.).
In addition, you need:
- take into account the presence of drainage, snow retention, etc.;
- use fasteners that maximize heat transfer from the heating cable to the heated surface of the roof elements.
If you are counting on the stable and correct functioning of heating systems, you should use only original components (cable, boxes, heat-shrinkable sets, etc.), entrusting their installation to experienced professionals who have been trained by the component manufacturer.
When installing the roof heating system, we use the method of continuous foiling of the heating cable, which ensures a high heat transfer efficiency. This method has an additional advantage - over time, neither foliage nor dirt gets under the heating cable, which means that its heat transfer to the heated surface does not decrease.
Our advice will help you make the right choice. We are ready to give additional advice, as well as to develop a technically competent, most efficient and cost-effective project for a roof heating system and implement it.
Installation on different types of roof
Depending on the type of roof and, accordingly, places “weak” to icing, the heating cable is laid in different ways.
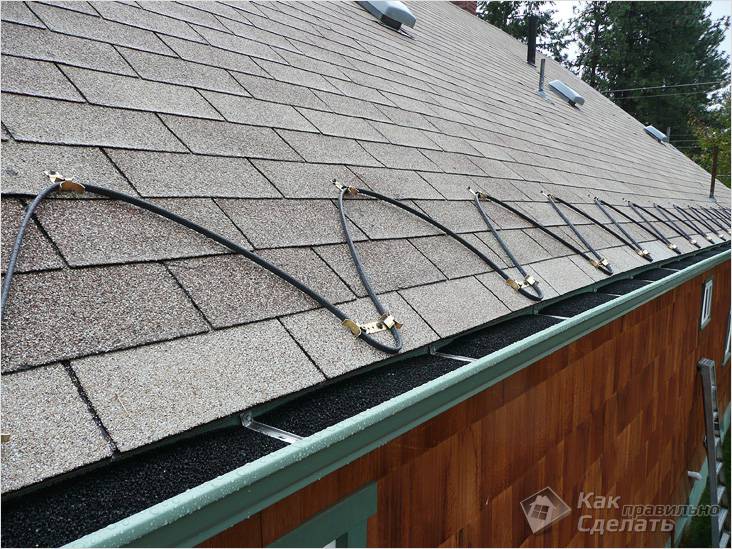
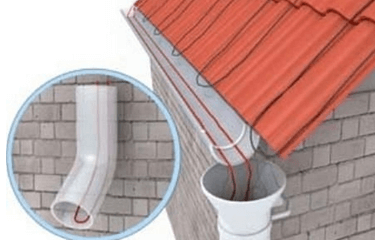
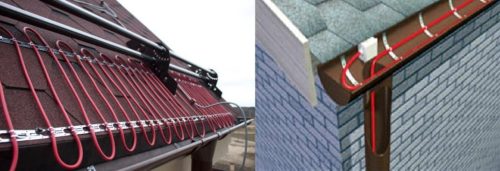
High-quality heating is possible with the correct location of the wire.The cable, as a rule, is laid in a snake, the height of its laying is usually equal to the length of the roof slope to the intersection with the plane of the walls and plus 20 cm. In such places, the most intensive accumulation of melted ice occurs. The cable is laid in increments of 50 or 60 cm. Here you need to proceed from the climatic zone. In places where the temperature changes above or below zero degrees very often, it is necessary to reduce the laying step, in which case the heating will be more efficient. For free passage of melt water, the cable must be laid in gutters and gutters around the perimeter of the building. This method is applicable for a single, gable roof with a soft surface.
For a metal roof, the following method of laying heating elements is typical. The wire is laid on each side of the seam of metal sheets, then passed through the gutters to the second seam and beyond. The cable allowance along the seam is approximately equal to the distance from the roof slope to the intersection with the plane of the walls and plus 30 cm.
The heating of roofs and gutters with a flat surface is carried out by placing the wire around the perimeter and in the waste inclined planes. In sloping roof options for buildings where there are no drains, it uses the method of loop-like placement of the cable with an allowance for the edge of 7 cm.
Ice accumulations also form in valleys, that is, in the inner corners of the intersection of a sloping roof, so they also need heating.
Methods for fastening the heat-producing core are selected depending on the type of roofing material. On soft roofs, a mechanical fastening method is used using clips that are nailed to the surface. The joints are treated with sealant. On the side of the roof about 10 meters long, about 50-55 clips will be needed, when laying in a “snake” way.
Mounting with glue is also possible. On a metal roof, the installation of the wire is carried out by gluing staples with special glue. 5 staples required per stitch
With the glue method, it is important to pay attention to the quality of the glue and follow the technology of its use, due to the fact that frost is especially strong on metal roofs and the heating core must be securely fixed. Fastening staples with nails and screws to a metal roof is rarely used, due to the direct impact on the roofing material and the violation of the anti-corrosion coating.
Scheme of automatic heating of the roof.
In gutters less than 15 cm wide, the wire is placed without rigid fixation; in wider gutters, it is recommended to place two cores separated by inserts. Directly into the drain or funnel, the core must be lowered by 30-40 cm to prevent ice accumulation, since freezing of drains renders the entire system of melt water runoff unusable.
How to mount the system
In order to fully equip ourselves to proceed with the installation of the system, we will visually consider an example of a heating scheme for roofs and gutters and we will adhere to a certain sequence.
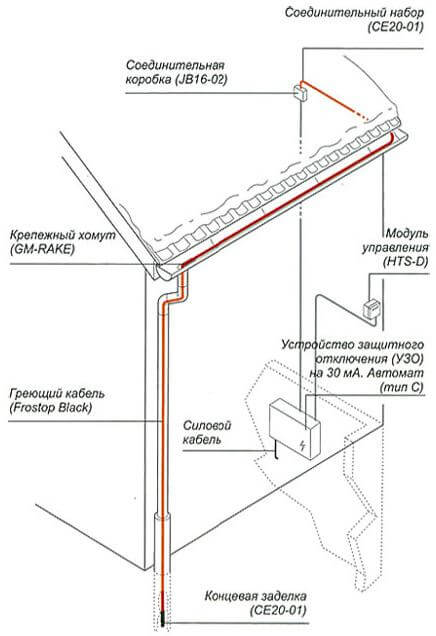
First, we select the installation site for the automation and control system indoors. Often the main controller and protection devices need to be located near the electrical switchboard. This is done for ease of installation, and allows you to reduce the length of cable and wire routes and increase the reliability of the circuit. It will not be difficult to connect the controller, since all its outputs and terminals are signed and marked. A person who is familiar with the basics of electrical wiring and knows how to handle a tool will quickly orient himself and do such work with his own hands.
The installation of a heating conductor in drains should be considered based on the fact that it is divided into four components (gutter, sewer, funnel and water intake), each of which must be heated. First you need to feed a loop of wire into the downpipe and screw it into the water inlet using steel clamps.Then we fix the cable in the lower part of the sewer pipe as high as possible, placing it at a distance of 5 cm from each other in the part of the pipe that is closer to the house (melt water usually flows through it). In the same way we fix the conductor and at the top near the bottom of the funnel
It is important that if the pipe consists of several collapsible parts, then in each of them it is necessary to organize an intermediate fastening of the heating system. In the funnel, the cable is laid in the form of a ring and screwed with clamps in this position
We pass to the gutter. In it, the wires must be placed on lateral opposite surfaces. Further, the ends are connected in the junction box to the terminals.
Advice! The self-regulating conductor does not have to be laid in a loop. Installation in one core is suitable, the end of which is insulated with a special plug.
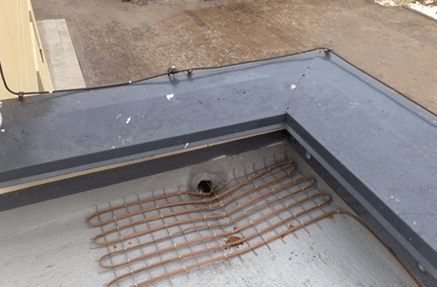
Let's take a flat roof as an example of installing a heating element. The cable is laid in the lower part along the perimeter of the water flow line and is laid in the inner funnel of the drain at a distance of 400 mm if the sewer is located in the building. If the pipe is mounted outside, then the “drip loop” scheme is used. At the points of contact between the parapet and the roof, the laid conductor should have a power of about 60-70 W / m 2. It is also necessary that a wire be laid around the heated funnel at a distance of 2 m as shown in the figure below:
The sequence of cutting the heating wire is shown in the photo:
Finally, when the previous steps are completed, the drainage and roof heating control system is connected to the heating elements using power cables through transitional junction boxes. Also, all necessary sensors and protection equipment are connected.
You can clearly see the installation process of the anti-icing system in the video:
That's all I wanted to tell you about how to do the heating of the roof and gutters with your own hands. We hope that the provided instructions were useful and interesting for you!
Which cable to choose
To install heating systems, two main types of conductors are used - resistive and self-regulating.
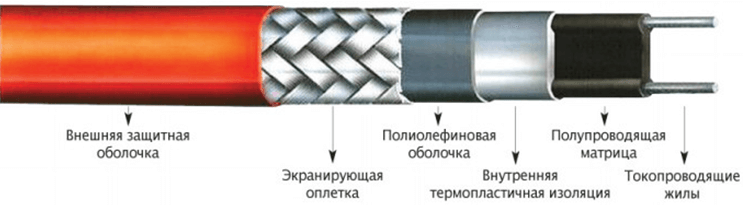
Resistive is very similar in structure to a typical two-wire power cable. It consists of several layers of insulation, inside of which there are heating conductors isolated from each other, connected to the power circuit. The temperature to which the wire warms up is always constant, as is the useful power and the resistance value. The photo below shows its structure:
A self-regulating heating conductor for heating roofs and gutters is produced using a special technology and, based on its name, is able to independently adjust the heating temperature. This allows you to make it a special structure. It consists of a matrix (itself regulates the degree of heating depending on the ambient temperature, therefore, changes the resistance) and external insulation, with an insulating sheath and a braid inside. The photo below shows what the wire consists of:
To determine the choice of the heating element of the system, we turn to their advantages and disadvantages. So, a resistive conductor is significantly cheaper in cost than a self-regulating one. However, the latter will automatically adjust to the desired temperature of the drains, as a result of which there is no need to use temperature sensors.
So what's the choice? It is rational to use both types of elements when installing the heating of gutters and roofs. Their combined use reduces the overall cost of the project and has a positive effect on the final quality of the system. It is customary to use resistive elements for the roof, and self-regulating elements for drainage systems.
How to heat gutters
The climate of many regions can hardly be called mild, the winter months are usually quite severe, snowy, the temperature can drop to quite low values. At the same time, the roofs of buildings are strongly affected, on which large masses of snow and ice accumulate, and this is fraught with a number of problems: icicles are formed on the edges of the roofs, which are dangerous to human health and life, snow and ice on the roof contribute to the fact that the roof structure can collapse.
Do-it-yourself heating of the drainage system is necessary to melt snow and ice.
In order to avoid such troubles, it is recommended to heat gutters with special cable systems that allow you to melt snow and ice in gutters and downpipes, to divert melt water to a safe distance from the house and its foundation.
Installing such systems for the roof is a rather complicated and costly business, but it fully justifies itself. Many people prefer to reduce the cost of work by laying the cable only on the surface of the roof, believing that this is quite enough, but this is far from the case. Often snow and ice completely clog gutters and drainpipes, and meltwater can only harm the roof, it has nowhere to go down, and drainpipes clogged with ice can simply burst.
Heating of gutters can be carried out by several methods, which differ not only in the way the cable is laid, but also in its type. Such a system can be installed by hand, but it is best to entrust its calculation and verification before launch to professionals who can guarantee the safety of cable electric heating.
Where does ice appear on the roof and drain
Icicles on the roof eaves and ice in the gutter occur due to two main reasons:
- The difference between day and night temperatures. This often manifests itself in the spring, when during the day the snow on the roof melts under the influence of solar heat and flows from the roof into the drainage system, and at night it freezes with a decrease in temperature, sometimes forming huge ice. Ice heaps often lead to the fact that the drainage system simply cannot withstand their weight, since it is not designed for it, and becomes unusable, simply breaking.
- Operation of a warm roof. The so-called mansard roofs, as a rule, are more often subject to the formation of frost even in winter, since the heated room under the roof provokes, albeit insignificant, heating of the roofing carpet. As a result, the snow melts, and water begins to flow down the roof overhang, and at the colder eaves of the roof and in the drain, it freezes again.

Scheme of cold and warm roof
Advice from a professional: You can prevent the heating of the roof in winter by organizing the so-called cold roof (with an unheated ventilated attic), as well as competently arranging the roofing pie - with a properly arranged ventilation gap and sufficient insulation thickness.
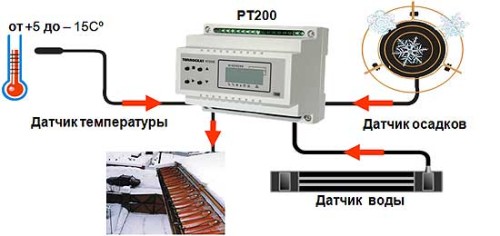
The principle of operation of the heating system
The heating system operates in automatic mode. Virtually no user intervention is required. This is ensured by the fact that the design provides for the presence of a special sensor that continuously receives data on the ambient temperature. It transmits a signal to the regulator, which closes the electric current supply circuit and the heating elements already come into action, heating the layer of snow or ice.
 The composition of the heating system
If necessary, activation can be done manually, usually an additional switch is provided for this.
Do-it-yourself heating of the drainage system and roof
In winter and early spring, you can often see huge threatening icicles hanging on the roof overhangs of houses, icy or, even worse, gutters disabled under a mass of ice.Properly organized heating of drains can prevent such phenomena - protect the inhabitants of the house from ice falling from the roof, and protect the drainpipe system from the need for annual repairs.
In our article, we will analyze the factors that affect the appearance of ice on roof overhangs and gutters, and we will also describe in detail how to choose a suitable heating cable, its installation scheme and arrange heating of the roof and gutters on our own.
The most effective is the scheme in which the cable is used to simultaneously heat the valleys, the roof overhang and the drainage system.