Ceiling tile adhesive choice of adhesive
Often, one of the most common adhesive options is Moment glue. As an alternative, you can purchase "Titan" or "Eco-Naset". However, experts say that the first option has a quick drying and gluing effect. But all three types are required, one way or another, to provide the required standard of reliability.

As for the type of adhesive, in this case, the choice should be based on the characteristics of the surface on which the panels will be glued. So, for example, for wet rooms, such as a bathroom or kitchen, you should purchase an adhesive that is highly resistant to moisture.
How to glue wallpaper
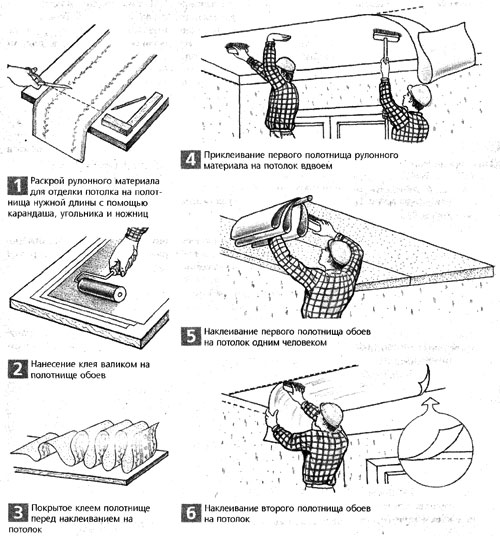
The scheme of gluing wallpaper on the ceiling.
After we coped with the installation of tiles, it's time to deal with wallpaper. If you are doing repairs for the first time, then it will be very difficult to glue the wallpaper alone. It is best to do this business with two or even three. It is always necessary to prepare for repairs in advance. Therefore, first stock up on the necessary materials. For work you will need: wallpaper, glue, stationery knife. Responsibly treat the choice of wallpaper, it is possible that they will decorate your room for more than one year. All work will consist of the following steps:
- First, the surface is prepared. (There are three indicators of a good surface: the absence of fatty substances, dryness, cleanliness. Paint and old wallpaper must be removed. Cracks are repaired with putty. If the surface crumbles, then it is treated with a primer).
- We prepare glue (glue varies depending on the type of wallpaper).
- Glue is applied to the wallpaper and sticks them. Glue is applied evenly over the entire surface. The wallpaper should lie down and soften a little before you start gluing it. If the wallpaper is very dense, then the glue is applied not only to the wallpaper, but also to the wall.
Let's take a closer look at each of the stages of work
Popular tile layouts.
If you plan to glue wallpaper indoors, then try to finish the painting work before this point. If they are glued to wood or plaster, then the surface must be well dried. If this condition is not met, then you risk getting stains on the wallpaper or they will move away from the surface.
If the repair is carried out in a new building, then it must completely settle. Otherwise, the wallpaper is deformed and wrinkled. If the wall is uneven, then it must be upholstered with cardboard. First, pieces of cardboard are wetted with water and nailed to the surface. After they dry and stretch, the wall will become more even.

The scheme of gluing wallpaper on the ceiling.
Now you can start preparing the material. At this stage, you need to trim all the edges and determine the direction and location of the pattern. It is easiest to glue wallpaper on which nothing is drawn, because you can immediately start cutting them. When buying material, you should carefully monitor that you are not sold rolls of various shades. This can easily happen even among identical batches of goods. Demand that along with the wallpaper, instructions must be attached.
To cut pieces of wallpaper of the desired length, measurements of the walls are first made. Always leave a margin of wallpaper length. It should be about 5 centimeters. This will help you achieve an even fit. After the wallpaper is cut, they need to be smeared with glue and allowed to rest a little. If the wallpaper is expensive, then put a layer of newspaper under them. As the paper gets wet, it will need to be replaced with a dry one.
The canvas impregnated with glue can be glued to the wall. It is at this stage of the work that you will need an assistant who will hold the wallpaper while you yourself carefully paste it.During gluing, it is necessary to press and iron the wallpaper with a cloth so that no wrinkles form.
If suddenly you find that the wallpaper is bubbling, then carefully peel it off in this place and stick it again. Bubbling indicates that air has entered under the material.
Wallpaper should be glued very tightly, especially if they are thick. After the work is completed, you need to leave the wallpaper to dry at room temperature. Drying usually takes a day. Try not to get direct sunlight on the wallpaper at this time. And only after the wallpaper has dried thoroughly, you can begin to decorate the interior of the room with ceiling plinths.
Why do it
First of all, you need to consider that by gluing foam parts directly onto the old coating, you can save a lot of time. It can take a whole day to peel off pasted wallpaper, and sometimes more. If you skip this stage, you can finish all the work on the same day.
At the same time, it will not be necessary to take out several packages or bags with the remnants of previously pasted wallpaper and spend time and effort on this. In addition, skipping the stage with wiping off old wallpaper, you can not cover the furnishings in the room with a film - there will be practically no dirt, and you only need to protect the furniture from dust.
Another important argument is economy. The existing coating will serve as the basis for applying a new one and at the same time strengthen the surface of the overlap, smoothing out minor defects. They do not have to be leveled, and then primed again. You do not need to purchase putty, tools for working with it and other similar things.
Recommendations for simplified installation
If we are dealing with a sufficiently large room, we start gluing tiles from the center (chandelier, decorative rosette).
The rooms rarely have an absolutely regular shape, therefore, so that there are no noticeable deviations from the parallel line - in small rooms, tiles are glued seam to seam, starting a row from the wall and from the corner opposite the entrance. If the room is irregularly shaped or the walls are not parallel enough to be noticeable, diagonal tiling is a great solution.
Very often, it is not possible to perfectly match the tiles
In this case, visible seams are putty with acrylic putty.
A ceiling made of tiles in contrasting colors or tiles pasted in a checkerboard pattern with a texture deployed in different directions will divert attention from the unevenness of the ceiling and look original.
Liquid universal adhesives are applied to the tile, pressed against the ceiling for a few seconds, then disconnected, wait a few minutes, and only then pressed firmly for a few minutes. After that, the tile is securely seized.
Non-laminated tiles require special care in applying glue and in work, since stains are quite difficult to remove from them.
If there is plaster or lime whitewash on the ceiling:
- We remove exfoliated and swollen fragments with a metal spatula.
- Primed with a penetrating primer.
- If there are visible irregularities, we use liquid nails or acrylic putty for installation. A denser adhesive composition levels out irregularities, unlike universal adhesives.
If there is old wallpaper on the ceiling
- We remove the exfoliated pieces of wallpaper. Anything that is tight, leave it alone.
- We process with a penetrating primer
- Thick or washable wallpapers are only left on the ceiling if they are held tight enough. If not, the wallpaper must be removed, otherwise there is a risk that the tile will peel off along with them.
- We choose glue depending on the condition of the ceiling: for a flat ceiling - universal, for chips and cracks - dense.
If on the ceiling, old ceiling tiles:
- If the ceiling is high enough and the loss of 15-20mm is not significant, you can glue the new tile on the old one.This is easy to do if the old tiles are not too embossed and the ceiling is not decorated with rosettes and other volumetric elements that imitate stucco. In this case, the tile will fit well and hold tight
- The old tile should be so firmly attached to the ceiling that it will really take a lot of time and effort to dismantle it.
- If the tile does not hold firmly enough, it must be dismantled with a spatula, and the surface treated with a penetrating primer.
- The top layer of tiles is positioned in such a way that the joints do not fall on the joints of the old layer. Then each new tile will be glued to the four previous ones and this will be a reliable construction.
- Liquid nails are the best option for sticking tiles on tiles. The glue must be applied in a thick enough layer so that it fills all the cavities of the relief of the previous layer.
- When gluing, you need to press the tiles very carefully so as not to leave dents.
- Two layers of tiles will improve the thermal insulation of the room and soundproofing characteristics.
As you can see, an unexpectedly simple and economical way to repair or simply refresh the ceiling. Of course, the implementation of a full range of preparation and installation activities is the right strategy. But objectively, there are times when the “cheap and cheerful” option turns out to be a priority. Then, armed with new knowledge, boldly proceed to the task and the result will pleasantly surprise you, against the background of significant savings in time, effort and money.
https://youtube.com/watch?v=VqaB2sMVq4w
Wallpaper for painting
The glued ceiling coating can be given any desired color by painting. If you choose a specialized washable composition for this, then the wallpaper will not be afraid of excess moisture and deposited dust. Such wallpaper will be a great assortment for such premises as hallways, kitchens, bathrooms. They are very convenient: they do not absorb odors and additional moisture, if necessary, they are perfectly cleaned.
It is good to use fiberglass wallpaper for such premises, which are both smooth and structural, with a pronounced texture. They are also very resistant to very high humidity, resistant to fungus and mold. Their decorative properties make it possible to realize even absolutely spontaneous artistic ideas. Among other things, such wallpaper for the ceiling can be repainted a couple of times.
Is cellulose wallpaper suitable for the ceiling surface? This decorative coating is considered a wonderful decoration for both walls and ceilings. However, this ideal wallpaper has one famous drawback - they are afraid of excessive moisture. Due to this, it is necessary to apply them taking into account this characteristic, where the moisture level, as a rule, is not more than the norm.
The process of gluing wallpaper on the ceiling
This does not depend on the type of selected wallpaper; at the beginning of the pasting procedure, a preparatory operation must be carried out. It is necessary to determine a sufficient amount of material for the work to be performed.
For this, the area of \u200b\u200bthe ceiling is calculated: the length of its sides is measured along the baseboard. The ceiling surface must be prepared - clean and leveled. It is better to remove the existing light source so that it does not interfere with continuous gluing. There are rules for pasting the ceiling, which will be better performed.
- Sticking a room always starts not from the walls, but actually from the ceiling;
- It is more convenient to stick on the ceiling surface wallpaper parallel to a shorter wall - the strips of material will be shorter and easier to manipulate;
- It is better to start gluing from the wall opposite the entrance to the room;
- It is much more convenient to work with an assistant. As long as you specifically paste the wallpaper, it will support their free part and control the direction;
Chalk print on the ceiling
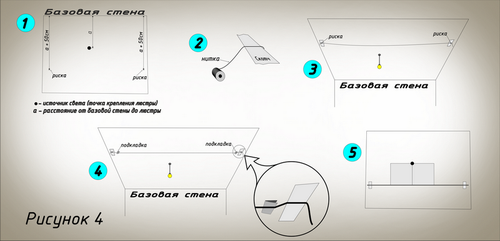
The distance we need is the width of the wallpaper minus 2.5 cm, which is needed for trimming. V ceiling you need to drive in a nail, at a distance of 4 cm from the larger wall, and at the previously calculated distance from the smaller one. On the wall opposite, in a similar place, another 1 is driven in. A rope rubbed with chalk should be tied to these two nails, pulling it tightly. After pulling it away from the surface, and abruptly release it. Hitting the ceiling, she will leave a clear, perfectly distinguishable imprint of chalk on it.
Wallpaper on the surface of the ceiling: spreading and folding
The number of wallpaper strips required for the entire ceiling is cut. If required, the drawing must be connected. Each strip has a length equal to the width of the room, plus one centimeter for trimming. If the room has an irregular shape, alcoves, bay windows, niches, some pieces are made shorter or longer.
The adhesive composition is applied with a roller or brush, in a neat, even layer, over the entire canvas. Then the piece is folded like an accordion, so that it is more comfortable to hold it on top. It will be necessary to work hard so that the smeared sides do not stick together, and the outer ones are not afraid of dirt. And, of course, the wallpaper should not wrinkle and tear from careless movements.
Pasting the ceiling
It is necessary to provide yourself and the assistant with free access to the ceiling. From the board and a pair of stepladders, the most ordinary goats are obtained. If, for example, the distance between the stairs is more than 2 meters, then it is better to use two boards for strength.
One person will hold the folded, glued wallpaper while the other person starts to paste it.
The edge is connected to the chalk print, pressed, then the cloth is smoothed either with a specialized brush or with a piece of clean soft cloth. As you glue and move forward, the assistant straightens the folded accordion, while controlling the coincidence of the edge of the canvas with the chalk line.
When the strip is on the surface of the ceiling, it is necessary to walk over it again, very carefully, smoothing out all the folds and irregularities. This can be done with a clean roller wrapped in cloth. With gentle movements from the center of the strip to the edges, the panel is smoothed out and pressed. All bubbles are removed, and wallpaper tightly attached to the surface. It is convenient to trim the wallpaper after it dries.
Is it possible to glue ceiling tiles on wallpaper
Styrofoam tiles designed for ceiling decoration are a very versatile and inexpensive option for finishing floors. It allows not only to save some amount on finishing, but also to significantly reduce the repair time. Speaking about the speed of work, many may ask themselves the question: is it possible to glue the ceiling tiles directly on the old wallpaper, previously pasted on the ceilings, without removing them? It turns out that it is possible, however, there are subtleties here and all of them will be discussed further.
Why do it
First of all, you need to consider that by gluing foam parts directly onto the old coating, you can save a lot of time. It can take a whole day to peel off pasted wallpaper, and sometimes more. If you skip this stage, you can finish all the work on the same day.
At the same time, it will not be necessary to take out several packages or bags with the remnants of previously pasted wallpaper and spend time and effort on this. In addition, skipping the stage with wiping off old wallpaper, you can not cover the furnishings in the room with a film - there will be practically no dirt, and you only need to protect the furniture from dust.
Another important argument is economy. The existing coating will serve as the basis for applying a new one and at the same time strengthen the surface of the overlap, smoothing out minor defects. They do not have to be leveled, and then primed again. You do not need to purchase putty, tools for working with it and other similar things.
How to do it
Having dealt with the question of whether it is possible to stick ceiling tiles on old wallpaper, you need to move on to the next step in the program - directly gluing.In order for the result to be expectedly good, it is necessary to adhere to some rules. They are not too complex and easy to follow:
Sticking is best done from the center of the room. If this is not possible or you want to do it differently, we start sticking from the wall on which the window is located. In this case, work is carried out from one of the corners.
In rooms with uneven or not very symmetrical walls, it is better to glue the coating so that the seam line is diagonal to the walls. This will visually hide the lack of a room.
In those places where the foam panels adjoin the walls loosely, the resulting gaps can be repaired with putty. Putty will help hide and not too tight seams between the tiles themselves.
Always follow the gluing instructions on the packaging of the adhesive. Some types of glue must be applied to the surface, allowed to dry a little, and only then the parts to be glued are finally pressed.
Do not stick ceiling tiles on uneven ceilings - all irregularities will be very noticeable, since the edges of the parts will not converge with each other. With such defects, you will either have to choose a different type of finish, or pre-level the surface.
When choosing what to glue first - wallpaper, or ceiling tiles, proceed from the features of your repair. In principle, sticking a tile is not difficult and you can do it at any time. However, if the walls are going to be seriously repaired, you can postpone the tile work to the final stage.
Here, in fact, are all the simple rules. Following them, you need to do the following:
- Surface condition check. If the wallpaper began to move away from the plane, they must certainly be removed. Otherwise, everything that is pasted will fall off.
- Primer will be required. However, unlike working directly with concrete bases, a less expensive mixture is needed here and this will save a little.
- When the primer dries, the surface is checked again for the presence of exfoliated areas. If they are not there, the gluing of the coating begins, taking into account the previously mentioned rules.
Of course, in each individual case, the gluing sequence may differ and adjustments will have to be made to these rules. But, most repairs will take place without any complications and you will not have to significantly violate the rules.
Is it possible to glue ceiling tiles on wallpaper?Styrofoam tiles designed for ceiling decoration are a very versatile and inexpensive option for finishing floors. It allows not only to save some amount on finishing, but also to significantly reduce the repair time. Speaking about the speed of work, many may ask themselves the question: is it possible to glue the ceiling tiles directly on the old wallpaper, previously pasted on the ceilings, without removing them?
How to install ceiling tiles
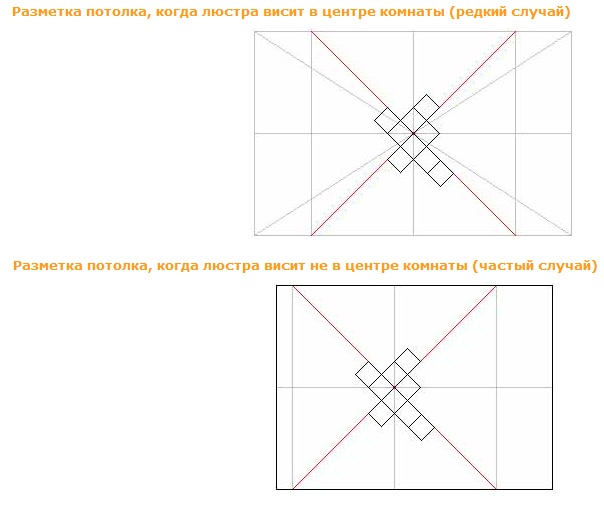
Ceiling markings.
The first step is to stick tiles on the ceiling. You can lay it on any surface, such work should not cause any difficulties. To work, you will need the following tools:
- ceiling tiles;
- glue;
- rope;
- putty knife;
- putty;
- knife.
The work will include the following main steps

Ceiling tile options.
- First you need to clean the surface on which the tiles are glued. If there is old lime on the ceiling, then it must be removed with a spatula. If the ceiling was covered with water-based paint, then it will also need to be scraped off in those places where it crumbles or exfoliates. If there are cracks or holes in the concrete, they must be properly sealed with putty. You can not strive to ensure that the surface is perfectly flat.
- The second step is to determine the center of the ceiling. This is necessary in order for the tiles to lay flat. Finding the center is not difficult. You just need to stretch two ropes crosswise into both corners of the room. The center will be located at the intersection of the ropes.From there, you should start laying tiles.
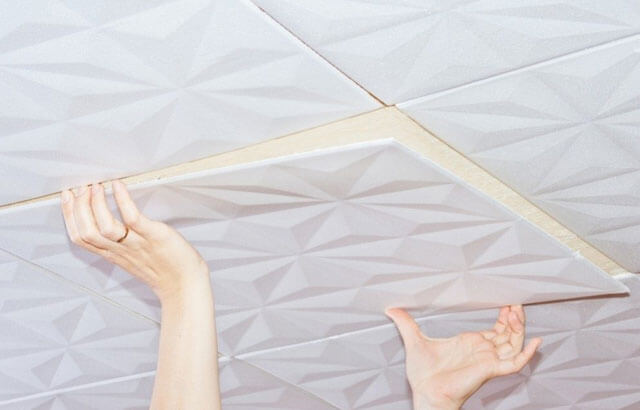
- You can start tiling. To do this, you will have to use special glue. It must be applied on the reverse side in a very thin layer. To prevent the tile from peeling off, you need to withstand the exact time indicated on the package with glue. Tiles must be glued in even rows, so that the distance between them is minimal. It's not hard work. Effort should be minimal. Most of the effort goes into keeping the tiles in contact with the ceiling for the glue to set. Usually at the end you have to lay the tiles in pieces, because the whole one does not fit into the remaining free space. Don't be afraid to cut tiles. This is a very thin material that can be perfectly cut even with a clerical knife. If the edges are not cut too evenly, then it's okay. All errors will be hidden under the ceiling plinth.
- It is necessary to carefully examine the glued tiles so that there are no traces of glue left. You can simply remove them with a sponge. But this must be done very carefully. No dark marks should remain on the surface. After all, they can ruin your mood for a long time and even push you to re-repair.
Design flaws
The disadvantage that can ruin everything is the thickness of the material. Most of the time it is significant. What materials are used to make ceiling tiles? Mainly:
- Styrofoam;
- gypsum;
- drywall;
- tree;
- metal;
- mirrors.
There are rooms with a low ceiling, and every centimeter that the ceiling tiles made of foam, gypsum, drywall, wood takes is important. In this case, this method of registration is not suitable. There is a thin tile, but it makes a more modest impression, relevant in the office, non-residential premises, where the character of the owner, personal preferences are not so important. Professionalism and knowledge come first. Is it worth it to be so humble? Only if she is needed. Most often you want to create a different atmosphere. Spotlights, wallpapers with special parameters are useful for decorating the ceiling of residential premises. These techniques create a visual illusion, and a person suffering from claustrophobia, for example, will be more comfortable in a room with such a design.
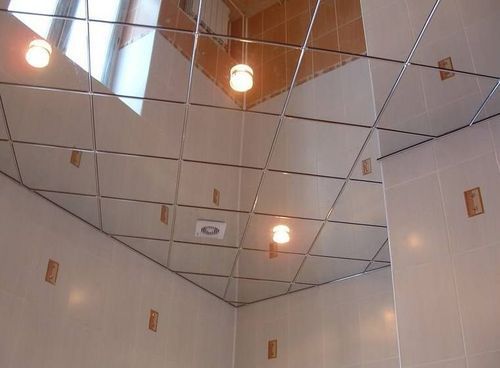
Metal or mirror tiles also expand the space. With its help, it is easy to create a fabulous, elegant, understandable, intuitive design, to bring any fantasy to life. But it costs more, it is more difficult to attach it - most of the benefits are lost. Is it worth trying so hard? You will definitely like the atmosphere. After reviewing these photos, you may be able to make a decision, refuse to compromise, choose mirrors or metal. Made from other materials, tiles in a room with a low ceiling will ruin everything, no matter how beautiful they are. Before you buy it, you should objectively evaluate the room. Coziness, comfort is more valuable than extravagance, style. The impression of interior design should be positive.
Various options for whitewashing and ceiling tiles
As practice shows, it is not possible to unambiguously answer this question.
To determine whether it is possible to glue tiles on whitewash, you need to find out the following two aspects:
- What whitewash was used. If chalk is the basis for whitewashing, then mounting such a finish on top would be a serious mistake. In this case, even repeated priming will not help, which is not able to provide a reliable basis for the use of glue. As practice shows, the chalk begins to crumble quickly, which leads to peeling off the tiles. Ceiling tiles for whitewashing may only be glued if they are made on the basis of lime.
- The type of tile used. According to the manufacturing method, foam plastic tiles for the ceiling are pressed, injection and extruded.The first option, due to the looseness of the structure, is not recommended for use on fragile foundations.
These are the cases:
- Sprinkling of whitewash is observed. Such a base does not guarantee the strength of gluing, because. decorative elements are likely to fall off very quickly along with lime.
- Used multi-layer application of whitewash. If the ceiling has been whitewashed many times, then the lower layers usually lose their former strength and begin to delaminate.
- Finishing was done with frozen lime. According to its characteristics, this type of whitewash resembles a chalk coating. This cannot guarantee good adhesion of the adhesive to the ceiling surface.

Glue ceiling tiles on whitewash, as practice shows, is possible only if the finishing layer has a small thickness and holds well. At the same time, decorative tiles should have as little weight as possible, which is quite suitable for classic options made of polystyrene foam or extruded polystyrene foam.
Calculation of quantity and features of choice
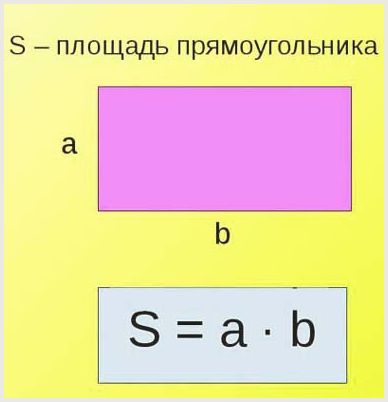
Before gluing tiles to the ceiling, you need to calculate its quantity. This is not difficult. Most often, it is produced with a side of 50 cm. This means that there are 4 tiles per 1 square meter. If you know the area of the room, you can easily determine the required number of tiles: multiply the area by 4. For example, the room has dimensions of 3.2 m * 2.8 m. The total area is 8.96 m2. Rounding up, we get 9 m2. To calculate the number of tiles, multiply by 4: 4 pcs * 9 m2 = 36 pcs. It will take some more trimming, part may be broken. Therefore, we increase the total number by several pieces. How much specifically - you need to look at the layout, but usually 10-20% of the stock is enough.

One of the seamless options
To make foam board ceilings look beautiful, when choosing a material, pay attention not only to the appearance and type. Carefully evaluate the geometry: all tiles should be the same size, the same thickness, the corners should be exactly 90 °
The quality of the drawing should be stable, clear, there should be no sags or inhomogeneities on the side faces. If you choose pressed boards, pay attention to the size of the "grain". The smaller it is, the better.
Is it possible to glue ceiling tiles on tiles, wallpaper, paint
Tiles on the ceiling - it's stylish, fashionable, modern! The unique qualities of materials allow you to achieve good sound insulation, hide the flaws of the main ceiling. In addition, the repair itself is quick and relatively inexpensive. But an inexperienced builder may have a lot of questions regarding the gluing process itself: is it possible to glue ceiling tiles on tiles or wallpaper, how to prepare the surface before work, and many others. Let's take a closer look at all these nuances.
How to glue ceiling tiles
In order for the tiles to adhere well, it is important to prepare the surface for work. In particular, if there is a previous tile on the ceiling, it must be removed
Otherwise, new plates will not hold well, peel off. It is not recommended to glue plates even on old whitewash. It should be removed, and then work can begin.
The whole process of gluing ceiling tiles looks like this:
- removing the old coating
- the ceiling is plastered
- a primer is applied to the surface,
- tiles are glued
- gaps are covered with sealant.
Is it possible to glue tiles on whitewash, paint or wallpaper
If you decide to glue the tiles on top of old whitewash or water-based paint, be sure to remove the crumbling parts of the coating. This can be done with a spatula. Then you should treat the surface with a penetrating primer and wait for it to dry completely. Then the tiles are glued according to the standard scheme. If there were wallpapers on the ceiling before, and you do not plan to remove this coating, use these tips:
- remove the part of the wallpaper that has peeled off (this is not difficult),
- treat the surface with a penetrating primer, let it dry,
- paste the boards.
If there are noticeable recesses in the surface of the ceiling, it is better to use "liquid nails" or acrylic putty for gluing the plates. These mixtures are thicker than glue; shrinkage practically does not occur when using them.
Is it possible to glue the tiles over the old
Of course, it is desirable to glue the tiles on a flat surface, cleaned and prepared for work properly. An exception may be expanded polystyrene tiles. It is very light, so theoretically it can be glued to the ceiling directly on top of the existing old foam tiles.
The advantages of gluing "for the lazy" are undeniable:
- significantly reduces the time for work,
- money is saved (no need to buy a primer, putty),
- there is no need to take furniture out of the room, as there will be no dust.
But it should be understood that the quality of work may suffer, so the choice is yours. You can glue tiles on top of the old one in such cases:
- the surface of the previous tile has no relief,
- high ceilings,
- the previous tile is glued according to all the rules and holds well.
Remember that you need to glue the plate on the previous layer with an overlap of the seam.
Ceiling tiles in the bathroom
Plates made of polystyrene foam and expanded polystyrene have good moisture resistance. Therefore, they can be used even in rooms with high humidity, for example, in the bathroom.
But in this case, you should be careful in choosing tiles for the ceiling: poor-quality material can not only turn yellow from contact with direct sunlight, but also deform from moisture. So don't skimp on quality.
Silicone sealant is suitable for sealing seams
Therefore, you should not save on quality. Silicone sealant is suitable for sealing the seams.
Practical Tips
- If the room is large, start tiling from the center of the room.
- For uneven walls, when the shape of the room is incorrect, try to place the seams of the plates diagonally.
- If the room is small and rectangular, you can start gluing from the corner opposite the front door.
- The gaps that form between the plates after gluing can be covered with acrylic putty.
- Do you want to make an unusual ceiling design? Get tiles of different shades and experiment!
Do you want to make high-quality repairs that will last a long time and will delight you with a flat ceiling surface? Glue the ceiling tiles according to all the rules, first removing the old finish. No time and effort to carefully prepare the ceiling for work? Use a little trick and stick the tiles on the old floor. But keep in mind that the result may be far from ideal.
Is it possible to glue ceiling tiles on tiles, wallpaper, paintHow to prepare the ceiling for tiling. Is it possible to glue ceiling tiles on tiles, wallpaper, water-based paint, whitewash. How will this affect the quality
Adhesive security guarantee
It is very important to choose the right option for ceiling tiles. It is equally important to attach them correctly
Usually ceiling tiles are glued. Modern adhesives securely fix, are not subject to moisture, heat, cold, vibration. Glue-on ceiling tiles are a 100% safe solution.
Any ceiling tile, if properly glued, will be easy to remove when the time comes. Good glue is the key to success, a prerequisite. It is better to spend money on a good tool, it is worth gluing only in accordance with the instructions in the instructions. Approach work responsibly. In this case, the design will be successful.
What to glue first wallpaper or ceiling tiles
Of course, you can first glue the wallpaper, and then start gluing the ceiling tiles. But that's right, you must first clean the ceiling of paint, wallpaper, and whitewash.
If, after removing the whitewash or paint from the ceiling, there are cracks or large indentations, they must be carefully sealed.To do this, putty is used, but it must be sealed so that the ceiling has a flat surface.
The next step is to divide the ceiling into two parts, for this you should use a rope or a strong thread, which you need to cross the ceiling.
From this center you need to start gluing the ceiling tiles. To do this, apply special glue to the tile and carefully glue it to the ceiling. It is advisable to hold the tile for several minutes so that it does not come off after it has been glued.
After the tile is already glued, you can take on the wallpaper. To do this, remove old whitewashing, painting or wallpaper from the wall. We close up all cracks and potholes with putty. If necessary, you need to treat the walls with a primer.
Once the primer has dried well, you can take on the wallpaper. We cut the wallpaper to the desired size, make a small markup for the wallpaper. We apply glue to the wall, we also apply glue to the wallpaper, it is desirable that there is a lot of glue on the wallpaper, since dry wallpaper will fall off after gluing. Then we start gluing. After you have glued it, gently iron the wallpaper with a cloth so that there are no air and lumps.
So first you need to stick tiles on the wall, and then take on the wallpaper, it will be right.