How to work with drywall
Working with drywall is primarily the creation of a frame and its further sheathing. Typically, drywall constructions are used to create lighting, leveling walls, erecting partitions, arches and niches.
Do-it-yourself installation of drywall is as follows.
- Step back from the wall at least 3 cm (profile width), and make marks: using a plumb line or laser level, draw a line on which the drywall wall will be located.
- Attach the main UD rails to the floor and ceiling. Their edge should follow your line.
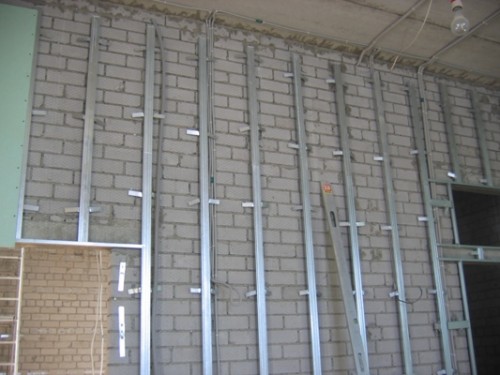
- After that, it is necessary to set up vertical racks from CD profiles. To do this, they are inserted into the guides and screwed with screws to each other.
- To stiffen the CD profiles, every 50 cm they are attached to the wall with the help of hangers, which are fastened to the wall with two dowel-nails. Suspensions are screwed to the profiles with self-tapping screws, and their corners are bent.

The width of a standard drywall sheet is 120 cm, so the distance between the centers of CD profiles is 60 cm.
After mounting the frame, insulation, electrical wiring, water pipes or heating pipes are placed in it.
When installing drywall sheets on the ceiling, not only direct hangers are used, but also wire strands and "butterflies", which have special steel "wings" that fix the strands at the desired distance from the ceiling.
 Types of fasteners for creating a frame Installing drywall on the ceiling suggests that you use special fasteners for this - anchors.
Self-tapping screws for installing drywall are screwed in increments of 25-30 centimeters.
We recommend watching this video, which shows the installation of drywall:
How to seal sheet joints
After the installation is completed, it is necessary to seal the joints and caps of the self-tapping screws in drywall. When joining whole sheets, the edges should form the required shape, and when installing cut pieces, a chamfer is cut off to ensure a triangular seam.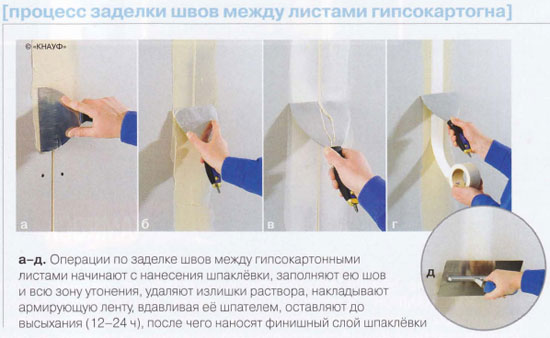 Use putty to fill the mounting seam. The junction is reinforced with a paint grid (sickle). Serpyanka is used after filling the seam with putty, then it is puttied clean. To reinforce the corners, you can use reinforcing perforated corners.
Now not a single repair in an apartment is complete without such a practical material as drywall. If you learn how to work with it correctly, then you will be able to create amazing structures for hiding communications, creating partitions and zoning rooms.
Working with profiles
As a rule, today no one uses wooden blocks for mounting the frame; instead, metal U-shaped profiles are used.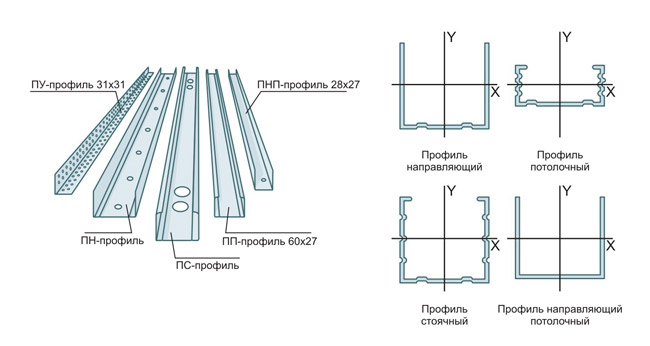 Work with drywall occurs using 4 types of profiles.
- Guide profiles for creating a frame, they are also often called PN or UW. They have a standard depth of 40 mm and the width can be 50, 75 or 100 mm. Guide profiles are used to create the basis for fastening rack and ceiling profiles.
- Ceiling guides (PNP or UD) have the same functions as the previous profiles, but are used for mounting false ceilings.
- Ceiling profiles (PP or CD) are designed to create a frame and lintels. They are inserted into the guides and fixed to the ceiling with suspensions, crabs, anchor clamps.
- Rack profiles (PS or CW) are used when it is required to install plasterboard partitions or to create walls. They are fixed in guides.
The main fasteners for the frame profile are self-tapping screws, the length of which is from 9 to 12 mm. There are also rivets and mounting pliers (cutter) for connecting several profiles. The frame is attached to the wall or ceiling with anchors or dowel-nails.
Do not be afraid of a large set of parts used in the installation of drywall. This is not a complete list of what professional builders use. In addition, do not forget that one-time work implies only the presence of direct suspensions, CD and UD, dowel-nails or anchors.
Particular attention should be paid to tools for installing drywall on walls. Since you will have to drill holes in profiles, walls and other materials, buy or rent a hammer drill with an impact force of 3-5 J. Using a hammer drill, making a hole in concrete is much easier than impact drill
She just can't handle that many holes. In addition, the perforator is perfect for mixing various putty and assembly mixes. To do this, you need a special nozzle-mixer.
Equally important is a cordless screwdriver with a set of special nozzles to screw screws with different types of hats.
In addition to power tools, hand tools are also used:
- hammer;
- metal scissors;
- screwdriver;
- stationery knife;
- markers;
- laser level or hydraulic level;
- drywall planer;
- pliers.
 To attach one rack of a frame 2.5 m high to the wall, use direct suspensions in the amount of five pieces, that is, every 50 cm - 1 suspension.
Two anchors are used to secure each, in total 10 holes need to be drilled. The distance between the posts is 60 cm, so for a wall 6 m long and 2.5 m high, you will need 7 frame posts and 70 holes.
What material to sheathe the installation for the toilet
The installation box can be sheathed with plasterboard or gypsum-fiber sheet. Builders prefer to finish the installation with drywall, because this building material is in an affordable price category and is versatile in use. Its characteristics:
- Environmental friendliness
- Plastic
- fire resistance
Therefore, drywall sheets are used in many areas of construction for repairs in the country or in the apartment.
Plasterboard sheathing is recommended to be covered with ceramic tiles in order to further reduce the level of humidity in the room. Install an electric fan in the bathroom to extract moist air from the room, which will prevent the wall from deforming.
How to sheathe a drywall installation for a toilet bowl
Before starting the sheathing of the installation, you should check its serviceability: install the toilet, then open the valve, and fill the tank with water. If it was possible to drain the water, then the installation is suitable for work.
Tools and building materials for flashing
In the process of fixing drywall sheets, the base for the frame will be used - drywall sheets and the installation system itself. You will also need the following inventory:
- Roulette with a marker
- adjustable wrench
- Screwdriver
- Bolts and dowels
- self-tapping screws
- Hammer
- Silicone
- Level
- Pliers
- Drill with drills
This list is formed on the basis of the main tools for working with the installation, in some cases other equipment for repair may be needed. Bolts, screws or dowels are recommended to be purchased with a margin in order to add the missing part if necessary.
Creating a framework for an installation system
When all the necessary parts are available, you can create and fix the frame for the bathroom. Builders recommend following a few tips that will tell you how to properly sew up the installation with drywall:
- Do the installation of the frame base in the same plane where the installation is located
- To form a frame, select a guide profile 27 by 28
- Sew the profile to the installation with metal-to-metal screws
- The profile groove must be directed towards the wall and ceiling, so it must be installed on top and on the sides of the installation
- Using the level, mark the limits at which the frame ends
- The profile must be installed on the wall so that the groove is directed inward
When the base for the frame is created, you need to install the cut profiles 27 by 60 into the finished base. From profile trimmings, you can cut fasteners that will help install the profile to the wall.

How to finish the installation with drywall
Next - fixing drywall to the installation. It is necessary to sew up the installation with drywall sheets in 6 stages, after which you can begin to operate the installed plumbing. Consider the main steps that will tell you how to sheathe the installation with drywall:
- Mark the building material according to the instructions for suspended plumbing;
- Attach the first drywall sheet to the front of the installation system;
- Before proceeding with the lining, fix the protective cover in the front cutout of the tank;
- All free sides of the installation must be covered with drywall sheets;
- Drill holes in the base frame that will connect the drywall lining;
- Connect the steel frame to the system and fix the drywall with screws.
After the installation has been sewn up with drywall, install a profile to the wall and plasterboard to fix the top and side fragments.

Thanks to the information on how to close the installation with drywall, what materials to choose for lining, whether it is possible to attach the installation to drywall, how to create a frame, you have the opportunity to prepare for a bathroom renovation. If you follow the instructions correctly, then as a result you will get a spacious bathroom with properly working plumbing.
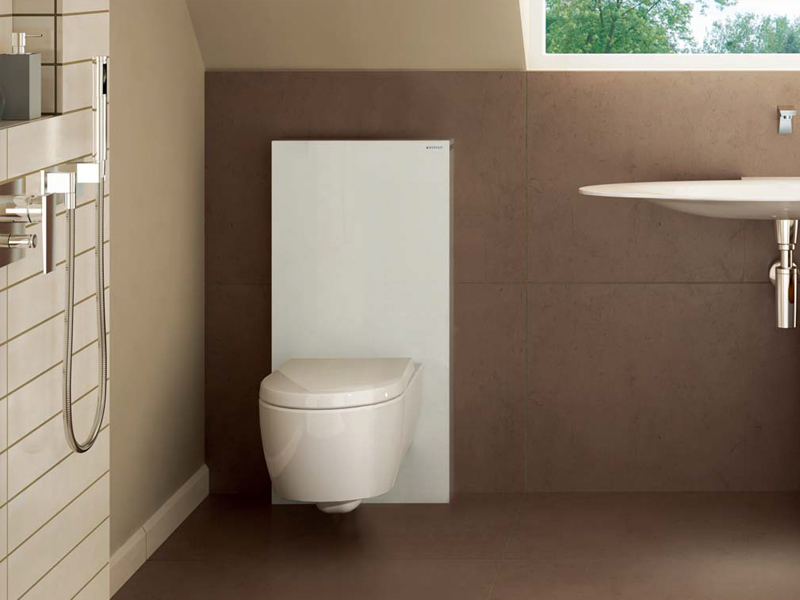
How is the installation for a hanging toilet
The main advantage of plasterboard sheathing is the ability to leave only the toilet and the drain button outside the frame. The installation system for a wall-mounted toilet bowl consists of 5 main elements: a metal frame, a cistern, mounting holes, a valve and a drain outlet.
The metal frame is equipped with retractable rods that serve to adjust the height. The studs on the frame are designed to mount the installation on the wall of the bathroom. There is a panel with threaded sockets into which you need to screw the bolts to fix the toilet bowl.
The difference between wall-mounted toilet bowls and ordinary ones is a flat drain tank. The base of the tank is made of plastic and placed in styrofoam insulation. This procedure helps protect plumbing from condensation. The system for draining water is installed in front of the tank and is responsible for the functioning of the toilet.
The installation system is connected to the water supply through the hole for mounting the adapter. It is located on the side or top of the drain tank.
The main task of the valve is to shut off the water if necessary, dose the drain and prevent overflow.
The outlet for draining is fixed to the tank and ensures that water is flushed when the toilet button is pressed.
What you need for installation
- Guide profiles KNAUF (or Gyproc) PN 28×27 mm
- Ceiling profiles KNAUF (or Gyproc) PP 60×27 mm
- Sealing tape Dichtungsband
- Separating tape
- "Dowel-nails" (another name is "Quick installation") 6 × 40 mm
- Cord breaking device
- Laser level or bubble level
- Rule aluminum 2.5 m
- Gyproc plasterboard sheets 3000x1200x12.5
- Seam putty (we work with Danogips Superfinish)
- Reinforcing tape for seams KNAUF Kurt
- Roulette
- Hammer
- Stationery knife (or special knife for cutting the Civil Code)
- Perforator + drill
- screwdriver
- Self-tapping screws for metal 3.5 × 25-35 mm (black, frequent pitch)
- Self-tapping screws with press washer 4.2×13mm or shorter
- Deep penetration primer (Knauf Tiefengrund, Feidal Tiefgrund LF)
- Direct hangers
- Metal shears or grinder
- Mineral wool ISOVER or KNAUF Insulation 50 mm thick (if sound insulation is required), Penoplex boards (if thermal insulation is needed)
- Narrow and wide spatulas
Conclusion
Whichever of the installation methods is chosen, the use of drywall will create a smooth and durable surface for subsequent finishing.
Mounting tiles on drywall is a pleasure. The glue is applied in the thinnest layers, there is no need to align each element. You can even glue it on silicone.
A drywall partition in a bathroom is rare, but can be used to more conveniently separate rooms.
The installation technology is even simpler than described in the article. The profiles do not have supports on the walls, which means that special durable wall models must be used.