When a wooden ceiling is hemmed with drywall
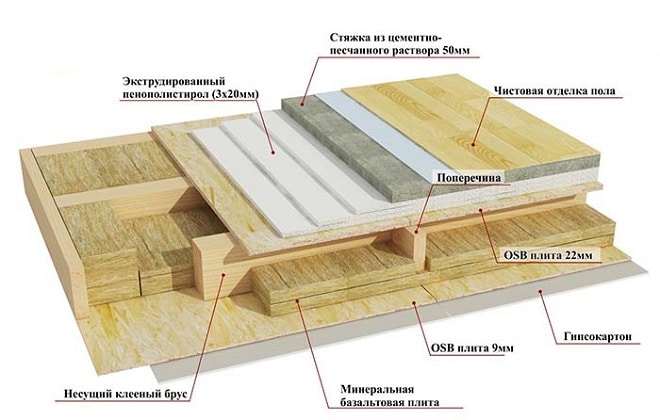
In a frame house or building made of wood materials, floors are made of beams. Between them, heat or sound insulating materials are usually laid. From above, a draft floor is laid on the floor beams, and from below they arrange a filing from different materials to obtain a ceiling surface.

Moreover, beam structures can be sewn in two ways:
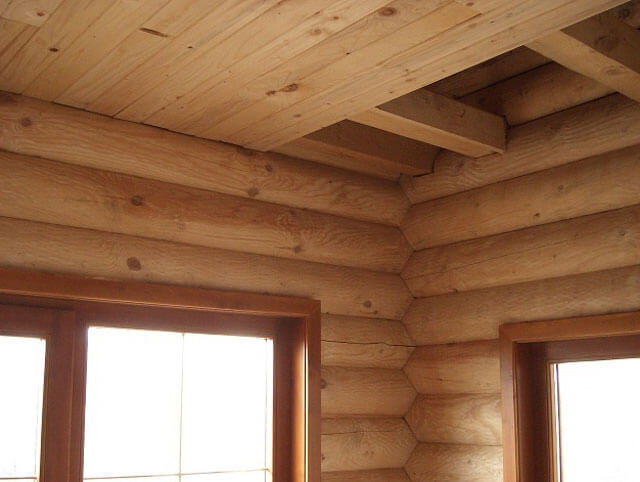
- just above the lower edge of the supporting elements (in this case, the beams will be visible in the interior of the room);
- hem the ceiling below the beams and completely hide them behind the finish.
The first option is used if they want to make the room visually taller and it is interesting to beat the beams in the interior of the room. Some design styles involve the use of ceiling beams, so they are not specifically sewn up with trim.
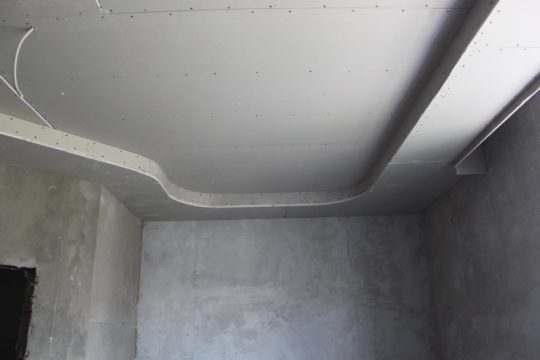
The second option is chosen by those who want to get a flat and smooth ceiling surface without protruding load-bearing elements. As a result, the ceiling can be made in the house, which will not differ in any way from the traditional plastered surface. The easiest way to make a plasterboard ceiling in a wooden house.
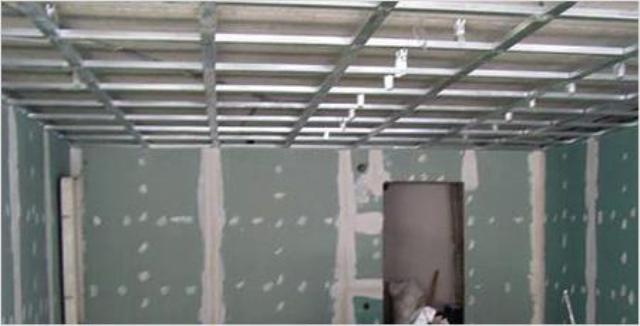
Sheathing the frame with drywall
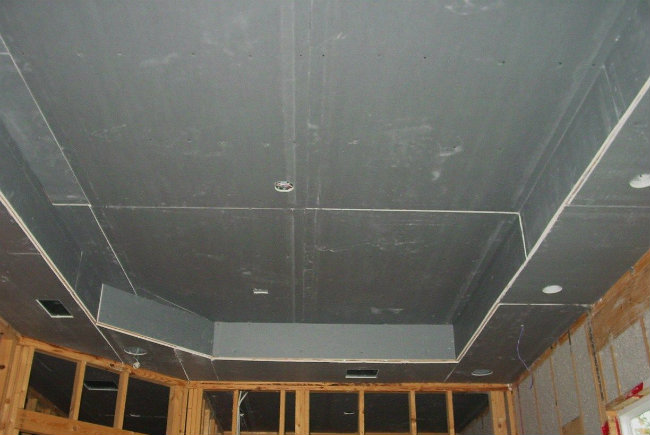
Fastening drywall to a metal structure is read from whole sheets. Sheets should be fixed with self-tapping screws in increments of 15–20 cm. The boundaries of drywall should not lie on one straight line.
 Sheathed frame base with plasterboard
The heads of the self-tapping screws are screwed a little into the drywall sheet so that they do not stick out on the surface. Do not overdo it - drywall can crack, the surface of the sheet will be damaged.
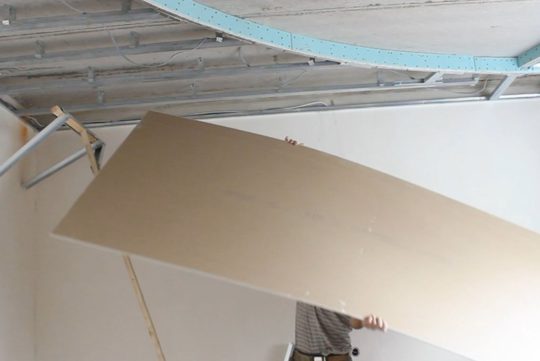
It is better to fix drywall to the ceiling with two people, since the sheets are large and heavy.
The boundaries of drywall should lie on the profiles. After sheathing with whole sheets, it is necessary to start cutting out pieces to seal the remaining places.
 Installation of drywall sheets
Drywall is easy to cut:
- the sheet should be laid on a flat surface;
- on it draw the boundaries along which the sheet will be cut;
- a construction knife with a little pressure should be drawn along the line;
- pressing a little on the edge of the GKL, the sheet will break;
- on the reverse side, carefully cut off the cardboard holding the two parts;
- the boundaries of the cut off part are processed with a planer. A 45 degree notch appears - a chamfer.
cutting drywall
After sheathing the frame with drywall, you can proceed to the next work on sealing the seams and further finishing.
Drywall finishing
The joints of the drywall construction are processed very carefully. The strength of the entire structure depends on this. If the joint is poorly processed, then a crack may occur, the drywall may be deformed.
- All joints on the ceiling are first cleaned of pieces of gypsum and dust.
- The seams are covered with a primer.
- The reinforcing tape can be ordinary, self-adhesive. The self-adhesive should be placed on the joint exactly in the middle. Press the edges to the base.
Reinforcing tape for plasterboard joints
- If the tape is simple, then you need to apply a thin layer of putty and lay the tape on it, slightly sinking. Put putty on top and leave to dry.
- Places of fasteners are sealed with putty.
Reinforcement of drywall joints
- After drying, all joints and other places are overwritten.
- The entire surface is covered with putty.
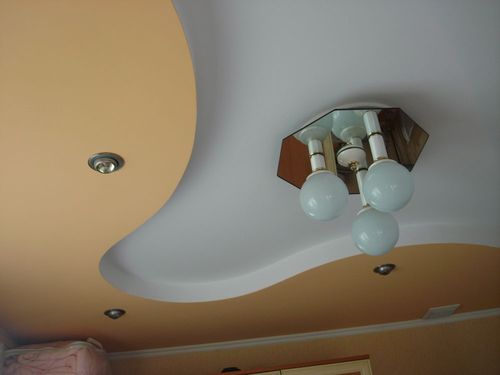
The ceiling is ready for further finishing material. It can be painting, wallpapering or material. The imposition of decorative plaster or coating with liquid wallpaper.
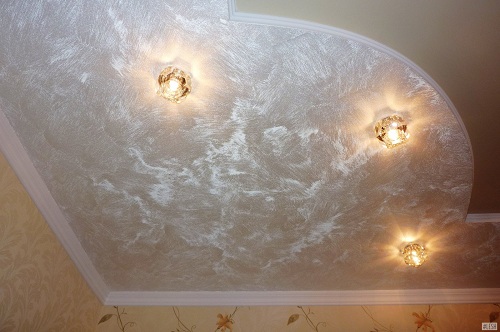 Decorative plaster
It is not necessary to burden the plasterboard ceiling with decorative materials. They should be light, high quality and match the overall interior of the room.
Preparatory work
This section includes work that should be done carefully, without haste.Because if you do superficial work, it will show its negative result in the process of mounting the structure.
- The ceiling should be cleaned of old wallpaper.
Remove the old coating from the ceiling
- Remove lighting fixtures and insulate the wire.
Wire sticking out of the ceiling
- Inflated plaster must be removed from the surface. If it falls after the plasterboard sheathing, it will make the structure heavier. Plasterboard sheets are not able to hold heavy loads. To weight the plasterboard construction with interior items, special fasteners are used.
Removing old plaster
- A depression will appear where the old plaster was removed. It should be treated with a primer and puttied with "Start". The surface must be made as close as possible to a flat plane.
Puttying the ceiling "Standard"
- The surface should be treated with primer and left to dry.
 Ceiling priming
It is necessary to pay attention to the smallest nuances on the ceiling. If there are any protruding objects, spots of unknown origin - you need to get rid of everything
Ceiling step by step
Do-it-yourself filing of the ceiling with drywall occurs in several stages:
- preparation for work;
- marking;
- frame installation;
- installation of drywall sheets;
- final stage.
Preparation for work
The first step is to stock up on the necessary tools. For work you will need:
- UD-profile, or simply the perimeter. It is attached to the walls where the drywall comes into contact with them;
- CD profile. The name of this profile type is guide. It is fixed at the junction of two sheets of drywall;
- fasteners - required for hanging guide profiles. There are two types - pendants and spacers;
- connectors - fasten two guide profiles. Sometimes they are replaced with crabs (installed at the junction of 4 finishing sheets);
- dowel-nails - necessary for fastening the frame to the walls (for structural strength, metal will be the best option);
- self-tapping screws.
Having picked up the tools, it is necessary to prepare the ceiling for the start of work: remove dust, dirt, etc., remove the chandeliers, leaving only the wiring. When finished, we move on to the next step.
 Before proceeding with the installation of a plasterboard ceiling, it is necessary to clean it of dirt, dust, and unnecessary elements.
Marking
We put markings on the walls and ceiling. We draw a straight line that indicates the location of the perimeter.
To make the right line, you need:
- Determine the height of each corner.
- From the corner (opposite the smallest side) we measure down the gap on which the ceiling will fall.
- Leave a mark at the measured level on both sides of the corner.
- Draw a line to the next corner. To keep it even, control with a level.
- Draw lines for joining the finishing sheets (they determine the places where drywall is fixed).
- Put notes on the fastening points of the profiles.
If you plan to make a single-level ceiling, then mark the walls immediately. In another case, you can mark up the next levels only after you have done the previous one.
Frame installation
Before starting work, we check the correctness of the markup several times. After making sure that everything is in order, we proceed to the formation and installation of the frame.
 To install the frame, you must first calculate the required amount of material, as well as mark the ceiling.
We fix the UD profiles along the drawn lines. Fasteners are made with dowel-nails or self-tapping screws. Choose depending on the material of the walls (for wood, use self-tapping screws, for concrete and brick - dowel-nails).
Next, we start working with guide profiles. To facilitate the work, pull the thread from one part of the room to another. This cord will indicate the exact horizontal level height for CD profiles.
We attach plumb lines or, if you use, crabs in the places marked earlier.Next, you need to fix the guide profiles along the rope so that they barely touch the stretched thread.
Telephone or Internet cables, heating pipes, computer networks, etc. remove from the place where the false wall will be located. Why is this needed? The fact is that drywall structures, after they are mounted, cannot be disassembled.
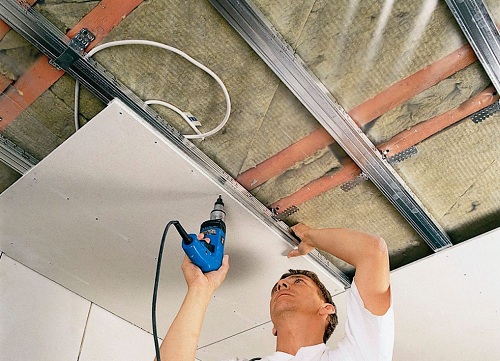
Installation of drywall sheets
Drywall is fixed on the profile in increments of 0.6 m. For this, we need self-tapping screws about 25 mm long. We screw the screws in such a way that its head is in the top layer of drywall (if you drive it hard, you can break the thread).
It is also worth considering that if cut sheets of drywall are used, then you need to cut it so that the edges of the plant are used during installation, home-made ones are discarded.
Final stage
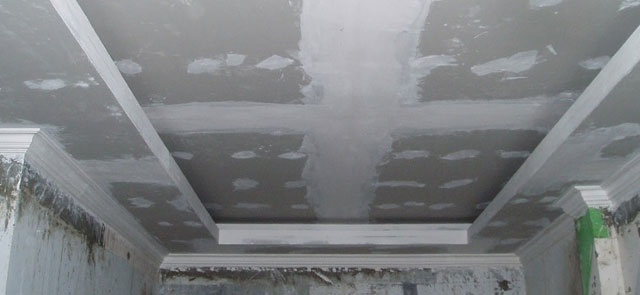
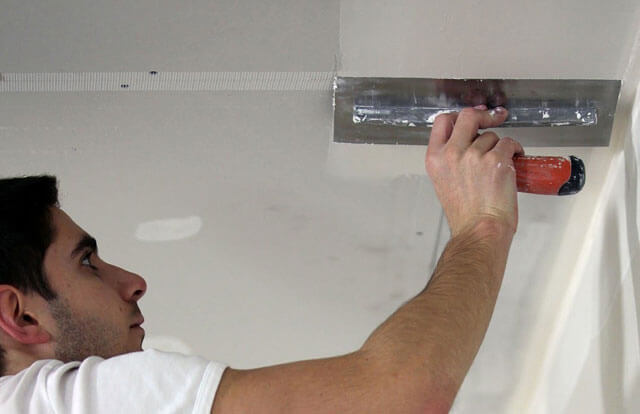
After covering the ceiling with drywall, you need to putty the seams between the sheets, as well as near the screws. When you are done with putty, make sure that everything is in order, you can level, sand and start painting.
 After sheathing the ceiling with sheets of drywall, you need to putty the caps of the screws, as well as the seams.
Putty plasterboard false ceiling
The application of putty on drywall sheets can be called the completion of the installation of a false ceiling. At this stage, two types of putty are used. The first type is the starting mixture, used mainly for leveling surfaces. This putty is characterized by a coarse-grained structure. The second type is finishing putty, after processing drywall sheets with such a composition, the surface becomes perfectly smooth. Therefore, the mixture for finishing alignment has a fine-grained structure.
In construction stores, putty is presented in a wide range and by different manufacturers. Among a large number of materials, the following types of putty are popular:
- Uniflot of the KNAUF company is a universal material presented in the form of a dry mix. It can be used for leveling surfaces and for finishing.
- Finishing putty from the company "Bergauf" has a fine-grained structure, resistant to high humidity, used for finishing hemmed plasterboard ceilings.
- Shitrok Universal Putty is a ready-to-use wet leveling compound. The main application is surface finishing.
- Belsilk T - 32 will be founded - a material made on the basis of white cement. In most cases, they are used to level the surface of walls and ceilings.
When using dry mixes, a small amount of water must be added. Each manufacturer on the packaging indicates their proportions for cooking, although there are no fundamental differences in this process.
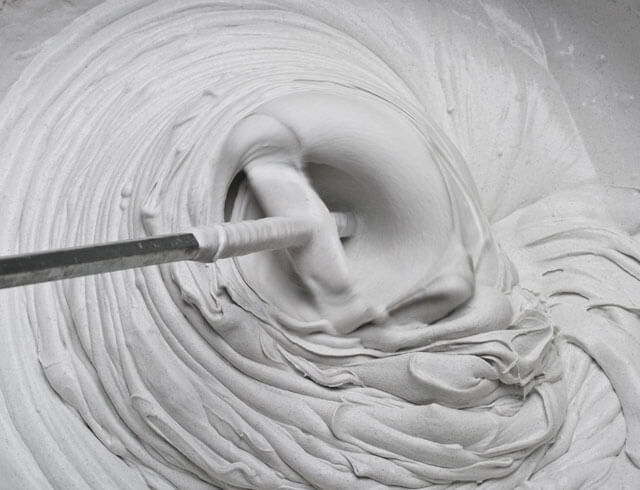
You can prepare a wet putty as follows:
- Take 1 kg of dry mix.
- Add about 2 liters of water.
- Mix thoroughly, trying to get a homogeneous, viscous and thick mass.
To apply putty, use a rubber or metal spatula. In the process of work, they try to fill as much as possible with the working composition all cracks, cracks and gaps. To obtain a high-quality result, it is necessary to press the mixture into a slot or gap and compact it well with a working tool. It is also necessary to mask the attachment points of the drywall sheet, trying to completely cover the cap of the fastener with a layer of putty.
At the end of the process, it is necessary to wait some time so that the putty can dry well.
The final steps are to grind the surface with sandpaper or a special sanding grid. The abrasive material must be firmly fixed on a special grater or in a plastic holder.
It is worth noting that sanding a plasterboard ceiling can be omitted if a stretch or suspended ceiling structure is installed as a finish. In this case, the hemming structure is completely covered by a suspended or stretch ceiling.
Characteristics of the finishing material
Among the many materials intended for interior decoration, drywall is in great demand. This is explained by its excellent properties. The main one is the creation of a perfectly flat surface.
The advantages of the finishing material include:
- light weight;
- ease of installation work;
- excellent soundproofing and energy-saving qualities;
- environmental friendliness;
- the possibility of "invisible" placement of communications (wiring, pipes, etc.);
- lack of smell;
- fire safety (due to the moisture content in the gypsum and the absence of air between the cardboard and gypsum);
- low cost;
- installation of ceiling structures and decorative elements of any complexity.
During installation, the sheets are easily bent and cut. In the material, you can drill simple and figured holes of any size and shape.
Drywall is a pleasure to work with for another reason.
In fact, being a dry plaster, for installation work it allows you not to prepare a wet working solution. And this does not lead to the appearance of excess dirt and debris.
The result will be simply excellent. Due to the ability to absorb moisture and give it away on hot days, a plasterboard false ceiling creates a favorable microclimate in living rooms.
The technology of facing the ceiling with plasterboard consists of the following steps:
- preparatory stage;
- frame devices;
- sheet mounting;
- putty work.
Varieties of drywall
Drywall is a thin layer of modified gypsum between two layers of construction paper. The material, of course, does not differ in particular strength, but it is simply irreplaceable for arranging interiors: flexible, unusually light, easy to install and allows almost any type of finish - from painting to tiling.
There are several types of material according to its resistance to external factors.
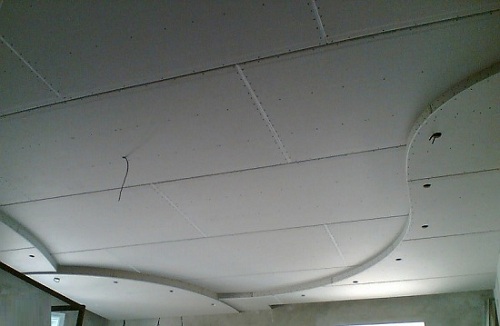
Ordinary - the same drywall, which is mainly used for finishing living rooms and offices. In addition to the above positive properties, it has good vapor permeability, so it is the best suited for work in an apartment or a private house, but only for rooms where humidity does not reach a large value. In the photo - suspended plasterboard ceiling.
Ordinary material is divided into wall and ceiling, the latter is thinner and more light.
- Waterproof - they can hem the ceiling in the bathroom, in the toilet, in the kitchen, that is, in a room with a high level of humidity and temperature changes. It costs a little more.
- Fire Retardant - Drywall is not combustible, but the material in this category also withstands contact with an open flame. In a private house, it is rarely used, mainly when it is necessary to file a fireplace portal.
- Fire and moisture resistant - a special drywall designed for enterprises.
Features of the arrangement of a false ceiling along the floor beams
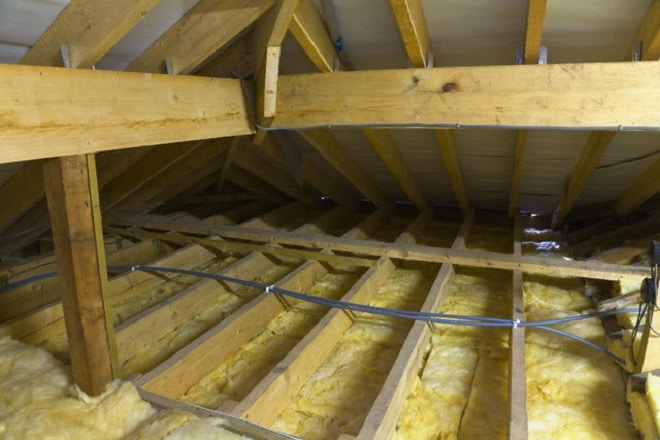
Installation of the structure along the floor beams has one rather important advantage - there is no need to prepare the base. The filing of the draft ceiling on wooden beams is quite simple
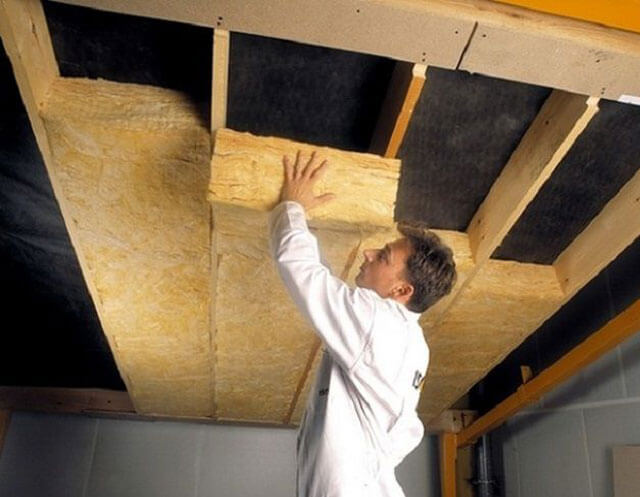
The hemming material in this case is edged and unedged board. If additional insulation of the upper floor is required, the heat-insulating material is placed in the space between the ceiling beams.
Most often, hemmed ceilings are created to level the base surface, for its thermal insulation and sound insulation.
In this case, the following can be used as a heater:
- Styrofoam.
- Glass wool.
- Mineral wool.
- Some bulk materials, such as expanded clay or sawdust.
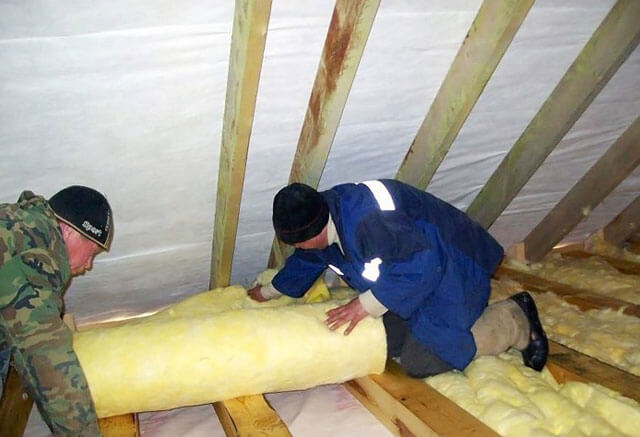
Loose heat-insulating materials are most often used to insulate the ceiling in a bathhouse or utility rooms. In this case, the ceiling is first hemmed inside the room, then insulation is poured from the side of the attic or upper floor. The pre-sewn material is treated with protective agents, including antiseptics and fire retardants. This will prevent the reproduction of harmful microorganisms and extend the life of the false ceiling.
Basic installation steps
Any false ceiling can be assembled and installed by hand. If you do not set yourself the goal of collecting something very complex and intricate, then anyone who has minimal experience with tools can handle it.
This will require a certain set of necessary tools, not counting materials:
- screwdriver
- Perforator or drill with impact mechanism
- Hacksaw for metal
- Pencil or marker
- Marking cord
- Construction and hydraulic level
- Hammer
Materials must be purchased such that the selected ceiling design option provides. For GCR, you need to buy sheets of material with a margin, for wooden planes - wooden planks and so on. All structures have one thing in common - a frame base.
For him, aluminum profiles or wooden bars are best suited. Profiles will need to purchase guides and ceiling, and the bars are needed, with a section of 30X30 mm. You can take wooden parts that have a different section - depending on the required design.
In addition to the parts from which the frame will be made, you will need to stock up on self-tapping screws and dowels to attach the base to the ceiling. When all this is acquired, work can begin on the construction of a new ceiling. Depending on the type of coating chosen, some steps may differ, but the main ones will be as follows:
- Base marking
- Assembly and fastening of the frame
- Installation of coating elements
- Finishing
It makes no sense to dwell in detail at all stages, since each type of material has its own, specialized instructions for installation and finishing. Here, only the processes as a whole are described in order to understand what you will encounter when installing such a ceiling.
Measurement and marking
The next step is to measure the entire perimeter of the ceiling and apply markings. After measuring the ceiling, you can calculate the required amount of material, start acquiring it. It should be noted:
- material should be taken with a small margin;
- drywall construction will be durable, high-quality and beautiful if the materials are purchased from the same brand.
False ceiling marking
The markup goes like this:
- Measure the height of the room at each corner.
- The smallest dimension (lowest point) is found.
- In this corner, 10 cm is marked down from the ceiling.
Ceiling markings
- Now this point should be placed in all other corners. In the other three corners, it can be 12 cm, 8 cm. It is necessary to make the point lie on the same plane. It is best to freeze from the floor.
- All marked points must be connected. Get a quadrilateral. This will be the future ceiling.
- On these lines, fastener points of the guide profile are placed. The distance between them will be 25-30 cm.
Fixing guide profiles
-
On the ceiling it is necessary to draw strictly perpendicular lines from the wall drawings. The distance between them is 60 cm. The attachment points of the suspensions are marked on these lines. The distance between future suspensions should be 30-40 cm. They should not go in one line. Suspensions go in a checkerboard pattern.
Fastening of direct hangers with anchor wedges
After the markup is done, the next step is to mount the frame.
How to hem a ceiling with insulation
Beam preparation
Before hemming the ceiling with the selected material, prepare the base base. And, if there are no difficulties with the overlap of the slabs, then the beams require a more careful approach:
- furniture is taken out of the room, the electrical wiring is turned off;
- remove the previous finish from the ceiling surface, knock down the plaster;
- dismantle the rack crate, remove the insulation layer;
- beams are cleaned of debris and mold, treated with antiseptics.
The evenness of the beams is checked using a laser level. If there are differences, they are eliminated. If the ceiling is completely sewn from the bottom side, it is leveled with a counter-lattice. To do this, use a beam with a section of 40x60 mm or profiles under the GKL. From the bottom side, a vapor barrier layer is mounted on the beams, which is attached to a construction stapler. The film is overlapped.
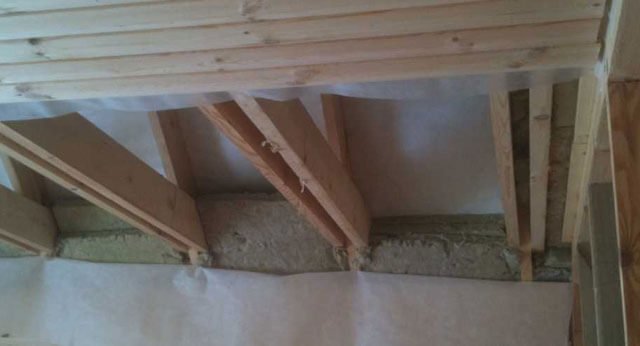
A heater 100-150 mm thick is laid in the space between the beams.
If the niches between the beams are not completely sewn up, then on both sides of the supporting elements a wooden beam is fixed to the screws so that it is flush with the beams. And the vapor barrier is mounted from the side of the floor of the upper floor or attic space. The cladding is fixed to the bars, and on the second floor the floor is laid from the boards.
Binder installation
When the preparatory stages are completed, the laying of hydro and vapor barrier is completed, they proceed to the decorative cladding of the ceiling surface.
An affordable way for self-implementation will be filing with boards:
- first measure and cut the boards to the desired length. The cut is made with a jigsaw on the reverse side so that the edges are even;
- the board is screwed with self-tapping screws or nailed to the counter-lattice;
- if lining is used, it is fixed according to the “thorn-groove” principle, plastic panels are also mounted;
- when the entire ceiling is sheathed, the seams between the walls and the cladding are closed with decorative skirting boards.
Drywall material for ceiling
For a false ceiling, chipboard, fibreboard, gypsum boards are used. GKL have many advantages over other building materials, so it is drywall that is used for a do-it-yourself false ceiling. In the production of drywall, all standards for the environmental friendliness of the material are observed; it does not contain poisonous materials and also has a perfect flat surface. Due to their low weight, gypsum boards are used in the technology of creating partitions, multi-level ceilings, niches and countertops.
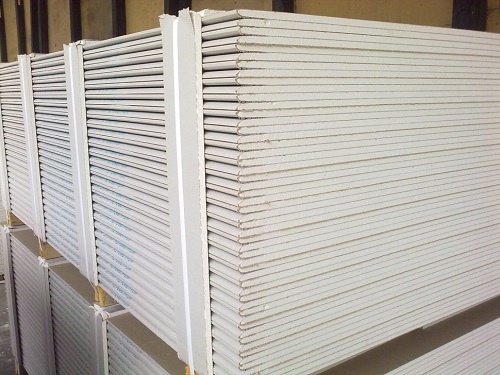 GK-Sheets
Drywall has varieties that allow it to be used in the bathroom, on the balcony, in production workshops, in leveling the floor and on the street.
What drywall is required for a false ceiling?
 Types of drywall
Drywall from the Knauf trademark differs from other products in its strength, durability, and quality. Sheets suitable for false ceiling:
- Fireproof drywall. Red coloring.
- Waterproof drywall green.
- Normal material sheets are gray sheets.
Each type of drywall has a number of advantages and one minus - the fragility of the material.
 Hole in drywall
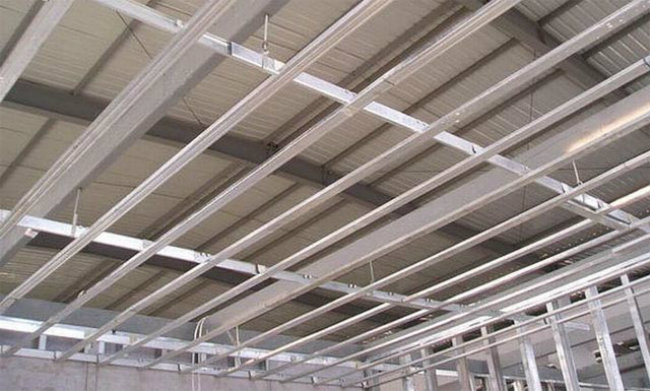
To create a rigid frame, you need to purchase a galvanized profile. It creates reliability and does not corrode metal.
False ceiling installation
For a qualitative solution to the question of how to make a false ceiling, experts recommend following a certain sequence of actions:
- First of all, you need to prepare the hemming material. At this stage, the lumber is treated with an antiseptic compound to protect against fungus and mold, as well as a means that prevents the material from igniting. After processing, the boards are well dried in natural conditions.
- At the second stage, the finished lumber is brought into the room where the installation work will be carried out. If you have equipment for lifting loads, you can immediately lift all the material up and lay it on the floor beams. But it is better to use this method if the building is under construction.
- Fastening of hemming material starts from one of the walls. 2-3 boards are placed perpendicular to the beams and fixed to them with nails or self-tapping screws. Accordingly, use a hammer or screwdriver. Boards can be placed close to each other or with a small gap. It depends on the type of insulation used or, if necessary, to save hemming material.
- Next, the thermal insulation material is laid. Styrofoam or mineral wool fills the gaps between the floor beams.
- In this order, the entire area of \u200b\u200bthe ceiling is hemmed.
This is interesting: Projects of a bath with a terrace and houses: we paint in order
Description of the false ceiling
The top floor of a building almost always consists of several layers, and each layer that completely overlaps the base ceiling can be considered a false ceiling. However, many home craftsmen mistakenly believe that any suspended structure can be called a false ceiling.
Suspended and false ceilings differ significantly from each other. A false ceiling is a suspended system located at a certain distance from the base ceiling. In turn, hemmed ceilings are tightly attached to the main surface. This is the main difference between these structures.
As for the design features, there are also some differences. A suspended ceiling is a collapsible structure, which can be of a through-pass and impassable type. In the first case, communications located inside the suspension system have free access. The second option for this purpose involves the dismantling of some sections, since the structure is part of the ceiling with the possible placement of engineering networks.
When installing a false ceiling, certain requirements must be observed. In particular, we are talking about the following:
- If the total weight of the structure does not exceed 10 kg, the base floor may not be reinforced.
- For the installation of structures whose weight does not exceed 20 kg, you can create an additional crate from wooden bars or a metal profile.
- For a false ceiling, the total weight of which is more than 20 kg, it is recommended to equip additional supporting structures in the attachment area.
Tips from professional builders
Not everyone knows how to properly hem the ceiling with drywall, so you should take into account the advice of real pros:
- Markup: to facilitate this process, you can do the following: put marks at eye level, measure the same height up, and there will be the ends of the lines.
- Hemming: When filing the ceiling, do not forget to take into account the fact that the frame must be given time to adapt to moisture and heat conditions.
- Final work: after the putty dries, it must be treated with sandpaper to avoid unevenness.
- Cutting drywall: make a cut line and use a clerical knife and a rail (acts as a ruler) to cut the top layer, and then just break it. Treat the fracture points with sandpaper.
- Hemming: before you begin to hem the ceiling, chamfer, this will make the puttying step easier.
- Evenness: Monitor the level of evenness carefully during each step.
- Self-tapping screws: in order not to sink self-tapping screws into the sheet, use a special bit with a limiter. This will make the process safer and more efficient.
- Fastening: if one of the ends of the guide profile is inserted into the perimeter, clamped with self-tapping screws, then the fastening process will become much easier.
- Markup: If it is difficult to understand how to markup correctly, watch the video for an example.
Filing the ceiling with drywall with your own hands does not require special construction skills. This is a very simple process.
For filing the ceiling in the apartment, choose ordinary drywall - this will reduce costs, but the quality will remain at the highest level. The main thing is to select the right tools for the job and markup very carefully. Follow the above rules for filing. Then you won't have any problems.
The only negative may be the working time, depending on the size of the dwelling and the number of workers. The ideal option would be a trio, but you can handle everything alone.
Drywall fixing
Now directly about how to properly hem the ceiling with drywall. Whole sheets should be used first. This work needs to be done by two, and preferably by three (2 people will hold the drywall, and the third will screw in the screws).
The step of the location of the fasteners is 20-25 cm. They are screwed in in such a way that the cap is slightly recessed into the finishing material (into the top layer). But do not overdo it. Driving the screw too deep will cause it to not hold the sheet.
When performing installation work, it is necessary to ensure that the edges of the sheets lie on the guide profiles. If the attached sheet suddenly does not match the profile, then do not despair (this is a special case). An additional insert should be made from the profile, which will coincide with the extreme part of the drywall.
Before fixing drywall, all sheets are cut with an edge planer at 45º angles.
This will facilitate the process of puttying the joints between the sheets. And the putty will not get on the cardboard part of the finishing material, which can fill with moisture and peel off the plaster.
In most cases, when installing drywall, you have to face the fact that you need to cut it. This procedure is carried out as follows:
- a cut line is drawn with a marker;
- an even long rail is applied to the line;
- along the rail along the line, several movements are made with a clerical knife;
- drywall is laid on the table (the notch line on the sheet coincides with the edge of the table);
- the sheet breaks off along the line;
- paper is cut on the other side of the sheet.
At the final stage, the ceiling is puttied. A sickle tape is laid at the joints, on top of which a starting putty is placed. It also closes up the holes formed by the caps of the self-tapping screws. After drying, the entire ceiling is treated with finishing putty. Again, the surface dries and sanded with sandpaper.
The new ceiling is covered with a primer, which improves the adhesive qualities of the finish coat. After the solution dries, paint is applied to the surface or wallpaper is pasted.