Bathroom faucet replacement
Tool and waterproofing
From the tool you will need an adjustable (better - a gas key), pliers and a roll of vinyl tape. Before tightening the nickel-plated nuts, wrap them with electrical tape in two or three layers so as not to damage the coating. The key will be needed more to dismantle the old mixer.
For waterproofing, FUM tape (Fumka) is most suitable. Orthodox plumbers still prefer oiled linen cable, but this can only be explained by their inertness: fumka is better in every way.
For insulation, the fumka is wound on the thread in 15 layers in the direction along the thread (clockwise), when viewed from the side of the hole. In this case, when screwing on the nut, the fumka will be pressed into the thread, creating a reliable seal. When winding in the opposite direction, the tape will wrinkle and slide, and such a joint will flow. Correcting the wrong winding is simple: remove the old tape and wind the new one in the opposite direction.
Dismantling of the former
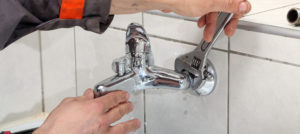
Replacing a faucet in the bathroom begins with dismantling the old one. And this is where problems almost always arise: due to the sediment of salts, the old one firmly sticks to the pipes. An attempt to unscrew with a gas wrench often ends in a breakdown of pipes, especially plastic ones.
Kerosene or brake fluid will help to cope with the situation: 5-6 drops are dripped onto the stuck joint. Then they wait 10-15 minutes - and it will go “like a pretty one”.
Installation of eccentrics
The fittings of the eccentric adjusting adapters (they must be included in the mixer kit) with a half-inch thread (which are thinner) are wrapped with a fum and tightly screwed into the outlet openings of the pipelines. Then, with an adjustable, or gas wrench, or pliers, turn the eccentrics to the floor - one and a half turns so that their wide fittings (thread - 3/4 inch) are either both at the top, or both at the bottom at the same level.
Next, 3/4 inch fittings are set according to the distance under the mixer. A convenient device for this is a U-shaped wire bracket. Gently bending its middle, try on the ends of the wire along the centers of the holes of the mixer, and then adjust the holes of the eccentrics along the same ends. You need to adjust by moving / pushing both fittings so as not to bring down the level.
Mixer installation
On the flanges of the mixer, decorative overlays are first applied. Then, complete gaskets are laid in the flanges: first, black soft (rubber), then colored hard - paronite. The paronite gasket protects the rubber from damage against the end of the eccentric fitting when screwing. Additional waterproofing is not required.
Next, the union nuts of the mixer are screwed by hand onto the eccentric fittings until they stop and turn with a wrench half a turn. There is no need to be zealous: paronite rubber is a very reliable seal, but if the rubber is squeezed, there will be a leak.
spout installation
When installing a spout (“gander”; the author of these lines once encountered a very “scientific” name in the instructions - a divergent), you need to make sure that the rubber sealing ring and the spacer ring are in place. Pushing the spacer ring into the spout fitting can cause some difficulties, as mentioned above. Make sure that the spacer ring is not crumpled during installation: the durability of the spout largely depends on this small detail.
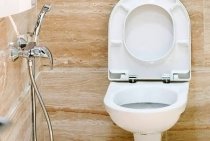
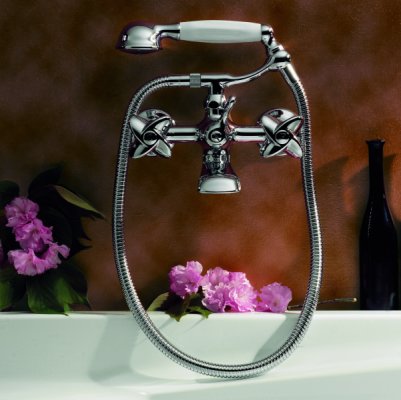
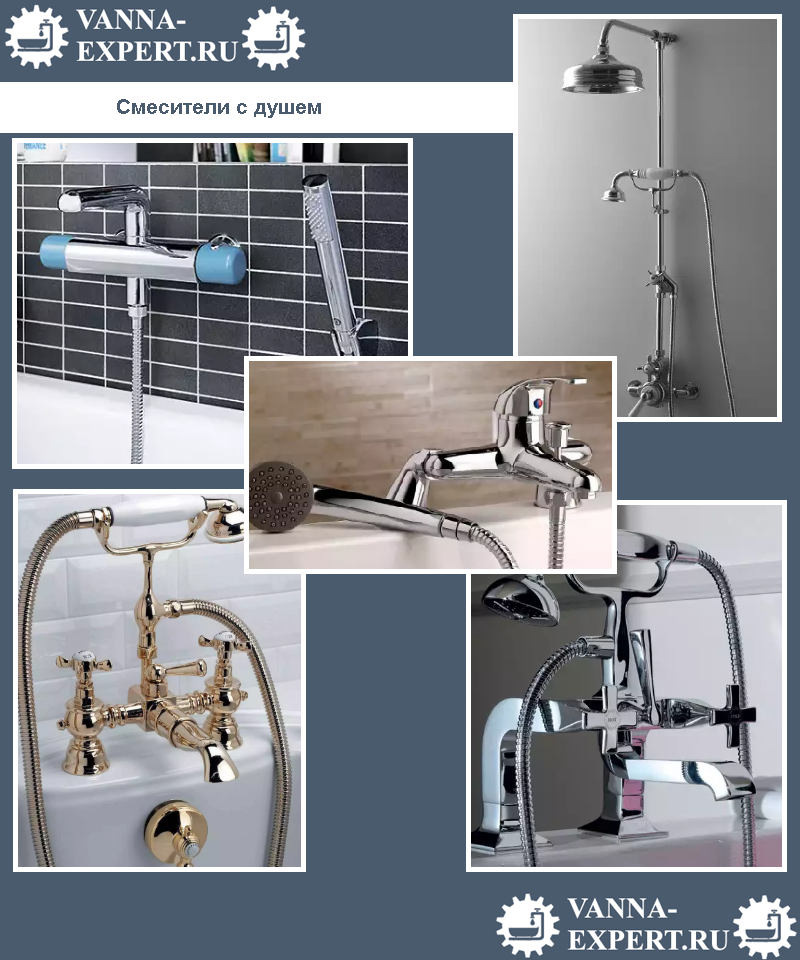
Shower installation
The shower is also installed on two gaskets: rubber and paronite. There may not be gaskets for a shower at all if its inlet fitting is with a conical recess, and the outlet for the mixer shower is hemispherical. Such a connection is no less reliable than on gaskets.
Types and brief characteristics of mixers
This information must be owned in order to select exactly the device that meets the operating conditions and preferences of the owners.
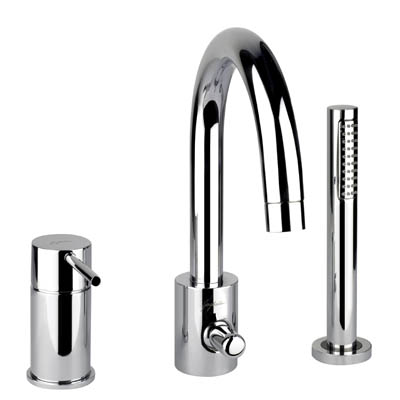
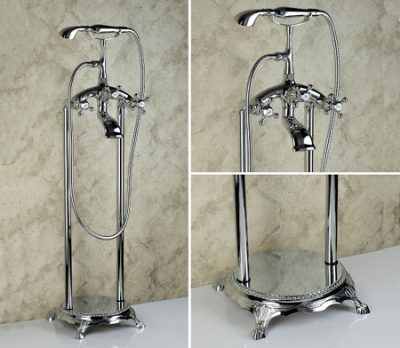
Bathroom faucets
They differ in the place of installation and engineering design, they can be fixed on walls, sides and racks.
| Illustration | Description |
|---|---|
|
|
Installed in bathrooms and showers, they can have a long, medium or short spout. |
|
|
They are mounted on wide sides of bathtubs, have a small spout. |
|
|
An exclusive option, the leg may have additional decorative elements. They are rarely used and only during the creation of prestigious interiors. |
According to the principle device, they can be single-lever and two-valve.
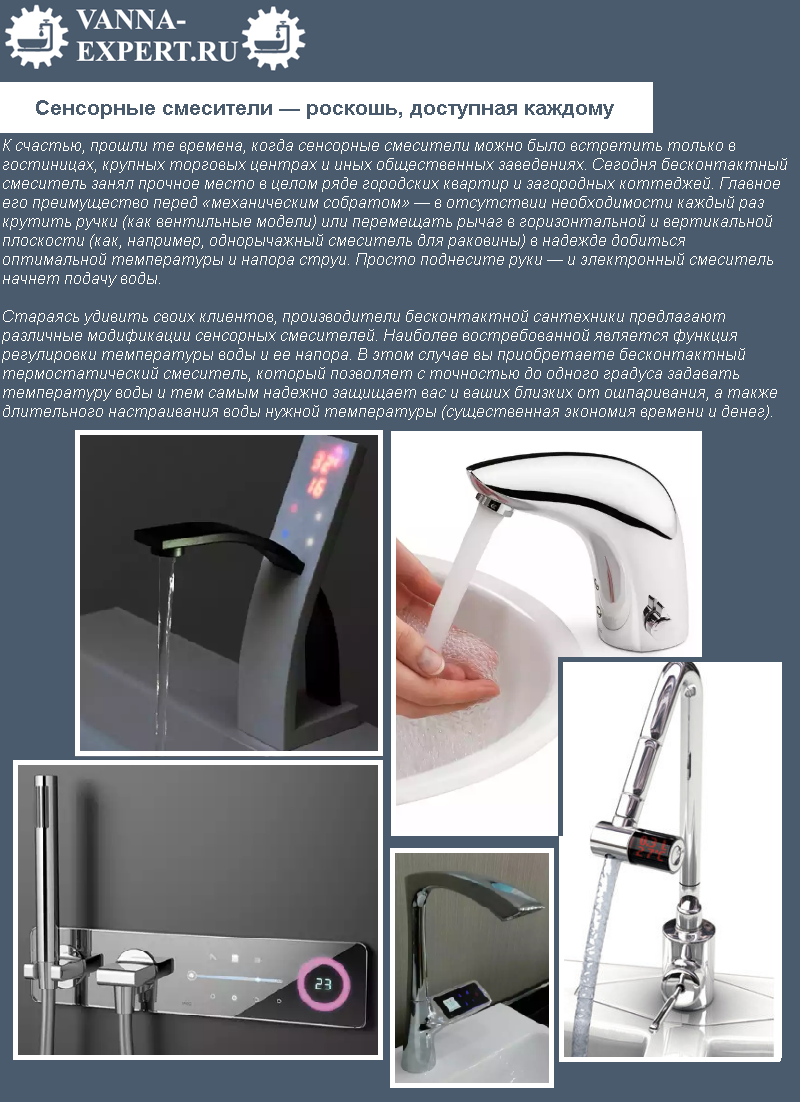
Modern innovative faucets can automatically maintain the water temperature within the specified limits - saving hot water consumption, increasing the comfort of taking water procedures.
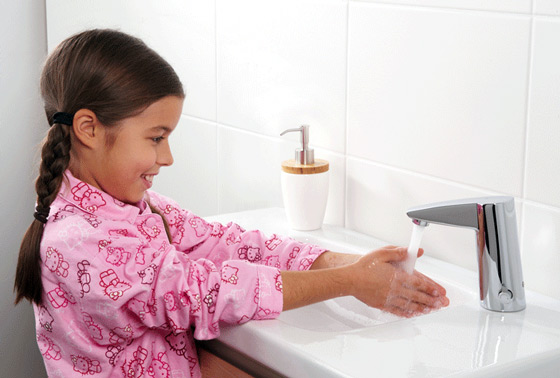
Another type of faucet - the inclusion of water is performed by sensors. Advantages - increased hygiene and ease of use. Disadvantages - high cost, difficulty in connecting.
Shower mixers
There are no fundamental differences. The only feature is the small linear dimensions. In some models there is no spout, only a flexible shower is installed.
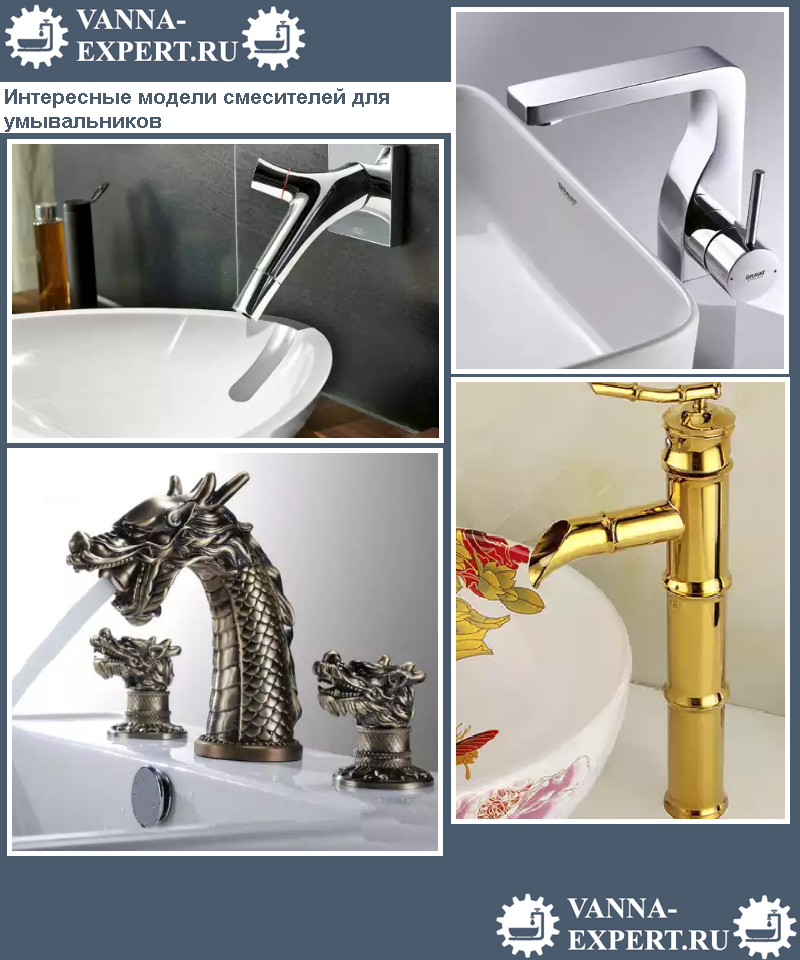
Basin faucets
Distinctive features - a short spout, mounted only on the sides. According to the method of mixing and adjusting the pressure, it is allowed to choose any options.
After choosing a specific model, you can proceed with the installation of devices. We will not dwell on specific types of mixers according to the principle of operation, for installation it does not matter. We will only talk about the stages of installation on the walls and sides.
Step-by-step instruction
Prepare mounting tools:
- gas and adjustable wrenches;
- FUM tape (can be replaced with ordinary tow or linen thread);
- a set of hex keys;
- pliers;
- Screwdriver Set;
- wrenches.
Often, when installing inlet fittings, it is almost impossible to maintain a distance between them equal to 150 mm. If you made a small mistake, then it's okay. Especially for this, transitional eccentrics are included with the plumbing fixture.
Take your chosen sealing material and wrap it around the threads of the eccentrics, and then screw them into the inlet fittings of the water main. Rotate the eccentrics to obtain a distance equal to or as close as possible to 150 mm. Check the horizontal position of the installation with a spirit level.
Pre-screw the body of the new faucet and make sure it is level. Check how the union nuts are tightened. They should be quite easy to tighten by hand on the entire thread of the nut. If it is rather tight, you will need to fine-tune by slightly turning the eccentrics to achieve unhindered twisting. After that, you will need to wind up the decorative cups that will hide the connection point of your new faucet to the mains.
Insert the gaskets and put the body of the product in place. Take the wrench and tighten the fixing nuts. Be sure to place a piece of soft cloth under the jaws of the wrench so as not to spoil the coating of the nuts and the general appearance of the product.
Just in case, you can apply pressure to the line and make sure there are no leaks. In case of its presence, it is necessary to additionally tighten the nuts until the leakage is completely eliminated.
Next, you will need to install the gander. Screw on the nut and tighten it with a wrench through a piece of fabric. Insert the gasket and screw the watering can hose to the main body. Insert another gasket, only now to connect the watering can to the hose. Mark the position and attachment points of the watering can holder.
Next, you will need to drill holes for the fasteners and fix the watering can holder bracket to the wall.After that, the process of self-installation of the faucet in the bathroom can be considered complete. Finally, you will need to open the shut-off valves, make sure that the mixer is working properly and check the tightness of the connections.
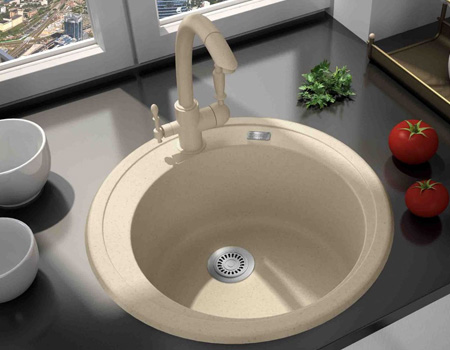
We will analyze the step-by-step installation of a mortise sink under the countertop. Together we will assemble the drain system under the sink and connect it to the plumbing in the bathroom.
Operating procedure
An o-ring is put on the gander. Remove the nuts from the studs, insert the eyeliner.
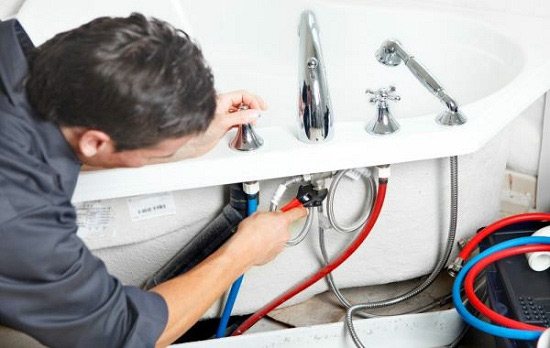
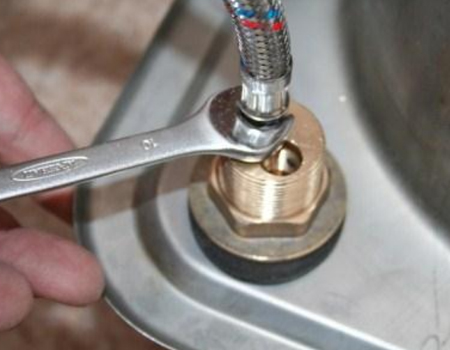
As a rule, 2 hoses are included in the kit: for hot and cold water. One of them has a short fitting, the other has a long one. The short hose is installed first. Installation is carried out with a key, carefully so as not to damage the thread. Then attach the eyeliner with a long fitting.
The studs are fixed at the bottom, install the gasket on the mixer. The connecting hoses are threaded into a special sink opening, then the mixer is placed in the hole intended for this.
From below, a sealing gasket and a clamping washer are put on the mixer. Using an adjustable wrench or pliers, tighten the lock nut. Check that the mixer is correctly and securely fixed to the sink.
After that, the hoses must be connected to the pipes.
Connection to water pipes
Threaded pipes are cleaned and insulated.
You can do this in two ways:
- A sealant is applied to the thread, and linen tow is wound on top.
- A sealing tape is wound over the overlapping threads, trying to distribute it evenly. This method is simpler and more reliable.
The hose is attached to the pipe, tightened with an adjustable wrench. After checking the entire structure for tightness.
To do this, turn on the water supply in the kitchen, but the taps do not open. Water flows through the pipes to the mixer and, accumulating, appears on the thread if the connection is not made correctly.
In this case, the water in the kitchen is again blocked, the remaining water is drained from the tap, and the connection is redone.
Rigid connection installation
If the kitchen sink is located too far from the hot and cold water pipes, and the flexible connection is not long enough to make a connection, a rigid connection can be used. Preparatory work in this case is done in exactly the same way as when installing a flexible connection.
To make access to the collet more convenient, a corner needle is screwed to one of the entrances, while making sure that it is directed to a free area under the sink.
A gasket is placed under the mixer, a tap is installed in the hole, a second gasket is put on it from below. Then a straight needle is screwed into the mixer until it stops.
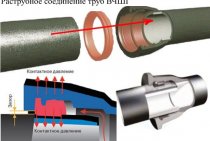
The distance from the sink to the water pipes is measured, the supply pipes are cut to the required length, and they are connected using clamping couplings.
These recommendations will help you install a new faucet yourself.
Installing a faucet with a stopper on a bathroom sink
In this article, you will learn how to install a faucet on a bathroom sink. We will assume that the sink has already been installed and pipes with hot and cold water have been connected to it. The sink is installed with three holes on the shelf for installing the faucet.
Preliminary work
- If your sink has a pedestal, remove it. But before doing this, check the reliability of fastening the sink itself to the wall.
- If your sink is mounted on a cabinet, it is best to detach the sink from the cabinet, remove it from the cabinet and fix the faucet away from the cabinet. Then put the sink in place and connect the water supply and sewer outlet.
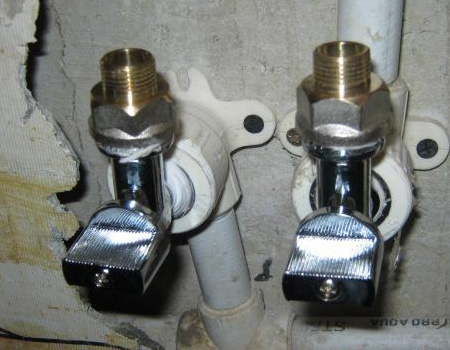
- If there are no shut-off valves on the connected water pipes that allow you to shut off the water for the sink separately from the apartment's water supply, they must be installed.
In this example, we will supply water to the mixer with a flexible connection: special reinforced hoses with threaded connections at the ends. Purchased mixers have hoses for water supply, standard length.If they are long, not enough to the pipes, then you need to buy a longer flexible liner.
When buying new flexible hoses, make sure that their connections match those of the shut-off valves. As a general rule, the flexible hose should have a 3/8" connection on the faucet side and a 1/2" connection on the plumbing side.
Estimated work time for installing a faucet in a bathroom with a pop-up drain plug
2 hours.
Shut off the water supply to the bathroom;
Remove the entire sewer outlet with siphon, if necessary.
Work materials
New faucet, new pop-up drain plug (usually supplied with faucet), plumbing acrylic sealant, flexible water line if needed.
Starting work on installing a new faucet on the bathroom sink
Step 1
If you have an old faucet, then turn on the water and turn off the water supply until the water stops flowing completely. Disconnect the siphon from the sewer and completely remove the old siphon. Unscrew the old water supply, the nuts securing the faucet to the sink. Remove the old faucet and thoroughly clean and dry the sink shelf.
Step 2
If the faucet requires assembly, assemble it. If the faucet kit does not include a rubber gasket for installation between the faucet and the sink, apply sealant to the sink under the faucet. Install the faucet on the sink shelf, remove excess sealant with warm water.
Step 3
You will need an assistant or a little dexterity. It is necessary to hold the mixer from above, and below, under the sink, tighten the fastening nuts. Tighten by hand first, and then tighten the nuts with a spanner wrench.
Step 4
Remove the old sink drain. Clean the drain hole of old putty and dirt. Lubricate the new drain with sealant and install it in the sink.
Step 5
Press the drain against the sink, put the rubber gasket and washer on the bottom of the drain. Hold the drain to one side while you hand tighten the retaining nut. Tighten the grooved locknut with pliers. Remove excess sealant with warm water.
If the drain is equipped with rubber gaskets to seal the drain on both sides of the sink, then no sealant is needed.
Step 6
Install the plug control lever rod. Install the plug needle through the drain hole. Using a sealing plumbing thread, insert a drain extension pipe into the drain hole. Install the stopper.
Step 7
Step 8
Check plug operation. In the closed position, the plug should tightly close the hole. To adjust the position of the cork, loosen the screw connecting the spoke from the cork and the rod from the lever and move the mount up or down.
Domity.com
Theoretical knowledge
In most cases, bathrooms already have an outlet for female end fittings for. In the event that you will be engaged in the supply of highways with your own hands, consider the following important points:
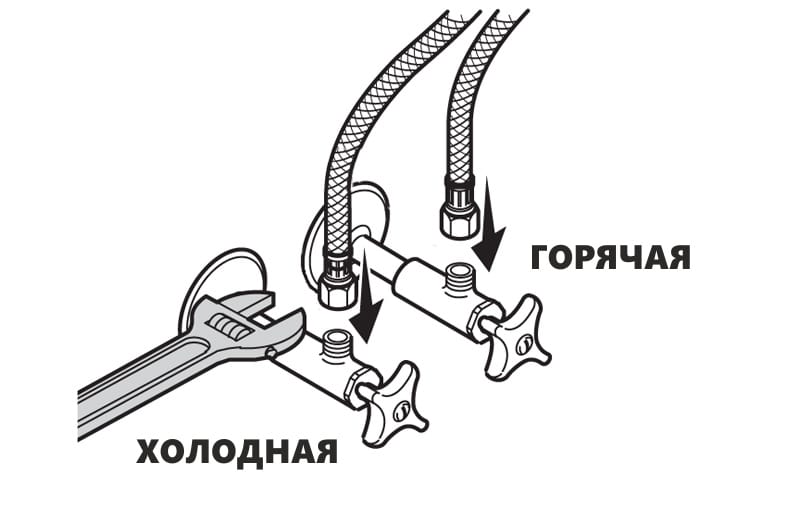
- The axis of the inlet fittings for hot and cold water must be installed at a distance of 15 cm from each other.
- Hot water is supplied on the left, and cold - on the right.
- It is most convenient to use a mixer installed at a height of 15-20 cm from the bathtub and 60-80 from the floor level. Therefore, it is best to be in this position.
- Push inlet fittings into the wall. This must be done in such a way that when laying the tiles on the wall, the ends of the fittings are flush with the front side of the ceramic tile. Thanks to this, you can hide the connection points of the plumbing fixture behind decorative cups.
For plumbing, it is best to use plastic pipes. They are cheaper and more practical than steel and cast iron products, and even a person without experience can handle welding such pipes.
The nuances of installing a mixer
With the installation of a tap on ceramics, everything is clear, but questions may arise when the sink is made of a different material. There are small nuances, which we will now take a closer look at.
When the stainless steel sink
The most important thing in installing a mixer is to choose the right model and correctly perform each stage of the work. It's not difficult, but it requires attention and calmness.
If the sink is made of stainless steel, then you need to choose a faucet of a suitable design, size and shape.
Moreover, most often stainless steel is used for the manufacture of kitchen sinks - it is a durable material. It is more convenient to mount the mixer in stainless steel when it is not installed at the workplace.
If the sink is easily removed, then it is better to do this by putting it in place after installing the faucet
When there is no way to remove the sink, you have to enlist the help of a friend, son, wife or other person. After all, the conditions in which the stainless steel sink is located are very constrained. Therefore, you can not do without an assistant and a flashlight.
The process of installing the faucet on a stainless steel sink is similar to installing it on a ceramic sink. If there is no hole for the mixer, then it is easy to cut it with your own hands, processing the edges so that they become smooth.
If the sink is made of glass
Glass products are often used in the interior. Shells made of this material look especially stylish. Moreover, they can be of different shapes, colors and sizes - it all depends on the flight of designer imagination.
Image Gallery
In the installation of the faucet on the glass sink, there will also be no difficulties.
It is important to follow the safety rules and choose the most suitable model
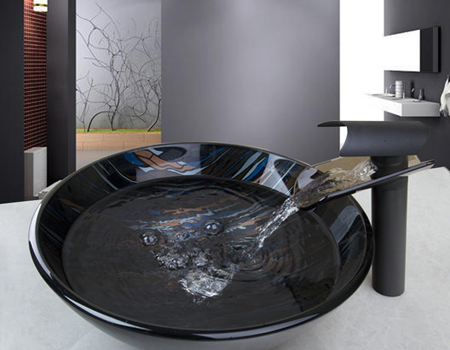
Often, a waterfall-type mixer - frap is selected for glass sinks. Some manufacturers supply a mixer and a bottom valve as a set.
Installation is carried out on the surface in which the hole is provided. If this is a model mounted on a pedestal, then you have to work with this base.
When working with glass, you should not rush - although it is heavy-duty, it can break when a hammer falls.
Other types of shell material
In addition to ceramics, glass and stainless steel, marble, porcelain, granite, plastic, acrylic and even wood are used for the production of sinks. Porcelain containers are quite expensive. As for the installation, it is simple and depends on the type of mixer to be installed. The purchased model comes with instructions that detail how to properly install.
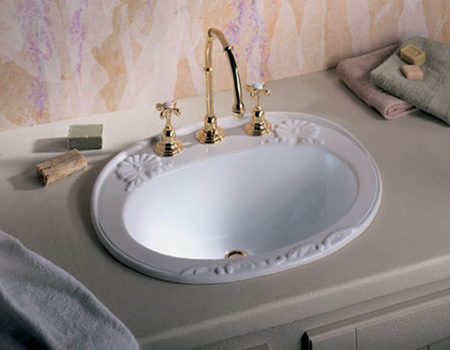
The porcelain sink looks elegant and sophisticated. For her, mixers of a special configuration are most often provided, when the valves for supplying water are located apart from the spout. There are corresponding holes in the sink body
If in a bathroom there is a sink or a pedestal for a sink from a tree installation - the mixer does not differ in special complexity. The only thing is that this material is rather capricious and will simply not be able to serve for a long time. The faucet will most likely outlive the sink.
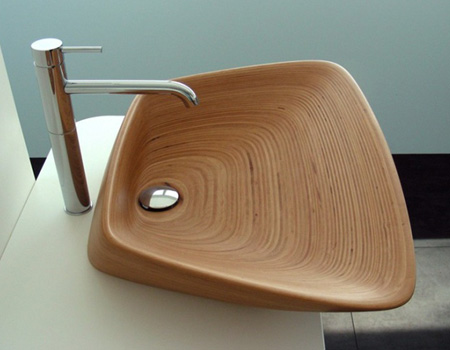
A wooden sink can be made in the form of a bowl fixed on a base made of a polymer or other material. In this case, the installation of the mixer will take place in the base
For marble, granite and acrylic, it is necessary to use a mixer installation technology similar to installation on a ceramic sink
It is important to assemble the mixer correctly, and in the process of tightening the fasteners, do not overtighten anything and carefully perform the connection and sealing knots
Granite sink is most often used for the kitchen. It allows you to add sophistication to the design of the room. Often the manufacturer completes a granite sink with a suitable faucet model.
Mixer selection
materials
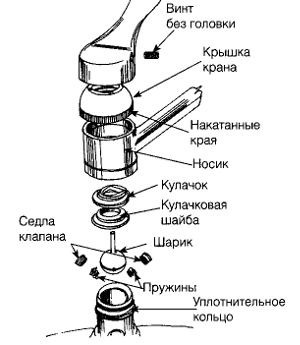
Metal
- Definitely brass or bronze. Silumin mixers, even from world brands, are subject to intergranular corrosion.She has no primary signs, except for small white spots, indistinguishable from ordinary salt deposits. But at one not at all wonderful moment, the mixer falls off or falls apart from a light pressure on the tap. It can fall off on its own, just when you and your whole family are on vacation, and before leaving you forgot to turn off the water. It is very easy to choose: by the yellow neck of the spout. Gray - silumin mixer.
Seals
- also definitely rubber. With all the achievements of modern chemistry, there is no plastic that could compare with it in terms of reliability and durability.
Spout spacer ring
. This important detail is located on the root part (neck) of the spout above the sealing rubber ring, in the annular groove. Most often it comes in a kit, in a bag with small accessories. Sellers often do not understand its purpose and recommend not to install it. In fact, without a spacer ring, the spout will immediately begin to stagger and soon leak. So be sure to check it out before buying.
The spacer ring is split. It is first put on the spout root so that it falls into the groove, and only then the spout is inserted into the socket. The ring is tight; it just won't fit into the hole. Then you need to squeeze it from the sides of the cut with your fingers or tweezers, and press on the spout root from below until it clicks and snaps into place.
Shut-off valves
What should be the faucet tap? Two-handle valve or cork with a rocking lever? A faucet with a two-handle faucet can only be recommended for aesthetic reasons: “I like this one!”; “But I want this one!” In all technical and economic indicators, the lever-cork crane surpasses it.
- Firstly, in terms of efficiency: if you close the valves, then the water temperature will have to be re-regulated when they are opened, and the water, which costs money, will go to the drain in the meantime. The lever-cork faucet is closed by moving the lever down, and the water temperature is adjusted by swinging the lever sideways. You can leave it in the desired position, then simply raise the lever, and the water of the desired temperature will immediately flow.
- Secondly, in terms of efficiency: due to the knee with a seat and the spool in valve valves, their hydraulic resistance is 3-5 times higher than that of a plug valve. Water flows through an open plug faucet as if it were not there at all. If the pressure in the system has dropped and it barely oozes out of the tap, then there is still a stream from the plug tap, under which you can wash.
- Third, for convenience. For a person who is accustomed to two "krantiks", it is "somehow wrong" to use the lever. But in fact, reaching out to the lever and raising / lowering or turning it requires the same 3-5 times less movements than groping and turning the handwheels. In addition, handwheels can be confused with a soapy head and closed eyes, and there is only one lever.
Sometimes they write: they say, a plug valve, when it is opened abruptly, can create a water hammer, from which the pipes burst. In this regard, it would be appropriate to tell the following story:
shower diffuser
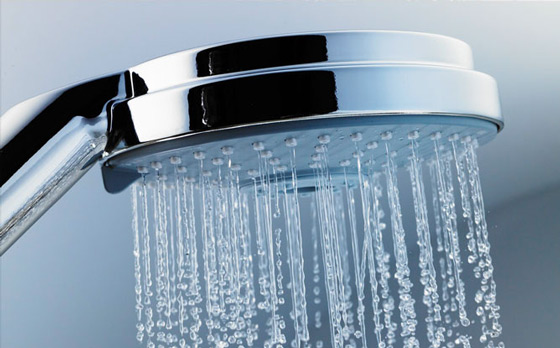
The head (diffuser) of the shower must be with self-cleaning nozzles. It is easy to determine this by appearance: soft papillae with small holes should protrude from the apertures of the diffuser grid. When you turn on / off the shower from changes in water pressure, the nozzles either expand or narrow and shake off salt deposits. A shower head with nozzles in hard material will sooner or later start splashing to the sides.
If there are (or are) ladies in the house, then it is better to purchase a mixer with a combi head. These have a lever on the side. In one extreme position, the shower works like a shower; in the other extreme, the water flow is blocked, which is convenient: you do not need to reach for taps or a lever. In the middle position, only the central nozzles work, giving a narrow and strong, but soft, non-cutting jet, designed specifically for the purposes of feminine hygiene.
Step 7 Check the sink for leaks
Washbasin installation completed. Now we open the instrument taps below, start the water and check the joints for leaks. Everything is dry, you can use it.
Installing a faucet with your own hands is so simple that it simply makes no sense to pay a master plumber for it. Of course, this does not apply to elite products of a special design and costing hundreds of dollars. But they are always supplied with detailed instructions, unless it is a fake.
The main issue when replacing a mixer is its choice in terms of actual quality. For ignorant people, some technological subtleties may also matter. We will talk about both.
Tap hole in stainless steel sink
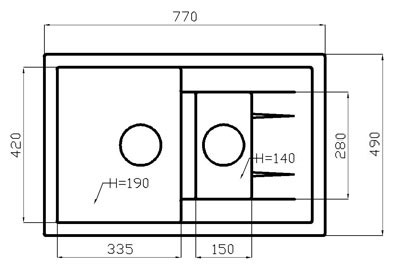
Diagram of the approximate dimensions of the kitchen sink.
There are several proven ways to drill a smooth hole in stainless steel. It should be noted right away that it is impossible to make an exit under the mixer in an already installed plumbing, since due to the support on the countertop there is a possibility that the plumbing will crack. Before carrying out work, the sink must be turned upside down so that all its edges rest on the surface of the table, and only then proceed to work.
If it is possible to purchase or rent a special cutter for making holes, it will not be difficult to carry out the work. First of all, you need to make an initial hole with a drill and a 10 mm drill. Next, the cutter screw is inserted and tightened with the help of 2 keys, so it turns out that the metal is squeezed from 2 sides and pressed through by the press method. The diameter may vary depending on the type of cutter used. If it is not possible to purchase a special device, you can resort to other methods.
So, in order to make an outlet for communications of the desired diameter in a stainless steel sink without the use of special tools, you will need the following tools and materials:
Scheme of the device mixer for the kitchen.
- marker;
- mounting tape;
- hammer;
- round file;
- center punch
In order for the diameter to correspond to the norm, first of all it is necessary to make a circle of the desired size and shape from mounting tape. The cut circle must be attached to the selected place under the mixer and circled with a marker in order to cut an even hole in the future. In addition, you need to mark the center in order to make the initial hole with a center punch. The tip of the punch should be directed to the center of the circle from the mounting tape and punch the initial hole with light taps. If you have a drill, you can drill with it. Next, the initial hole must be expanded with a round file to the boundaries noted earlier.
Just drilling an outlet for a faucet in a stainless steel sink is not enough, as the edges can turn out to be crooked, and it will be very problematic to align them later. After you get the exit under the mixer of the desired diameter, you need to carefully sand the edges of the cut, then you can proceed with the installation. To prevent further oxidation of the metal, the edges of a fresh saw cut must be treated with a sealant. After it hardens, you can proceed to install the sink.
Preparatory work
Before installing the mixer, it is not necessary, but it is advisable to flush the entire plumbing system. The meaning of this procedure is to clean the pipes from scale and the smallest metal particles adhering to their walls.
It is especially important to flush pipes in new buildings.
Preparation for the installation of the mixer is as follows:
- It is necessary to block the access of water through the central riser
- Secure the workplace in one of two ways: either connect the hoses to the place where the mixer will be installed and lead them into the toilet, or unscrew the siphon elbow and drain the water into the sewer pipe.
- It should be a couple of times with the help of valves to let water out of the central riser.
- Drain water from all plumbing fixtures with open valves.
- Install mechanical water filters. The place of their installation is immediately behind the central hot and cold water valves.
Dismantling the old mixer
With the help of valves in the kitchen, they turn off hot and cold water, then open the taps and wait for the remaining water to flow out of them.
If the faucet in the kitchen is very old, it may be difficult to dismantle it due to stuck threads. To facilitate the process, you can lubricate problem areas with a large amount of kerosene or apply a special tool.
After 10–20 minutes, they again try to unscrew the hoses - after lubricating with kerosene, they should come off easier. Using an adjustable wrench, unscrew the clamping nut, and unscrew the fixing screw with a screwdriver.
The mixer hole is cleaned of dirt and rust. Put in a new faucet to see if it fits. If the diameter of the hole is not enough for the product to fit into the sink, it is expanded. After the entire work area is wiped with alcohol to degrease.
The mixer is delivered unassembled and must be assembled before installation.
Errors during installation
When an invited master with remarkable experience is involved in the installation, the result of his work will be excellent - he knows all the nuances for sure. But self-assembly does not exclude the occurrence of various troubles. Especially if such work is carried out for the first time in life.
Firstly, after installation, you may find that the crane is dancing from side to side or leaning to the side. This problem will not arise if the nut is carefully fixed at the stage of its connection to the sink. Also, you need to check the correct placement so that you do not have to redo the work.

With the correct installation of the mixer, the deflection angles of the lever for turning on hot and cold water relative to the tap are equal
The second trouble is that when hot water is turned on, cold water flows and vice versa. This is also an easily fixable problem. Just at the stage of connecting the tap to the water supply, there was confusion with the pipes. It is necessary to shut off the supply of cold and hot water, disconnect the flexible connection and, having swapped the tubes, reconnect them.
Most often, the hot water supply pipe is on the right, and cold water on the left. If water meters are installed nearby, then you can determine from the meter
As a result, a flexible hose with a red tape should be connected to a pipe supplying hot water, and a tape braided in blue should be connected to a cold water supply pipe.
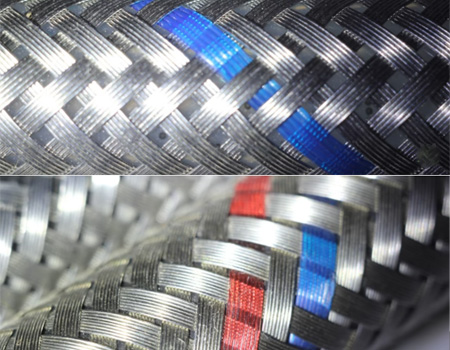
Cold water can be supplied through an eyeliner with blue tape or through a universal one that has both red and blue braided tape
Thirdly, leaks may appear at the junctions. This is the result of a weak tightening of the nut. You should tighten it at the leak and look again. If the leak does not stop, then the reason may be in the nut itself - perhaps it was overtightened, and it burst. Have to use a spare.
Silumin nuts break especially often - products made from this material attract with their low price. It is highly undesirable to use them at home - a more expensive product will last 10-15 years without requiring replacement
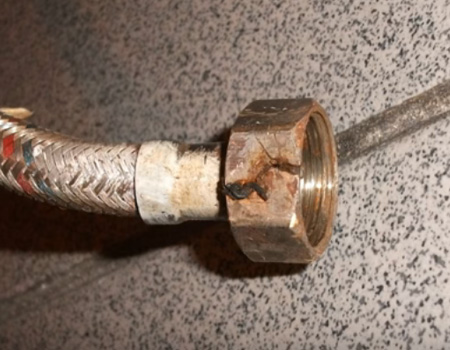
Fourth, flexible eyeliner can burst. This happens if one of the following situations occurs during installation:
- the flexible tube was short and had to be stretched a little;
- too long eyeliner was attached, it twisted and bent several times;
- technical rubber eyeliner with an aluminum frame, and the junction is hard to reach. It was sharply bent and broke;
Whatever the cause, it must be eliminated. It is bad when there is not enough length, but no less bad when this length is in excess.It is correct to choose the optimal eyeliner, taking into account the material - it is desirable that the rubber tube be made of food grade rubber, and the outer braid made of stainless steel or galvanized.
Image Gallery