Design of faucets and sinks which option will be optimal
- With retractable hose. This option is suitable for small rooms or small sinks. Subject to the choice of a deep bowl, the “mobile” hose will significantly expand the list of possibilities for using the mixer in the kitchen;
- From one collection. It is considered one of the simplest and also fastest options, in which the selection of elements is already done for you. In this case, you not only get a set made in the same style, but devices with similar technical parameters. Large manufacturers, at the same time, include optimal installation schemes in the data sheet of models and also indicate the recommended distance from the mixer to the sides of the bowl;
- Items from various collections. The option is suitable when buying, for example, a round sink, or a model with a non-standard shape. In this case, visual alignment becomes the best way, which can be done right in the store.
Some services also provide ready-made solutions by pre-selecting faucets and sinks for the buyer according to parameters such as: style, characteristics, dimensions, shape, operating options, etc. This allows not only to quickly find the perfect solution.
If you want to buy all the structural elements in a specialized store and do not have the skills to make the right decision, the best way to solve the problem is the service of a consultant. The seller will not only offer things
optimal for your kitchen, but will also give the necessary recommendations for the selection, installation, operation, etc.
Hole in the sink for the faucet, how to make it yourself if necessary
As you know, most sinks and sinks are sold with a ready-made hole for installing plumbing equipment. But some options have a symmetrical shape that allows you to install the water supply from different sides, in addition, if you purchased a three-hole sink faucet, then most likely you will have to do two of them yourself.
It is to this question that this review will be devoted.
Any mistakes in such work lead to damage to expensive plumbing, so you need to do everything carefully.
Basic requirements for work
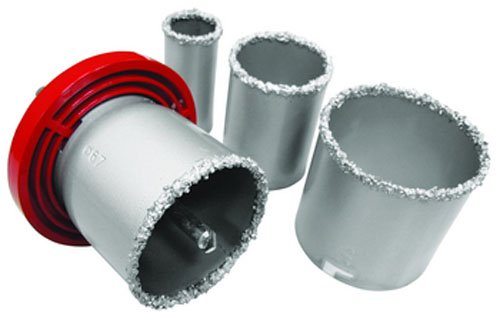
In the photo: on sale you can find whole sets of crowns with which you can drill any ceramics - from sinks to tiles and even artificial stone
Advice! It is better not to save money, but to purchase crowns from well-known companies, since cheap options often have a poor quality of abrasive edge deposition and wear out literally before our eyes. Therefore, choose a product at least from the middle price segment.
Features of the work
Consider how to drill a sink with your own hands. This is a simple matter, but it requires accuracy and precision, so proper preparation is just as important as the main stage.
Preparatory activities
Everything is quite simple and clear here:
- You need a drill or a screwdriver, if there is no tool, you should not buy it - you can rent it for an hour or two. The price of this service is low, so you can save a lot of money, since it is at least impractical to purchase a drill for the sake of just this work.
- You also need a crown, the diameter of the hole for the faucet in the sink usually does not exceed 34 mm, fixtures of 35 mm in size are on sale, they are just right. So the installation will turn out to be convenient, especially since the connection is sealed with a rubber ring (if it is not there, you can use a fum tape).
- Another option is the so-called "ballerina" for ceramics, it is a design on which the distance from the cutting segment to the center can be adjusted.This option is suitable for you only if the thickness of the shell at the drilling site is small.
This is what a ballerina looks like
Do not forget about the measuring and marking tool: a tape measure, a ruler and a pencil will allow you to carry out all the work with high quality. Of course, it is best to use a special pencil for ceramics, but in extreme cases, you can get by with a simple building one.
A special pencil is perfect not only for ceramics, but also for glass, and even for metal
The place of work should also be equipped, the sink should be laid so that it is as stable as possible. Either two wooden bars or a wooden pallet will do, on which you can conveniently place the products.
The working process
Drilling is carried out in the following order:
First of all, there is a marking of the location of the future hole or holes. On some plumbing products there is an indication of the places that can be drilled, it is those areas that should be used. If there are no marks, the right place is selected, on which everything necessary is marked.
The 3-hole basin faucet looks very interesting, but there is much more work with it, especially when drilling
Next, the crown is carefully fixed in a drill, and the sink is laid so that it does not move during operation, if necessary, you need to attract an assistant to hold the structure and ensure its immobility.
Advice! On some crowns, a centering drill is installed, with its help it is much easier to get into the markup exactly, therefore, for those who have not had experience in such work, this option is recommended.
- Drilling is done carefully - without pressure, the abrasive itself deepens under the influence of high speed drills. If you press too hard, you run the risk of damaging the crown or even ruining the ceramic, which will simply crack from excessive stress.
- Do not listen to pseudo-specialists who claim that the drilling site must be constantly watered. Modern attachments do not require this, so you should not be distracted by an unnecessary operation, which, among other things, can ruin the crown.
If the instructions for using the crown do not provide for moistening, then water will be superfluous in the workflow.
Making a hole for installing a mixer
Currently, there are many models of sinks that have a symmetrical shape. Such sinks are extremely convenient, as they can be installed both on the left side and on the right.
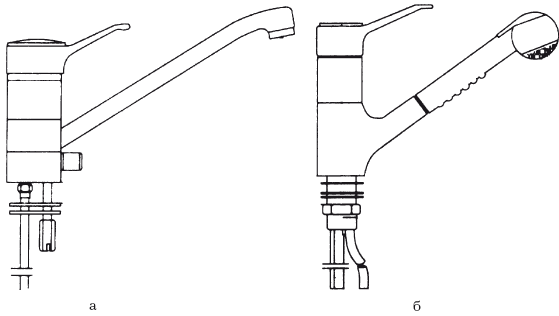
Some models of modern faucets: a - kitchen sink faucet; b - a mixer for a kitchen sink with a shower screen on a flexible hose.
It is assumed that a hole for the mixer of the required diameter will be made immediately before the installation of plumbing. On the one hand, this is very convenient, because it is not always possible to choose a sink with ready-made outlets due to a discrepancy in the parameters.
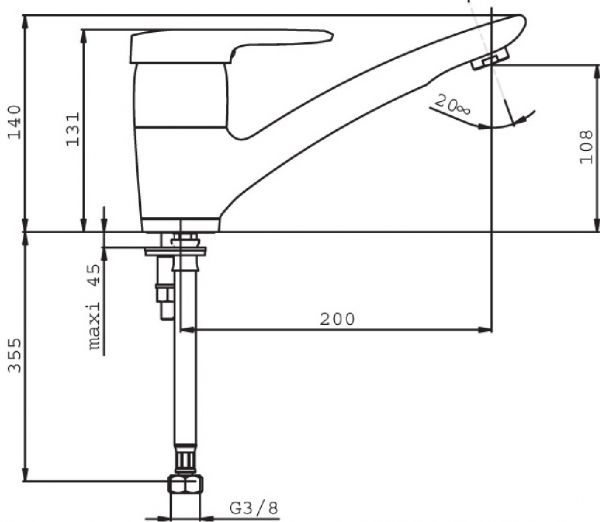
Single hole kitchen sink faucet: drawing.
Most ready-to-install kitchen sinks have a factory outlet of 32mm, while faucet diameters can be over 34mm. Currently, sinks without a ready-made outlet are produced in both stainless steel and ceramic. For many, making a hole of the required diameter may seem like an impossible task, but in this case there are a number of measures that can be taken.
In some points of sale of such sinks, it is quite possible to use the services of specialists: they will select the outlet for the mixer of the required diameter, they will do everything with the help of special tools. But such services are far from being provided everywhere, and owners of sinks without a ready outlet for the mixer will have to make it on their own.
It’s worth saying right away that you can make a neat hole on your own only in stainless steel, while experimenting on a granite or ceramic kitchen sink is fraught, as the material may crack.
Work on the manufacture of outlets for communications in a ceramic sink must be carried out as carefully as possible so as not to spoil the appearance of the sink. If possible, you need to purchase tools: for stainless steel, special cutters for making holes are sold; for ceramics, it is best to use diamond-coated drills. Drilling ceramic plumbing with a conventional drill will not work, as the ceramics will simply crack. However, it is quite possible to get by with some improvised means, but you need to act very carefully.
Hole for sink faucet
The rule is the same for all sinks, the higher, the deeper the bowl should be. When choosing an arc-shaped mixer, flat models are not recommended. Such designs are more suitable for mixers of small height and become a good option, if necessary, to equip a small corner.
When choosing a design for the kitchen, it is also important to consider the following:
- The sink should be of such a shape that the jet of water would fall exactly on the bottom of the bowl, even with full pressure (a narrow sink is not the best option);
- When installing the sink on the countertop, a high-rack faucet model will be a quality choice;
- The angle of incidence of the jet is quite rarely equal to 90 degrees, so the distance from the counter to the side of the sink should be taken into account;
- The number of holes required in the design determines whether a wall-mounted sink can be purchased. Or a product that is installed on a countertop (the model can be presented both with one hole and with three).
Another criterion for choosing a product is the design of the faucet. How to choose a model, read on.
Reasons for the lack of holes
Manufacturers of sinks and plumbing fixtures are trying to standardize the dimensional parameters of the models so that they are as compatible as possible with each other.
But there is one important circumstance: individual layouts are very popular both in the kitchen and in the bathroom. To meet such needs, the release of models of sinks in which the tap hole is not provided is required.
The groove is made independently in the most convenient place and with the desired characteristics.
There are no holes in metal sinks with two bowls, where by default the grooves for washing or drying are not provided for practical reasons. A person chooses the best option for himself by installing the sink on the spot.
The size of the holes depends on the design of the faucet. Mixer models may vary significantly. The size of the required groove in the sink depends on this.
Before performing work, you need to choose a model, find out its parameters and design features.
Hole in the sink for the faucet, how to make it yourself if necessary
In this case, the preparatory stage is the same as when performing flexible installation.
Then the work is done according to the following algorithm:
- For more complete access to the collet, an angled needle is screwed into one of the faucet inlets so that its direction is oriented to the freest part of the space under the sink. This will make it easier to connect the pipe later.
- A hydraulic seal is made between the sink and faucet using a gasket.
- The valve is installed in the mounting hole.
- From below, the crane is sealed and reinforced with another gasket.
- The straight needle is screwed into the mixer until it stops.
- After determining the length of the supply pipes, the desired size is left, and the excess section is cut off with a pipe cutter. Metal-plastic well accepts the desired configuration when bent.
- Finally, the pipes are fixed with clamping sleeves using the necessary keys.
Before starting plumbing work, you should decide on the interior design of the room. First, it is better to choose a sink, and only then a mixer to it. Its correct installation guarantees ease of use, long-term trouble-free operation, reliability and comfort.
More information on the topic: http://aqua-rmnt.com
Hole in stainless steel sink
as I understand it, you don’t need to draw anything, there is a green sticker in the place where you need to break through.
If it can be done with a core drill, then that's great, tomorrow we'll try to buy it. Or maybe you can just hammer on this place with a chisel ?! Will it pop out?
When we bought a sink, we were offered to immediately punch a hole in the store for 200 rubles.
In Blanco sinks, the hole for the faucet is simply knocked out. In these places, the stone is specially made thinner. But in a place not intended for a mixer, I do not advise trying to drill a hole
Of course, if there are places for holes, then no drill is needed, the instructions should. told how to knock it out.
we made this hole immediately upon purchase. the current was asked how the sink will stand.
There should be two places for holes, depending on which direction you turn the wing and knock it out. Also, they are marked with stickers.
Heron
23-11-2007, 00:09
The only question was how to knock out! What kind of tool, so as not to break the sink. By the way, I found out that a hole can be knocked out in the Blanco service center. It costs 200r. This is in the district of m. Lesnaya.
Does anyone know how to make a faucet hole like this?
Here is your question. Everyone answers it for you.
In general, of course, you have a strange installer. Ours installed the sink and punched this hole without problems
Thanks to all!
Development of events.
Friday morning. I handed over the sink to the nearest store to make a hole. They said it would cost $300. Friday evening. The call of the master on the mobile phone: “I didn’t do a damn thing! Did not have time! Now only on Monday! Saturday morning. I go to the store, I pick up the sink. Heavy, dog… Saturday evening. The sink is in its place in the kitchen. I'm near. In the hands of a drill d = 10 with a pobedite tip. Request to his wife (Heron (http://2006-2009.littleone.ru/member.php?u=72)) to confirm the operation. A minute later. Confirmation received. Hit! The hole is ready. Though not round. A dozen more weaker blows, tapping with a hammer, grinding with a file. There is a hole.
Sunday evening. The sink is installed on silicone sealant, the mixer is installed and connected, drain, overflow, etc. - too. I’m sitting on the floor, sorting through all sorts of papers from the kitchen: installation instructions, operating instructions, warranty cards, etc. “Here are the figures,” I say, “they couldn’t write in Russian!” I read English to my wife (and myself) aloud. Installation guide for the sink... Point five: "in some cases, the following operations may be necessary." A sticker is drawn, a drill, a hammer, it is written that you need to hit the sticker several times ... In short, exactly the sequence that I completed is given! They cried for a long time. Sometimes it's good to read the instructions.
Thanks to all! :support:
what and how to drill a hole for a mixer in a stainless sink
In this case, if you pre-install both hoses and mounting studs, then the fasteners and hoses will not be able to fit through the hole in the sink. Therefore, it is advisable to install one connection hose and fasteners at the first stage. Connect the second hose after installing the faucet on the sink.
The fastening studs at one end have a groove for a screwdriver. Thanks to this, they can be easily fixed on the mixer. It should be noted that it is necessary to wrap the studs well, because. with their help, the mixer will be attached to the sink.
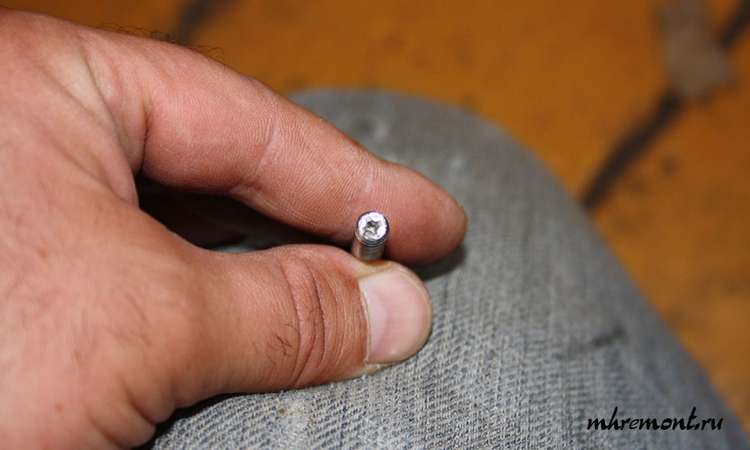 Fig.3. The fixture for a sink consists of a washer of a hairpin and a nut. The stud has a special slot for a screwdriver. With it, you can securely fix the pin in the mixer without damaging the thread.
Now a few words should be said about the connection hoses.
Why should only one hose be wrapped? The fact is that if you immediately install two hoses, then inserting the mixer into the hole in the sink will be very problematic. Therefore, it is advisable to first connect one hose, then fix the mixer in the sink, and then connect the second hose.
Hoses should not be tightened very tightly, because.Because since they themselves are double sealed, there is little chance that it will not be airtight. If the hose is tightened too much, the seal may be damaged and it may leak in the future, and there may also be problems with replacing the hoses.
When purchasing a kitchen faucet, you should pay attention to the ends of the hoses that are connected to the faucet. For well-known manufacturers, they have different lengths, and accordingly, the places (nut) for which the hoses are tightened are spaced relative to each other, which greatly simplifies their connection
This is especially useful when replacing hoses without removing the faucet from the sink.
After all preparations are completed, it is necessary to install the mixer on the sink and lightly screw on the fastener nuts. Then install the second hose.
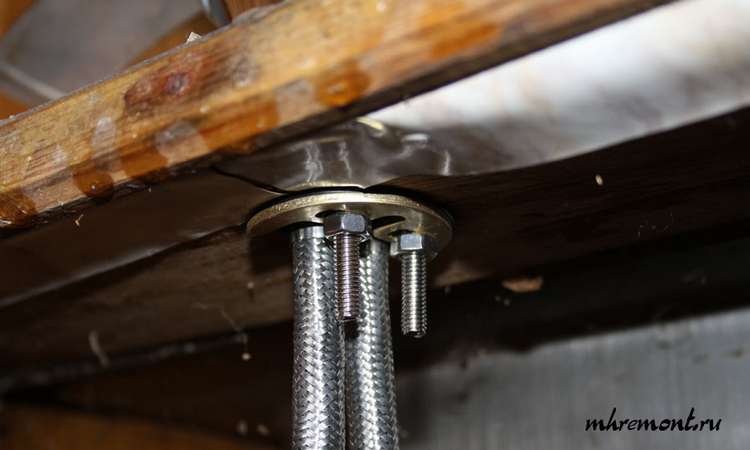 Fig.4. The mixer is installed in the hole in the sink. After that, you need to make fasteners. Then you need to connect a second hose to the mixer. Further, in order to make it convenient to use the mixer, it is necessary to set the position of the mixer relative to the sink. Then you can tighten the fastener.
Next, you need to install the mixer itself in the desired position relative to the sink, and then fix it well
Two points should be noted here
It is necessary to check that the mixer completely closes the hole in the sink under it. Otherwise, leakage through it during operation is possible.
You should check the position of the tap when turning on hot and cold water, so that the mixer is convenient to use.
And the last thing to say about installing a faucet in the kitchen
Please note that the end of the hoses that connects to the water supply has a nut-like connection. Therefore, the water pipes must be threaded
This is true for all types of mixers. It should also be said that when connecting the hoses to the water supply, do not overtighten the nuts on the hoses. The water pipe may cut through the gasket and the connection will leak.
Basic requirements for work
Even before you start work, you should know some requirements, the observance of which will ensure a quality result. Do not forget that any mistake is fraught with damage to the sink and its destruction, therefore, in no case should you neglect the recommendations below ().
Availability of the necessary power tools
It is unlikely that you will be able to make holes manually, so you should take care in advance that a drill or a powerful screwdriver is at hand. At the same time, the equipment should be not only powerful, but also convenient - it is unlikely that it will be possible to accurately drill ceramics with a heavy drill.
The right choice of equipment
In no case should ceramics be processed with drills for metal, concrete or wood
It is necessary to purchase a crown with a special tungsten coating, which will allow you to carry out work efficiently and quickly, they will help you choose the right option in the store, the main thing is to know such indicators as the diameter of the elements and the drilling depth
Accuracy in measuring and marking
It is very important to correctly mark the position of future holes, since in case of errors they will not be able to be repaired. In addition, do not forget about the convenience that should be provided, sometimes the mixer is located on the side and it is inconvenient to use it.
Accuracy at work
The drilling process itself must be carried out very carefully, below we will consider this part of the work in more detail, since it requires the closest attention.
Installing a faucet on a kitchen sink with your own hands
The faucet is integral to the kitchen sink and sink installation work includes installing the faucet on the sink. About the options for installing a faucet on a kitchen sink in this article.
Two mixer options
There are two fundamentally different options for installing a sink faucet. These options for the selected sink differ, or rather, whether there is a hole in the sink for installing the mixer.
In the next two photos we see two different types of kitchen sinks.In the first sink there is a factory-made hole of a standard diameter for installing a mixer. There is no such hole in the second sink. This means that you can make a hole for the faucet yourself or install the faucet on the countertop next to the sink.
sink faucetcountertop faucet
The option of self-drilling a hole is possible, but has several disadvantages. First of all, in the place of the factory hole for the mixer, manufacturers of metal sinks intensify the sink.
Thanks to this, the mixer stands firmly on the sink and does not “play” with the metal. If you drill a hole yourself, then the mixer may oscillate after installation.
In addition, self-drilling of the sink will violate its anti-corrosion coating at the drilling site.
Therefore, if a hole is not provided in the sink, then the mixer is placed on the countertop. In the photo we see the installation options for the mixer next to the sink.
Steps for installing a sink faucet
The mixer is installed on the sink before it is installed on the countertop. It is more convenient and technologically better.
The connection of the faucet to the water supply is carried out after installing the sink with the installed faucet on the countertop or kitchen cabinet. It is better to assemble the mixer on a convenient surface.
For assembly, prepare the mortise sink itself, a faucet with an installation kit and a flexible hose. The installation kit is included with the faucet and includes:
- Gaskets;
- fastening washer;
- Studs (stud) fastening with nuts.
Related article: The difference between overhead and mortise sinks for the kitchen
This is the most common option for attaching the mixer to the sink, which can be called standard.
Important! Faucets differ in the way they are connected to the water supply. Here I show a faucet with a flexible connection option (connection hoses), which are screwed to the faucet separately
On sale there are options for mixers with factory-installed non-removable connection hoses. When buying them, you need to take into account that it is impossible to repair such mixers in case of damage to the connection hoses.
The flexible hose is screwed to the faucet before the faucet is installed. There is no need to do any winding of flax under the thread.
To tighten the eyeliner at its end there is a hexagon for an open-end wrench No. 10. The tightening must be carried out with a slight gain so that the gaskets on the hose do not crack.
After fixing the eyeliner, we screw the fastening bushings into the mixer body (if they are included separately, and not assembled at the factory).
After assembling the mixer, it is installed in the sink hole. Do not forget to install the gasket between the sink and the faucet, which comes with the faucet. The gasket can be pressed into the mixer body.
On the reverse side of the sink, we put on a special gasket and a washer of the same profile on the mounting bushings. Next, fasten the mixer to the sink with nuts, tightening the nuts until it stops.
sink faucet installed
So that the fastening does not weaken over time, we fix the first nuts with the second nuts, which are not included in the mixer kit and must be bought in advance.
The result of the installation should be a solid fastening of the mixer, it should not stagger, the eyeliner should be on the mixer.
Next, the sink is placed on the countertop, as in the article: Do-it-yourself installation of a mortise sink with a bulkhead of the lower kitchen cabinet
Related article: Decorative stone on the kitchen wall: choice, design, installation
Steps for installing a faucet on a countertop
In this version, the sink can be placed before or after the installation of the faucet on the countertop. There is no difference, it all depends on the ease of access.
A hole for the mixer with a diameter of 35 mm is pre-drilled in the countertop. The thickness of the countertops is 28 or 40 mm, and the length of the faucet fixing pins is 100 mm, so they should be enough to fix the faucet to the countertop.
conclusions
Installing a faucet on a kitchen sink with your own hands is not associated with big problems. Especially if the connection is made through a flexible eyeliner. It is much more difficult to change the faucet on an installed sink or connect a faucet with a hard connection.More on this in future articles.
Varieties of modern sinks
The two main options for kitchen sinks are in greatest demand today - stainless steel and ceramic products. Manufacturers are in no hurry to make holes in them, leaving this work entirely on the shoulders of sellers and end consumers.
It would seem that the problem has been solved, but in practice situations often arise that do not coincide with the plans of consumers. For example, when ordering a kitchen of non-standard sizes, or the kitchen equipment itself, if the hostess is left-handed, the hole in her new sink is located on the right side, which is incredibly inconvenient for her.
Before you cut a hole in the sink for the faucet, first install it, take a good look, and only then decide where to make nests. If you still decide to do everything yourself, then use the following useful recommendations:
- Perform all manipulations with the product immediately before its installation in a stationary place - this will prevent premature damage and deformation of the object.
- The sink should be installed horizontally on a wooden base, then drill a hole with a special drill.
- In the case of using a punch and a hammer, punch a sufficiently fixed bowl manually with special nozzles, previously selected for the diameter of the tap or mixer tap holes in the new sink.
- If you want to use a specially designed punch, please note that it works according to the extrusion method. As a rule, such a device consists of two nozzles and a threaded pin, a pressing washer and a tap. It is enough to put the pin in place from the outside, wind the washer, make a tightening-pressing.
- The use of a special drill involves the use of a cone-shaped drill that works according to the simplest principle.
- When buying a mixer with large diameter glasses, it becomes necessary to prepare a special seat. This problem is solved in two ways - you can order a nest in the store or drill several holes around a circle with a smaller diameter.
Where to cut a hole
Another important question that will arise regardless of what material the sink was purchased from: cut a hole in it from the front side after installation? Or do it before installation and from the back?
Each method has a number of pros and cons:
- In the first case, the edges on the front side will be much smoother, but there is a chance of spoiling the front side of the sink with a drill, and if it has a narrow rim, then splitting the edge.
- In the second option, the risk of damaging the bowl is much lower, but there is a chance of getting a sloppy edge of the hole on the front side. In most cases, this is not critical, since the edges of the hole are closed with a mixer. When flipping, it is possible to inadvertently make a hole on the wrong side, so it is advisable to mark the side on which you want to install the faucet.
In any of the methods, it is desirable to place the hole away from the edge of the product, but without touching the bowl. To do this, before starting work, it is necessary to attach the lower mixer nut to the sink and mark its center.
The nuances of shells from algomerat
If you purchased a sink made of stone agglomerate, it will be a little easier to work with it.

Agglomerate shell shown
Well-known manufacturers usually attach a cutter or core, which knocks out a piece of stone that has already been drilled, but not completely. If they are absent, then it is best to use a diamond-coated cutter or crown and proceed as when working with porcelain stoneware.
A fostner cutter will also cope with a hole in a stone agglomerate product. But be prepared for the fact that after that it will need to be sharpened, or even thrown out altogether.
Be sure to read the instructions and operating instructions before taking any action so as not to accidentally lose the product warranty.
acrylic stone
If the sink is made as one piece with the countertop and the same color with it, then this is an acrylic artificial stone.Of the above materials, this one has the lowest density, so it is easiest to work with it. If the purchased sink is made of acrylic stone, then it can be drilled with ordinary drills for working on metal or wood.
The hole for a standard mixer, in most cases, has a diameter of 35 mm. In a product made of acrylic stone, it is easily drilled with a drill bit for woodworking or a forstner cutter of the same diameter. It is necessary to work at low or medium speeds. When drilling this material, a large amount of chips are formed, and the plastic that is part of the acrylic stone emits an unpleasant odor, somewhat reminiscent of epoxy glue.
An example of a sink made from this material
Acrylic stone is the most malleable of all types of artificial stone, so most countertops are made from it. If there is a need to make a hole in it for a sink or hob, it is better to pre-practice in the middle of the cut-out part so as not to spoil the entire countertop. Despite the fact that the acrylic stone is sawn without any problems with a jigsaw, it is undesirable to cut it with it. When working with a jigsaw, so-called stress concentrators (sharp transitions, sharp corners, microcracks) often occur, which will affect the service life of the product.
In this case, it is permissible to cut a hole smaller than necessary by 5 mm with a jigsaw. After the work with a jigsaw is finished, bring it to a clean size with a cutter. Be sure to make an R3 chamfer along the edges, it will also reduce stress and increase the life of the countertop.
More information in this video.
If you are not ready to take on this work on your own, delegate it to the masters of your craft. The contact form is at the bottom right. Consultation on questions and calculation of the cost - free of charge.
Is it worth it to make holes for the mixers yourself
Installation details depend on the installation location. Wall-mounted mixers are mounted on the outlets of water pipes rigidly fixed in the wall or fixed on its surface. During installation, couplings and fittings are used. But, the distance between the outlets of the pipe and the inlets of the mixer does not always coincide, therefore, eccentrics are used for such installation.
Most often, the mixer is installed in a sink with a tie-in. This arrangement of the tap is more in line with ergonomic standards, simplifies installation, does not require laying walls in pipes. In addition, installing a tap on a sink or countertop does not take up much space and does not interfere with cooking or washing dishes. When mounting on a sink or countertop, the mixer is inserted into the installation hole and fixed from below with a nut. After that, cold and hot water are connected. When connecting, flexible hoses or copper tubes are used, which can be shaped to the desired shape.
After completing the connection, check the reliability and tightness of all connections. To do this, first open the valves on the risers a little and make sure that there are no leaks. After that, the valves are opened completely, but for some time they continue to monitor in order to identify and eliminate the malfunction in a timely manner.
More questions about your topic:
leave a comment
Builder's dictionary :: Repair questions :: Calculators :: Special equipment :: Miscellaneous
2006 - 2017 user agreement :: contact with the site administration max@remotn.ru