Laying electric underfloor heating under tiles
In order for the underfloor heating system to function reliably, it is necessary to correctly lay the cable or heating mat, the laying technology of which will be different.
Installation of underfloor heating cable under the tile
Before laying the cable, check the resistance of the cable. Then fasten a special tape with fasteners to the floor. Due to the fact that the fasteners on the tape are located frequently, it will not be difficult for the installer to arrange the cable at the right distance from each other. The second option is to lay a metal mesh on the floor and attach the cable to it using a plastic clamp. And the clamp is not tightened too much. Such a cable floor device for tiles is convenient in that it creates additional rigidity.
The heating cable is located at a distance of 150-200 mm from the wall, and 100 mm from each other. Laying is usually done with a snake.
Installation of mats for a warm electric floor under a tile
Heating mats are easier to install than cable. To prepare the system for launch, it is enough just to lay the mats on the floor and check the resistance. At the same time, during the laying process, the electric mat can be laid straight, with a turn (for this, the carrier mesh is cut) or with a turn (the mesh is cut and unfolded). Also, by cutting the mesh, you can bypass obstacles (for example, a podium).
The requirements for the location of the mat are the same as for the cable, and the distance between the sections is 50-100 mm. The laid mat is fixed with adhesive tape.
Turning the heating mat when laying the electric underfloor heating under the tiles Installation of the electric underfloor heating under the tiles Pouring the screed under the electric underfloor heating under the tiles Laying tiles on the electric underfloor heating
A grounding device and RCD for warm electric floors is mandatory, regardless of their installation location.
Note. As for the installation of an electric underfloor heating system in a bath or sauna, there is no consensus among users. Some of them claim that with proper installation, it is permissible to install the system in any bath room. The part claims that installation in the sink is unacceptable. Or it is recommended to turn off the warm floor while using the sink / shower. In any case, this is electricity, so operation in a humid environment is extremely dangerous.
Other purchases
Before proceeding with the question of how to lay a warm floor under the tile, you must purchase:
- Tools. To install a warm floor, you will need a tape measure, a construction knife, crosses and spacers for laying tiles, a grinder, a notched trowel, a mallet and much more, so carefully consider your shopping list before going to the store;
- Penofol is a heat-insulating material made of polyethylene foam and foil. It is laid on a concrete base under the heating element in order to minimize the heat expended, and, accordingly, energy;
- floor tiles;
- Tile adhesive and grout.
Film underfloor heating under the tile
Installation of a warm film floor under a tile is distinguished by its own characteristics, and it requires much more time and effort than in all other cases, since it was originally planned only for dry installation. That is, this means that not every film floor is able to withstand the alkaline environment of tile adhesive or cement screed.
Important point: a warm film floor must be installed exclusively at a positive temperature.
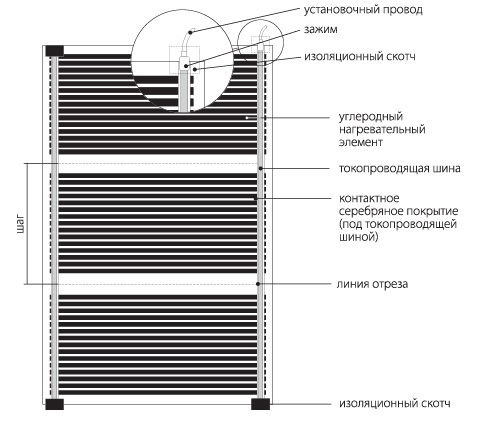
The film is laid down with the side on which the conductive copper bars are visible. The base must be clean and dry.To prevent the strips from moving after connection, it is better to attach them with masking tape. Remember: the main thing is to get tight contact between the heat-insulating material and the film. This eliminates the occurrence of an air void.
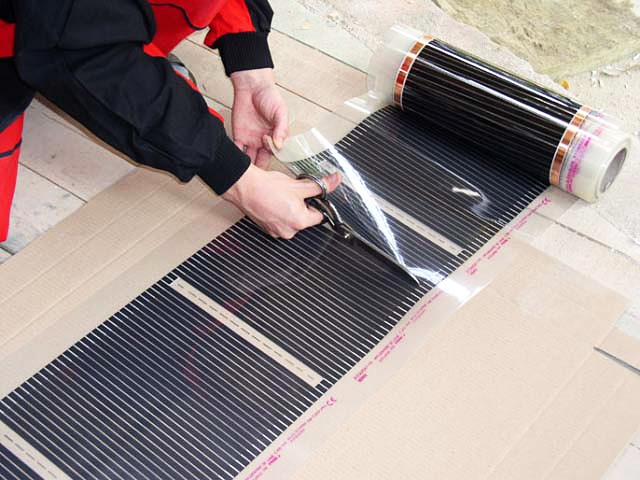
Cut the required length of the film
Upon completion of all work on laying the film, connecting the thermostat and temperature sensor, the warm floor can be connected to the network and tested. If everything is fine, then a plastic film is laid on top of the film, and already a polymer, but not a metal, construction mounting grid with dimensions from 20 to 40 millimeters is placed on this waterproofing.
Important point: if a significant load on the floor is expected, then moisture-resistant GVL or LSU up to 6 mm thick can be placed on top of the waterproofing material as a protective coating.
Installation instructions

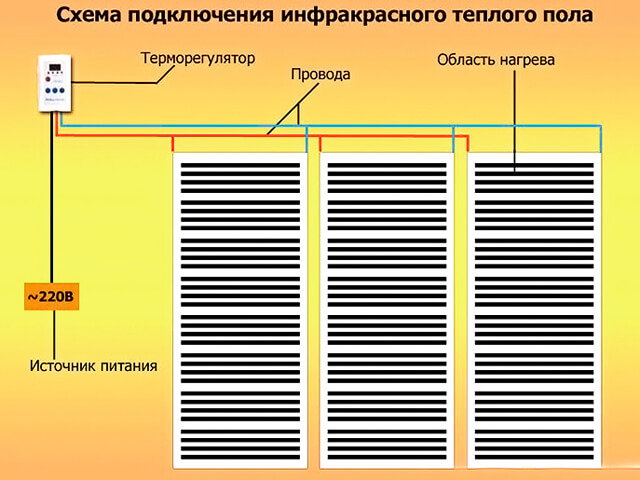
General scheme for connecting a heating film to a thermostat (bottom view)

In the case of installation wires directly under the floor covering (view from below)
The installation of a warm floor under the tile ends with laying the tiles directly or porcelain stoneware. However, it should be noted that in this case the layer of tile adhesive must be at least ten millimeters. In addition, the glue itself needs to be bought special, which is provided specifically for underfloor heating. To compensate for thermal expansion between the wall and the floor covering, it is necessary to leave a small gap - it can later be closed with a plinth.
It is advisable to lay a warm film floor under the tiles at the stage of overhaul.
Laying and checking the wiring
Wire connection
Laying the wiring of the underfloor heating film must be carried out from the center to the skirting boards on the walls in order to avoid excessive pressure of the floor covering. The wires are laid under the film, in which holes are pre-cut for them. After fixing the incision site, they are fastened with adhesive tape. The layout of the wiring must be done so that it does not protrude beyond the thermal insulating substrate.
Connecting the cable to the terminals is carried out in parallel. The ends of the wires are stripped, pushed through a notch in the film and inserted into the clamp attachment points, after which they are pressed with pliers. The junction is isolated and fixed to the film with adhesive tape. In order not to mix up the wiring lines, you can choose a cable of two colors.
Thermostat connection
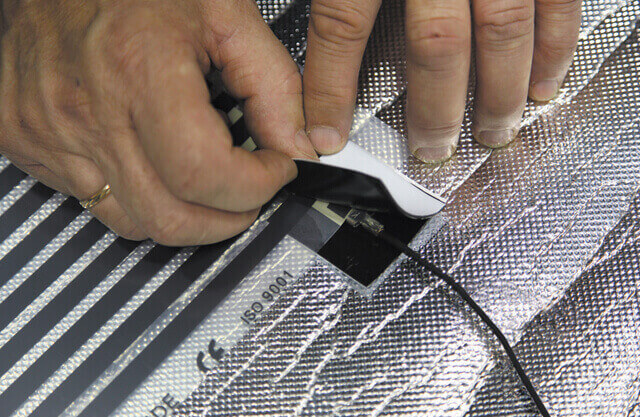
After laying the thermal film, it is necessary to attach a temperature sensor to it. It is usually located in the area of the second section. Under its wiring and the sensor itself, cuts are made in the film. In addition, it is worth making sure that the film makes a smooth turn at the place where the cable passes under the temperature sensor. This will prevent the cable from breaking.
Once the sensor is installed, you can proceed with the installation of the thermostat. It is preferable when it is connected permanently, however, it is also possible to connect it through a socket.
It is possible to keep the wiring in working order for a long time if most of it is laid under the baseboard.
Connect the thermostat to the film infrared heat-insulated floor in the same way as other types of underfloor heating. Two wires each, suitable for the temperature sensor and the underfloor heating, are connected in pairs on both sides of the thermostat. The two remaining free connectors are used to connect power cables. Grounding is connected using a terminal.
System check
Before laying laminate flooring, make sure that the underfloor heating is functioning properly. If there is no overheating of individual elements or sparking, then the thermal film is of high quality.
As soon as it is established that there are no malfunctions, it is necessary to cover the heating elements with a layer of protective polyethylene, no thicker than 80 microns, designed to prevent moisture from entering the thermal film. In addition, such a layer will increase the service life of the warm floor.Lay a plastic film overlap over the entire surface of the warm floor.
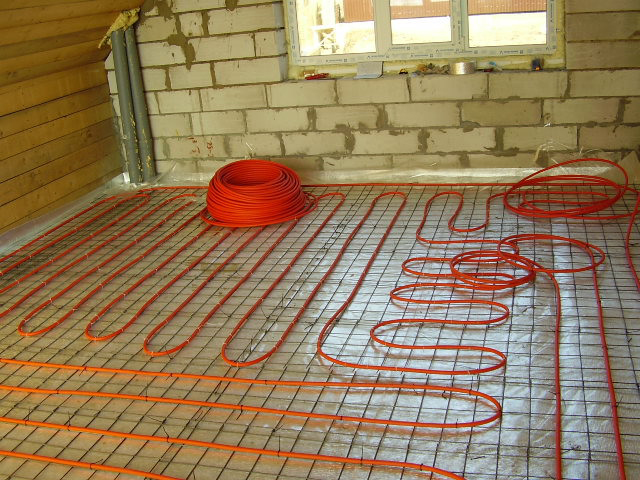
What parameters determine the pitch of the pipe
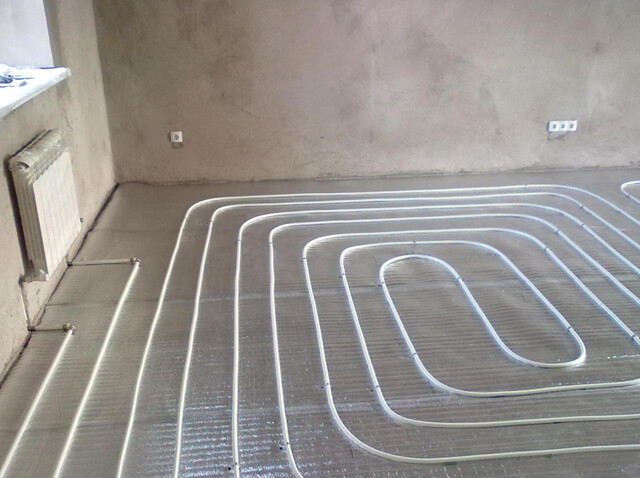
Many are wondering with what step it is more rational and efficient to lay a warm water floor. This parameter affects the load power. It implies the stability of the heating of the entire room. The contour pitch directly depends on the diameter of the pipe used (16, 20, 25 mm). Range - from 100 to 500 mm. The most demanded step is 150, 300 or 400 mm.
For example, the most efficient step in a heating system with a power of 50 W/sq.m is 300 mm. Pipe pitch 16 for a warm water floor is relevant for rooms that require particularly strong heating on an ongoing basis. For example, in those areas where heat loss is greater (along the outer wall, at the door, etc.), the optimal step is 200 mm. Accordingly, at a power of 80 W / sq.m, it is recommended to reduce the step of laying a water-heated floor (up to 150 mm).
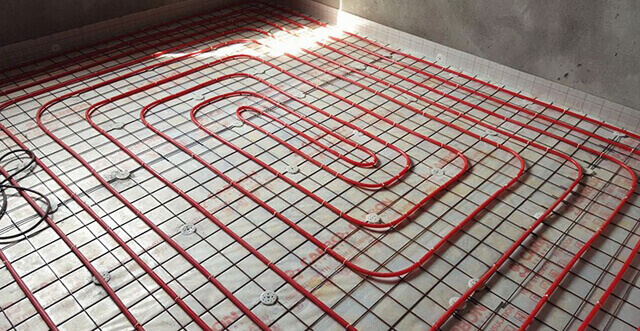
The simplest contour laying technique to perform is a spiral. Pipes are laid with a bend of 90 degrees. In the "snake" technology, the bend is 180 degrees. This point complicates the installation of the heating system a little. If the room is large or has features in zoning, then double schemes are used.
Important! The contour must be laid from a single pipe without overlaps and damage
The optimal pipe pitch for a warm water floor is determined during system calculations and project preparation. If the step is too large, the sensitivity of the person increases and the difference in the temperature difference of the flooring becomes noticeable.
It is unacceptable to use a small pitch for pipes with a large diameter and vice versa. Such errors in the installation of the heating system lead to overheating of the circuit or thermal dips. This contributes to the disruption of the underfloor heating as a single and efficient system.
Important! To increase the efficiency of the system, each time increasing the distance between the pipes, raise the temperature of the water. In addition to the size of the circuit, the step is influenced by the type and dimensions of the room, as well as heat load calculations.
With a load of 50 W / sq.m, the most rational distance between the pipes will be a value of 300 mm. With a load of 80 W / sq.m - 150 mm. The last option is optimal for the bathroom, where the temperature of the flooring is the most important at any time of the year.
In addition to the size of the circuit, the step is influenced by the type and dimensions of the room, as well as the calculations of the heat load. With a load of 50 W / sq.m, the most rational distance between the pipes will be a value of 300 mm. With a load of 80 W / sq.m - 150 mm
The last option is optimal for the bathroom, where the temperature of the flooring is the most important at any time of the year.
In addition to the constant pitch technique, there is a variable option for laying the contour. The bottom line is a denser arrangement of pipes in a particular area. Typically, this technology is used near exterior walls, windows and doors. These zones are characterized by high heat losses. An accelerated step is 60-65% of the standard. Most effective distance: 150 or 200 mm with a pipe size of 20 or 22 mm. The number of rows is determined during the installation process.

A variable or mixed distance between the circuits is practiced in non-primary premises where there is no urgent need for constant heating, as well as in places with large heat losses.
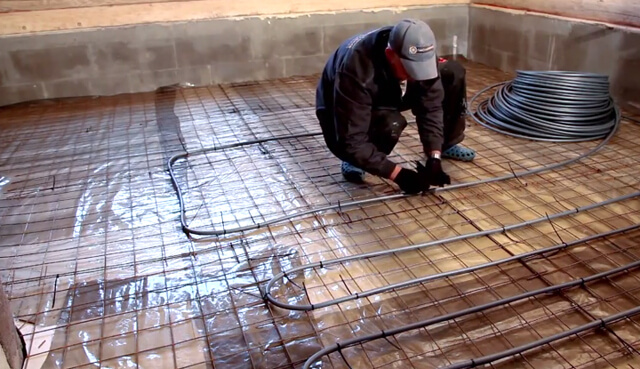
Before laying the contour, prepare the surface. To do this, it is necessary to ensure its uniformity. An error of 3 cm is permissible. The presence of bumps, dips and irregularities leads to the fact that after starting the heating system, the heating of the room will occur unevenly. A damper tape is laid along the walls of the room. It will reduce the risk of cracks when the screed dries.
Also, at the preparation stage, thermal insulation is laid. Its density remains within 35 kg/m3.The last preparatory stage is the laying of the reinforcing mesh. It will serve as the basis for the fastenings of the circuit and help to distribute heat more evenly. It is recommended to use special panels for laying pipes for a water floor, which greatly facilitate the installation process.
What should be the distance between the pipes
The distance between the pipes of the warm floor should be calculated based on the air temperature inside the room. In rooms where the air temperature is low, it is worth reducing the layout step. When installing the system in narrow spaces, such as corridors, it is worth isolating the supply pipe - this will avoid overheating of the surface. In order for the room to have a comfortable climate for a person, it is necessary to maintain a distance between the working elements of no more than 35 cm.
There is a defect in the pump: floor heating is not very warm
The pump is subject to wear. If it does not work correctly, the heating water cannot be transported sufficiently and it will not be warm enough.
Underfloor heating is not warm: what simple reasons are possible
If the heating system is still not working, carpets or furniture may be the cause. Most of the soil must be uncovered to allow ignition. A thick carpet prevents heat from being released into the room, and it does not heat up anywhere.
Compliance with expansion joints on vinyl flooring is important due to the properties of the flooring. We indicate the relevant data during installation with this report
Why is it important to have and maintain expansion joints? Why are expansion joints important in vinyl? We are happy to provide you with information on this topic.
Features of fixing pipes in the circuit
Underfloor heating pipes can be laid in one of the following ways:
- using plastic strips that look like a cantilever tape;
- using special mats with laying grooves;
- using a metal mounting tape;
- using separate brackets - they are attached to the base at a distance from one another.
As an example, consider the use of a plastic strap for fasteners, on which there are grooves for 16 and 20 mm pipes. At the same time, opposite clamps on the fastener are located at intervals of 50 millimeters, and pipe clamps are located at a distance of 20 centimeters from each other.
A convenient installation method is to fasten the contour with plank (or tape) clamps - they provide a 200 mm pipe pitch when laying a warm floor and therefore no marking is required.
A similar distance of 20-25 centimeters should be adhered to in the case of mounting the heating structure using point brackets. They are designed to ensure that the screed is heated evenly, regardless of the laying methods - a spiral or a snake.
It is also possible to provide a fixed gap between the pipes by using aluminum heat-distributing plates. They are placed on plates of extruded polystyrene foam, which have special grooves on their surface. The result is a kind of assembly system that has much in common with children's designers, since all the necessary sizes are already provided in them.
To avoid deformation of the metal-layer during a sharp turn of the heating circuit, a steel spring is put on the pipe before installation work, having a length of 20-25 centimeters and a width of 18-20 millimeters. It should be pulled over the intended bending point, as a result of which it will compress the walls and the plastic will begin to stretch evenly, so that the hall will not occur. During the laying process, the spring is pushed further to the end of the contour and then removed.
You need to know how to properly lay a pipe for a warm floor over a screed so that the coating warms up evenly.The fact is that warm air through concrete rises not strictly vertically to the top, but at an angle of 45 degrees, resembling a cone in shape. In the event that the edges of the flows cross on the surface of the concrete layer, then the floor covering will warm up evenly and when moving along its surface, the temperature difference is not felt.
In fact, it is enough that the thickness of the screed is less, namely about 10-12 centimeters, and there are several explanations for this:
- On top of the concrete layer, a finishing floor covering will still be laid, which will increase the height of the floor.
- In practice, pipes located in the screed do not create clear heating limits, and the concrete is heated nearby, as a result of which the same temperature is kept at the surface.
Installation and selection of pipes for underfloor heating is a completely solvable task. But it must be remembered that the heating system is equipped once for a long time and repairs as a result of a breakdown will cost a significant amount.
Methods for laying pipes under the floor covering
Laying water floor heat carriers can be done in several ways. The most common styling are "snail" and "snake". Each type has its own advantages and disadvantages, so it is worth considering them in more detail.
Snail
This method of laying is also called - shell. A contour is made along the floor in the form of a spiral so that a return line passes between the heat carriers, through which the cooled liquid will flow. This method of installation is quite simple in order to perform it without the services of a specialist. However, with a large step of laying a water-heated floor, cold zones will appear at the base of the room. Therefore, the step between the pipelines should not exceed 10 cm.
snake
Such installation of heat carriers can be carried out by conventional or double laying over the entire area of the room in the form of rings. It is rather difficult to perform such laying on your own, therefore special mats for fastening pipes with specially fixing elements were developed. Therefore, when choosing this method, you should be prepared for additional costs. But if we take into account the fact that the laying step of the underfloor heating pipes is performed at a greater distance, it will be possible to significantly save on pipeline costs.

And so, having decided on the choice and laying of pipes for a water-heated floor, you can directly begin to prepare the calculation of the length of the working material for a particular room in the room.
How to properly install a film floor
First you need to clean the floor surface, then heat-insulating material is laid on it. When choosing it, be guided by what the finish coat will be. If you plan to lay linoleum or carpet on top, then there can be any insulation, just consider the thickness of the sheet - it is 3-5 millimeters. At all joints, the sheets are glued with adhesive tape.
And if the coating is ceramic tiles, it is recommended to use a technical cork 2 mm thick as thermal insulation.
In addition, during installation, it is necessary to determine in advance the position of the thermostat. also draw up an installation diagram so that later the film lies on the floor correctly. And lay it exclusively in open areas where it is not planned to install furniture.
According to the technology of installing a warm film floor, the film is divided into strips of the desired size along the lines that the manufacturer noted. After that, the film is laid out on the floor in such a way that it fully complies with the scheme.
Important point: the film is placed with a copper strip down, and with the contacts to the wall where the thermostat is planned to be installed.
Then the film must be connected to the wiring. Install the contact clamps on the edges of the copper strip, and connect the contact wires to them.Be sure to insulate with bitumen insulation all the places where the wires are connected, as well as the places where the film is cut on the reverse side.

Film floor connection diagram
Next, the floor temperature sensor is connected. This is done from the underside of the film, and it is also insulated. When the warm film floor is completely laid, and all contacts and wires are connected, a thermostat should be installed, and only then it is connected to the mains. But before laying the finish coating, the warm floor must be tested to ensure that its surface warms up evenly.
Important point: if tile is chosen as the finish coat, after laying it, the screed must dry for at least three weeks. And only after that the floor heating system can be used.

Film Mounting Pattern: Minimum Distances