What does the ladder for the cabin look like and how to choose
A floor drain in a bathroom is not complete without a drain, a mandatory device to ensure proper operation. The ladder is a device that connects a free-type drain to a sewer pipe. Let's highlight the main functions that this device provides:
- Disposal of waste liquid is carried out efficiently and promptly;
- The drain is equipped with a filter that does not let debris into the sewer;
- The drain drain creates a vacuum that prevents the passage of an unpleasant odor from the sewer into the room;
- The classic design allows you to quickly disassemble the drain and clear blockages.
Upon purchase, a ladder under the tile will be found in two types - dry and hydraulic. Both designs allow you to freely get to the device in order to deal with the problem in case of blockage.
The most common type of shower drain is a dry drain.
Equipment selection
A dry shower drain is a mechanical structure that pulls down under its own weight and tries to close the pipeline. Here, too, things are not easy and there are such types of construction:
- Membrane;
- pendulum;
- With float;
At the same time, a drain with a dry seal allows the installation of a check valve, which, in the event of pressure in the sewer, will prevent runoff water from entering the house.
A wet type water seal, also called a siphon, looks like a bent pipe of a certain size, which is selected from the list upon purchase. A dry water seal for sewage does not have such a choice. The disadvantage of plumbing of this type is the presence of the possibility of drying out during prolonged downtime, because of this, the system loses vacuum and the house is filled with unpleasant odors. In order to avoid such problems, regularly pour water through the siphon so that it does not end there.
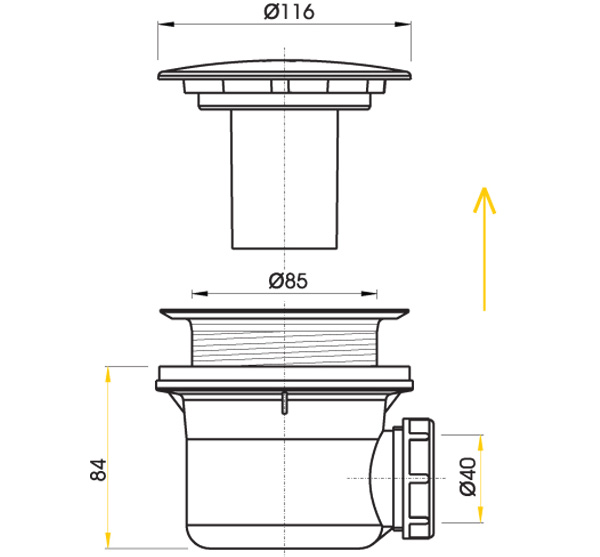
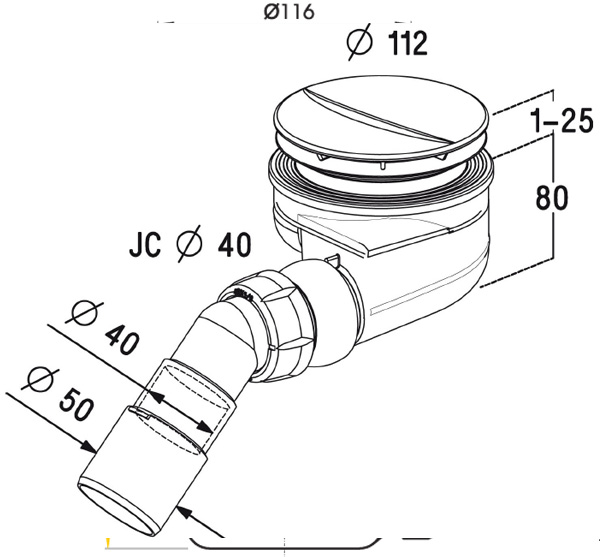
When choosing a model, in addition to the design features, it is important to choose the size of the device. This determines the height above which the floor will rise.
In compact rooms with low bathtubs, it is more convenient to use a device with a thickness of no more than 6 cm, while having a margin of size is preferable
When choosing a dry shutter, also pay attention to the throughput - this is the ratio of the amount of liquid supplied to the amount that the ladder is able to pass. The technical documentation that accompanies each package of siphon equipment will help you quickly understand and choose a drain in the bathroom.
What to look for when choosing a shower drain
If a siphon is not included with or a pallet, then measure the diameter of the drain hole before purchasing it. European standards provide for only three standard diameters: 52, 62 and 90 mm. Accordingly, siphons for pallets are mainly produced for them. It should be borne in mind that for siphons for drain holes of 52 and 62 mm, openings should be arranged with the possibility of unhindered access to this plumbing equipment for cleaning. On the contrary, 90 mm siphons can be installed in the floor, since, if necessary, they can be cleaned through the drain hole.
Also, attention should be paid to the design features of the siphons, or rather, to the number of butt joints that will need to be made during installation. The fewer of them, the better - there is less chance that one of the connections for some reason will leak over time
Another important design element of the shower tray drain is drain valve
. It is necessary for deep trays, which usually collect water during use. In fact, the valve may not be provided for in the design - the drain in this case is blocked by an ordinary plug, but this, to put it mildly, is out of date.
Modern shower cabins often provide for the installation of semi-automatic siphons, the drain valves of which can be opened and closed with a simple turn of the handle. It is clear that no stubs are required in this case.
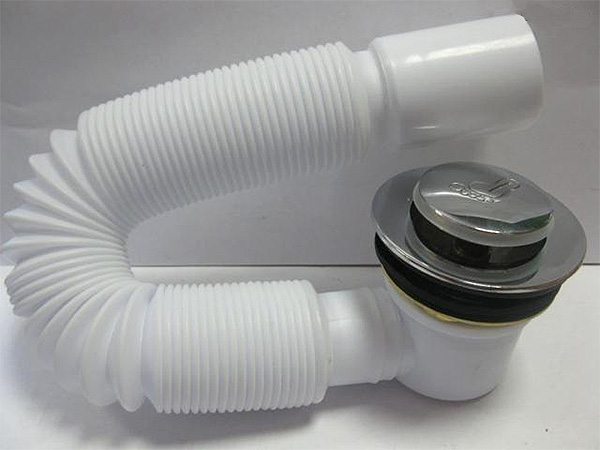
However, the most advanced models of semi-automatic siphons are equipped with click-clakc valves, which open and close by simply pressing the valve with your foot. Accordingly, in order to collect or drain water in the pan, you do not even need to bend down.
Types of drains
Drainage drains are cast according to the type of installation. They are of three types:
-
Point. Usually the receiving opening is small, the grating is square, less often rectangular. Installed anywhere.
-
Linear. The shape of the receiving chamber is rectangular, long and narrow. It is installed mainly along the walls, retreating from them some distance.
-
Wall ladder. The drain hole is also long and narrow, but this design is different in that it is mounted not only on the floor, but also on the wall. The installation is immured into the wall, in the same place, behind the wall, there are sewer pipes, and the drain hole itself is located exactly near the wall.
Most often, to make a floor with a drain, point drains are used, much less often - linear ones. Installation of wall drains is generally a rather rare occurrence, since installation is possible only at the stage of overhaul, not only on the floor, but also on the walls. In addition, such devices are much more expensive.
Gate types
In addition to different design solutions, the floor drain (point or linear) has different types of gates. A shutter is a device that prevents odors from the sewer from entering the room.
The simplest seal is a water seal. In these devices, the discharge pipe has a bend in which water remains. It blocks odors. The disadvantage of such a system is the possibility of drying out. This happens if the water has not been drained for a long time. Also, the cause of drying out can be an incorrect installation (incorrectly selected slope) or the presence of floor heating - the warm floor in the bathroom “dries out” the water in the water seal.
Dry shutters for ladders are more reliable in this regard. They are of several types:
-
Membrane. A movable spring-loaded membrane is installed, which, under the pressure of water, falls down, and in its absence blocks the drain hole, blocking the access of gases from the sewer to the room.
- Membrane made of a material having "molecular memory". The principle of operation is similar to the membrane, but the reliability is higher - the springs can break, and the material simply striving to return to its original state is more durable.
-
Float. This system has a float. In the presence of water, it rises, and when the water has gone, it falls down and blocks the entrance to the sewer.
- Mint. The drain into the sewer closes the device, which, under the influence of gravity, tends to take a position above the drain.
Dry drains are made mainly of plastic, grates are made of stainless steel or also plastic. There are models with a built-in check valve. It prevents the rise of water when the sewer overflows. When arranging a floor with a drain in an unheated bath, look for models that can be used in cold weather (there are some).
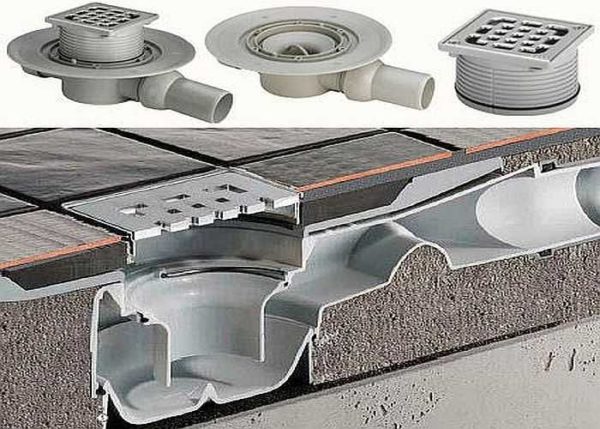
Purpose and design features of drain drains
At its core, a drain is a drain device mounted under a waterproof floor covering or mounted directly into the thickness of the “sex pie”. Trapiks for draining water are widely used in baths, hospitals, boiler houses, swimming pools, laundries, and catering establishments. Installing this element in the drainage system of private houses and apartments allows you to create designer shower cabins based on the purpose and availability of free space in the bathroom.
In addition to draining wastewater into the sewer system, the drain for draining water in the floor solves the following tasks:
- Rough sewage treatment.
- Creating a barrier for the reverse movement of water and the penetration of unpleasant odors from the sewerage system into the room.
- Drain hole decoration.
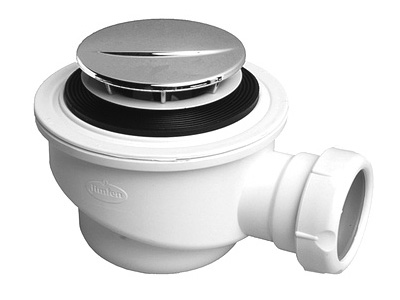
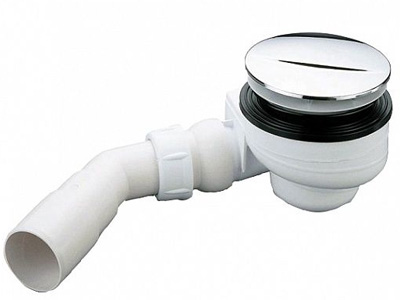
The classic floor drain is a structure that consists of the following elements:
- Pipe for draining liquid into the sewerage system.
- Siphon to create an obstacle to the penetration of odors from the sewerage system into the room.
- Decorative removable grille.
In addition, the drain for water drainage is necessarily equipped with sealing and clamping elements that ensure the tightness of the structure. Optionally, a floor drain with a grate can be equipped with a check valve and a plug to prevent debris from entering the system during installation work.
Types of drains
Drainage drains are cast according to the type of installation. They are of three types:
-
Point. Usually the receiving opening is small, the grating is square, less often rectangular. Installed anywhere.
-
Linear. The shape of the receiving chamber is rectangular, long and narrow. It is installed mainly along the walls, retreating from them some distance.
-
Wall ladder. The drain hole is also long and narrow, but this design is different in that it is mounted not only on the floor, but also on the wall. The installation is immured into the wall, in the same place, behind the wall, there are sewer pipes, and the drain hole itself is located exactly near the wall.
Most often, to make a floor with a drain, point drains are used, much less often - linear ones. Installation of wall drains is generally a rather rare occurrence, since installation is possible only at the stage of overhaul, not only on the floor, but also on the walls. In addition, such devices are much more expensive.
Gate types
In addition to different design solutions, the floor drain (point or linear) has different types of gates. A shutter is a device that prevents odors from the sewer from entering the room.
The simplest seal is a water seal. In these devices, the discharge pipe has a bend in which water remains. It blocks odors. The disadvantage of such a system is the possibility of drying out. This happens if the water has not been drained for a long time. Also, the cause of drying out can be an incorrect installation (incorrectly selected slope) or the presence of floor heating - the warm floor in the bathroom “dries out” the water in the water seal.
Dry shutters for ladders are more reliable in this regard. They are of several types:
-
Membrane. A movable spring-loaded membrane is installed, which, under the pressure of water, falls down, and in its absence blocks the drain hole, blocking the access of gases from the sewer to the room.
- Membrane made of a material having "molecular memory". The principle of operation is similar to the membrane, but the reliability is higher - the springs can break, and the material simply striving to return to its original state is more durable.
-
Float. This system has a float. In the presence of water, it rises, and when the water has gone, it falls down and blocks the entrance to the sewer.
- Mint. The drain into the sewer closes the device, which, under the influence of gravity, tends to take a position above the drain.
Dry drains are made mainly of plastic, grates are made of stainless steel or also plastic. There are models with a built-in check valve. It prevents the rise of water when the sewer overflows. When arranging a floor with a drain in an unheated bath, look for models that can be used in cold weather (there are some).
How to raise the floor in the bathroom for the installation of a drain
The smallest floor drain, mounted on the floor, has a height of 6-7 cm. At the same time, in order for water to drain normally into it, it is necessary to ensure a slope towards the drain hole of at least 1 cm per meter. This means that by making the floor with a drain, the height of the floor is increased towards the walls.The zero point in this case is the upper part of the installed ladder. How accurately the floor rises depends on the size of the shower or bathtub completely, if you plan to collect water from the entire area of the bathroom.
The layout of the ladder for draining water in the floor
Raising the floor in the bathroom or in the shower can be done in several ways. When choosing a method, it is necessary to take into account the bearing capacity of the floor, otherwise you can harm the entire structure.
Screed of different types
The most obvious way to slope the floor drain in the floor is to pour the screed. But the option is not always the best. Firstly, the usual cement-sand mixture has a lot of weight, and secondly, it “ripens” for a long time. But there are some good options.
- CPS. Ordinary cement-sand screed. The option is understandable, but very heavy - 15-16 kg per 1 sq. meter with a layer thickness of 1 cm. Not every floor can withstand such a load. You need to be especially careful in old houses.
-
First pour a layer of expanded clay, pour cement-sand mixture on top (thickness not less than 3 cm). Not a bad option, but it must be considered according to the bearing capacity of the floor - will it withstand or not.
- Make an insulated floating screed. Plates of extruded polystyrene foam are laid down (not polystyrene, it will collapse under the weight of the screed), pour DSP on top (the minimum thickness is also at least 3 cm). A good option is that the floor will not be so cold, and the total mass is relatively small. An underfloor heating system is easily integrated into this option. More rational - electric, with water a lot of trouble during installation.
- Polystyrene concrete or other types of lightweight concrete. The option is very good, at the same time the problem of the “cold floor” is also solved - since these materials have good thermal insulation properties. Here it will be necessary to look for a compromise solution - between the mass of the screed and the strength characteristics.
The most common way to make a floor with a drain is using a screed. It’s just that the screed can be different, especially since the thickness of the “pie” is usually significant - rarely less than 12 cm - which makes it possible to make it combined. This allows you to provide the required reliability, but reduce weight. Most often, the floor with a drain is made insulated. But the maximum thickness of the insulation and screed is 10 cm, which is clearly not enough to install most ladders. The remaining centimeters are “gained” by laying a rough screed, but it makes sense to make it from lightweight concrete in order to reduce the load on the ceiling.
On the logs
In order not to overload the floors, you can make a podium in the shower or bathroom on the logs. The option is controversial, since high humidity and wood do not mix well, but sometimes this is the only way out. When choosing such a floor drain device, you need to use well-dried wood. Before use, it is treated with protective compounds (according to the instructions, but at least twice). It is desirable to choose from those impregnations that are intended for outdoor work or for direct contact with the ground - their degree of protection is higher. After the composition has dried, you can start working.
-
Make it full of wooden joists. Logs are installed in an "envelope" with a center at the location of the drain. In general terms, the technology is as follows: holes are drilled in the floor screed for the installation of studs (M14-M16), the installation step is about 30 cm. Logs are attached to the studs (40 * 60 mm or 45 * 90 cm - from the size of the podium being built). The logs are laid (can be hung up) taking into account the creation of the required slope. On them - moisture-resistant plywood 12 mm or thicker, then GVL, waterproofing, on it - tiles.
-
Make a flat wooden floor on the logs, and lay the tiles with a slope due to different thicknesses of glue. This option is good in small areas - if you do the drain exclusively in a small shower stall.
The advantages of these methods are the minimum weight, the disadvantages are the complexity of execution, since attention to detail is required, high quality waterproofing.As you can see, the floor with a drain in the bathroom or in the shower can be done in different ways.
Choose the option that best suits your conditions
As you can see, the floor with a drain in the bathroom or in the shower can be done in different ways. Choose the option that best suits your conditions.
Making a shower with a drain in the floor
If you don’t want to buy a shower tray, but you need to wash somehow, then in this case, arrange an inclined floor for the room, this kind of system is popular today. Such a coating is convenient for construction in the apartments of the elderly - they do not have to climb into the bath with effort.
A waterproofing device for a shower cabin is a mandatory stage of work for further operation
The floor in the bathroom is built according to a certain algorithm. First, choose a place in which the shower without a tray will become and mark the floor to make it easier to navigate. After that, you need to put the formwork into which concrete is poured. To assemble the formwork, you will need boards and timber, which are assembled and fastened with nails so that they can be easily disassembled later. After that, the waterproofing of the shower without a pallet is laid, choose a rubber membrane. In this case, the coating must be positioned so that not only the floor is covered, but also a couple of tens of centimeters of the wall. The waterproofing device is such that it must be securely fastened to the walls, not with one self-tapping screw.
Fastening begins from the corners, and then the canvas spreads out to the sides, firmly pressing against the walls and fastening. It is allowed to fasten both directly to the wall, and to the boards that were previously fixed on the wall. In the latter case, use thin nails, it is advisable to ask the seller for help in order to choose the right option. The base of the waterproofing is fixed 20 centimeters from the floor, remember this when carrying out work.
Having finished with this, proceed to the arrangement of the drain hole. In order for the shower drain with a dry shutter to be installed in the right place in the waterproofing, a hole is cut with a knife that matches the one in the floor. The size should not differ, otherwise it will not work to insert the siphon into the sewer normally. In addition, if you do not guess with the size, it will turn out that the sealant will leak into the sewer when filling, so cut carefully so as not to miscalculate.
When the cutting work is finished, put the water seal in place, tighten the fixing bolts with your own hands. After that, a ladder is placed, which is sealed on top with insulating tape, it turns out that in this way we prepare the floor for pouring concrete. At this stage, we knead the solution and begin to fill it - closer to the wall a layer of 5 centimeters, to drain 2, so that the water flows away. Here the concrete layer is not thick, so a classic spatula is suitable for work. After installation is complete, allow the concrete to dry and sand until smooth.