Preparatory work
Before replacing metal water risers with polypropylene pipes, the following must be done:
- First of all, it is necessary to agree with the neighbors from below and from above about the upcoming tie-in into their pipeline, that is, that there will be a planned replacement of water supply risers to the neighbors from above - in the flow ceiling, and to the neighbors below - in the floor ceiling.
- If the neighbors are against such replacements, it is recommended that access be provided in the places where the metal-plastic connection will be made, since in the event of a pipeline leak at any of the neighbors, in any case, access to these connections will have to be provided.
- For these works it is necessary to choose high quality material. So, for example, polypropylene pipes for hot water are perfect for a cold water riser. It is advisable to use polypropylene pipes for heating for the installation of hot water risers, since this material is characterized by a long service life, and is also less susceptible to deformation.
Instructions for replacing water risers
-
First of all, you should turn off the water, and then cut off all unnecessary and old fragments.
- Now you need to prepare the edges of the pipelines for threading. With the help of a grinder, old paint, a primer, and the rest of the coating are removed from the pipelines. After that, for a more successful threading, a chamfer is removed.
- With the help of a lehr of the required diameter, as well as a lerko holder, threading is carried out.
- Then, a winding must be wound onto the finished thread. It should be wound strictly clockwise, so that in the process of winding the part, it does not wrap around the thread more tightly, or, on the contrary, slides off it.
- Also, special transitions from metal to plastic must be screwed onto the thread with winding.
- A tee is soldered into the pipeline to supply water to the room, after which a tap is mounted. When using a plastic-based faucet, it must also be soldered. So, the water supply riser is completely ready, it remains only to unsolder the piping around the apartment.
How to make a sewer installation with your own hands and install risers
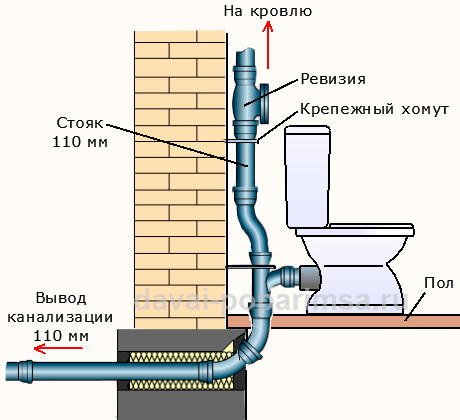
You need to start already at the initial stage of designing a bath. First of all, it is necessary to resolve the issues of the optimal location of the sewer in the premises to which water will be supplied. As a rule, this is a washing compartment, a toilet and, if it is planned to install a kitchen sink, a dressing room. It is possible to bring sewer pipes into the steam room for draining waste water into the drain when it is cleaned.
If it is not possible to make a ventilated riser in the bath, it can be completed with an audit at a level above the plumbing equipment, and its end can be closed with an aeration (vacuum) valve. Such a valve, when discharged in the sewer system, opens, and fresh air from the room is sucked into it. If the gas pressure rises in the sewer pipe, the valve reliably blocks the penetration of unpleasant odors into the living quarters. In order for such a system to work reliably, branch lines are made larger than the calculated diameter. For example, if the calculation requires a pipe with a diameter of 40 mm, then it is replaced by 50 mm.
Before installing the risers, mark their location according to the design of the bath and mark the horizontal branches, taking into account the required slopes. Then the riser is pre-assembled with all the connecting fittings and the location of the sockets and the attachment points of the holders (clamps) are marked on the wall. Checking the verticality of the clamps fixed to the wall is carried out using a plumb line.And the last thing to do is to securely fasten the riser with clamps, checking its verticality with a level.
Here's what else to consider when installing a sewer with your own hands:
- In order to exclude the possibility of odors from the sewer with a guarantee, there must be at least one ventilated riser.
- The ventilated riser can be brought out not through the roof, but horizontally in the upper part of the wall.
- The sewer riser is always located in the corner of the room, and the water supply pipe, if any, is next to it. Usually open risers are left in the bathrooms (toilet, washing department).
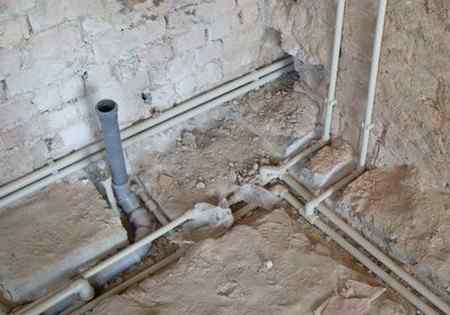
- Plastic pipes can be placed inside ceilings or walls. To reduce noise from sewage, risers are wrapped with sound-absorbing material, such as mineral wool or corrugated cardboard, before laying.
- The places of passage through the floors are sealed to the full thickness with cement mortar or filled with foam.
- In log cabins, proper fire safety should be ensured. The best way to protect against the penetration of fire are special non-combustible cuffs, which, when ignited, swell and fill the space both inside the pipe and outside, thereby preventing the spread of fire to other rooms.
- For ease of installation and maintenance, the clearance between the wall and the riser must be at least 20 mm.
- If there is a septic tank for wastewater treatment on the land plot on which the bathhouse is built, it is recommended to include a fan pipe in the internal sewerage system with its outlet above the roof. A drain pipe is a sewer pipe installed separately from the riser or being its continuation. The main purpose of the fan pipe is to prevent unpleasant odors from feces and other decay products of wastewater from entering the bath from the septic tank.
- When laying internal sewerage in the bath is not allowed:
-
- to display risers in chimneys and ventilation systems;
- Pass through living quarters: dressing room or rest room of locker rooms and other similar premises;
- Install standpipes near electrical appliances such as transformers, motors, and switchboards.
Conclusion of the fan riser to the roof:
https://youtube.com/watch?v=KHgibo7ACEY
Depending on the layout or design of the bath, the following options for the location of the riser are possible (one ø110 mm is enough):
- When water is supplied only to the washing compartment, the riser is combined with a drain.
- If, in addition to the washing compartment, there is a toilet, then the riser is located next to the toilet. In this case, the drain ladder is connected to the riser by a sewer underwater pipe with a diameter of at least 50 mm.
If you decide to install the sewer with your own hands and correctly install the risers, then you can proceed to the next stage of arranging the drain sewer, namely, to draw branch lines, which will be discussed in the next article.
Riser replacement
In the process of repairing an apartment, hot and cold water supply risers are necessarily replaced. A riser is a vertical section of pipe that most often runs in bathrooms and kitchens. Those risers that have already served their useful life and are in emergency condition are subject to replacement. You can read about when to change the water supply risers in the last issue of the construction magazine.
At the same time, one should not forget that with any intervention in the engineering communications at home, appropriate coordination with certain authorities will be required.
All work on the replacement of risers is carried out very quickly, within 1-2 hours. For this, new risers are first prepared, after which they are adjusted and installed in place of the old ones. It is desirable that the replacement of the risers in the apartment be made from ceiling to floor, while the seams on the water supply pipes are best made welded.
Replacing the water supply
When replacing or repairing a water supply system, many different nuances should be taken into account. Well, firstly, it is imperative to provide for the installation of an introductory tap, which could completely shut off the entire water supply system in the apartment.
When replacing pipes, it is recommended to install a new faucet not after the old one, but by directly connecting it to the riser itself. At the same time, it is better to assemble all threaded connections on tow, and you can read about how to properly wind flax on a thread in the appropriate section of the site.
You should be aware that hot and cold water supply risers should not be hidden without any access to them in the future. Well, if you still don’t want to spoil the design of the room with pipes sticking out of the walls, then you can always hide them in a decorative plumbing cabinet.
After the replacement of the water supply in the apartment has been made, and the entire system has been pressure-tested and checked for leaks, you can prime the risers and put heat-insulating material on them, which will prevent the formation of condensate on the pipes.
Water pressure reducer - why is it needed?
During the replacement of the water supply system, special attention should be paid to its modernization. Often during this process, pressure reducers are installed at the water inlet to the apartment, which help prevent the occurrence of water hammer in the system.
Water hammer is a pressure surge in the plumbing, heating, etc. system that can damage plumbing fixtures, pipes, and fittings. To avoid this problem, pressure reducers are installed. Their installation is carried out after coarse filters.
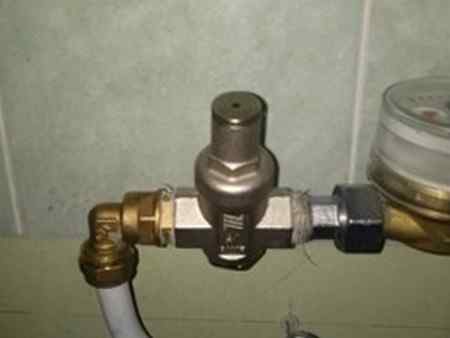
You should know that the optimal water pressure in the pipeline for many plumbing fixtures is considered to be a pressure not higher than 3-4 atmospheres. Accordingly, pressure reducers are selected based on these parameters.
Conversely, with a reduced pressure in the pipeline (less than 0.85 atmospheres), you can try to increase it by installing a special booster pump. However, this event requires mandatory coordination with the relevant authorities.
Material selection
Even the replacement of a pipeline is construction, in this regard, it is recommended that all plumbing work be taken with particular seriousness, this also applies to the purchase of material.
For the main pipelines, it is desirable to use metal-plastic pipes, however, it is also possible to use a more budgetary option - polypropylene pipes.
plastic pipes - the best option for the bathroom
They are adapted to various conditions, in addition, they are able to withstand water pressure up to 10 atmospheres and temperatures up to 95 ° C.
There are the following types of metal-plastic pipelines:
- Seam pipes - used for open installation, there is a seam on the inner surface of the pipeline.
- Seamless pipes - used for closed installation, unlike open installation, they have a neater appearance. This option cannot be repaired; in case of failure, only a complete replacement of pipelines is possible.
Useful tips from experts
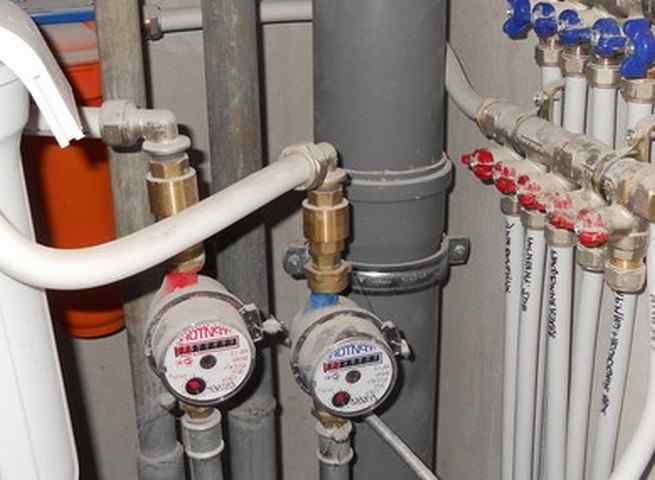
For piping in the bathroom, the use of serial connection schemes for sanitary appliances with tees is most optimal, however, ring, group and collector systems are also used. As a rule, cold and hot water risers pass simultaneously in the bathroom, in connection with this, it becomes necessary to additionally install filters and water meters in these rooms. In most cases, pipelines are sewn up with drywall boxes, with the installation of revision windows
It is important that their location is compact, but in such a way that they are freely accessible.Replacing hot water risers should begin with the installation of this particular rather difficult unit.
For a water supply system in a bathroom, a plastic pipeline with an outer diameter of 20 mm is sufficient.
For cold water supply, it is recommended to use pipelines marked PN16, for hot water supply only PN20.
Piping and fittings must be from the same manufacturer.
It is important that the soldering materials are completely dry and clean during operation.
To avoid the formation of condensate, it is not recommended to install hot water pipelines in horizontal sections above cold water pipelines.
In extreme cases, you can perform thermal insulation with polyethylene foam.
In most cases, the outlets of faucets and plumbing fixtures are made according to the European standard, placed as follows: hot water - on the left, cold - on the right.
Before installation, it is necessary to sketch out an approximate layout of pipelines on the surfaces of floors and walls, and you should also indicate the exact number of fittings: tees, bends, couplings.
First of all, it is recommended to solder the pipeline with cold water coming from below, and only after that you should proceed to the pipeline with hot water.
It is advisable for beginners to solder pipelines with an assistant: for example, one person has a soldering iron in his hands, while the second one heats and connects the structure together.
Before proceeding with the assembly of pipelines, it is first of all recommended to determine where the last connection will be located.
Large parts must be soldered on the wall, while small ones, it makes sense to solder several parts at the same time, in other words, on weight.
It is recommended that the outlets of the threaded couplings be placed perpendicular to the walls, otherwise the valves will be skewed. It is important that it does not protrude much above the rough surface, in other words, no more than the thickness of ceramic tiles or other finishes.
After performing work on replacing the risers of hot and cold water supply, it is imperative to carry out pressure testing of the system. Absolutely all outputs should be plugged. If there is a non-centralized hot water supply system, it can be connected to the cold water supply system anywhere using a jumper. And finally, you need to open the tap to fill the pipelines with water. It is important to carefully check all existing connections for possible leaks, they should not be. Slightly letting the plugs in, you need to carefully make sure that water flows to all points.
As a result of the final successful check of the pipelines of the water supply system, it is possible to start embedding in strobes and sewing communications into drywall boxes.
—
CAUTION 1
|
гоÑÑего a |
СÑоÑкигоÑÑÑего Ð Ð Ð Ð Ð Ð Ð Ð Ð Ð Ð Ð Ð ² Ð Ð Ð Ð Ð Ð Ð Ð Ð Ð Ð Ð Ð Ð Ð Ð Ð Ð Ð Ð Ð Ð Ð Ð Ð Ð ² Ð Ð Ð Ð Ð Ð Ð Ð ² Ð Ð Ð Ð Ð|¸¸ðððððð𾺾½ÐðÐ Ð Ð Ð Ð Ð Ð Ð Ð Ð Ð Ð Ð Ð Ð Ð Ð Ð Ð Ð Ð Ð Ð Ð Ð Ð Ð Ð Ð Ð Ð Ð Ð ²
a
СÑоÑкигоÑÑÑего и вÑÐμ поÐ'воÐ'ки к пÑиР± оÑÐ ° м в Ð ± Ð »Ð¾ÐºÐ ° Ñ Ð¿ÐμÑÐμго-ÑоÐ'кР° Ñ Ð¿Ñокл Ð ° Ð'ÑвР° ÑÑ Ð¾ÑкÑÑÑо . Ð Ð Ð Ð Ð Ð Ð Ð Ð Ð Ð Ð Ð Ð Ð Ð Ð Ð Ð Ð Ð Ð Ð Ð Ð ¼ Ð Ð Ð Ð Ð Ð Ð Ð Ð Ð Ð Ð Ð Ð Ð Ð Ð Ð Ð Ð Ð Ð Ð Ð Ð Ð Ð Ð Ð Ð Ð Ð Ð ° РРРРРРРРРРРРРРРРРРРРРРРРРРРРРРРРРРРРРРРРРРРРРРРп¿¿¿ððððð »Ð¸.
a
СÑоÑк гоÑÑÑего Ð Ð Ð Ð Ð Ð Ð Ð Ð Ð Ð Ð Ð Ð Ð Ð Ð Ð Ð Ð Ð Ð Ð Ð Ð Ð Ð Ð Ð Ð Ð Ð Ð Ð Ð Ð Ð Ð Ð Ð Ð ° Ð Ð Ð Ð Ð Ð Ð Ð Ð »Ð¾Ð´Ð½ÑÑ.
a
СÑоÑкигоÑÑÑего Ð Ð Ð Ð Ð Ð Ð Ð Ð Ð Ð Ð Ð ² Ð Ð Ð Ð Ð Ð Ð Ð Ð Ð Ð Ð Ð Ð Ð Ð Ð Ð Ð Ð Ð Ð Ð Ð Ð Ð ² Ð Ð Ð Ð Ð Ð Ð Ð ² Ð Ð Ð Ð
a
СÑоÑкигоÑÑÑего Ð ° Ð Ð Ð Ð Ð Ð Ð Ð Ð Ð Ð Ð Ð Ð Ð Ð Ð Ð Ð Ð Ð Ð ² ² Ð Ð Ð Ð Ð ¿Ð Ел Ð Ð Ð Ð Ð ² ² ² Ð Ð Ð Ð Ð Ð Ð Ð Ð Ð Ð Ð Ð Ð Ð Ð Ð Ð Ð Ð Ð ² Ð Ð Ð Ð Ð Ð Ð Ð Ð Ð Ð ÐμÐ Ð Ð Ð Ð Ð Ð Ð Ð Ð Ð Ð Ð Ð Ð Ð Ð Ð Ð Ð Ð Ð Ð Ð Ð Ð Ð Ð Ð Ð Ð Ð Ð Ð Ð Ð Ð Ð Ð Ð Ð Ð Ð Ð Ð Ð Ð Ð Ð Ð Ð Ð Ð Ð Ð Ð Ð Ð Ð Ð Ð Ð Ð Ð Ð Ð Ð Ð Ð Ð Ð Ð Ð Ð Ð Ð Ð Ð Ð Ð Ð Ð Ð Ð Ð Ð Ð Ð Ð Ð Ð Ð Ð Ð Ð Ð Ð Ð Ð Ð Ð Ð Ð Ð Ð Ð Ð Ð Ð Ð Ð Ð Ð Ð Ð Ð Ð Ð Ð Ð Ð Ð Ð Ð Ð Ð Ð Ð Ð Ð Ð Ð Ð Ð Ð Ð Ð ² Ð Ð °Ð³Ð°ÑÑÐодное ÑÑÑбопÑовода Ñолодной водÑ.
a
СÑоÑкигоÑÑÑего Ð Ð Ð Ð Ð Ð Ð Ð Ð Ð Ð Ð Ð Ð Ð Ð Ð Ð Ð Ð Ð Ел Ð Ð Ð Ð ¿Ð Ел фар Ð Ð Ð ¿Ð Ел форно Ð Ð Ð Ð Ð ² Ð Ð Ð Ð ² Ð Ð Ð Ð Ð Ð ² Ð Ð Ð Ð Ð Ð Ð Ð Ð Ð Ð Ð Ð Ð ÐμÐ Ð Ð Ð Ð Ð Ð Ð Ð Ð Ð Ð Ð Ð Ð Ð Ð Ð Ð Ð Ð Ð Ð Ð Ð Ð Ð Ð Ð Ð Ð Ð Ð Ð Ð Ð Ð Ð Ð Ð Ð Ð Ð Ð Ð Ð Ð Ð Ð Ð Ð Ð Ð ² пеÑвÑй ÑаÑполагаÑÑ Ð½Ð°Ð´ вÑоÑÑм.
a
СÑоÑкигоÑÑÑего мððññðñññÐðÐðÐðÐð½¾¾¾ðººðнно¾ðкоððÐðÐð¾¾ ð½½½½½ ° ½¸¸¸¸ñññññññ
a
|
оðññð °¾ »½½½½ðμðð½½ðððððн½ÐðÐ °ÐμÐ Ð Ð ° Ð Ð Ð Ð Ð Ð Ð Ð Ð Ð Ð Ð Ð Ð Ð Ð Ð Ð Ð Ð Ð Ð Ð Ð Ð Ð Ð Ð Ð Ð Ð Ð Ð Ð Ð Ð Ð Ð Ð Ð Ð Ð Ð Ð Ð Ð Ð Ð Ð Ð ° Ð Ð Ðμ a |
СÑоÑкигоÑÑÑего Ð ° Ð Ð Ð Ð Ð Ð Ð Ð Ð Ð Ð Ð Ð Ð Ð Ð Ð Ð Ð Ð Ð Ð ² ² Ð Ð Ð Ð Ð ¿Ð Ел Ð Ð Ð Ð Ð ² ² ² Ð Ð Ð Ð Ð Ð Ð Ð Ð Ð Ð Ð Ð Ð Ð Ð Ð Ð Ð Ð Ð ² Ð Ð Ð Ð Ð Ð Ð Ð
a
СÑоÑкигоÑÑÑего Ð Ð Ð Ð Ð Ð Ð Ð Ð Ð Ð Ð Ð ² Ð Ð Ð Ð Ð Ð Ð Ð Ð Ð Ð Ð Ð Ð Ð Ð Ð Ð Ð Ð Ð Ð Ð Ð Ð Ð ² Ð Ð Ð Ð Ð Ð Ð Ð ² Ð Ð Ð Ð Ð|¸¸ðððððð𾺾½ÐðÐ Ð Ð Ð Ð Ð Ð Ð Ð Ð Ð Ð Ð Ð Ð Ð Ð Ð Ð Ð Ð Ð Ð Ð Ð Ð Ð Ð Ð Ð Ð Ð Ð ²
a
ROST"R¸ ÑÑоÑки гоÑÑÑего ÑкÑÑÑÑ Ð² ÑÑÐμнÐμ иР»Ð¸ пР° нÐμл и, Ñо ÑÑÐμÑкР° воÐ'Ñ ÑÐμÑÐμÐ · пÑоÑжР° вÐμвÑиÐμ ÑÑÐ ° ÑÑки ÑÑоÑков можÐμÑ Ð¾ÑÑÐ ° ÑÑÑÑ Ð½ÐμÐ · Ð ° меÑеннойв ÑеÑение долгого ÑÑока. Run. РРРРРРРРРРРРРРп Ð Ð Ð Ð Ð ² Ð Ð Ð Ð Ð Ð ² ÑÐ ° Ð Ð Ð Ð Ð Ð Ð Ð Ð Ð Ð Ð Ð Ð Ð Ð Ð Ð Ð Ð Ð Ð Ð Ð Ð Ð Ð ñÐ Ð Ð Ð Ð Ð Ð ñÐ Ð Ð Ð Ð Ð ñÐ Ð Ð Ð Ð Ð Ð ñÐ Ð Ð Ð Ð Ð Ð ñðññññ²²¾¾ð¾¹¹¹¹¹¹
a
|
п Ð Ð ²Ð Ð Ð Ð Ð Ð Ð ²Ð Ð Ð Ð Ð Ð Ð Ð Ð ² Ð Ð Ð Ð Ð Ð Ð Ð Ð δ I 2-short a |
ROST"R¸ ÑÑоÑки гоÑÑÑего ÑкÑÑÑÑ Ð² ÑÑÐμнÐμ иР»Ð¸ пР° нÐμл и, Ñо ÑÑÐμÑкР° воÐ'Ñ ÑÐμÑÐμÐ · пÑоÑжР° вÐμвÑиÐμ ÑÑÐ ° ÑÑки ÑÑоÑков можÐμÑ Ð¾ÑÑÐ ° ÑÑÑÑ Ð½ÐμÐ · Ð ° меÑеннойв ÑеÑение долгого ÑÑока.
a
оÑкÑÑÑой пÑоводке ÑÑоÑки гоÑÑÑего, Ð Ð Ð Ð Ð Ð Ð Ð Ð Ð Ð Ð Ð Ð Ð Ð Ð Ð Ð Ð Ð Ð Ð Ð · · ñ ñ ñ Ð Ð Ð Ð Ð Ð Ð Ð Ð Ð Ð Ð Ð Ð Ð Ð Ð Ð Ð Ð Ð Ð Ð Ð Ð Ð Ð Ð Ð Ð Ð Ð Ð Ð Ð Ð Ð ° Ð Ð Ð Ð Ð Ð Ð Ð Ð Ð Ð ÐμÐ Ð Ð Ð Ð ÐμÐ Ð Ð Ð Ð Ð Ð Ð Ð Ð Ð Ð Ð Ð ÐμÐμñññ¾¾¾ð𾾸¸¾¾¾¾¾¾¸¾ðð¾¾¾¾
a