The principle of operation of the HP
 TN operation algorithm:
- The system starts up - the heat exchanger raises the temperature inside itself by 5 degrees, and then heated freon or ammonia enters the internal circuit from the external circuit.
- The coolant from the first block is converted from a liquid into a gaseous state. This process occurs due to the fact that freon can boil even at low temperatures.
- The refrigerant passes from the first block to the second, which is the compressor: the gas is compressed in it, which causes a sharp increase in temperature.
- Freon falls into the condenser at the transition to the third unit. It transfers heat from gas to water, which is located in the pipes of the home heating system. After transfer, the gas loses its temperature, cools down and returns to the liquid state again.
- Freon returns to the first block. After that, the heating process is repeated due to the well-functioning circulation of the system.
Our other related articles:
- Do-it-yourself heat pump for home heating: principle of operation, detailed installation instructions.
- Heating wiring from a boiler in a private house: a diagram and instructions for beginners.
- What are the types of heating devices: http://ksportal.ru/26-tipy-otopitelnyx-priborov.html
Frenetta heat pump principle of operation and the possibility of self-manufacturing
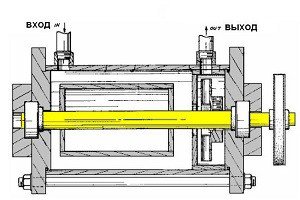
4c), a stable mode of self-generation of the universal generating unit is created, which ensures its operation without an external power source.
From the tank 1, if necessary, hot water, steam or oxygen and hydrogen through the outlet pipe 3 enter the hot water supply, heating, steam supply, cold storage or oxygen and hydrogen collection systems, respectively.
The most efficient universal generating plant operates with a curved shape of the inner surface of the housing 6 with a ratio of the maximum diameter "D" of the disk 7 (Fig.
2) to the diameter "d" of the shaft cavity 9 as 3:1, with the ratio of the maximum diameter "D" of the disk 7 (Fig. 2) to the height "H" as 3:1, with five disks 7 forming four vacuum zones 11 with four circular exits 12 into curvilinear channels 10 of rectangular section with a height of 1.4 mm and a width of 2 mm.
The layout of the universal generating set can be either horizontal or vertical, with a top or bottom drive, with installation on one or two bearings.
The excess water pressure created by the water heater in the tank 1 allows the universal generating unit to perform the functions of a circulation pump.
Now, here are some observations:
In accordance with the essence of the invention, a universal generating plant is manufactured with a speed of up to 13,000 rpm.
At the same time, the water heater includes: a body with a curved surface of the lower side and a height of "H" - 70 mm, with a curvilinear arrangement of channels in the amount of 73 pieces, having a rectangular section with a height of 1.4 mm and a width of 2.0 mm; 5 disks with a maximum diameter of the lower disk "D" - 210 mm, forming four vacuum zones with four circular exits to the channels; shaft with a diameter "d" of the shaft cavity - 70 mm.
Expected design parameters of the manufactured universal generating plant:
At 7600 - 8000 rpm, water is heated up to 100oC;
At 8000-10000 rpm, water is heated with vaporization, 100oC and higher;
At 10000-13000 rpm, vaporization occurs with a steam temperature of up to 400oC;
At 12500 rpm, the self-generation mode is set.
At 15,000 rpm and above, water decomposes into oxygen and hydrogen at a temperature of minus 60oC and below.
2015-2018 poisk-ru.ru All rights belong to their authors.
This site does not claim authorship, but provides free use. Copyright Violation and Personal Data Violation
Making a heat generator with your own hands
As mentioned above, a hydrodynamic heat pump can be made by yourself. To do this, you will need: a metal cylinder, a small electric motor, steel discs, a steel rod, nuts, pipes and a radiator. The diameter of the discs according to the rules must be less than the diameter of the cylinder.
How to do it:
- The disks are sequentially strung on a steel rod, they are separated by nuts;
- The cylinder is filled with disks to the top;
- An external thread is applied to the steel rod, along the entire length;
- Two holes are made for the coolant in the housing, heated oil enters the radiator through the top one, and the oil returns to the system from below for subsequent heating.
Do not use water as a coolant, liquid oil is more appropriate. However, the boiling point of the oil is several times higher. When water heats up quickly, it turns into steam, and an excess of pressure can occur in the system. And this is a threat to the integrity of the structure.
Equipment Features
In the seventies in America, the remarkable inventor Eugene Frenette showed the world his creation - the Frenette heat pump, named after its discoverer.
It is notable primarily for the fact that the efficiency exceeds 100%. Some believe in both 700 and 1000 percent, but skeptics who operate with physical laws do not support them - this is, after all, an exaggeration.
The scope of the Frenett pump is not limited to residential areas. It has been successfully used in production.
At one time, this device was very popular, so enthusiasts studied its circuit, more and more improving the design of the heat pump.
The basic principle still has not changed: the creator of the device offered a simple, but ingenious in its simplicity, invention. Everything is based on the release of heat due to friction.
When he first introduced the Frenette heat pump, the scheme was as follows:
- Two cylinders of excellent size: a smaller one in a larger one. Oil in between.
- A small motor is equipped on one side with a fan, on the other - with an engine (electric motor).
- The outer case implied grooves for air, and the thermostat optimized the operation of the installation.
Now let's figure out how this unit approximately functioned, which in its design differs from most of the climate devices familiar and familiar to us.
The rotation of the small cylinder heats up the oil. The fan circulates warm air in the room.
Despite the fact that this system is called a heat pump, the Frenett machine coincides with the correct representation of this term only in the role of a heater.
The heat pump must work according to the inverse Carnot principle, converting the low potential of the environment into a high potential of heat energy. Here there is no such thing.
Many tried to transform the invention, including its creator himself. Therefore, you can find different types of Frenett pump.
Structural differences from the above nuances, for example, may be as follows:
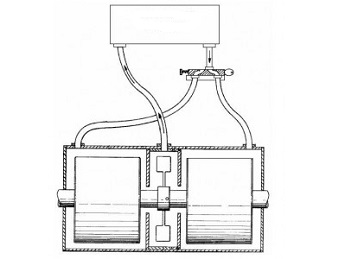
The drum with cylinders is in a horizontal position, a shaft passes through the center, the end of which protrudes outward. There is no fan, usually it is replaced by a radiator or the coolant is supplied directly to the system
It is important to ensure the tightness of the installation. View from two drums with an impeller between them
The heated oil is ejected from the impeller into the gap between the rotor and the pump housing, ensuring maximum performance.
Non-standard type of Frenett pump, developed by Khabarovsk scientists. The oil is replaced by water, the base is a mushroom element. The steam formed during heating and boiling moves through the channels at a speed of up to 135 meters per minute.This design is able to exist without the supply of energy from the outside. It is used only for industrial purposes.
The internal structure and principle of operation of the Frenette heat pump
Invented by an American engineer, and subsequently named after him, the Frenette heat pump, the device has revolutionized the family of heat-producing equipment with its efficiency, which is almost 1000%.
The main structural elements of this pump are:
- Stator (fixed cylinder);
- Rotor (movable cylinder);
- Shaft;
- Electric fan.
The role of the first two elements is performed by cylinders. Moreover, the rotor is inserted inside the stator. The latter is filled with oil, which heats up as a result of the friction that occurs when the rotor rotates. The movement of the inner cylinder is carried out by a shaft, with a fan impeller fixed at its opposite end. It is he who transfers the heated air to heat the room. In the future, the Frenette heat pump circuit was repeatedly improved.
The most important of these is the replacement of the cylindrical rotor with several steel disks and the rejection of the fan.
The efficiency of this pump model and its efficiency are ensured by:
- The absence of a heat exchanger;
- The fact that the coolant moves in a closed system;
- Heating occurs with the generation of energy of high power;
- The basic part of the design of this pump is conical, which contributes to the increase in temperature and the creation of vacuum zones.
The amount of energy produced by the device used to heat the room is many times greater than the cost of consumed electricity.
The change in the temperature of the heat carrier used is achieved through the transformation of energy.
Selection Tips
Buying a Frenette heat pump is advised more often for large industrial organizations - as they need more power. It is provided by high temperatures, which means that you need to work with the installation carefully.
Such an installation for a private house is a rather rare solution - it is not easy to find an installation for sale, due to its structural complexity.
Unfortunately, despite such an impressive efficiency, this installation did not take root as a household heater - so you can’t just go to any climate equipment store and buy such a heater.
And yet, for the home, some manage to make Frenette heat pumps with their own hands.
It is easy and profitable to do this - the cost of fuel and elements will be much lower than the estimated cost of the energy generated by such a device.
Some craftsmen make a Frenette heat pump, reviews of which are then often posted, sharing their own opinions:
Eugene, 43 years old, Moscow:
Sergey, 39 years old, Yekaterinburg:
Although, it would seem, everything was done correctly and according to the drawing, and our people are literate - it’s even strange that it didn’t work.
 Artem B., 48 years old, Rostov:
A colleague somehow showed a diagram and a description of the Frenette pump, well, I caught fire - there is enough free time, there is a small cottage - there, in fact, I experimented.
What can I say - I was looking for sensible information for an unexpectedly long time - despite the fact that there are plenty of drawings and videos on the Internet on the topic, some subtleties are still missed, attention is paid only to the main essence. As a result, I managed to assemble the installation with grief in half, and it works very efficiently
But I doubt that an ordinary person who does not have specific knowledge will cope with such a task.
As a result, I managed to assemble the installation with grief in half, and it works very efficiently. Only now I doubt that an ordinary person who does not have specific knowledge will cope with such a task.
How to assemble?
In practice, the easiest way is to make a Frenette heat pump with your own hands without a fan and a small cylinder.The oil remains as a coolant.
A dozen metal discs are placed inside a large cylinder. It is they who will rotate, replacing the small cylinder.
A radiator is attached to the device - it is into it that the oil will flow, cool, give off heat, and return to the pump. Thus, we will need:
- Cylinder;
- Metal discs;
- Fixing elements (nuts);
- Kernel;
- Pipes and radiator;
- Oil - can be any technical (rapeseed, cottonseed) or mineral;
- Motor (electric), the shaft of which must be extended.
Just like in the original model, it is necessary to provide a gap between the large cylinder and the disks - for this, their diameter is calculated in advance.
 The rod is located in the center, disks separated by nuts are preliminarily strung on it.
A hole is made at the top and bottom for a pipe that goes to the radiator.
The oil heated in the case will exit through the upper hole, give off heat through the radiator and return through the lower one for subsequent heating.
When mounting the rod, you need to install the bearing in the base - for easy rotation of the discs and reduce friction. Otherwise, the device will work worse, and in addition, it will become unusable many times faster.
The engine will suit any required power for a particular installation. If we make the Frenett pump ourselves, then the motor from the old fan may be at hand, for example - it will fit well into the design.
For convenience, thermal sensors can be added to the system, which will turn on / off the engine. This will make the pump even more economical and rational in use, thereby automating the control of the installation.
After completing the assembly of the structure itself, you should fill the installation with oil, then connect the working rod to the drive, and the input and output lines in oil with the lines leading to the heating radiator.
After completing the final check of the correctness of the assembly, you can try to include the installation in the work.
An installation of this type can be equally effectively used both for heating a building and for a separate room. In practice, it has been found that it is most expedient to use it, combining it with underfloor heating systems.
Such a solution will allow you to get a fairly efficient heating circuit that allows you to cope with low indoor temperatures.
How to make TN Frenetta with your own hands
Option 1
The compressor can be purchased from an old air conditioner at home appliance repair services. The fact is that a high-quality compressor has a much longer service life than an air conditioner.
 Freon TN manufacturing algorithm:
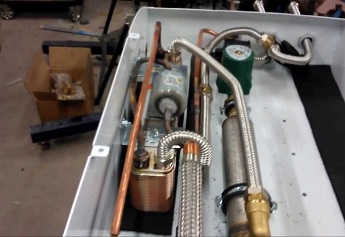
- Fix the compressor to the wall. This will be easy to do using L-brackets or steel angles. The place for fasteners must be chosen so that the entire heat pump fits.
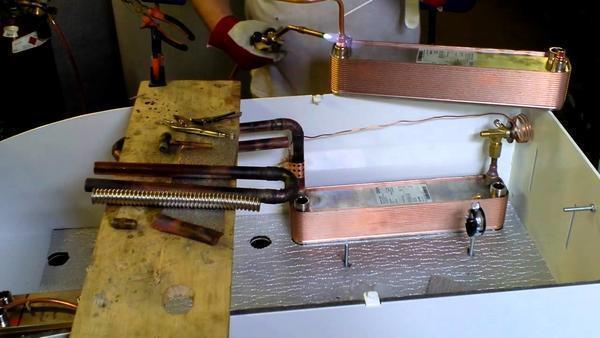
- Prepare the coil. It is made from copper tubes, wrapped around a cylinder of the desired inner diameter. The winding pitch must be the same.
- Cut the capacitor in half. This must be done in order to get a coil into it. In the prepared tank, threaded inlets are made on both sides. The extreme tubes of the coil are inserted into them, and then the tank is carefully welded at the seams, thereby returning its integrity.
- Prepare an evaporator for this design. This can be a simple plastic barrel or other suitable container. The main thing is that the volume matches the capacity of the condenser tank.
- Supply water to the radiators using ordinary PVC pipes.
- Fill the unit with freon. It is better to entrust this responsible step to specialists.
Option 2
- pump (for an apartment, you can choose one of the low-power types);
- steel cylinder;
- square tubes;
- set of steel discs with holes.Their diameter should be 5-10% smaller than the size of the cylinder into which they are inserted;
- electric motor with extended shaft;
- technical oil.
The engine is selected based on the required temperature, which is necessary for the system to heat the house. For example, in order for the water in the radiator to heat up to 100 ° C, you need to purchase an engine with an indicator of 8000 rpm.
Algorithm for the manufacture of oil HP Frenette:
- Place the drive shaft together with the bearings inside the selected steel cylinder. Seal the place where the shaft enters the cylinder. This is necessary to increase the life of the device.
- Mount the disks on the motor shaft, and place square tubes assembled into manifolds between them. The number of discs must be sufficient to fill the entire height of the cylinder.
- Drill holes at the top and bottom of the cylinder. Pass the pipe fasteners through them. The upper one will be designed to supply oil, and the lower one - to return the used coolant from the radiators.
- Fix the resulting device on a metal frame.
- Carry out the final assembly of the unit: pour oil into its cylinder, connect the system pipes and seal the resulting joints.
Installation steps
A do-it-yourself heat pump can be made entirely from old parts, taken, for example, from a non-working air conditioner.
Costs, payback, power
A factory-made device costs about 4,000 euros and more. A self-made pump for heating 100 m² of area will pay off in approximately 2 years. For houses with not very good thermal insulation, the power should be 75 W / m²., With good thermal insulation, 50 W / m² is enough, and when using modern thermal insulation materials, 30 W / m² is enough.
The ideal option would be when the pump is included in a project for heating a house with underfloor heating and tile flooring.
Process of creation
First you need to get the compressor from a non-working air conditioner, not necessarily a new one. It will be cheaper to purchase it in refrigerator repair shops. The compressor is attached to the wall with brackets (L-300 will do).
For the manufacture of a capacitor, a stainless steel tank of 100-120 liters is suitable. It is cut in half, a coil is installed inside. The coil can be made by yourself from a plumbing copper tube or from a refrigerator. Here you need thick walls - from 1 mm and more. The tube is wound on a conventional cylinder (gas, oxygen) with a uniform distance between the turns and is fixed in this position with a perforated aluminum corner (they form the corners under the putty). It is attached to the coil so that each turn is located against the hole in the corner.
The result will be an even pitch of turns and structural strength. After creating the coil, the halves of the container are welded. Threaded connections are also welded. Then an evaporator is created. An ordinary plastic container of 60–80 liters may be suitable for it. with a ¾ inch pipe coil mounted inside. Simple plumbing pipes are used to transport water.
The evaporator is mounted on the wall with an L-bracket. But the injection of freon should be done by a specialist in refrigeration equipment: he will weld the pipes and pump freon into them. After that, the structure is connected to the heating system inside the house, and then to the external circuit.
Features for each species
A vertical ground-to-water heating pump requires a 50–150 m well. Geothermal probes are placed in it and connected to the pump. The probes take heat from the ground, which is transferred with non-freezing water to the pump, and from there to the heating system. For small areas, probes are suitable, for large areas, a horizontal collector.
For a horizontal apparatus of the "soil-water" type, you need to create a collector from a pipe system. It is located below the freezing level (1–1.5 m) and looks like a kind of serpentine underground.A layer of soil is removed, pipes are laid and the soil is poured back. It is possible to lay pipes in separate trenches.
For a water-to-water unit, it is assembled from HDPE pipes, which are filled with a heat carrier and then transferred to a reservoir. The pipes look like a large serpentine at the bottom of the reservoir. It is advisable to place them in its center.
The air-to-water apparatus does not require labor-intensive earthworks. A place is chosen near the house or on its roof, where a home-made heat pump is connected to the house heating. Heat is extracted by fans and an evaporator.
The principle of operation of the heat pump
Scheme of the heat pump. (Click to enlarge)
By the principle of operation, heat pumps resemble conventional refrigerators. So, refrigeration equipment in the process of operation takes heat from the chambers and delivers it outside.
This is where radiators come into play. As for the pump, it takes heat from the earth or liquid. At the next stage, thermal energy is processed and supplied to the heating system of a building.
In the operation of the heat pump, a special place is occupied by the refrigerant, which is used as freon or ammonia. The refrigerant moves along the external and internal circuits.
Here, the external circuit is responsible for receiving thermal energy from the external environment, whether it be earth, water or the atmosphere. After the temperature of the refrigerant rises a few degrees, it begins to circulate through the system.
In its original state, the refrigerant is a liquid, but as a result of the action of the evaporator on it, it turns into a gas. After that, the refrigerant is sent to the compressor, where it is compressed.
As a result, its temperature rises. Further, the gas is sent to the condenser, where the exchange of thermal energy with the heat carrier of the heating system takes place. As a result of cooling, the gas turns into a liquid and returns to its starting point.
Principle of operation
All the space around us is energy - you just need to know how to use it. For a heat pump, the ambient temperature must be greater than 1C°. Here it should be said that even the earth in winter under snow or at some depth retains heat. The work of a geothermal or any other heat pump is based on the transportation of heat from its source using a heat carrier to the heating circuit of the house.
Scheme of operation of the device by points:
- the heat carrier (water, soil, air) fills the pipeline under the soil and heats it;
- then the coolant is transported to the heat exchanger (evaporator) with subsequent heat transfer to the internal circuit;
- the external circuit contains the refrigerant, a liquid with a low boiling point under low pressure. For example, freon, water with alcohol, glycol mixture. Inside the evaporator, this substance is heated and becomes a gas;
- the gaseous refrigerant is sent to the compressor, compressed under high pressure and heated;
- hot gas enters the condenser and there its thermal energy passes to the heat carrier of the house heating system;
- the cycle ends with the conversion of the refrigerant into a liquid, and it, due to heat loss, returns back to the system.
The same principle is used for refrigerators, so home heat pumps can be used as air conditioners to cool a room. Simply put, a heat pump is a kind of refrigerator with the opposite effect: instead of cold, heat is generated.
Do-it-yourself Frenette heat pump drawings
The thermal oil heater is a steel cylindrical shell, inside of which there are two coaxially arranged tubular heat exchangers forming a three-circuit combustion chamber.
-
The heat exchanger is made of API certified SCH 40 pipes tested at 10 bar pressure.
-
The design of the heater uses burners manufactured by Riello (Italy)
-
The front and back walls are made of refractory material, if necessary, they can be dismantled for cleaning and maintenance.
-
The thermal oil circulation system is provided with coarse filters designed to trap impurities.
-
The design of the thermal oil heater is provided with shut-off valves that allow maintenance without draining the thermal oil from the heating system.
-
The thermal oil pressure and temperature control system is fully automatic, based on the signals of electronic pressure and temperature sensors at the inlet and outlet of the heat exchanger.
Instruments are also provided for visualization of temperature and pressure readings of thermal oil.
-
The control panel is housed inside a dust- and moisture-proof panel, with a high degree of protection.
-
The automatic control system allows you to set the time of daily start and stop of the liquid heat carrier heater, an automatic timer is provided to keep the heat carrier circulating after the burner is stopped, this system allows you to use the received thermal energy as efficiently as possible.
-
The design provides a viewing window made of tempered glass, which allows you to visually control the combustion chamber.
-
Thermal insulation is made of refractory material with a thickness that excludes heat loss.
Specifications for liquid heat carrier heaters
It is possible to supply heaters of the liquid heat carrier of the following models:
|
CNT model |
CO10 |
CO15 |
CO20 |
CO25 |
CO30 |
CO40 |
CO 50 |
|
|
Heat flow power. |
kW |
|||||||
|
The amount of thermal oil in the system. |
l. |
|||||||
|
Installed power. |
Kv |
|||||||
|
Pump performance |
||||||||
|
Inlet / outlet flange. |
mm. |
|||||||
|
Length |
mm. |
|||||||
|
Width |
mm. |
|||||||
|
Height |
mm. |
|||||||
|
Total weight. |
kg. |
|||||||
|
Burner power |
kW |
Including gas burner.
The delivery set of the UNT includes:
1.Firebox; 2. Riello burner 3. Installation control cabinet; 4. Alarm block; 5. Smoke pipe;
Lecture Search