Manufacturing
The whole process of manufacturing countertops consists of several stages:
- creating a sketch, in the process of work, you need to decide on the shape and size of the future product;
- marking at the installation site;
- creating a frame;
- sheathing;
- execution of finishing works.
Create a Sketch
When creating a sketch of a future countertop, you need to focus not only on aesthetic appeal, but also on convenience and functionality. There are standard options:
- height - 80-110 cm;
- the distance between the plumbing elements is 70 cm or more;
- the distance from the wall to the washbasin bowl is 10 cm or more.
However, these are standard settings, so you can change them for convenience. For example, if everyone in the family is tall, then you can place the countertop at a higher height. In addition, you need to consider the need for additional details - shelves, niches, etc.
markup
After the sketch is created, and the materials are purchased, you can start marking. First of all, you need to free the installation site from unnecessary items so that nothing interferes with the work. If the countertop is not built immediately after the repair, then you need to carefully inspect the finish for defects.
If they are found, then it is necessary to take measures to eliminate them (to repair potholes in the flooring, replace broken tiles, etc.). The markup is done like this:
the height of the countertop is marked and a mark is placed on the wall (if the floor is uneven, then you will first have to mark the zero level, and then measure the height of the countertop from it);
then, at the level of the height of the countertop, its length is noted;
then you need to make a projection of the future structure on the floor, measuring its length and width;
marking is done using a level, it is very important that the lines are laid strictly vertically or horizontally without distortions.
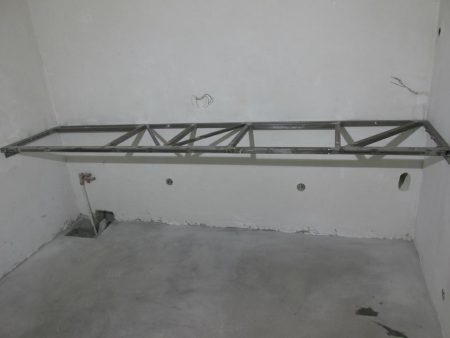
Assembling the frame
Now you need to cut the profile or timber according to the dimensions of the sketch. It is recommended to try on each part on the spot and number it so as not to confuse which one to install during the assembly process. After all the details are prepared, you can begin installation. To complete the work you will need:
- puncher or drill with an impact function to create holes in a concrete wall;
- screwdriver;
- dowels;
- self-tapping screws.
Completing of the work:
- holes are drilled in the frame elements for installing dowels in increments of 20 cm;
- the prepared part is applied to the installation site, a point is marked on the floor or wall through the hole in the part;
- holes are drilled at the marked points;
- drill holes in the walls and floor, the diameter of the hole should be 6 mm, and the depth should correspond to the length of the dowel;
- install the frame parts in place, insert the dowels and screw in the screws. During the assembly process, it is necessary to periodically check the correct installation using a level;
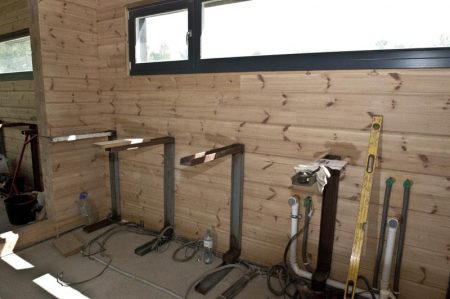
- to make a protruding stand, it is necessary to use two identical sections of the profile, they must be inserted one into the other and fastened with self-tapping screws. A double profile is much more reliable than a single one, so it's not worth saving;
- horizontal jumpers (stiffening ribs) are also desirable to be made double. The prepared jumpers are inserted into the groove of the profile installed on the wall and fixed with self-tapping screws. Jumpers are attached to the protruding rack through a bracket, which is easy to cut out of the profile trim;
- the upper part of the frame is reinforced with stiffeners; when placing jumpers, it is necessary to leave room for installing the sink. Spacers must be made double, otherwise, the finished tabletop will sag, even with a slight load;
- the last stage of mounting the frame is the final check of the correct location of the parts using a level.
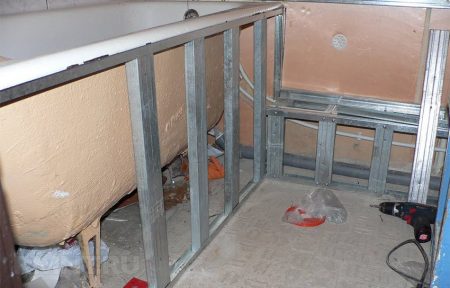
sheathing
The finished frame needs to be sheathed with GKLV. They do the job like this:
- cut blanks corresponding to the dimensions of the profile;
- the upper blank is laid in place and the contour of the shell is drawn on it according to the template. This is a very crucial moment of work, because if the hole is not cut correctly, then after installing the sink, ugly gaps will remain;
- then the cut parts are hemmed to the frame, screwing in the screws every 15 cm;
- GKLV sheathe the upper and side parts of the structure, according to the sketch. At the last stage, narrow strips are attached to cover the ends;
- cut a hole under the sink, install it;
- then grout all the seams and proceed to the finish. Tiles or mosaics are used as decoration.
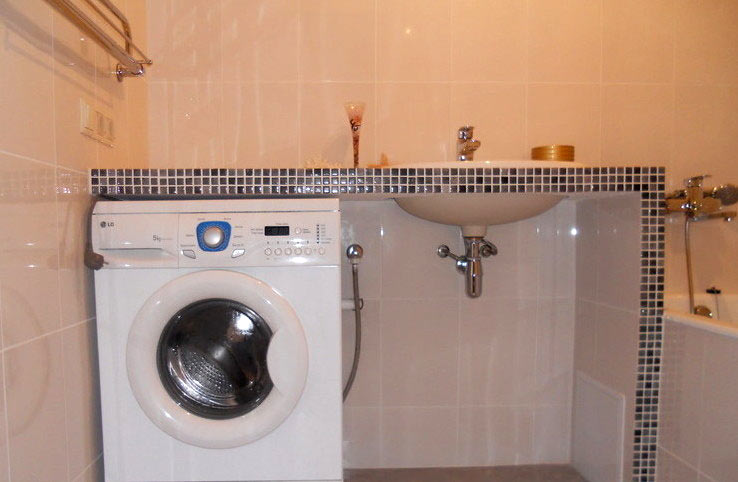
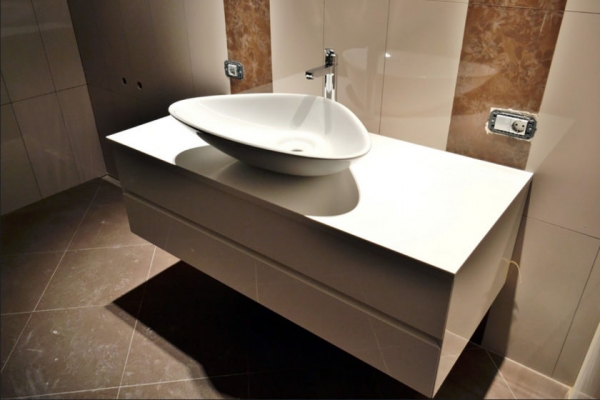
So, if you want to make a countertop in the bathroom, it is convenient to use moisture-resistant drywall. Working with this material is simple, but you need to be extremely careful when marking up. It is best to finish the countertop with ceramic tiles. The mosaic finish will look elegant.
Best Answers
Nikolay Todorov:
Depending on what shape you want the base of the sink. If not very massive, then you can use metal profiles and GVL sheets, and there is also an option from foam blocks, and then you can finish it with tiles and stone and mosaics
Sergei Gudovsky:
An artificial stone, I heard it happens. Lightweight and no tiles needed.
Luke' :
If the wall is thin, it will not come off, but the movements will crack the whole tile for you. Strengthen and make the frame mosaic - it looks amazing when the master does it.
teammen:
I have just such a table. Made by a good craftsman. The frame of the countertop is made of profiles (aluminum profiles are light and durable) and is attached to the wall and there are two more racks from the same profiles, plus the sink itself is attached to the wall on brackets. The frame is sheathed with plasterboard and lined with tiles. Everything is holding up very well. But if the wall is so fragile, then you can make four or more supports on which everything will hold. Is the wall between the bathroom and the toilet so fragile? It is probably made of foam blocks, must withstand the weight of the sink, and the weight of the countertop is distributed on the supports. But in lute everything is as it should be. bom case weigh 5 kg. it won't. The weight of the tile + the weight of the glue + the weight of the drywall is no longer light weight. You can also strengthen the wall. Or make supports from metal corners and distribute all the weight on them.
Finishing plasterboard worktops
After the drywall construction is ready, it should be brought to the ideal look with the help of decorative finishes. Most often this is done using ceramic tiles. The tile should be of the same tone with the room. You can make one color, but the difference is literally 1 tone lighter or darker. Drywall tiles can be beaten into different pieces, different shapes and chaotic abstractions are laid out of them.
Ordinary ceramic tiles should be laid using special crosses that keep the correct location of each tile, the same location from each other. The tiles must be laid on a special adhesive applied to the drywall with a notched trowel. The glue must be moisture resistant.
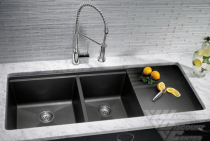
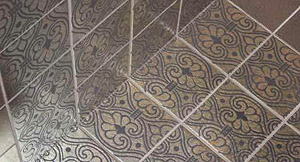
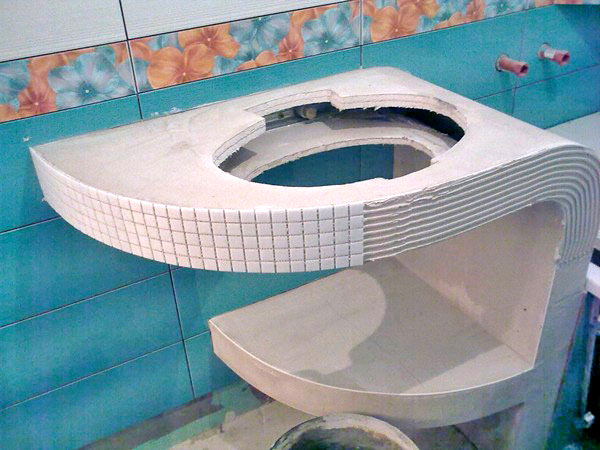 An example of finishing a countertop with a special tile
In order to cut the tiles around the edges of the sink, you should use a template made and used earlier from cardboard. Cut the tile carefully and so that it exactly follows the contours of the washbasin. Between the countertop and the washbasin, the seam should be treated with silicone or another hermetic agent. In order for the tile to repeat a perfectly flat surface, it is necessary to put a flat board on top after laying it, which will press the tile down.
After the glue dries, the seams should be sealed with cement mortar or the same glue.Again, after drying, the seams are rubbed with a special solution with paint suitable for the general background of the bathroom.
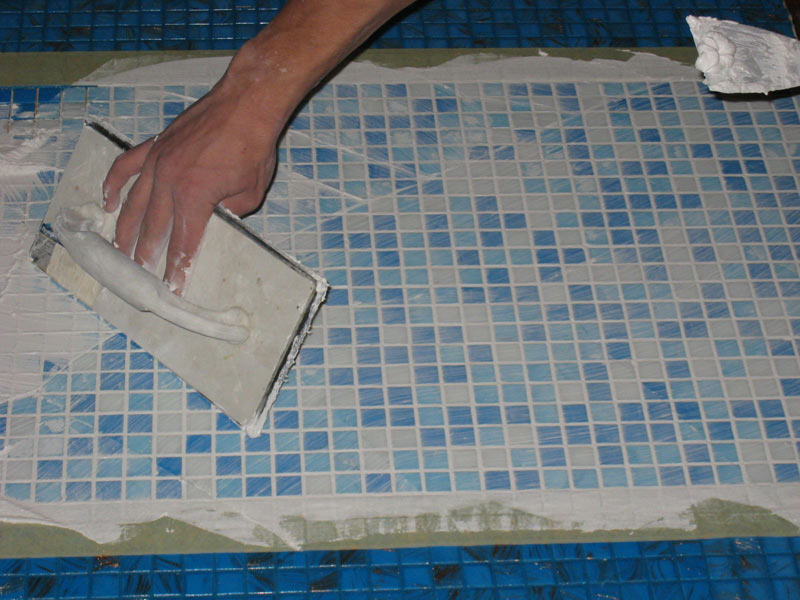 The process of grouting joints with cement mortar
Mosaics usually come in smaller sizes and often form drawings. It is laid according to the principle of laying tiles, only it requires more patience and time. The drawing is laid out in a separate place, and then each individual mosaic is taken from the drawing and placed on the surface prepared with glue. Excess glue can be removed with a wet cloth or sponge. Seams are sealed with colored grout, which is matched to the color of the tile.
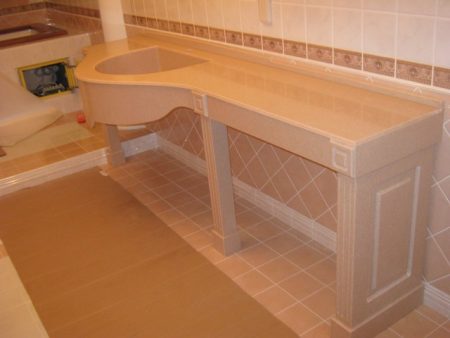
 Construction and design of a simple drywall countertop
Important tips.
- For a long service life of the countertop in a drywall bathroom, you need to buy high-quality materials, fasteners and dowels.
- Tiles or mosaics should be laid on a waterproof adhesive.
- The primer must also be of high quality moisture resistant.
Do-it-yourself plasterboard worktop in the bathroom is easy. It should not save on materials. Because the metal is susceptible to corrosion (galvanized profiles are required), and ordinary drywall can swell and deform from moisture.
Frame assembly
It is carried out in the following sequence:
- In order not to confuse the blanks, it is better to number them. In each make holes of 6 mm.
- Each profile is applied along the marking lines and marks through the holes where the dowels will be located.
- Drill holes for hardware in the wall. If the surface is tiled, the enamel is scratched at the intended point.
- Using a perforator, which is inserted into the holes in the frame blanks, holes are drilled again for the length of the dowel in the walls. and on the floor.
- They take the profiles and put them in their places, insert the hardware and fix the guides. The evenness of their location is checked using a level.
- The protruding rack is formed from two guide profiles, inserted one into the other and fixed with self-tapping screws along the joint line.
- On the upper markup, horizontal jumpers are fixed, which are also made double. Fastening is carried out with a bracket of profile scraps on self-tapping screws.
- Reinforce the frame with spacers. Two are placed on the sides, and two more - under the base of the countertop.
Check the evenness of all guides and the quality of the connection, as well as the absence of gaps and backlash.
Execution process
In order for the countertop to turn out beautiful and functional, you need to know the stages of its creation, follow the recommendations and correctly apply all the necessary tools.
Of the tools you will need:
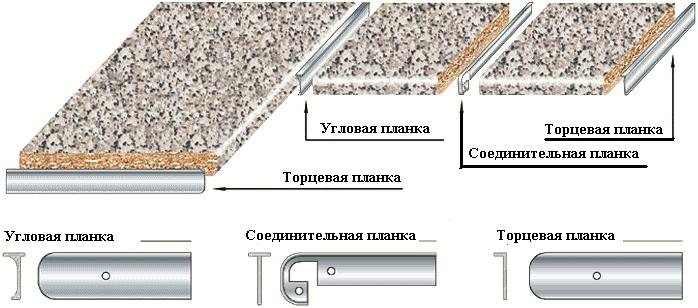
Scheme of installation of aluminum strips for countertops.
- drywall;
- self-tapping screws;
- screwdriver;
- pencil;
- sandpaper;
- dowels;
- metal profiles;
- moisture resistant glue;
- sealant;
- primer;
- decorative slats;
- jigsaw;
- putty knife;
- tassel;
GKL processing for waterproofing
Despite the fact that drywall is moisture resistant, it is necessary to take care of its additional waterproofing. Moisture resistance provides him with a coating, and he does not need additional processing from above and below. Sections are at risk, and slats and moisture-resistant glue are useful for them.
The exposed edges of drywall need to be sanded with sandpaper. After sanding, the matter will remain with the primer. It is best to choose waterproof too.
Mounting and installation
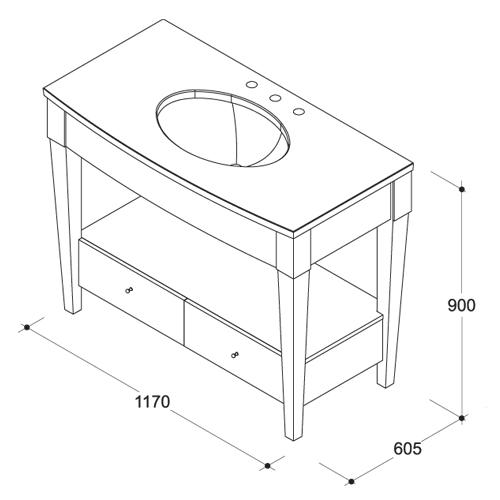
Bath counter dimensions.
The creation of a unique interior object begins with the construction of a frame; a metal profile is suitable for this stage, which is usually used to work with plasterboard structures. To create the correct frame, you need to decide on the general parameters (length, width), at what height the countertop will be, measure the sink and cut a suitable hole. It should be remembered that drywall can break if carelessly handled.To avoid unpleasant surprises, process it on a flat surface so that the sheet does not hang from the edges of the workplace. The ideal option would be a pre-prepared table surface. To accurately outline the sink hole, trace it directly on the drywall sheet, so you get the exact dimensions and you don't have to finish or glue something during the installation process.
A simple countertop without additional departments and sophistication is easily mounted. To do this, you will need corners, through which you can connect the structure to the wall, for fastening you will need screwdrivers and self-tapping screws. Install the sink and seal the joint of the GKL with it with a sealant, so you protect your structure from moisture.
Multi-level tabletop
A more complex version of the countertop is a multi-level countertop. Before starting work, you need to determine all the components, the number of levels and shelves.
The more elements in your design, the more carefully you need to take measurements. First, determine for yourself all the components, the number of levels, shelves, etc. Measure and cut out all load-bearing and decorative structural elements. At this stage, do not forget about proportions and the laws of physics. Cut the hole for the sink according to the already familiar principle. All cuts open to moisture should be treated with a moisture-resistant putty.
We collect the outline of the future countertop from the profiles. Profiles are sheathed with drywall. The bottom sheet is attached first, immediately after its installation, we proceed to the supports so that the table top is stable and does not shake. After installing the sink in the prepared hole, the seams must be treated with a sealant.
Bathroom countertop installation
Tabletop installation can be done in the following ways:
Floor-mounted - when the tabletop is installed on legs or on a cabinet with sliding shelves or doors.
This is the easiest installation method, as it only requires you to place the furniture where you feel most comfortable, adjust its height and place the sink on the countertop in the bathroom.
For the greatest convenience when cleaning the room, it is worth using cabinets under the countertop in the bathroom with legs, as this will allow the space to be ventilated and provide access for cleaning.
Countertops are installed on the wall - while leaving the space under it unoccupied. Such countertops are fastened with special corners or fasteners.
The product, which will be wall-mounted, should not be wider than 60 centimeters.
Today, there are a number of models equipped with drawers, shelves and compartments for storing various small items that are often needed at hand.
However, such products should be fixed quite reliably, as they are massive and heavy.
Models are attached in a combined way - combining elements of the floor and wall tabletops.
In this case, one part rests on the legs, and the other is attached to the wall.
Our next steps
- We attach the slats to the bottom of the tabletop, which we used as beacons. They will serve as a support for facing the ends of the countertop. To the end part of the tabletop, we fix the angular outer profile on the screws. We carefully prime the cement layer, wait for the primer to dry.
- Dilute the glue, according to the instructions. A primer can be added to the mixing water to ensure strength (1 part primer to 3 parts water).
- Facing is carried out from the “red corner”, i.e. from those sides that will be in sight. We will start from the outer sides of the countertop, which we will veneer with full-length tiles. With a notched trowel, apply a layer of glue to the cement layer.
- Lay the first tile on the corner of the countertop. Next, lay out the first rows, observing the angle
90°, checking the outer line with a spirit level. Also, do not forget to check the horizontal plane in all rows using a level.The inner sides of the tile should be at the same distance from the lines we beat off.

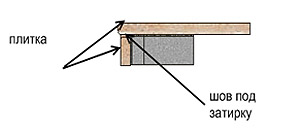
A small nuance to think about before we start laying out the first rows: how will we veneer the end parts of our countertop? There are several solutions to this problem. Let's consider one of them. The tile is displayed approximately one centimeter. The trimmed end tile or decorative border is glued at a right angle, factory side up. The size of the seam is regulated by crosses and subsequently filled with grout. The underside of the trim is hidden in profile. This is the easiest way to finish the end of a countertop. To simplify the work, laying the first row, immediately expose the end tiles. We observe the seams in the same way as on the main masonry. You can replace the end trim with a border. You can bring the end tile up and attach the main masonry to it. It's already the way you like it.
- It is possible to mount an external corner by applying an external corner tile profile. In this case, I advise you to start it under the top tile.
- Another option is to cut the tiles at a 45° angle. Please note that this is a rather difficult job and, without special skills and additional equipment, it is better to get by with the two methods described above. If you decide to file, do not forget to grind the edges so that they are not sharp. It is possible to finish the end face of the countertop with shaped tiles or ceramic plinth. I'm not afraid to repeat myself: here everyone is a creator and artist for himself.
-
Further installation should not cause any special difficulties. We lay the tiles in rows - it is best to lead "long" rows. Do not forget to insert crosses into the seams and remove excess mortar. We control the plane: when applying the level, there should be no gaps between it and the tile.
-
Sawing tiles under the sink, you can allow an error within 0.5 cm. The most important thing is
the sink must rest on the lined surface over the entire plane. Note that porcelain stoneware is quite easy to cut with a lever tile cutter and very hard - with an angle grinder with a diamond disc. In the case of sawing tiles under the hole for the sink, it is possible to make a template from cardboard and further mark it. For more information on how to lay tiles, see the article “Tile. Do-it-yourself apron in the kitchen.
So, we place the trimmed tiles near the walls and adjacent the countertop to the refrigerator, cabinets, stove, etc. In the future, these joints can be closed with a plinth, having previously smeared the seams with silicone sealant.
Making the base of the future bathroom countertops with your own hands
3 sections of cabinet furniture are taken as a basis:
- cabinet under the sink, size 500X560X820;
- cabinet with sliding shelves 500X560X820;
- two-door cabinet, size 600X560X820.
Cabinets in the future will be displayed along the wall of the bathroom in a row. The section will be 1600 mm long and 560 mm wide.
Required to work

Diagram of the grinder device.
Tools:
- angle grinder (grinder) and a tile disk;
- rasp (for processing the edges of cut tiles);
- putty knife;
- notched trowel;
- rags;
- jigsaw;
- stainless self-tapping screws (3.5-3.8 cm) 200-400 pieces;
- felt-tip pen;
- pencil;
- electric drill;
- mixer;
- wood drill (5-6 mm);
- solution bucket.
Materials:
- tile adhesive;
- crosses for tiles 2.5-3 mm;
- silicone sealant;
- protective composition for wood processing;
- primer;
- glue for wood;
- waterproofing composition or quartz sand + liquid glass.

Scheme of installation of overlays on the countertop.
The base of the tabletop should be made of two sheets of softwood plywood, dimensions 1500 X 1500 X 20 grade FB or FSF.
FB is bakelite waterproof plywood (impregnated with bakelite varnish). This moisture resistant plywood can be used in sea water and hot humid climates.
FSF is a waterproof plywood glued with phenolic resin. Moisture resistant plywood can be used outdoors.
Plywood fastening must be done in at least 2 layers, overlapping. Before starting work, plywood must be properly treated with bituminous mastic or a waterproofing compound for wood and impregnation.
Plywood should be cut taking into account that the fibers in all layers should go along the section. From the walls of the section, plywood should protrude from all sides for 3-5 cm. The joints of the plywood strips should not go into the hole that needs to be cut out for the sink. Plywood should be cut with a jigsaw.
The design will turn out to be quite heavy, so there is no need to save on legs for the case.
The first layer of plywood must be fastened especially securely. The structure must be immovable. In the side ties of the cases from below, it is necessary to fasten the first layer of plywood with your own hands (3-4 self-tapping screws on each side). The side walls must be pulled with self-tapping screws (1.5-1.8 cm) to the first layer of the future tabletop using metal corners.
Then it is necessary to apply glue for wood (carpentry glue, moisture resistant PVA) on the top layer of plywood. Glue must be moisture resistant. It should be applied to the surface in a zigzag manner, and then the second layer of plywood should be pressed and tightened with self-tapping screws. To prevent the hats from sticking out, you need to pre-drill those places where the screws will be attached. It is necessary to place self-tapping screws in increments of 15 cm both along the perimeter and deep into the sheets.
To the upper part of the second layer of plywood, using a stapler, it is necessary to attach a masking grid with a cell of 0.5-2 cm.
We overwrite the seams
Let's take a closer look at this stage of work. Our countertop, as we said above, will be subject to extreme loads - moisture, grease, chemicals of detergents and cleaning agents. That is why the filling of the seams must be approached very carefully. Ordinary tile grout just won't work here. The fact is that the limestone filler is afraid of acids. Recall an experience from a high school chemistry course: when a drop of vinegar was applied to a piece of chalk, the limestone reacted.
The most suitable materials for these purposes are grouts based on epoxy resin. They are resistant to chlorinated water, oils, fats and acids, as well as high temperatures.
The materials of this group are quite widely represented by Western and domestic manufacturers. These are usually two-component formulations consisting of a modified epoxy resin (component 1) and fillers, pigments and a hardener (component 2).
The preparation of the material consists of mechanical (preferably with a low-speed mixer) mixing of the two components
When choosing a grout composition, it is necessary to pay attention to the recommended joint width. Often, epoxy grouts are recommended for wide (from 8 mm) joints
In our case, compositions for a seam width of 2-12 mm are suitable. I’ll make a reservation right away that working with epoxy grouts is quite difficult, since the mass turns out to be thick, and it’s not very convenient to apply it in the usual way, rubbing it with a rubber or plastic spatula into the tile joints.
Moreover, it is necessary to remove the remnants of epoxy grout from the tile in time, otherwise it will be impossible to do it later.
One way to make grouting easier is to protect the tile with masking tape, leaving the grouts clean, and use a syringe to grout the grouts. The cylinder is filled with a grout, the necessary nozzle is put on the syringe. After that, the grout is squeezed into the seam. The surface of the seam is formed with a piece of a bent electrical cable, or with the back of a rubber spatula. Next, the protective tape is removed.According to the instructions, after 30-60 minutes, the remains of the grout are soaked with water to an emulsion state, after which they are washed off with a damp sponge. The sponge is often washed in clean water. After another 2-3 hours, the entire surface of the tile is washed clean.
An alternative to epoxy grout is a combined epoxy-cement grout. It is more easy to use. The disadvantage of this material: a limited choice of colors.
Please note that epoxy and cement-epoxy materials are distinguished by a high cost. Packing 2-2.5 kg will cost you from 1500 rubles.
Another option for grouting can be cement-based grouts designed for floors. In these grouts, the soft limestone aggregate is replaced by finely dispersed quartz. That is, the material itself is resistant to chemical reagents and has increased resistance to abrasion. After applying such a grout, after three days it is necessary to treat the seams with a strengthening water-repellent composition twice, with an interval of 12-24 hours. It is best to use a watercolor brush for these purposes. The glaze of the tile is sealed with masking tape. The resulting seams will be resistant to all surprises.
We pass the seam between the wall and the countertop tile with silicone sealant.
If we decide to veneer an apron, the work procedure is described in detail in the article “Tile. Do-it-yourself apron in the kitchen. The only thing is that it would be better to grout the countertop tiles together with the grout of the apron. The seam between the vertical and horizontal cladding is filled according to the technology described above. Options with a ceramic or plastic plinth are possible. The seams of the apron can be rubbed with the same composition, or you can use the usual, cheaper grout.
When installing the sink in place, do not forget to coat the joint with silicone sealant.
Having shown ingenuity, we can turn old kitchen furniture into a masterpiece. Part of the facades can also be tiled. You just need to fix the drywall sheet or the remains of our GVL to the facade. It won't take much work. It is enough to make a tile countertop and replace the facades. By the same principle, you can make a countertop in the bathroom, veneer a table in a room, in the country. Even according to the most conservative estimates, the savings (in comparison with the cost of buying and installing countertops made of natural or artificial stone) will be at least 2 times.
My special thanks for the help in writing the article and advice to my Canadian colleague Yuri Litvichko.