The principle of functioning of toilets on peat components
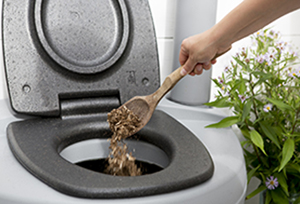 As a filler for a dry closet, ordinary peat is used. The active substance in the form of a peat filler has excellent absorption. It is capable of absorbing a large amount of waste. Moreover, this ability is expressed in specific proportions - just one kilogram of peat freely absorbs 10 liters of waste!
In the process of processing liquid waste with the participation of peat, compost useful for soil fertility is formed. Such home production of compost is very important for summer residents, especially since the smell from processed products is almost completely eliminated and useful components are preserved.
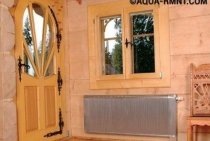
Outwardly, the Finnish peat toilet for a summer residence resembles an ordinary toilet bowl, however, its formats can be arbitrary. Also, the dimensions of the dry closet are also different.
What designs of toilets for summer cottages exist
Such buildings can be divided into several varieties suitable for giving:
- toilet house with a cesspool;
- typical powder closet;
- factory biotoilet.
Toilet house with a cesspool
For such a structure, a foundation pit is first dug. Then they equip the cesspool, reinforcing the walls with concrete rings, brick, monolithic concrete, or installing a plastic container in the pit.
Above the pit, a toilet house is installed from improvised material, in which a pedestal or toilet seat is placed. Such a toilet project for a summer residence involves the accumulation of waste in a cesspool.
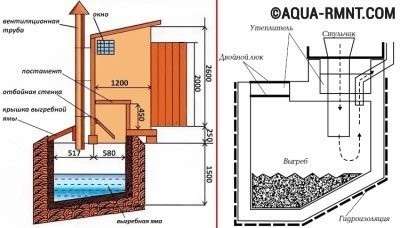
To eliminate the smell distributed from the cesspool, install a ventilation pipe
If the structure is not airtight, liquid waste partially seeps into the soil or evaporates.
Filling the sealed pit is faster. When the impurities reach a certain level, they have to be removed. Cleaning is carried out either independently using a pump, or they call a sewage machine.
Powder closet - a house without a cesspool
A house is also built for a powder closet, but without a cesspool. In this version of the country toilet, waste is collected in a container located under the toilet seat.
For greater convenience, two "different-sized" tanks are installed. Small holes are made in the smaller one and inserted into the larger one, on the side of which a round exit is made and a drainage hose is installed. Through it, excess liquid will go into the ground or into the drainage system.
A receptacle for the filler is placed next to the toilet seat. It can be sawdust, peat or dry earth.

Despite the fact that the filler partially restrains odors, the powder closet needs to install a ventilation pipe
After visiting the toilet, the waste is sprinkled with filler. This reduces unpleasant odors and promotes the decomposition of sewage. As the tank fills up, it is taken out to the compost heap.
The scheme for building a toilet in a powder-closet cottage should take into account the method of getting the container. Basically there are only two of them. In the first case, the tank is removed from the toilet seat by lifting the seat.
In the second, a small door is being built at the back of the building, opening which you can remove the drive.
Do not want the hassle - buy a dry closet
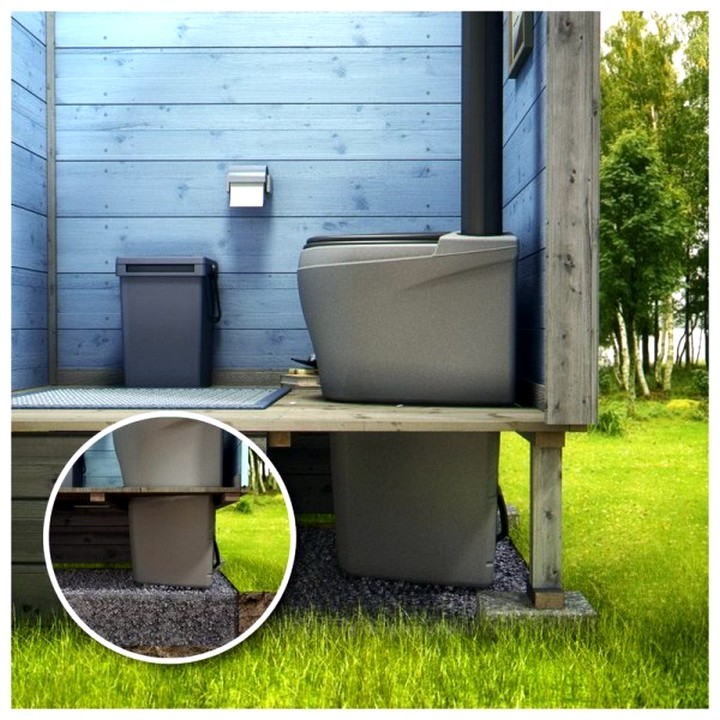
For those who do not have the desire or time to build a toilet, there are ready-made products. Manufacturers of dry closets have already taken care of everything. You just have to choose the appropriate option and install it in a room or house. If funds allow, you can buy a toilet with a cabin.
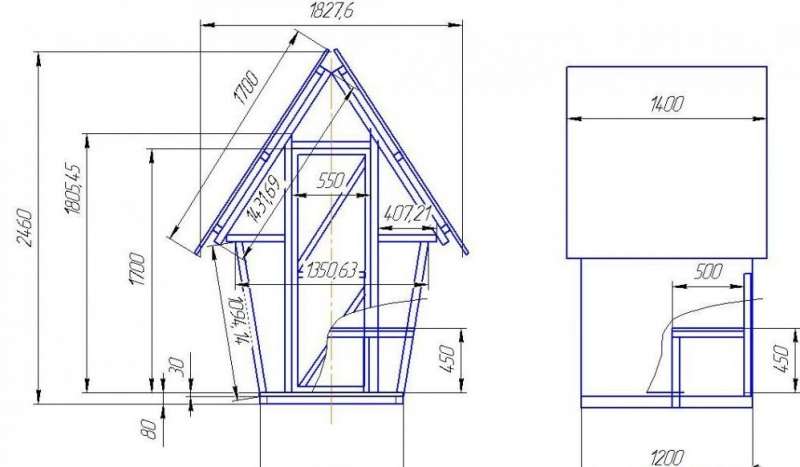
Whatever type of toilet is chosen, it is advisable to start its construction by drawing up a diagram. It must indicate the dimensions of the structure and the location of all components. For example, a scheme for the construction of a country toilet with a cesspool should be drawn up taking into account the width and depth of the pit.
Dry closet installation
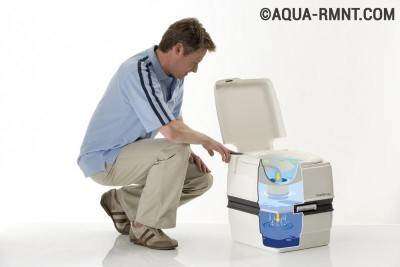
The simplest option is to purchase a chemical portable dry closet with replaceable cassettes. You will need to insert a cassette or fill the tank with concentrate and choose a suitable toilet seat.
The place can be chosen from personal preferences, since you do not need to be tied to a cesspool. In addition, you don’t have to worry about groundwater pollution (the exception is portable toilet bowls with a chemical filler). The smell will be present, but not strong, but barely perceptible - this is a completely natural process. If you do everything according to the rules, then you can put a dry closet at home, only then you need to take care of the ventilation and drainage system. Given all these nuances, you can choose a suitable place and proceed with the installation.
How to put a dry closet in the country:
- If you have chosen a portable toilet with cassettes (cleaning with chemicals), then you need to remove the protective film from the toilet and assemble the structure.
- You need to insert a cassette with liquid or pour liquid concentrate into a special compartment, snap the lid on and put the top bowl with a lid on.
- Do not forget to check in action how the toilet works.
- If everything suits you, you can hoist a portable toilet in a permanent place.
- Do a control flush. Waste should move to the lower storage tank.
- When the tank is full, you need to remove it and press the reset button (the pressure will drop and the tank will be freed from the contents).
- Then you need to wash the container and pour water again, add a biological product.
- If you bought a dry closet with a volume of 12 liters, then after about 35 visits (for 1 person this is a week of visits), you need to empty the tank, the tank volume of 21 liters will be enough for 70 visits (2 weeks of use).
- There are models equipped with a tank full indicator and a pump for convenient operation.
If you want to tinker a little, then you can make a peat bio-toilet yourself. It is necessary to prepare all the materials and you can get to work.
What you need:
- plastic or metal container for peat;
- seat (stool, container or bucket);
- dry peat;
- compost pit.
To make it more convenient to use the toilet, you can put a bucket of peat next to the toilet and pour a new portion of the filler after each visit. Before using the toilet for the first time, you need to pour a little peat on the bottom of the container, then the feces will be cleaned well and quickly.
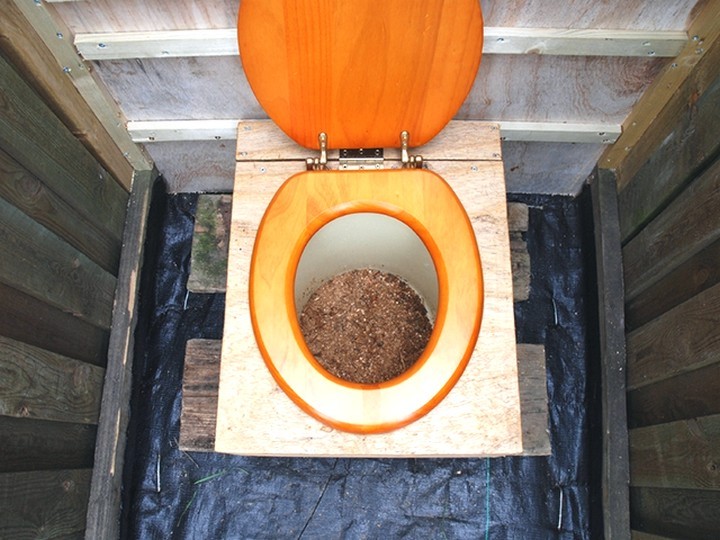
The design of the dry closet is simple: you need to install a bucket or other suitable container, pour a little peat mixture into it, install a toilet seat on top and attach the lid. Now you can use the dry closet. As soon as the bucket is full, pour the mixture into the compost pit.
Dry closet for a summer residence. Video:
Do-it-yourself outdoor toilet made of corrugated board and wood
Even in the country, you can not deny yourself comfort. This applies especially to the toilet.
This is the most important room for creating convenience in the country. It is necessary to take care of its arrangement even before the start of the garden season.
Most often, far from the city, there is no local sewerage system. Therefore, one has to refine oneself, as one can.
There is a large selection of materials from which you can build a toilet.
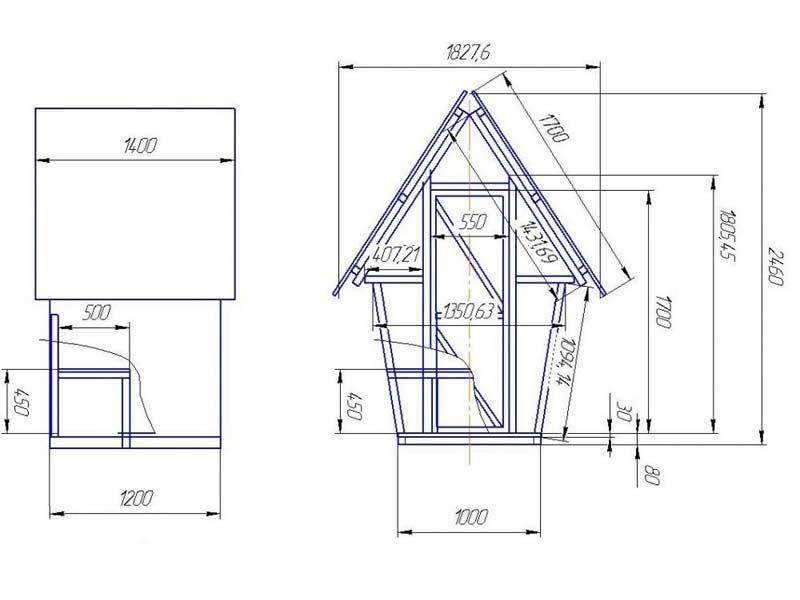
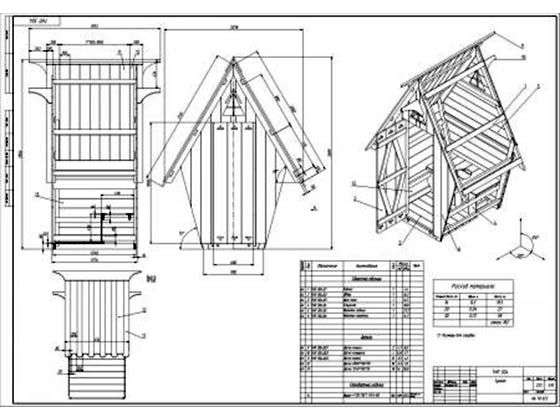
And there are enough varieties of such buildings to choose the right design. Having decided on the material from which the structure will be built, you need to draw up a drawing of a country toilet. Thanks to him, you can calculate the amount of necessary building materials. So before you start building, make a work plan.
The device of a country powder-closet
Arrangement of this type of country toilets as a powder closet can be performed anywhere on the site.
Its design does not imply the presence of a cesspool - instead, a sealed container is installed, which is emptied as it is filled with sewage. For this reason, there is no danger of soil and groundwater pollution.This means that there is no need to maintain a distance of 25 meters from a source of drinking water when building a toilet.
Powder closet can have different sizes.
In the back of the frame, holes are created for cleaning work and ventilation (for more details: “Ventilation of a country toilet, we do it ourselves”). A box with backfill is placed in the booth, which can be peat, ash, sawdust. They are powdered with sewage every time after visiting the toilet.
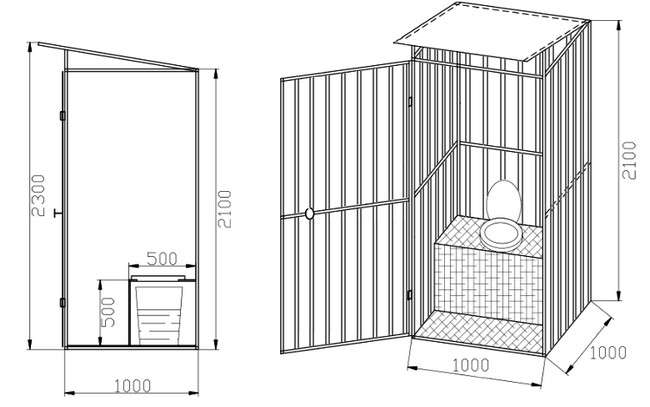
How to build a seat with capacity
The simplest dry closet is a seat with a capacity installed in a separate building.
For it, you will need a storage capacity of 20 liters, made of a material that is not subject to corrosion. It is desirable that it be in the form of a bucket. In addition to the container you will need:
- square bar (5:5 cm);
- plywood or chipboard 1.5 cm thick.
Also the tools:
First, the necessary blanks are cut out. 4 legs 35 cm high are made from a bar. The following are prepared from plywood:
- 2 rectangles - 52:30 cm, for the side walls;
- 2 rectangles - 45:30 cm, for the front and back walls;
- 1 rectangle - 45:48 cm, for the lid;
- 1 plank - 45:7, for loops.
When everything is ready, you can collect.
Legs are screwed to the short side of the side parts. They will protrude from one side by 5 cm.
Then the back and front walls are screwed to the legs, eventually forming a box.
A bar is screwed to the back side, over the legs.
A lid is hung on it with the help of hinges.
Now you need to make a hole.
In order for it to strictly correspond to the size of the container, the bucket is turned upside down, placed on the lid in the middle and a circle of the desired diameter is outlined.
The hole is cut with a jigsaw strictly according to the mark.
After that, the wooden surface is ground and covered with an antiseptic.
To give the product a more attractive look, you can paint it, varnish it, upholster it with linoleum. This is up to you.
What are the designs of dry closets
The simplest dry closet consists of two combined containers. The upper one is the receiving compartment and the lower one is for the collection and disposal of waste. In order for the decomposition of human waste products to pass faster, various filler compounds are used.
In addition to speeding up the recycling process, they eliminate odors. Dry closets are:
Now let's figure out which one you can build yourself.
The design of an electric dry closet is very complex, in addition, it requires power supply to operate.
Why are you overspending?
To use liquid dry closets, you will need a lot of water. We'll have to think about how to remove excess fluid, and there will be a lot of it. The price of biological products that are used as a filler also "bites".
 The use of a liquid dry closet leads to a large flow of water.
In addition, he needs to remove excess fluid.
And what is needed for a peat dry closet? The idea of installing such toilets is not new. Previously, something similar was called a powder closet. What was he like? The main detail of this design was a container for collecting waste. After the need was relieved, it was necessary to “disguise” everything with powder.
Sawdust, dry earth or ash were used for it.
This technology is still in use today. Peat acts only as a powder or filler. The structures made at the factory have two combined tanks. One is storage for waste, the other is for storage of filler.
For homemade dry closets, two separate containers are often used. In addition to the simplicity of design, the peat dry closet has other advantages:
- does not pollute the environment;
- works without water;
- low cost of consumables;
- obtaining high-quality natural fertilizer.
So, we decided: we are building a peat dry closet on our own.
How to make a peat toilet with your own hands
And be sure to mention that the seat cover is always closed.
Is drainage required for this design?
In order for the liquid that enters the container of the dry closet to be completely adsorbed, a lot of peat is needed. This is expensive and inconvenient, because the waste will have to be taken out more often. When using the usual norm of the filler, the liquid partially evaporates, partially absorbed by peat, it is desirable to remove the rest through the drainage.
What is needed for this?
Two containers of different sizes so that one fits snugly into the other, and at the bottom there is a little space between them. The bottom of the smaller tank should have small holes for liquid to seep into the larger tank. To remove it, a hole is made on the side, into which a drainage hose is inserted and brought out. For the liquid obtained at the outlet, a small collector can be built.
Proper waste disposal
You need to be able to properly dispose of waste, so that the result is a good fertilizer.
As the storage tank fills up, it must be cleaned. But this does not mean that you need to wait until it is filled to the brim. Not only is it not aesthetically pleasing, but a full bucket is physically difficult to endure. The more often you clean, the better.
The contents of the dry closet are taken out to the compost heap.
But do not expect that there will be no smell at all. Bacteria need time to completely process waste. Therefore, it is more desirable to make a compost heap away from home, and sprinkle “fresh” waste with dry earth or leaves.
It is even better if a container with a lid is used for it. After emptying the container of the dry closet, it is desirable to wash and dry it. Therefore, it does not hurt to have another one to change.
Installation and operation
Installation of peat toilets in a summer cottage is a very simple process, you can handle it yourself. Before starting the assembly of the structure, you should decide on the place of its installation. For the full functioning of the dry closet, install it on a flat surface strictly horizontally.
You will probably be interested to read about whether it is possible to fertilize the garden with feces.
Next comes the installation of the ventilation duct. To prevent unpleasant odors from accumulating in the toilet cubicle, it is best to bring the pipeline up to the roof.
It is desirable that the ventilation pipe be mounted without bends, which during operation will create obstacles to air flow.
The next step in the installation of a dry closet will be the installation of a liquid waste disposal system. The drainage hose must, without creases and bends, exit the storage tank into the cesspool. Instead of a pit, you can use a canister or other convenient container into which liquid fractions will flow freely.
The final step in installing peat toilets will be filling the peat tank - manufacturers recommend pouring the mixture no more than a third of the tank's volume. The main rule of operation is to cover the waste with a small layer of peat after each visit to the dry closet.
Cabin for homemade dry closet
Of course, if you wish, you can install a dry closet with your own hands and in the house. But this will require a separate room with ventilation.
If more than one person uses the toilet, a drain hose must be installed.
Those who cannot afford this will have to build a toilet on the street.
The house for him can be made of brick, wood or any material left after the construction of the house. Instead of a wooden seat box, you can build a whole pedestal with two holes. And at the back or side of the house, attach a small door to take out the container.
More information on the topic: http://aqua-rmnt.com
Country toilet and shower project under one roof
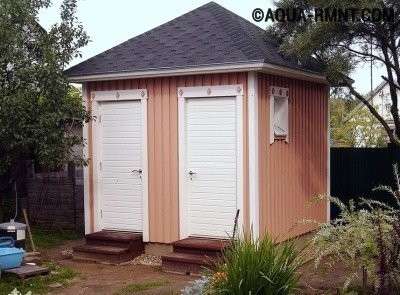
A toilet is good, but a toilet with a shower is even better. Both of these buildings create the comfort needed in a summer cottage. By combining these designs, you can save a little on material.Consider the project of a country toilet with a shower and its execution.
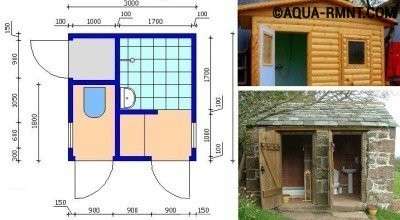
The toilet with a shower has a common wall: this will help save on building materials
The proposed diagram shows that the toilet and shower have a common wall. This is the cost of building materials. This project is designed for the installation of a dry closet.
If a cesspool is used, the scheme is slightly changed.
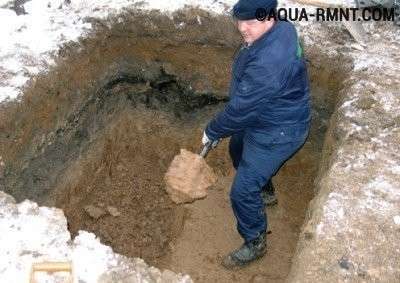
For the construction of such a structure, they first dig a foundation pit and strengthen its walls, and only then proceed to the construction of the building itself.
Preparation of the base for construction
First of all, a square section pit with a side of 4 meters and 0.3 cm deep is dug out for construction and covered with gravel somewhere at 0.2 m.
After careful tamping of the foundations, the formwork of wooden panels for the foundation is knocked down for a foundation 0.3 m wide and 0.5 m high.
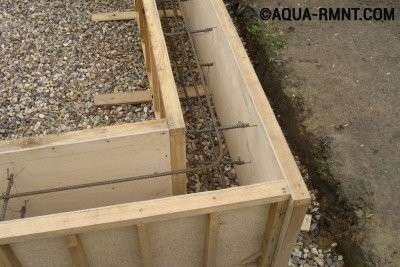
To make the foundation stronger, it is necessary to reinforce it.
Sand-cement mortar is prepared and poured into the formwork.
Crushed stone is used as a filler. When the concrete sets, the boards are removed and the defects are covered with mortar.
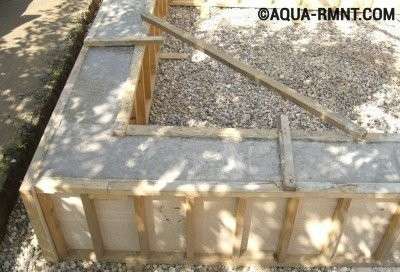
After the formwork has been removed, the defective areas are sealed with mortar.
The next step is the installation of sewer pipes.
We save the environment with a peat dry closet for a summer residence
Then the base under the floor is covered with sand and carefully rammed.
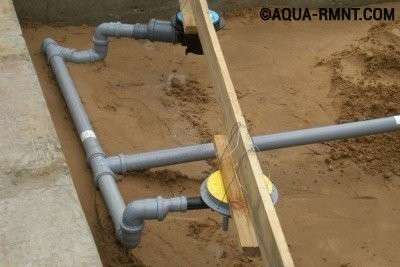
For sewerage take pipes with a diameter of 50 mm
To keep the room warm enough, foam is laid on top of the sand.
Reinforce the base and fill with mortar.
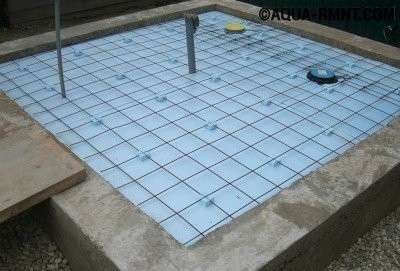
Styrofoam makes the room warmer, which will allow it to be used even in cool weather
In the process of pouring the solution under the shower, do not forget to make a slight slope
Construction of walls and roof structures
A beam is fixed on top of the foundation around the perimeter.
To do this, use long pins with a diameter of 1 cm, you can use reinforcement.
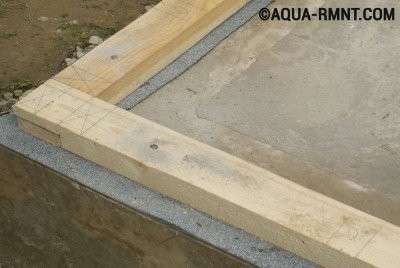
Roofing material is laid under the timber for waterproofing
Then they build a frame for the walls and a roof sheathing from edged boards (0.5 × 1 m).

In the process of building walls, you need to use a level
When making a roof crate, take it out of the gables by at least 0.3 m
Produce roof sheathing with edged boards.
Frontal boards are attached to the end parts of the crate.
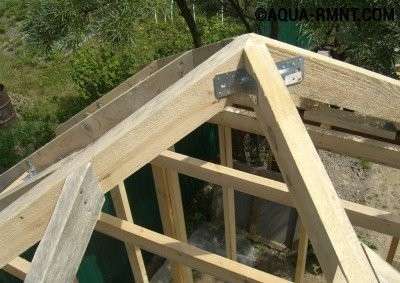
For the strength of the crate, metal corners are used.
Then proceed to laying the roof.
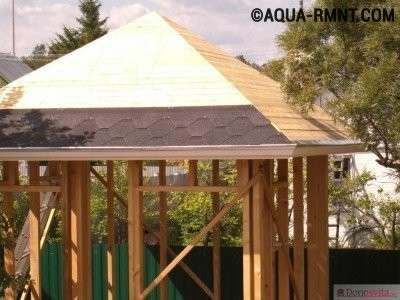
For the roof, you can use soft shingles, slate or other coating
After finishing work on the roof, they mount the wind protection and the wall sheathing.

The crate of the structure is necessary to provide a ventilation gap
Outside, the building is sheathed with edged boards (0.22 × 1 m).
Doors are also made from it (2.1 × 0.9 cm). Insert windows and sew on platbands.
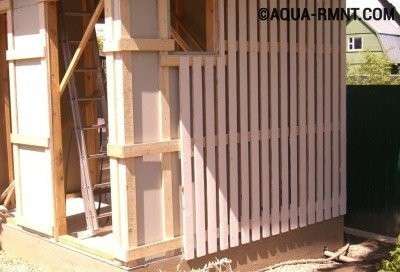
The crate will be sheathed with edged board. Wooden elements must be treated with an antiseptic
A large container is dug under the sewer drain and a pipe is connected.
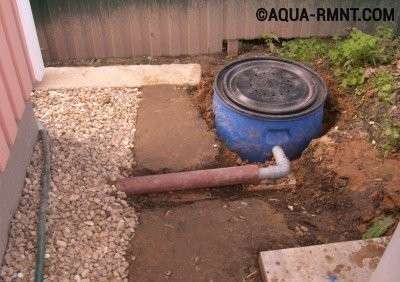
The sewer tank should protrude slightly above ground level.
This will keep rainwater out of it.
Interior decoration
After outdoor work, proceed to the interior decoration of the premises. Walls and ceilings are insulated, polyethylene is fixed. It is used as a vapor barrier.
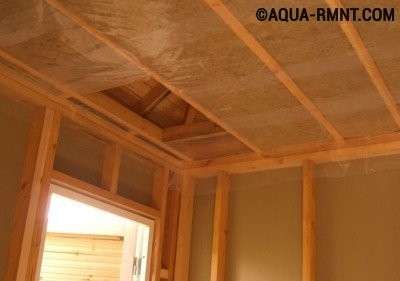
Polyethylene can be used as a vapor barrier. Fasten it with a construction stapler
Then a crate is stuffed on the surface and sheathed with drywall.
They make partitions and also sheathe.
After that, all surfaces are plastered and treated with waterproofing for wet rooms. All walls are lined with clapboard.
In the dressing room they build a bench with a box inside.
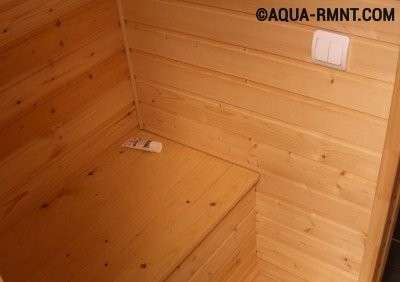
Under the seat of the bench equip a convenient box
The shower is tiled. Install bio-toilet. Electricity is supplied to illuminate the premises.
Install electrical equipment, supply water.
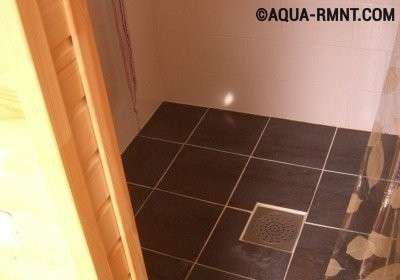
Since the shower room is a room with high humidity, tiles are laid on the wall as well as on the floor.
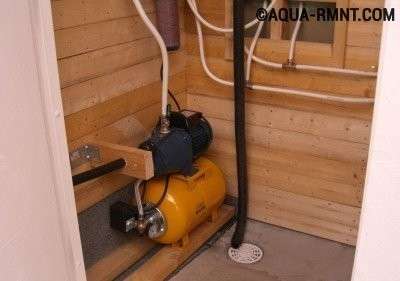
Installation of a boiler and pump allows you to use the shower even in cool weather
The end result is this building.
Outside, the building is equipped with comfortable steps
And in conclusion, when building a toilet, its placement must be taken into account. Structures with a cesspool should not be located closer than 25 m to the water source.
For areas with close groundwater, the use of a cesspool is prohibited to avoid contamination. If the soil water is above the 2 m mark, a powder closet must be built.
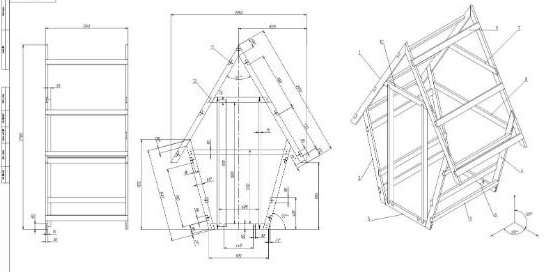
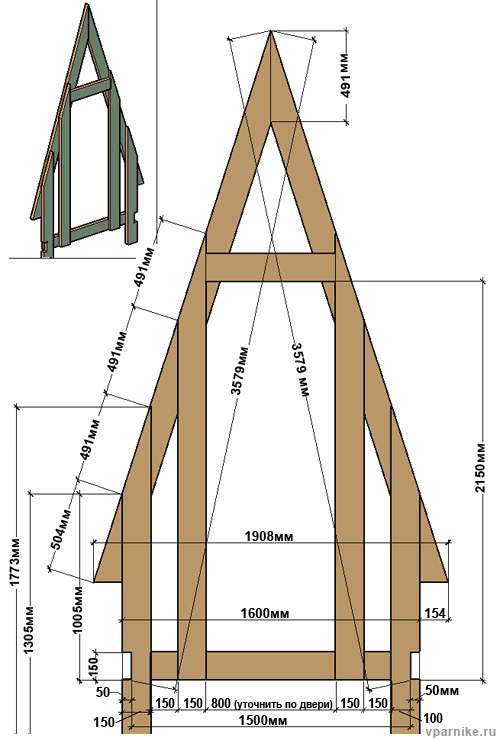
 Miracle Teremok.
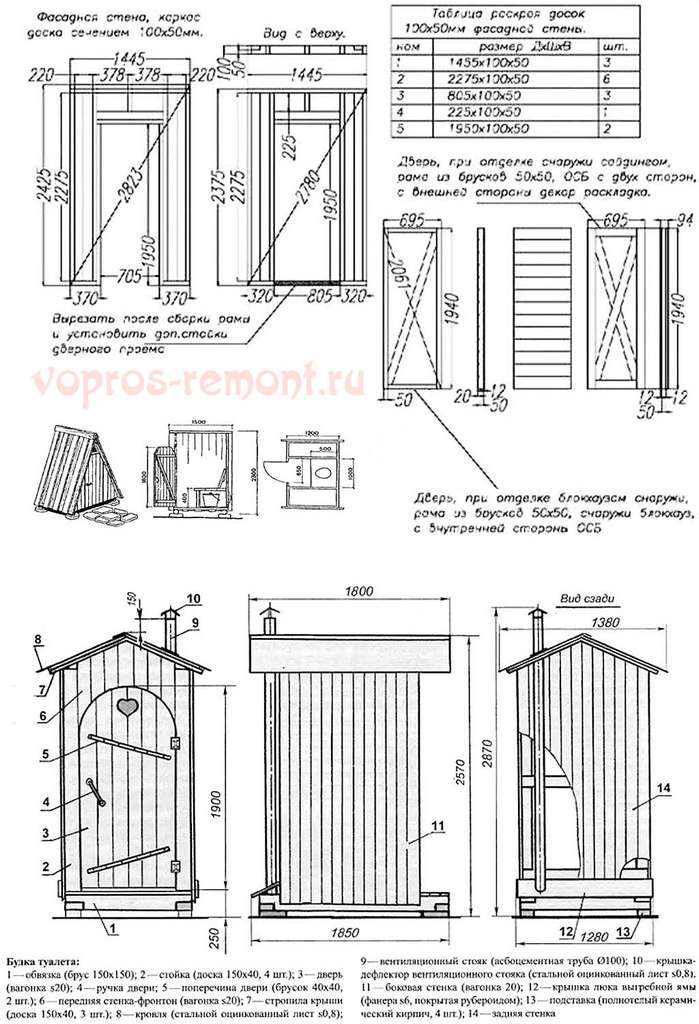
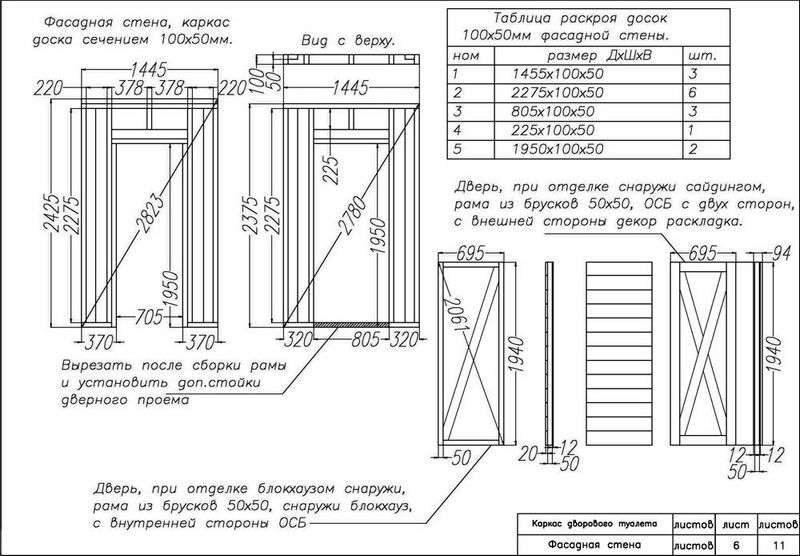
Construction of an outdoor country toilet 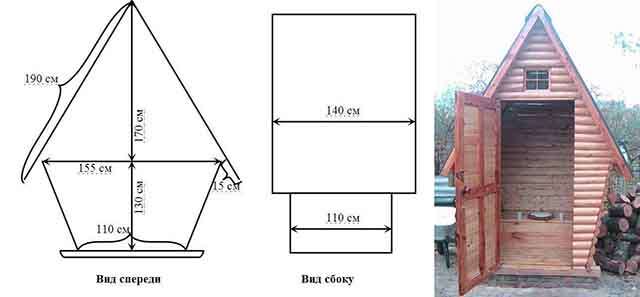 Do-it-yourself country toilet - how to make a toilet
 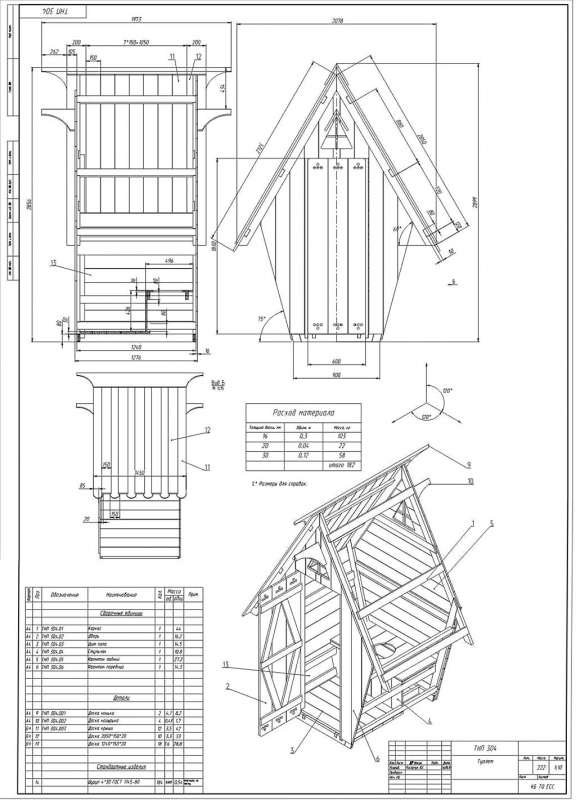 Do-it-yourself country toilet. How to make a toilet
 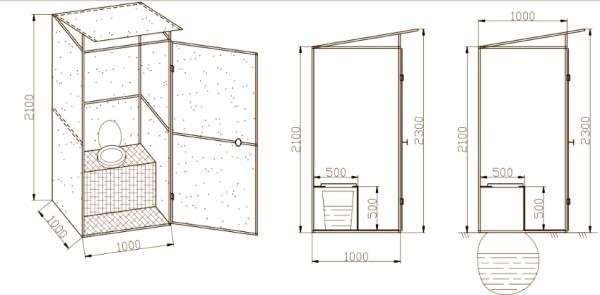 How to build a toilet on the street with your own hands
  Do-it-yourself street toilet: photo in the country
  How to make an outdoor toilet » Utility room.
com