How to choose a faucet cartridge
To choose the right cartridge for the mixer, you need to pay attention to the main characteristics of the device. This:

Naturally, it is better to buy high-quality models from European manufacturers. Good reviews about Grohe, Kaiser and Blanco. But, if necessary, you can pick up good Chinese options. These are Potato, Frap and others.
Mixers are of the following varieties:
Double valve
It does not yield its position even to new, more advanced mixers, since it is already considered a classic, which is very convenient to use and repair.
This device is, thanks to which the flow of hot and cold water is adjusted. It is this main part that will usually cause them to break down, due to which water leakage may occur. However, it is two-valve faucets that are most convenient for installing them in the bathroom.
Lever
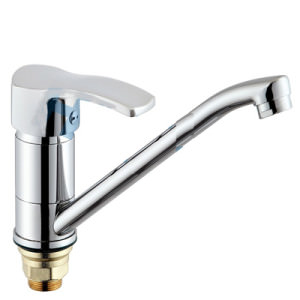
It appeared on the plumbing market not so long ago, but in this short time it managed to gain immense popularity and demand.
This mixer has only one lever, with which they can adjust the total pressure of the water flow and its temperature. To do this, simply lift the lever up and turn it to one side. Inside their structure, single-lever mixers have special cartridges and locking mechanisms.
Ball Valves
As well as lever not very long ago in the plumbing market.
They replaced the old stuffing box valves, which often had problems with rubber gaskets. In these taps, there is one handle for regulating the water, which is attached under the trim with a small screw. They have a simple, very precise design, which is easy to repair in case of breakage.
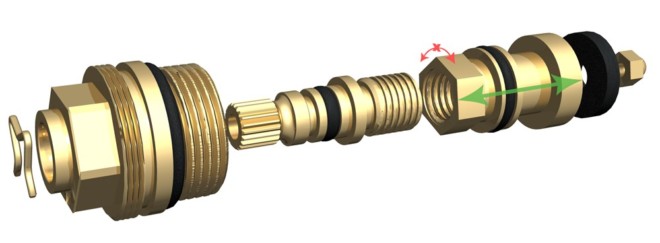
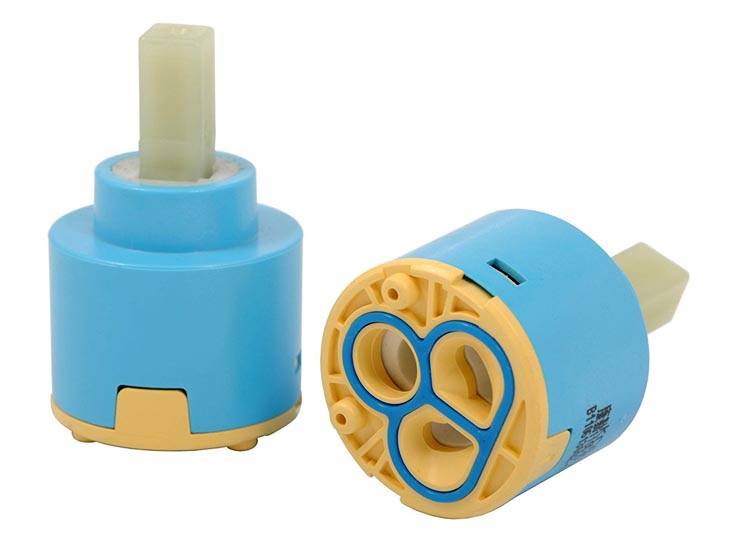
How does he work
The cartridge has movable plates connected to the rod and fixed plates located at the bottom of the unit. The plates have specially shaped holes that open or close the inlets for cold or hot water, and a hole for supplying mixed water at the required temperature to the spout. The plates are ground tightly almost to the molecular state. When the lever moves in a vertical plane, the shank of the cartridge shifts the movable disk in such a way that the water supply to the spout opens. Turning the lever to the right or left opens the hot or cold water supply.
Due to the tight contact between movable and fixed discs, the requirements for the state of water are increased. The ingress of even small particles of foreign fragments disrupts the stable operation of the disks and leads to premature failure of the cartridge, and hence the mixer. Therefore, the issue of water filtration must be resolved in advance.

Crane box replacement
If the faucet faucet does not close completely, water accumulates in the shower hose or constantly drips, measures must be taken. Replacing the crane box of any system is not particularly difficult, with very little effort, you can handle this matter yourself.

To work, you need a little tool, in most cases, a regular adjustable wrench and a thin flat screwdriver are enough. Before starting work, it is necessary to close the valves on the risers of both hot and cold water supply. If there are no taps in the apartment, which is typical for old houses, you will have to turn off the valve in the entrance, of course, in this case it is worth warning the neighbors so that they do not accidentally organize a flood in the apartment.
The work of replacing the faucet box in the mixer can be divided into two stages - removing the old one and installing the new one.
Removing the old head
First of all, using a flat screwdriver or a regular kitchen knife, you need to pry off the plastic flywheel plug. Using a screwdriver, unscrew the fixing bolt.We must be prepared for the fact that he will not want to unscrew on the first attempt. No need to be zealous, dealing with rust and oxide is easy - just use WD-40 or its equivalent.
In the case of an imported crane box, there may be a plastic retainer under the plug, it must also be removed. Next, the flywheel is removed from the splines, access opens directly to the part to be replaced.
It is necessary to unscrew the faucet box carefully. To do this, you can use a wrench. Some models have a lock nut that needs to be loosened first. Most domestic models are easy to unscrew using a 7 key. It is put on instead of a valve and rotated counterclockwise.
Installing a new part
Before screwing in a replacement, you should carefully inspect the seat. If necessary, clean it, remove salts and accumulated debris. Assembly is carried out in reverse order. Twist the crane box, clamp it. It is necessary to clamp strongly, but carefully, this is especially true for models with ceramics, the liners break easily.
The flywheel (lamb) is installed last. Fix it with a bolt or plastic latch. Open the water, check the tightness of the connection. If water does not ooze along the stem and does not drip from the tap, then the replacement was successful.
How to solve the problem
The first step is to disassemble the mixer, clean its parts and cartridge, then assemble and check. Keep in mind that it is worth doing this only if you have the skills or at least knowledge of such work, otherwise an attempt to repair may turn into a complete inoperability. If the problem is dirty water, then the answer to the question is that the faucet knob turns tightly - what to do will be a thorough washing and cleaning of the components of this device
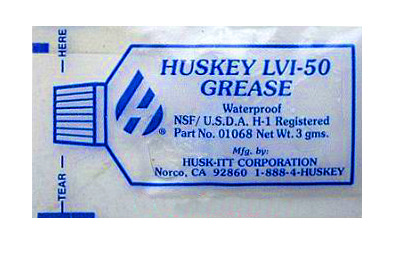
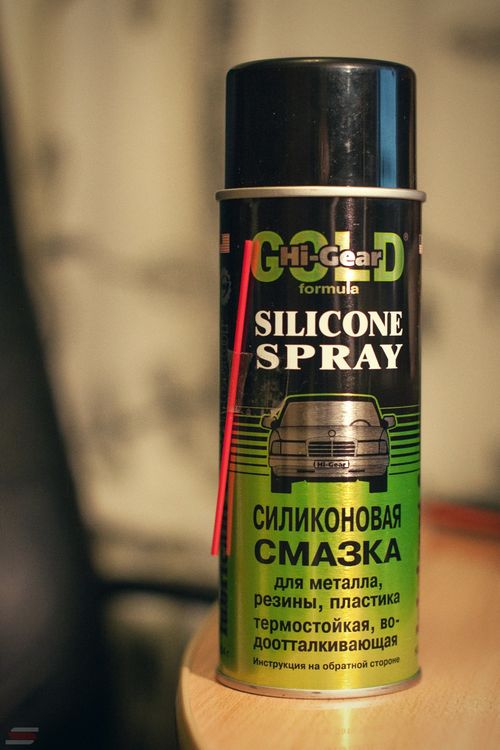
With the mechanical nature of the failure, it is important to understand what exactly needs repair, which part or component. During the operation of the mixer, the lubricant dries up, which makes it turn smoothly
If this is what caused the tight turning, then the problem is solved by re-lubrication. It should be borne in mind that only high-quality lubricant will help the case, otherwise, the situation can only get worse.
Why the door starts to creak and how to fix it
There are several main reasons why the front door starts to creak. Let's consider them in more detail:
- The most common reason is the improper manufacture of the door itself. For example, hinges are welded incorrectly. You can solve this problem yourself, or contact specialists. As a rule, for a high-quality rearrangement of the hinges, the door must be temporarily dismantled and the necessary work carried out. Experts strongly recommend that you do not experiment with self-digestion of loops, because this process is important enough for further functioning;
- There is no lubrication in the hinges. This problem is very easy to fix with your own hands. The door leaf is slightly lifted on the hinges, and lubricant is added to the resulting gap. If everything is done correctly, the creak disappears very quickly;
- Lubricant selected incorrectly. A striking example is the use of conventional grease to lubricate the front street door. The fact is that at low temperatures, some types of lubricants begin to thicken and turn into a classic abrasive. If this problem is not eliminated in a timely manner, a very large output will appear on the hinges, which may cause them to be forced to be replaced;
- There are no balls in the loops. To eliminate this problem, the door leaf must be carefully removed from the hinges, put small balls inside the hinges and install the door leaf in place;
- The door leaf lining touches the hinges. The most relevant solution to this problem is a neat "fit" of the cladding.As a rule, this can be done with a regular knife. In some cases, the cladding must be removed before fitting.
Expert advice
Experts strongly recommend following a few simple rules.
First of all, we are talking about new doors, which are covered by the manufacturer's warranty. There are frequent situations when, after installation, the door begins to creak slightly.

Most often, installers assure the owner of the apartment or house where the door is being installed that the creak will pass very soon, since at the moment the hinges are still quite new and the lubricant has not been completely distributed. In fact, new loops should not creak, which means that you must immediately inform the store about this shortcoming.
The next important nuance is the independent reinstallation of the loops. As mentioned earlier, it is better to entrust this work to specialists. The fact is that for proper functioning, the hinges must be located clearly along the axis. The slightest deviation will lead to very unpleasant consequences, and all efforts will be in vain.
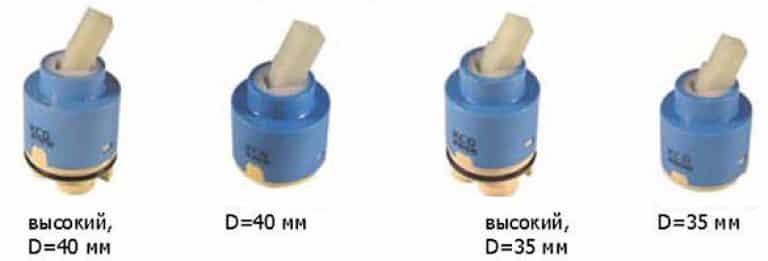
Popular cartridge sizes
Naturally, cartridge sizes are standardized for each mixer model. For wash basins, sinks and showers, the most common sizes are 28 mm, 35 mm and 32 mm. At the same time, details from 40 mm to 46 mm are most often used for the bathroom (in particular, in Grohe and Kaiser). But why such a difference in almost identical mixers?
It is believed that the larger the ceramic mixer for a single-lever faucet, the better it is. In fairness, it should be noted that for Chinese faucets (with the exception of FRAP), where the diameter of the spout is often larger than that of branded ones, this rule is really followed. But for branded models (Fiore Rubinetterie, Iddis, Sedal and others), a large cartridge is not always synonymous with quality.
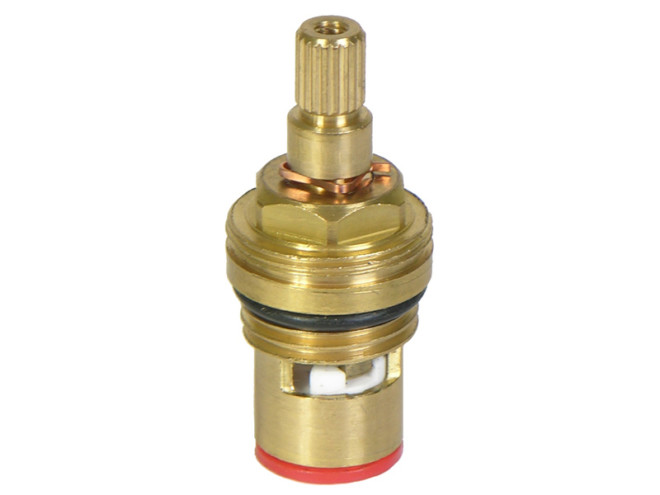
Consider the technical characteristics using the example of a cartridge with a brass rod Touch-Z:
- Diameter - 45 mm;
- Height with leg - from 60 mm to 65 mm;
- Cartridge height without stem - 47 mm - 50 mm.
Similarly, according to the characteristics, you can choose a cartridge for the faucet in the kitchen. Let's take Potato as an example. The diameter of the swivel spout is important here - it is recommended to use sizes from 26 mm to 30 mm. For the supply of hoses, a hole is used from 38 mm to 40, depending on the model.
The listed sizes are considered standard, but for many original mixers they will not fit due to the too large diameter. In such cases, non-standard components for 18 mm, 20 mm and 22 mm are used. Hose connections can also be made in holes of 25 mm to 26 or more.
What to do if the hinges are rusted
If you see that the hinges are covered with rust, do not despair. In most cases, this problem can be solved fairly quickly.
First of all, you need to take any oil and a small cloth. Next, we moisten the cloth well with oil and apply it as tightly as possible to the places covered with rust. Given the fact that the rust removal process is quite lengthy, the oiled cloth should be left for a while.

If you still managed to completely neutralize the oxide, then you need to think about how it does not appear in the future. To do this, you need to take a few simple steps:
- First of all, so that the door does not creak, it is necessary to regularly lubricate all moving parts using an ordinary pipette or oiler, as shown in the photo;
- If there are hinges, then such a way out of the situation as the installation of grease fittings is allowed. To do this, drill a small through hole and cut the thread. Further, a special grease fitting is screwed into the prepared hole, through which, in the future, oil can be added to the cavity so that the door does not creak.
- If the factory grease gun is not at hand, you can simply fill the interior with lubricant and screw in a plug, which is a small bolt.
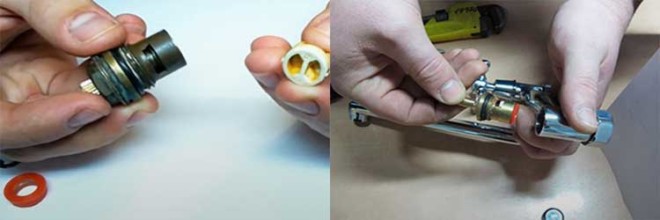
Faucet Cartridge Repair
Cosmetic repair of the mixer cartridge can be done by hand. But, we note right away that this only applies to breakdowns associated with clogging of working surfaces or wear of thrust rings. If the plates or balls are worn out, cracks appear, etc., then the device must be replaced. Neither professional nor self-repair will work.
What can be done when redecorating a single-lever mixer:
Video: disassembling a single-lever faucet cartridge
Main malfunctions
If the faucet leaks when turned off, then this is a sure sign of a cartridge failure. The consequences of a malfunction can be anything from flooding neighbors to a cosmic utility bill.
If the faucet drips, it flows from the spout in the closed position, or water leaks from the spout when you switch the “Rain” mode (in the shower), then you need to disassemble the mixer and replace the cartridge. The main reason for water leakage may be that the locking mechanism has worn out or the cartridge itself has cracked.

Similarly, if a flag or two-valve faucet hums, creaks or turns hard. There may also be several reasons for this:
- The cartridge is not the correct size. The diameter of the faucet spout is slightly smaller than the cartridge outlet or the stem is longer than necessary. As a result, the lever cannot rotate normally on its axis;
- If the tap is very noisy, then this is affected by a sharp pressure drop in the system. Most often, to eliminate such a malfunction, it is enough to replace the sealing gasket in the crane box. It will be useful to check the condition of the seal every few months.
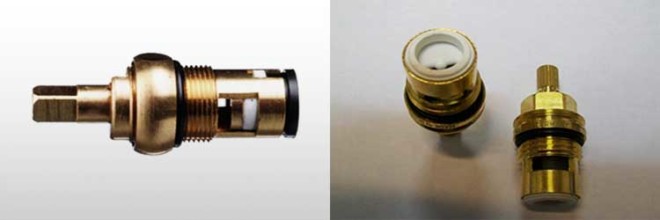
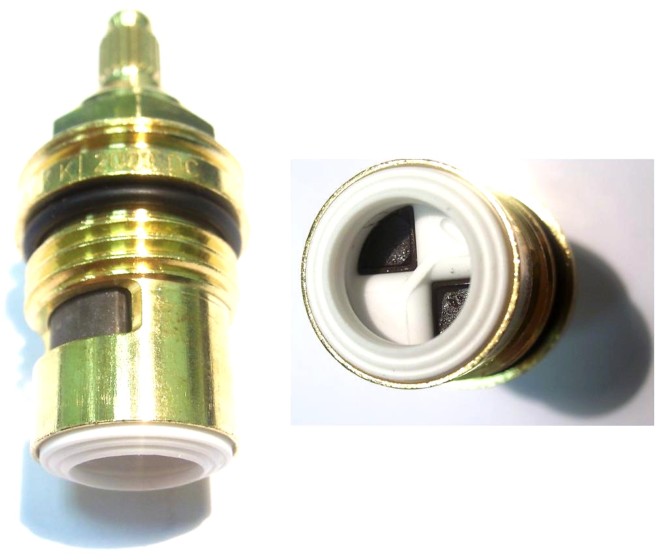
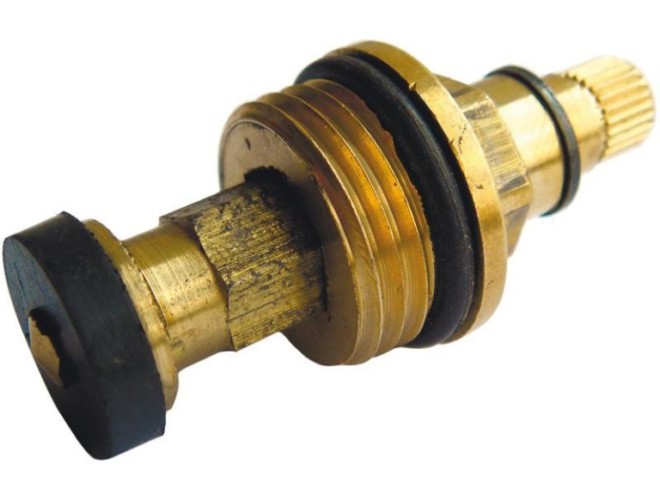
Crane box with ceramic plates
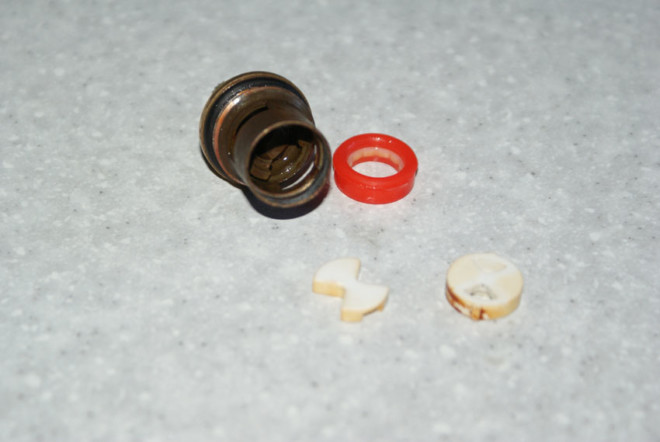
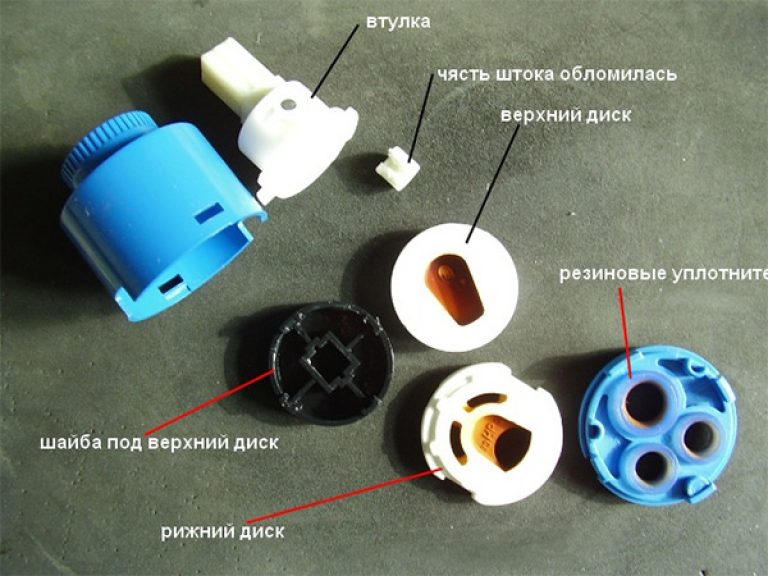
The ceramic faucet box for the water faucet consists of the following components: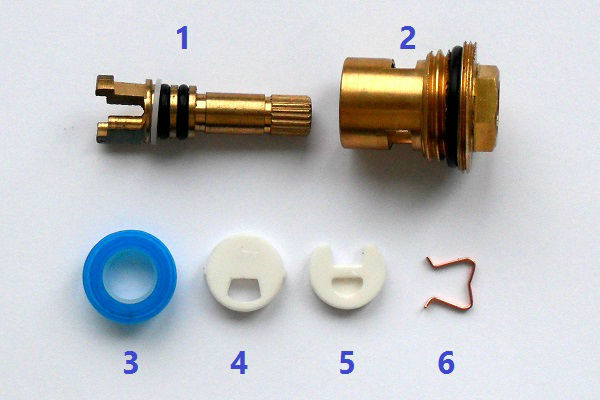
- Crane axle box with plastic pressure washer and sealing rings.
- The body of the ceramic crane box.
- Sealing gasket (pressed against the valve seat).
- Fixed ceramic plate.
- Movable ceramic plate.
- Stock retainer.
As you can see in the image, in a ceramic faucet box, only the plates that block and open the water are actually ceramic.
If any components of the ceramic faucet box are coated with salt from hard tap water, including the sealing gasket (number 3 in the photo), place them for a while in a citric acid solution to remove plaque.
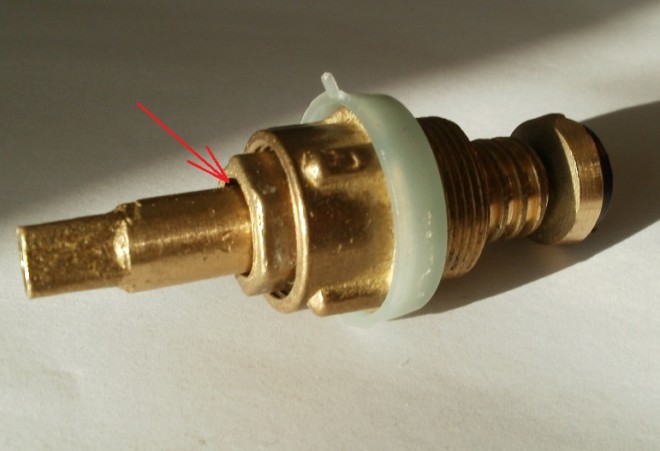
Reasons for turning the faucet on the mixer
Conventional faucet boxes, installed on most modern two-valve mixers, break down quite often. An expert in the field of plumbing will be able to name several possible reasons for which such a faucet starts to turn and stops fixing the water supply. Among them:
- wear of the thread of the axle box core (the most common and common cause);
- factory defect of the core (most often it gives itself out when installing a new mixer);
- mechanical damage to the thread (may occur due to constriction or poor-quality repair of the mixer).
Regardless of the nature and cause of the breakdown, only replacing the core with a new one will radically solve the problem. Next, a detailed algorithm for working on its replacement will be considered.
Faucet repair if the crane box scrolls
First, shut off the water supply. Usually, valves (faucets) designed for this purpose are located just below the flexible supply hoses, however, if there are none, you will have to block the entire riser. By the way, you can limit yourself to blocking only that feed, the core of which is to be replaced.
After the supply is blocked, it is necessary to stock up on the necessary tools. To replace the core of a scroll faucet, you will need:
- flat screwdriver;
- stationery knife;
- pliers;
- a set of wrenches or an adjustable wrench;
- new core.
First you need to carefully use a clerical blade or a thin flat screwdriver to pry off a plastic or iron decorative cap that closes the axle box mounting bolt on the front side. Sometimes such a cap can only be removed with the help of pliers, so do not overdo it with the blade.
As soon as the cover is removed, you will find a screw with which the axle box is attached to the mixer. Unscrewing it can be difficult (such connections often rust, which makes it much more difficult to disassemble them), so a screwdriver or screwdriver with a convenient wide handle may be needed.
After the valve has been successfully dismantled, you will see the core, which must be replaced. The core is unscrewed counterclockwise using an adjustable, wrench or spanner wrench (at worst, with pliers). If the mixer has served faithfully for several years and has never been repaired, it may not be easy to unscrew the core, but it only takes a few turns with the key - and things will go easier.
The new core is screwed in place of the old one clockwise using the same key. Try to tighten it as tightly as possible, but at the same time do not damage the thread. If you feel that the part has not gone along the thread or is screwed in too tightly from the very beginning, it is better to unscrew it immediately and clean both threaded connections with a soft rag or brush.
When the valve returns to its place and the screw fixing it is tightly tightened, you can insert the decorative cap into place. Next, you need to turn on the water supply and check the operability and tightness of the mixer.
If you did everything right, the axle box will, without much effort, completely block the feed after a couple of revolutions. If there is a sudden leak or the quality of work did not satisfy you for any other reason, it's time to contact a professional plumber.
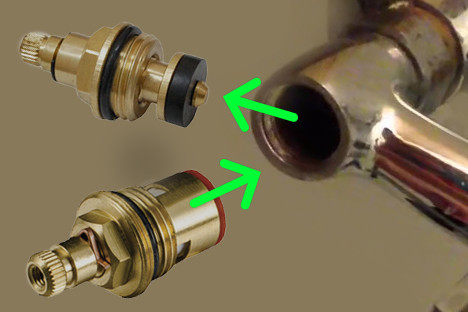
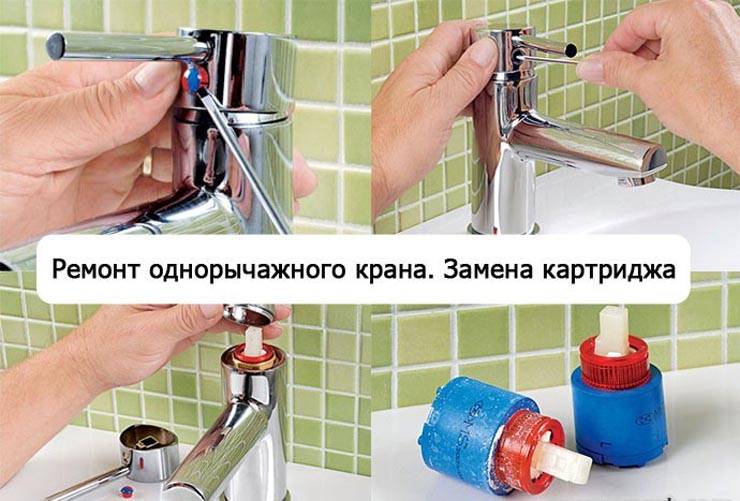
Faucet cartridge replacement procedure
How to change the cartridge in the mixer yourself, what tools and consumables are needed for this? Modern single-lever faucets use two types of ceramic cartridges, which visually differ in size (diameter). If you are not sure which consumable you need, first you need to remove the cartridge from the mixer and go with it to the nearest plumbing store or market to buy the same new one.
How to pull the cartridge out of the faucet, because the design of the tap seems to be solid? Everything is very simple if you know the design of a single-lever mixer and arm yourself with the right tools. To replace the cartridge in a kitchen or bathroom faucet, we need the following tools:
- Slotted screwdriver with a small sting.
- Plumbing wrench with a diameter of up to 40 mm.
- A set of small hex keys.
Changing a cartridge in a faucet takes about 10 minutes if you have everything you need at hand, including a new consumable. The process itself goes like this:
- Shut off the water supply (hot and cold).
- Using a screwdriver with a thin sting, carefully pry off the plastic decorative plug on the front side of the lever (it is blue-red).
- After removing the plug, using a small hex wrench, loosen the screw that holds the mixer lever.
- The lever is removed, and we get access to the cartridge, which is clamped with a nut.
- Unscrew the nut with an adjustable wrench and take out the cartridge.
- We put a new cartridge and assemble the mixer in the reverse order.
Quite often, in cheap models of Chinese mixers, the nut is made not of steel, but of silumin and coated with chrome. This part is short-lived and often breaks when unscrewing with force. Buying a new nut is not a problem - it is sold in almost any plumbing store.
DIY repair
Sometimes it is not possible to replace the crane box. There are a lot of reasons for that. For example, there is no specialty store nearby or what is available for sale is not credible. Another option is possible - there is a desire to completely change the mixer until a new one is purchased, and the old one needs repair. It is not very wise to put a new part on a faucet that will soon be thrown away. There is also a banal lack of money. In any of these cases, it is worth considering the possibility of repairing the crane box with your own hands.
Ceramics
Repair of a valve head with ceramic inserts is difficult due to the selection of spare parts. Nevertheless, in some cases, the cause of the malfunction lies not in the integrity of the inserts, but in their condition. Sometimes it is enough to disassemble the crane box, clean the discs, assemble the mixer correctly, and it will last more than one year. Most often, this happens in homes with poor quality tap water without the use of filters.

Rubber cuffs
In the case of using a crane box with cuffs, the first thing you should pay attention to is the condition of the seal. The fact that it needs to be replaced is evidenced by drops from the tap, which cannot be completely screwed on, the strong noise of water in the mixer speaks in favor of the same

To solve the problem, you need to disassemble the mixer, pull out the crane box and check the condition of the cuffs. Of course, work can only be started after the water supply to the apartment is shut off.
A frayed, torn cuff is changed. It is not difficult to buy such a part, it can also be cut from rubber of a suitable thickness. It is attached with one bolt from the bottom.
In addition to the seal, you need to pay attention to the condition of the stem. If there are cracks and chips in the metal, the new seal will not save, you will have to replace the crane box
Another case is possible. Locking devices work normally, but water oozes from under the valve. To correct the situation, you need to lubricate or replace the o-rings mounted on the stem.