Recommendations for redevelopment
The layout of the toilet in a narrow bathroom.
During the construction of houses at the design stage, the bathroom and bathroom are arranged in such a way as to use a small area with maximum efficiency. Despite this, many in the future make redevelopment of these rooms, and separate rooms are combined. In addition, plumbing fixtures are changed or supplemented with new equipment: a bathtub is replaced by a shower cabin, and a bidet is placed next to the toilet.
Before starting work, you should create a bathroom project. If any "grand" changes are carried out, then it is necessary to coordinate them with the relevant state bodies. In addition, it is necessary to focus not only on your preferences, but also on building codes.
For a better process, it is recommended to listen to the following advice from experts. Before buying and installing new plumbing fixtures (for example, a bidet), it is necessary to take into account all the nuances of water supply and sewage systems. Any little thing in the future may lead to the need to parse the entire system.
Particular attention should be paid to the layout of a small bathroom. You should immediately decide where all the important plumbing units will be located.
In this case, it is necessary to take into account the dimensions of plumbing and the standards for the distances between them.
Before proceeding with the planning and purchase, it is recommended to decide on the models of plumbing: bath or shower, toilet, sink, bidet.
Toilet cistern installation diagram.
Installing a toilet and bidet requires special attention. They should be located directly next to the sewer riser. Otherwise, the likelihood of clogging the drain pipe from the toilet and bidet increases significantly. This is due to the fact that the angle of inclination will not be enough for a quality flow of content. It is recommended to place the toilet at a distance of no more than 1 meter from the central riser, other plumbing - at a distance of no more than 3 m. Otherwise, installation of an air duct may be required.
In a large bathroom, this problem can be solved by installing a toilet or bidet on a raised platform (for example, on a podium).
Building requirements
When designing a combined bathroom, the following SNiP standards should be taken into account:
Connection diagram for plumbing in the bathroom.
- The minimum area of the combined bathroom, where the sink, toilet, bathtub and space for the washing machine are located, is 3.8 m².
- Before the bath or shower, there should be at least 70 cm of free space, the optimal value is 105-110 cm.
- there must be a free space of at least 60 cm in front of the toilet or bidet, and 40 cm on both sides on the sides of the longitudinal axis of the plumbing.
- The free space in front of the sink should be at least 70 cm, and if it is located in a niche - at least 95 cm.
- The distance between the sink and the wall should be at least 20 cm and between the toilet and the sink - at least 25 cm.
- The sink is installed at a height of more than 80 cm from the floor.
- The flush pipe that flushes the urinal should be at a 45 degree angle with the opening to the wall.
- The best option is to have a window in the bathroom, which provides natural light and ventilation. However, in the construction of modern high-rise buildings, such a design of a bathroom is extremely rare. The window is replaced by a forced ventilation device that removes the resulting condensate and odors from the bathroom.
- The bathroom is not allowed to be located above the kitchen and other living rooms. An exception to this rule are only two-level apartments, where it is allowed to place a toilet and bidet above the kitchen.
By fulfilling all these requirements, you can get a properly equipped bathroom.
Installing an installation for a wall-hung corner toilet
To choose a reliable and convenient corner toilet with a tank, you need to pay attention to certain parameters. With knowledge, you will acquire the optimal model of sanitary equipment, which, during further operation of the product, will not cause inconvenience and discomfort.
With knowledge, you will acquire the optimal model of sanitary equipment, which, during further operation of the product, will not cause inconvenience and discomfort.
Ways to position the toilet
The place for the future installation of the toilet should be determined in advance. When choosing a model, you must clearly understand how it will be located in the bathroom:
The toilet bowl can be placed parallel to the wall of the bathroom, while the drain tank will be slightly shifted to the side.
You can install the toilet on the bisector of the corner of the room, then the tank will be placed at an angle of 45 or 90 degrees.
If the bathroom riser is located along the wall, the installation of the corner structure becomes more difficult. The use of additional wiring in the form of a hose or corrugation will help solve the problem.
Corner toilet connection, water supply, sewerage
To successfully install a corner toilet, you must first make sure that it is possible to connect plumbing equipment to communications.
Cold water can be brought to the corner model in one of two possible ways:
- bottom water supply
- lateral water supply
In order to avoid the need to use additional connections during the installation of the equipment, it is necessary to choose a model that will initially correspond to the communications available in the bathroom.
High-quality sanitary ware supplied to Russia from Italy, Germany and Switzerland is in high demand among modern consumers.
Installation of a corner toilet with installation
The most common design of a corner toilet is a "compact", and the installation of such a product is not difficult, because. the cistern is either made integral with the toilet bowl, or due to its shape it fits well into the corner and is mounted on the toilet bowl. More difficult with hanging and some attached toilets.
how to choose a compact toilet
Wall-hung toilet with corner installation, equipped with a hanging cistern, which is usually mounted on the wall or installed in the wall above the toilet. But the problem is that there is no wall behind the corner toilet: there is a corner. In this case, the corner installation for the Geberit Duofix toilet bowl will come to the rescue.
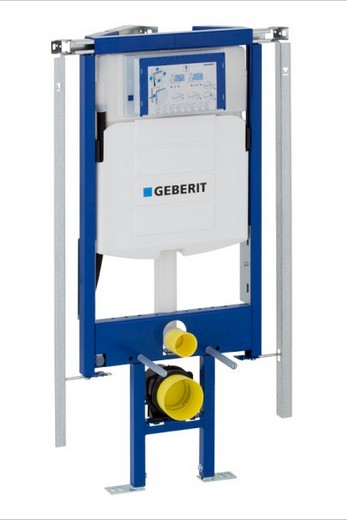 Geberit-Duofix installation for corner toilet
This is a metal frame, which is attached to the floor and walls with the help of anchor bolts or dowels. A flat (only 8 cm thick) cistern is already installed on it, and you can also mount a hanging toilet bowl to it.
The Geberit frame has great installation flexibility: thanks to the threaded connections in the supports, it can be adjusted in height; since the fastening to the walls is carried out using threaded columns, the verticality of the frame can also be adjusted.
Threaded connections are equipped with stoppers to fix the knots in the adjusted position.
Frame adjustment is usually carried out using the building level: it is important that the frame is not skewed, because. a crooked toilet bowl will quickly fail
Usually the work is carried out in the following sequence:
- Fasten the frame to the floor with anchor bolts or dowels;
- Aligned in height and horizontally;
- Attach to the walls and check for verticality;
- They lead through the communication frame for release from the tank;
- Sheathe the frame with drywall or other facing material;
- Mount the toilet on the frame;
- Connect the toilet outlet to communications;
- Connect the flush tank to the toilet.
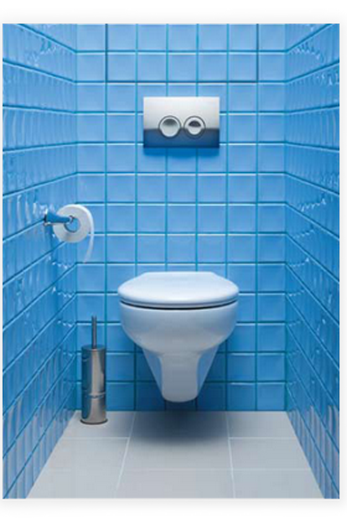
Mounted on such a frame, the most common product looks like a corner toilet in the interior of a bathroom.
Popular models of corner toilets
Among the most popular manufacturers of corner-mounted plumbing equipment, it is worth noting foreign companies that produce quality products under trademarks:
- Geberit (Switzerland).
- Grohe (Germany).
- Viega (Germany).
Also, many lovers of high-quality plumbing prefer products from the brands Roca, Vitra, Gustavsberg, Villeroy & Boch, Cersanit, Laufen.
Do-it-yourself toilet installation
Installing the toilet in the bathroom can be done by hand. First, the old toilet is dismantled. The process goes like this:
Draining water from the tank.
Turning off the water supply.
Disconnecting the toilet from the floor
If it is fastened with screws, they must first be unscrewed; if with cement, then it should be carefully broken.
Disconnection of the socket: the corrugation is simply removed, if the socket is cast iron or plastic, then it is disassembled or cut down. After dismantling the old toilet bowl, preparatory work is carried out:
After dismantling the old toilet bowl, preparatory work is carried out:
- Cleaning the floor from dirt, cement residues, glue, silicone.
- Surface preparation. It is necessary to level the floor if its evenness was damaged during dismantling. Next, you should prepare holes for fastening for a new toilet bowl. Old holes can also be used if they are in good condition, do not crumble and hold the dowels well.
Toilet installation diagram.
After all the work done, they proceed directly to the installation of a new toilet bowl in the bathroom. It can be fastened with screws, cement or epoxy. The most convenient and common way is to use screws and bolts. Rubber gaskets must be placed under the heads. It is necessary to tighten the screws gradually, on one side and the other alternately, as the toilet may crack. It is necessary to install plumbing exactly.
The use of epoxy resin is possible if the floor is perfectly flat. The surface must be cleaned of debris, degreased, then roughened with a corundum stone and degreased again. Next, a solution is prepared in accordance with the instructions, the mixture is applied to the surface with a layer of 4-5 mm. The toilet is tightly pressed against the surface with force and kept in this state for at least 12 hours.
Next, you should act in the following sequence, which is the same for any type of toilet:
- Attaching corrugations of the required size. To do this, the socket is lubricated with sealant and connected to the corrugation.
- Installing the toilet in place and screwing the screws (if this method of fastening is selected).
- Filling the joint between the floor and the toilet leg with silicone. This must be done to prevent water from entering under the base of the plumbing fixture.
- Tank installation. When screwing the fasteners, it is necessary to monitor the evenness of the position of the tank. After installation, it is necessary to check the tightness and serviceability of the drain tank.
- Installation of flush mechanisms.
- Connecting the toilet to the water supply using a flexible hose. The ideal connection option is a reinforced hose with union nuts.
- Checking the tightness of the connection. Turn on the water and make sure there are no leaks.
- Final check of the entire system, its high-quality working condition.
It is also recommended to check the system after 1 hour. This completes the installation of the toilet in the bathroom. And if the plumbing fixture is working properly, then the whole process was carried out correctly and efficiently.
Peculiarities
- The shape of the bowl itself is identical to conventional toilets, but the drain tank is made in the shape of a triangle. This, by the way, does not reduce its volume in any way.
- Some models of cisterns in corner toilets are mounted on walls, thereby improving the aesthetic component of the bathroom.
- Such solutions allow you to save space in a small bathroom and bring an unusual design solution to the interior.
- Toilet bowls can have both a one-piece design with a drain tank, and a separate hanging drain tank.
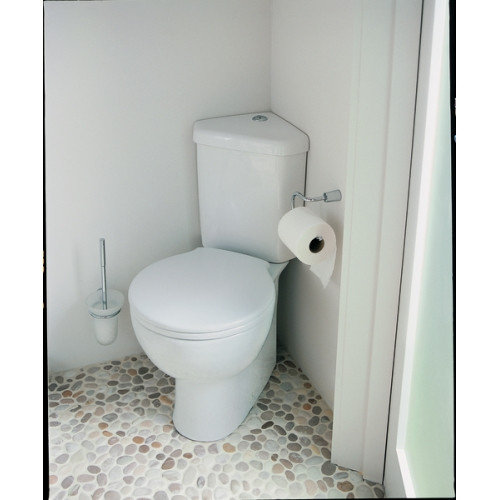
- In separate bathrooms, the toilet room is usually small. Installing a corner toilet will save space so that there is space for a washbasin, bidet, etc.
- Suspended corner models can withstand about 500 kilograms of load. Calling them fragile is completely wrong.
- Some variations are offered with a height-adjustable bowl that can be raised and lowered in a range of about 5 centimeters.
- The design of the bowl is one-piece and very reliable, and therefore can last for many years without cracking or bursting.
Design features of the corner toilet
As the name implies, corner toilets are not installed directly against the wall, but in the corner of the room. This is due to a number of features of this design:
- Triangular tank. To get close (not close, but quite close) to the wall, the toilet bowl must match the shape of the corner. As a result, it is made triangular. The bowl, however, does not change shape. It can be round or oval, rectangular or square - it all depends on the preferences of the owners;
- The possibility of hiding the tank in the wall. Modern wall hung toilets can also be installed in a corner. To do this, of course, you need to purchase a special model and the corresponding installation;
- Original design. The corner toilet can be used not only as a space-saving model, but also as part of the design concept;
- Ability to choose the location of the tank. Optionally, the tank should be located on the toilet. It can be hung higher. However, compact corner toilets are the most practical solution;
- Reliability. Suspended corner models can withstand weights up to 500 kg. No less durable bowl for floor models.
- Modifications. Innovations designed to make visiting the toilet more comfortable are also applied to corner toilets.
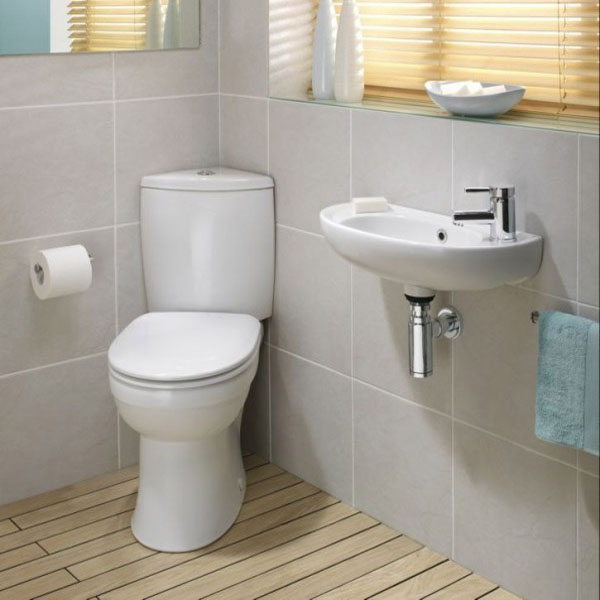
 floor-standing corner toilet in the interior of the bathroom
Disadvantages of corner toilets
There is a slight minus in the corner toilets. It is connected exclusively with the method of installing mounted products. The wall to be mounted on must be strong enough to support the expected weight.
It is also important to choose the correct height during installation, taking into account the growth of all the inhabitants of the house / apartment
When it comes to drywall flooring, it will be necessary to place a solid wood mortgage under the sheathing in advance and fasten with long bolts to pass through the wooden part and sufficiently deepen into the main wall.