The device of the car heating system Niva Chevrolet
The Niva Chevrolet car is equipped with a liquid-type heating system combined with an engine cooling radiator. This design, the main function of which is heating the passenger compartment, allows, if necessary, to increase the intensity of cooling of the motor. In addition, air conditioning is included in the LC and GLC trim levels.
Heating system without air conditioning
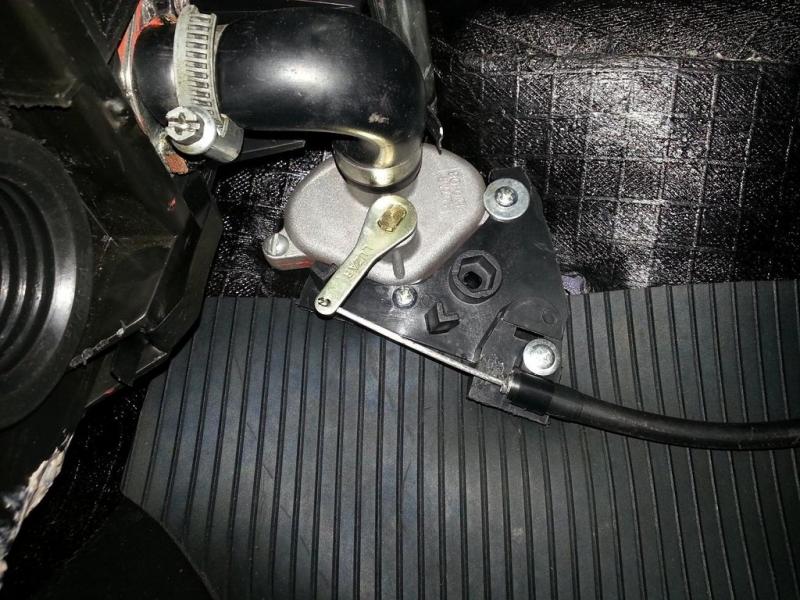
Most of the elements of the heating system are located in the passenger compartment. The exceptions are the stove valve built into the partition of the engine compartment, and the pipes connecting the heater to the engine cooling radiator.
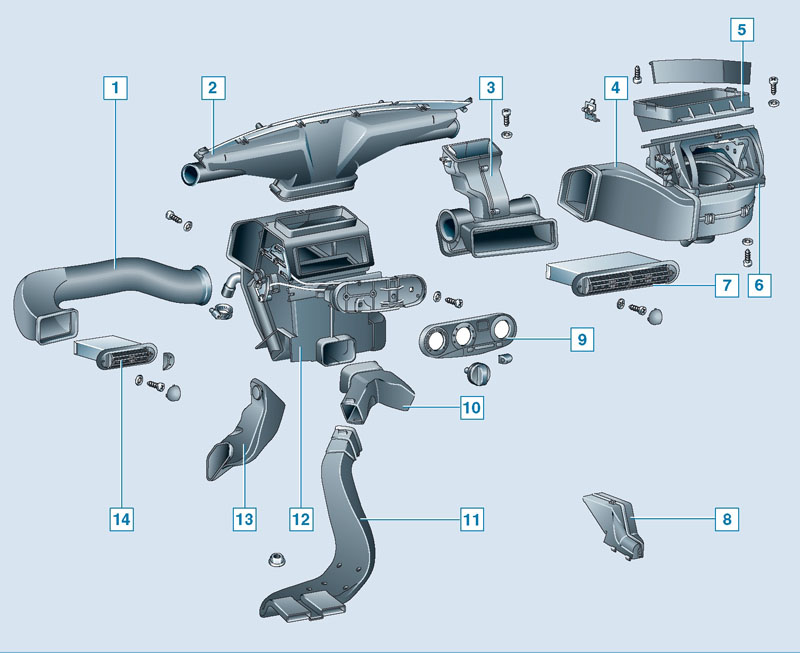
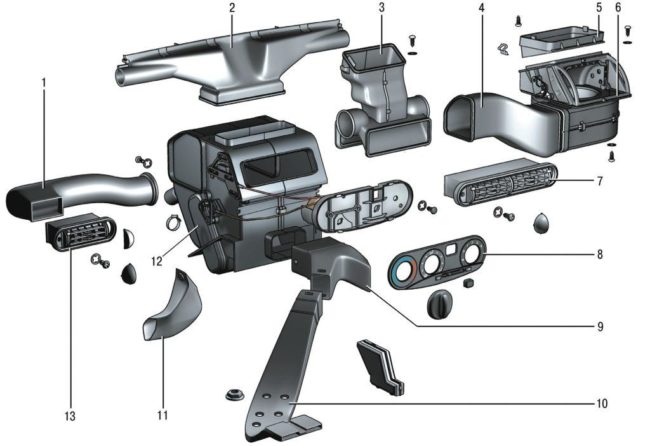 The Chevrolet Niva heating system is quite simple: 1 - ventilation duct; 2 - glass heating air duct; 3 - intermediate body; 4 - intermediate air duct; 5 - air intake filter housing; 6 - stove motor and fan; 7 - central cabin deflector; 8 - overlay of the controller panel; 9 - front cabin air duct; 10 - rear saloon air duct; 11 - air duct for heating the legs; 12 - heater block body; 13 - side cabin deflector
The radiator and stove dampers are combined into a block hidden by a common plastic case. If necessary, this assembly can be replaced entirely.
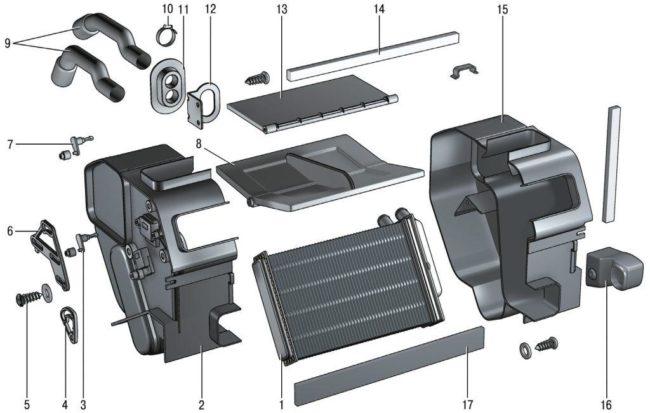 The radiator and dampers of the stove are combined into a single unit: 1 - stove radiator; 2 — the left casing of the block; 3 - heater damper lever; 4 - intermediate lever; 5 - screw; 6 — frame levers; 7 - damper lever for distribution of air flows; 8 - heater control damper; 9 - branch pipes of the stove tap; 10 - collar; 11 - screen pipes; 12 - bracket; 13 - damper for the distribution of air flows; 14 - sealant; 15 — the right casing of the block; 16 - air duct for heating the legs; 17 - radiator gasket
Coolant (coolant), heated by the engine, enters from the radiator of the cooling system into the radiator of the stove through pipes and a valve. The air blown by the heater fan enters the heating system through an air intake located under the windshield. Depending on the position of the damper, the air flow goes either through the stove radiator or directly into the air ducts. The distribution damper is responsible for the distribution of the flow between the air ducts. The choice of the operating mode of the stove, temperature and direction of air flows is made using the stove control unit located on the center console.
Heating system with air conditioning
The principle of operation of the stove of a car with air conditioning is similar to that described above. However, its design is significantly different. Instead of the intermediate body of the heater, an air conditioner evaporator is installed, hidden by a plastic casing. When the air conditioner is turned on, air is supplied to the passenger compartment through the evaporator using a damper.
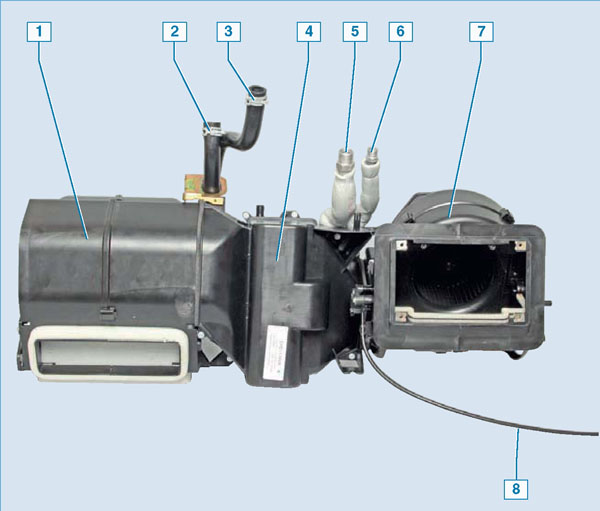 The design of the stove of a car with air conditioning is somewhat different: 1 - heater housing; 2 - inlet pipe of the stove radiator; 3 - outlet pipe of the stove radiator; 4 - evaporator body; 5 - outlet pipe of the evaporator; 6 - inlet pipe of the evaporator; 7 - the body of the electric motor of the stove; 8 - air damper control cable
Cabin ventilation
Outside air can enter
inside the vehicle as follows:
-
through the top slots of the panel
instrumentation and nozzles for blowing the windows of the front
doors if you move the switchgear
lever to the extreme right position; -
through the side 13 (Fig.
8-29) and central 7 nozzles if
switch lever move
to the extreme left; -
through the lower nozzles
passenger footwell area, if
the control lever is in
middle position.
To increase air supply
in the car interior, turn on
electric fan 12 (Fig.8-33) of the heater
switch 6 (Fig. 8-31).

Rice. 8-29. System
body interior heating:
1
– ventilation air duct;
2
– wind heating air duct
glass;
3
- intermediate building;
4
– intermediate air duct;
5
– the case of the filter of an air inlet;
6
– fan of the heating system;
7
– the central nozzle of ventilation of salon;
8
– facing of levers of management;
9
- Front heating duct
salon;
10
– a back air line of heating of salon;
11
– air duct for heating the legs;
12
– heater assembly;
13
- side nozzle.

Rice. 8-30. upholstery
body floor:
1
- screw;
2
– a cover of the lever of a distributing box;
3
– a cover of the lever of a transmission;
4
– lining of the floor tunnel;
5
– back facing of a threshold of a floor;
6
- Front trunk mat
7
– rear trunk mat;
8
- floor mat;
9
– front facing of a threshold of a floor.

Rice. 8-31. Drive unit
heater dampers control:
1
– draft of a drive of a lock of distribution;
2
– intermediate air duct;
3
– heater fan;
4
– draft of a drive of a damper recirculation;
5
– recirculation damper control lever;
6
- switch;
7
– an arm of control levers;
8
– control damper drive shaft
heater;
9
– a cam of a drive of levers;
10
– heater control lever.
R is.
is.
8-32. Heater details:
1
– heater radiator;
2
– the left casing of a heater;
3
– flap control lever
heater;
4
– intermediate lever;
5
- screw;
6
– sector of levers;
7
- distributor flap drive lever
air;
8
– heater control damper;
9
– heater hoses;
10
- collar;
11
– hose screen;
12
- bracket;
13
– damper of distribution of air;
14
- sealant;
15
– the right casing of a heater;
16
– Passenger's feet heating air duct;
17 - radiator gasket.

Rice.
8-33. Dismantling the heater fan:
1
– intermediate air duct;
2
– recirculation damper drive lever;
3
– lever of the damper of an air inlet;
4
– the left case of an air inlet;
5
- recirculation damper;
6
- screw;
7
– the right case of an air inlet;
8
– air intake shield;
9
- fan snail;
10
- additional resistor;
11
– fan flange seal;
12
– heater electric fan.
..
121
122
Do-it-yourself repair, replacement and refinement of the Chevrolet Niva stove
Perhaps the problem is not in the interior heater, but in the cooling system. With the help of damper position regulators, warm air is directed to different parts of the passenger compartment. First, adjust the dampers.
Follow the steps below to blow hot air to your feet. The engine warms up until the moment when warm air can be felt by hand. The heater fan speed switch is set to position 4.
Air should begin to flow into the lower part of the cabin. If the result is not achieved, the procedure is repeated.
This sequence of actions is due to assembly errors. Due to gaps and backlashes, air distribution is interfered with and the damper is placed in the desired position the first time. If, after the steps taken, the heat still does not enter the legs, the heating system needs to be finalized.
Chevrolet Niva & | Replacement of cables of a drive of a heater & | Chevrolet Niva
Antifreeze leak from the stove In used cars, coolant often starts to leak from the stove. The reason for this is usually the wear of the nozzles or a malfunction of the stove tap. Since antifreeze circulates under pressure, all connections must be tight. However, during long-term operation, hoses and gaskets lose their elasticity and burst.
After inspecting the heating system and finding a leak, the worn part changes, replacing the Chevrolet Niva stove cable with a new one. When repairing, do not use Chinese-made clamps due to their poor quality.
Due to the loss of elasticity, the pipes of the stove crack over time and let the antifreeze pass. The coolant can also flow out of the heater radiator itself. In this case, it will have to be replaced with a new one. The stove does not heat well. To diagnose a malfunction, turn on the ignition, start the stove and try to change the intensity of the air supply.
If at the first three speeds the air is not replacing the Chevrolet Niva stove cable or is supplied cold, the reason for this is a faulty resistor that needs to be replaced. The reason for the inability to switch speeds is the failure of the resistor. If the resistor is good, the diagnosis continues. Check coolant level. If it is low, the antifreeze is topped up to normal and checked after a few days.

If the level has dropped noticeably, you should pay attention to the hoses and pipes, the wear of which is usually the cause of coolant leakage. One of the reasons for poor interior heating by the heater may be a low coolant level in the system. If the control unit malfunctions, it will have to be dismantled
Repair of the block replacement of the cable of the Chevrolet Niva stove at home is possible only if you have the appropriate tool - it’s easier to contact a car service. Another reason for stopping the stove may be a dust-clogged cabin filter.
In this case, the load on the electric motor increases, which, in turn, leads to the failure of the stove fuse. In this case, it should be washed. This is true when buying and operating used cars. However, it can sometimes fail.

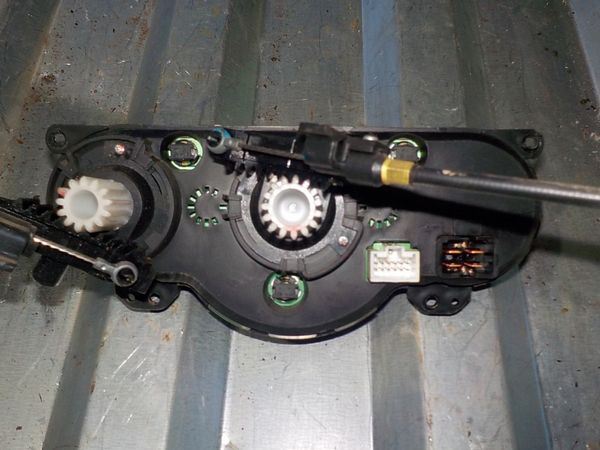
Replacing the stove cable Sometimes it is not possible to change the position of the stove damper. The reason for this is a cable break. To replace it, you will need a standard set of tools and a headlamp. Cable replacement is carried out as follows. The driver's seat retracts. Handles are removed from the damper control panel and screws are unscrewed.
The process of removing the control unit
Learning how to remove the control unit is fundamentally for every Chevrolet Niva owner, since he himself can fail, it is also dismantled to provide access to the damper drive rods and backlights. Certainly, and these acts are carried out, if only the listed elements show their malfunction, therefore they need to be replaced with new ones.
Withdrawal algorithm
Before proceeding with any actions with devices that have the status of "electro", it is quite important to disconnect the negative terminal from the battery in order to avoid the appearance of an unfortunate variant, accompanied by electric shock.
Now grasp the base of the temperature control knob, pull it slightly towards you. You will see that it yields to your movement, so continue to pull it towards you until it completely disengages from the panel. Do not make sudden movements with all this, so as not to provoke mechanical damage to the parts to be removed. Next, in exactly the same way, remove:
Video How to Remove the Heater Control Unit Niva Chevrolet
- knobs for adjusting the direction of the air flow;
- high speed fan switch.
After all three switches are dismantled, arm yourself with a screwdriver and, prying it a little, remove the air circulation control lever. Now nothing will interfere with you, you can easily remove the very lining of the control unit. Just carefully pry in several places with a screwdriver and remove it. Under the cladding panel you will find two screws, which will be easy for you to unscrew using a Phillips screwdriver. After these steps, you can carefully remove the control unit itself. On the reverse side, you will see that a block of wires is attached to the block, connected to the speed mode switch, by all means, pull it out as well.In the same way, find the block of wires connected to the backlight lamps, disconnect them too. If your car is equipped with an air conditioner, then you need to additionally disconnect the hoses from the vacuum switch.
A little lower you will find a bracket holding the damper drive rod shell. You need to carefully pry it off with a screwdriver. Do the same with other rods, ensuring that the control unit is completely disconnected.
As you can clearly see, there are no particular difficulties when dismantling the control unit. But you realize that such manipulations for the sake of enthusiasm, practical experience, of course, should not be done. Often you have to remove the unit if the backlight lamps are burned out. Changing them is simple, just scroll the cartridge in the opposite direction, pull it out, change the lamp, and then perform all the actions in the reverse order.
You also have to disassemble the control unit when you find that the heater of your Chevrolet Niva does not work or works with more problems.
Very often, the electronic control unit for the stove installed on your Niva fails. In this case, you will still have to turn to qualified electricians for help, since you can remove the unit, but you cannot identify the cause of the problem. To carry out such work, it is very important to have various tools, devices, testers and devices, and it is also important to have good knowledge in electrics.
So, if you are dissatisfied with the way the stove works on your Chevrolet Niva, you don’t like the fact that the car’s interior warms up slowly, then act bolder, look for the prerequisites, eliminate problems, armed with tips and necessary instructions, and enjoy the good work of the car.