Expert answers
Dmitry Koltsov:
Until the screed is completely dry, it is not desirable, but at least immediately turn it on to dry the screed yet.
fire horse:
Can you wait a month?
vladislav:
Usually this is written in the instructions for the floor - maybe 24 hours, maybe 48 hours or more ... I know that some wet ones are not allowed up to 1 month!
Marina Bashtova:
The drying time of the cement screed is 72 hours, after drying, you can turn on the warm floor.
Scarifier:
The standard defines 28 days, in fact, you can do it in a week.
Timurat:
A month, I once turned it on as you are advised here in a week it was autumn and the glue did not dry out until completely 30% of the tiles flew off, and they were in dew drops from the inside
Edward Sovershenny:
I read a lot that the most efficient and economical underfloor heating comes with thin porcelain stoneware, the thickness can be from 3 to 6 mm, heats up quickly, good heat dissipation, there is info here .termosib /
P-18:
The cement screed does not dry out but seizes. For maximum strength, it is also sprinkled with water ... at least 72 hours.
Ivan Maltsev:
Don’t talk nonsense, dear ones. The guys from the firm Rovny Pol performed the screed - .rovnypol, they told everything there
The warm floor, which is made with a semi-dry screed, is turned on only after a month, and then, depending on the humidity in the room. We were fortunately saved from this stupidity, the “thermal workers” did not warn us, and the tie-down workers, on the contrary, told about everything. Otherwise cracks could go.... and this is thirteen how bad it would be
The water is hot, it must be gradually started and gradually raised the temperature. To avoid deformation of the semi-dry screed. Be careful
Sergei Sokolov:
I recommend contacting TCM.
mrwait:
the warm floor can be turned on as the screed gains 100% strength, this happens on the 25-30th day
Tasha Sinichka:
eco-h is a good site, everything is described in detail!
Very Samara:
A screed on a warm floor must be done with plasticizers. This avoids cracks until full strength is set. Source s stroy.it/usefulinfo/screedusefullinfo/plitonit-estrich/
Elena Ermakova:
If the screed has hardened, this does not mean at all that the screed is completely dry and the warm floor can be turned on. A month after the work is completed, use as usual. Order a semi-dry screed in Nizhny Novgorod s gintechnologi /
Vladislav:
If these are thin mats that go into tile glue and tiles are immediately glued on them, then on the third day, and if these are mats that are under a screed, then as you were recommended above, until completely dry.
Andrey Volkov:
in 3 weeks
Alexander Pashnyuk:
after all, the instructions say - after the cement floor has completely dried
Timurat:
I turned it on after 3 days, now I know how best to glue the tiles back onto the mixture of PVA and cement.
boosia:
after 45 days
How to start a warm water floor correctly after pouring, coolant supply to the system, test run, first warm-up
Installing a warm water floor as the main or additional heating system requires maximum attention and knowledge of the sequence of actions.
If something goes wrong, it will be too difficult and expensive to make changes, especially after the finish coat has been laid. To avoid this, you need to know how to turn on the water heated floor.
The method of filling water into the system depends on how it is arranged. Most often, a tap is installed for this, supplying the coolant from the water supply to the pipes of the warm water floor.
The water floor system does not need to be drained annually after the heating season, but a special tap for this should be on the outlet manifold.
Before filling the system with water, it must be thoroughly rinsed, because when laying pipes, small construction debris could get into them. To get rid of it, you need to fill in and drain the water until it becomes clean.
Manufacturers recommend updating the coolant with each new season, and if you follow their advice, then such a flush should be done every time.But, as practice shows, it is enough to carry out such work every 3-4 years, although some consumers do not drain water for decades, and the system works perfectly.
The next stage of work is a tested launch of a water-heated floor after pouring a coolant into it.
Pressure testing is a pressure test of the entire system for the possible presence of leaks in pipes and at their joints.
Without this stage, pouring the mortar and laying the topcoat is simply pointless. It is carried out when all pipes are connected to the distribution manifold.
Each heating circuit individually must be filled with liquid until all the air has escaped from it. To do this, valves, both regulating and thermostatic, must be opened and closed.
For each type of pipes of a warm water floor, its own type of crimping is required:
- If metal-plastic is used, then cold water is used for starting, supplied to the system at a pressure of 6 bar. If during the day it did not fall, then the design passed the test and you can proceed to further work - pour the screed over the pipes filled with water, which are under pressure. At this pressure, the air vents must be closed during the entire test stage, otherwise water will flow through them.
-
For XLPE pipes, verification requires other steps:
- firstly, the pressure for crimping should be twice the working pressure, but not lower than 6 bar;
- secondly, you need to watch when it starts to fall (approximately 30 minutes) and raise it again;
- thirdly, such actions should be carried out three times and only after that it is necessary to double the pressure again and leave the system for a day;
If during this time the pressure has dropped by no more than 1.5 bar and no leakage is visible, then the system has passed the test.
As an additional check, experienced craftsmen recommend applying the test with the maximum heating of the system. Such a first warm-up of a water-heated floor will show how high-quality the pipes are. To do this, you need to warm them up to + 80-85 degrees and leave for half an hour. If no leaks or steam are visible anywhere, then the structure is ready for pouring with mortar.
After all checks, the screed must be poured only on full pipes so that it “takes into account” their changed shape.
The first start of a warm water floor is carried out by heating the coolant to + 20-25 degrees. It is necessary to let the system settle for a couple of days, after which every day increase this figure by 10 degrees if water is used and by 5 if the coolant is antifreeze.
The whole process of gradual heating of the structure directly depends on the size of the room. If it is small, then you can meet it in just a couple of days, but since the launch of a warm water floor is arranged after all checks, pouring concrete and laying flooring, it is better not to rush with a sharp rise in temperature. This can cause cracks in the screed.
a source
How long to turn on the floor after pouring the screed
So, from the screed to the inclusion should take at least a month. During this time, the fill will dry completely. Such a holding period assumes that the launch will not cause irreparable consequences, such as a short circuit or floor deformation. In order not to have to redo it again, the first thing to remember is that it is absolutely impossible to turn on the warm floor at full capacity.
To extend the life of the heating system, after the screed and tile adhesive have dried, they turn on 18-20 days at a temperature of +35 ⁰С and only then set the desired heat indicators. So, from the beginning of actions to create a flat surface and to the free use of a warm floor, 50-55 days should pass.
Common Mistakes
Strict requirements for when to turn on the system after tiling does not guarantee a perfect job. Often the owners make gross mistakes that lead to complex problems.
The most common mistakes when installing underfloor heating:
- Cables or mats are laid over the entire area of the room. This can cause overheating of areas under large furniture (wardrobes, sofas, beds, washing machines, etc.).
- Shortening wires. It is forbidden to do this - the electric floor will simply fail.
- Turning on the underfloor heating to check the performance until the screed or glue has dried. It is safer to check the resistance of the system cables.
- Laying heating elements on a dirty surface. Even the presence of dust in the cable grooves will negate all the work.
- Walking on wires. So you can damage the cores, which will disable the electric underfloor heating.
- Blocking the temperature sensor. This device should be in a sealed corrugated pipe, so it is easy to access if it is necessary to replace it.
- Negligence. To make sure that the work done is correct, it is necessary to measure the resistance before laying the elements in the screed and after drying.
- Use turning on the system to speed up the drying of the screed or tile adhesive. Such actions completely disable the cable.
- Neglect of tightness. Underfloor heating elements must lie tightly in the grooves, the presence of air pockets leads to damage to the system.
- Lack of a scheme or plan for laying a warm floor. It is not necessary to draw, you can take a picture of the finished circuit, thereby protecting yourself from damage to the cable when installing plumbing or drilling in the future.
Expert advice
If you decide to install an infrared floor under a tiled floor and doubt your abilities, it is better to seek help from an experienced specialist. Thus, you can not only get a functioning heating system, but also learn some tricks and do this work yourself in the future.
The main recommendations are patience and compliance with the rules, as well as the use of only high-quality building materials and heating elements. The above mistakes should never be repeated.
In order for the floor to warm up the room well and last for a long time, it is necessary to mount it correctly. It is necessary to lay the cable only in clean, primed grooves in an already dried screed.
If the system will be filled with concrete mix, then voids should be filled. Before and after pouring the screed, it is necessary to measure the resistance of the cables. So you will be sure that the wire is not damaged. It is not worth rushing to turn on the warm floor.
After waiting for the required time, you need to gradually warm up the surface itself and the ceramic coating. Under the tile, it is necessary to use a substrate - a heating mat. Following these recommendations, you can get an effective and aesthetic warm floor covering.
We hope that this article will help you in arranging the heating of your home.
Surface strength
Many people are interested in what kind of bearing capacity warm floors have. It should be noted that the basis of this system is a concrete screed, which gives it a fairly high strength. You can dance or play sports on such a surface, it will not suffer from this. However, it is advisable not to install heavy furniture in the place where the cable passes - this can cause a violation of heat transfer.
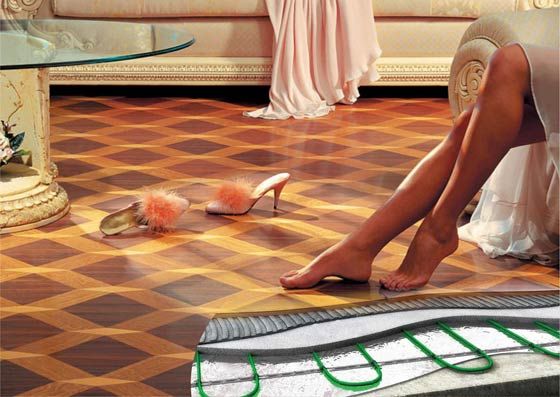
It is allowed to use almost any material as a finishing coating. Tiles, carpet, etc. can be laid on the warm floor. The only exception is parquet and laminate. Wood is a good thermal insulator, so there will be no benefit from a warm floor. Wooden cladding can be laid on an infrared film floor.
"Territory of comfort" will help you choose and install a warm floor.
m or turn it on if necessary? In theory, reaching the set temperature, the floor spends more electricity than maintaining it. Should I turn it off when I leave for work?
The same with a country house.Does it make sense, coming to the dacha only on weekends, to heat the house for the rest of the week, assuming that there is no water anywhere and there is no need to maintain a small plus.
It probably needs to be clarified so that there is no confusion 1. The floor is in the apartment. A country house in itself, there are no warm floors in it.
2. The issue is complicated by the fact that we have a 3-phase meter. The main idea: the floor goes into operation (within 1-2 hours) at night, during the cheapest tariffs. Then, in the morning and afternoon, it only occasionally turns on to maintain the temperature. It seems to me that during the day the heated floor will spend as much on maintenance as it does on reaching the operating temperature in the first 1-2 hours. Not?
If the economic component is important to you, then the less often the floor is turned on, the cheaper it is.
If its temperature is important to you, then you do not need to turn it off.
stop it 🙂 > 2. The issue is complicated by the fact that we have a 3-phase meter. The main idea: the floor goes into operation (within 1-2 hours) at night, during the cheapest tariffs. Then, in the morning and afternoon, it only occasionally turns on to maintain the temperature. It seems to me that during the day the heated floor will spend as much on maintenance as it does on reaching the operating temperature in the first 1-2 hours. Not?
it’s even lazy to count the heat expended on floor heating and the heat loss per delta t
If you want to save, set the time programmable
Self-deception: A normally insulated house cools down for a week. And then it warms up for a week. This means that if leaving for work you set +14°C, in the evening it will not be +14, but maybe +20 instead of +22. You can get a significant effect only in a leaky house (which cools down in an hour or two), or a monthly schedule (is this a vacation?). And with an insignificant effect, your smart regulator will pay off "100 years."
Can you read and count? If the house cools down by 0.00001°C in a day, where does the savings come from?
Well. as it were, my theory is supported by practice (see below). And the expenses of your friends - "blah blah blah"
In my bathroom there is a floor of 3 m2, with a power of about 400 W, but it consumes an average of 60 W (the temperature difference between half and air is only 2 ° C). For a month, this is approximately 44 kWh, which is 110 rubles in money. My regulator costs 1700 rubles. Programmable - how much? Thousand 5? Let half the time the floor is off. Payback 6 years. Past the checkout. In addition, the TP in the bathroom (me) is also quick-drying towels and washed linen.
When can I turn on the underfloor heating after laying the tiles
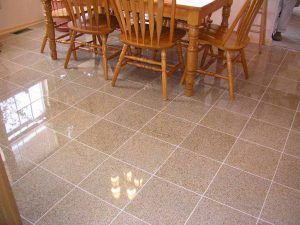
Any tiled materials are hygienic, aesthetic and durable. The tile holds heat well, but it also warms up for a long time, especially with classic home heating. There are rooms, bathrooms and toilets, where tiles will always be cold. Additional heating in the form of a warm floor will be an urgent solution to the problem.
A beautiful and smooth tile floor can be obtained by preparing a solid and even surface for laying it. In addition, do not forget that the mass of tiles and porcelain stoneware is significant. For example:
- 1 m² of tiled floor tiles will weigh 15-25 kg / m²;
- 1 m² of porcelain stoneware weighs much more - 20-45 kg / m².
To support such a weight, a strong, well-equipped concrete substrate is needed. A concrete base laid on a heating cable or water pipes can prevent deformation of the elements of the heating system due to the weight of the floor covering. A well-seasoned concrete screed forms a strong protection around the embedded parts and does not allow the force action of the top coatings on the internal elements.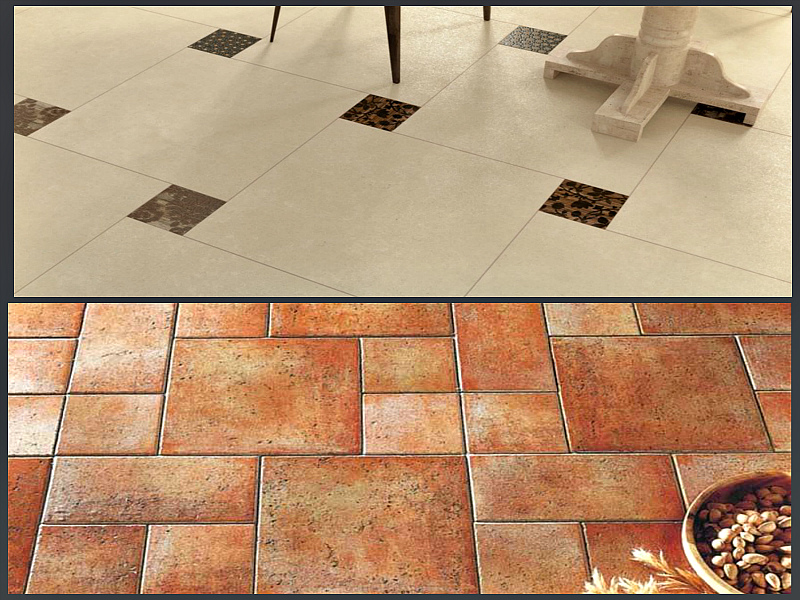
Warm floors laid under tiles, massive structures and not every floor of a multi-storey building can withstand it. For example, in Moscow and other cities with historical buildings, such work is equated with redevelopment and must be coordinated. The weight of an electric underfloor heating with porcelain stoneware flooring reaches 100-120 kg/m². Floors with water heating will be even harder.
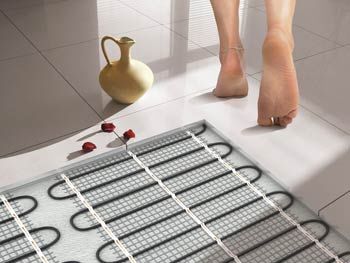
Infrared film floor for tiles
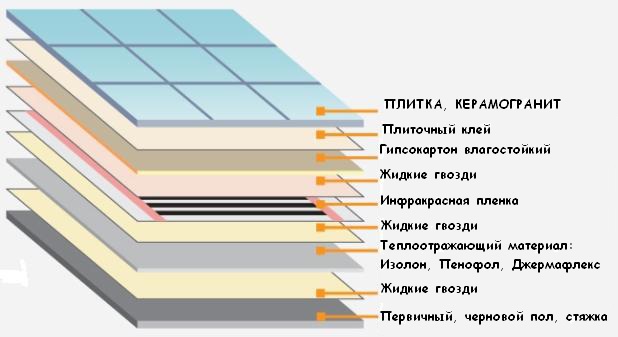
- The infrared film is characterized by low adhesion (adhesion to the surface) and if you put PVC or ceramic tiles on top of it under the screed, then the entire layer will simply “float”. If a heavy object is accidentally dropped on such a floor, the screed is likely to crack.To increase the adhesion of the infrared film floor, cuts and notches are made between the seams of the tiles, which subsequently need to be isolated for a long time and painstakingly.
- All types of adhesives and screed solutions contain alkali. This leads to gradual erosion of the heating film coating, regardless of the layer thickness. As a result, the probability of closing the heating circuit of the electric floors increases.
- The bimetallic film infrared floor is generally not combined with ceramic tiles; under it, infrared radiation loses a number of its useful qualities.
Despite the difficulties with arranging a film underfloor heating under a tile, there is an installation technology that can be used when laying tiles with your own hands. The installation costs are paid off by the insignificant energy consumption of the IR film floor, so for electric heating of 1 sq. m. floor consumes 35-55 watts.
Installation of film underfloor heating
- Insulation is laid (it is best to use penofol with one foil side).
- Do-it-yourself laying of infrared-type electric floors is carried out with a reflective layer upwards. Installation continues by fastening sheets with lavsan tape.
- The film must be carefully laid with the copper strip down, fastening the adjacent strips with double-sided tape. Laying the heating film circuit is carried out in one layer.
- Terminals are attached to the cut of the film, providing contact with the power cable.
- A thermostat is attached to the wall with your own hands. This device must be located near the wiring.
- Power wires are connected to the terminals on the film.
- The film is connected to the supply wires, the power wires are brought to the terminals and crimped with pliers at the junctions.
- A device for measuring the temperature regime is installed.
- The heating film circuit is connected to the network.
Do-it-yourself tile laying
 The technology, with an orientation towards which the laying of the film infrared floor under the tiles with your own hands, requires compliance with the algorithm:
- Drywall or construction mesh is being installed. The thickness of the drywall sheet should not be less than 4 mm.
- The floor surface is marked with an orientation to the layout of PVC or tiles. The device of an infrared warm floor under the tile allows you to lay it both diagonally in the room and parallel to the walls.
- Do-it-yourself tile laying instructions allow you to start placing it from the middle of the room. In some conditions, it is permissible to shift the initial laying point of the facing material.
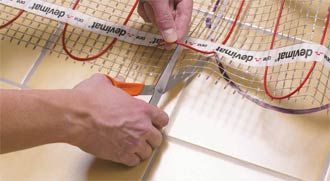
- The tile adhesive is being prepared and must be compatible with the underfloor heating system.
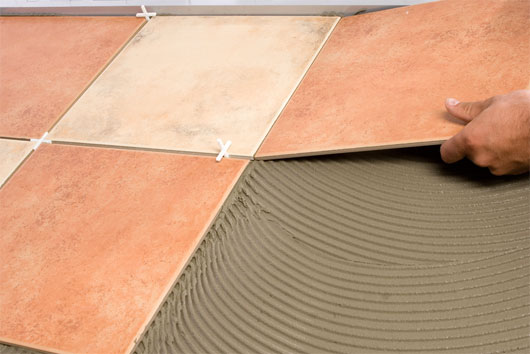
- Given the markup, the laying of tiles begins, you can start installation not only from the middle of the room, but also from the wall farthest from the entrance.
- Using a soft notched trowel, the adhesive composition is applied to the tile and floor, while the adhesive layer should be thin - 3-4 mm.
- The product is pressed tightly against the floor surface and in this way the entire floor covering is laid.
- To adjust the same distance between the tiles, a special separator is used. Glue protruding from the seams is wiped off immediately.
- At the wall itself, it is necessary to leave a small gap without tiles (about 0.5 cm, the so-called "thermal seam")
In the process of laying with the help of a level, it is necessary to periodically check the evenness of the tiles relative to each other.
Laying tiles on a prepared screed
Adhesive is selected resistant to temperature extremes. The recommended thickness of the adhesive layer is approximately 1 cm, for a proportional distribution of heat waves over the tile area. The surface of the screed is primed twice to increase the adhesion of the adhesive. The remains of waterproofing materials protruding above the screed along the perimeter of the walls are carefully removed.
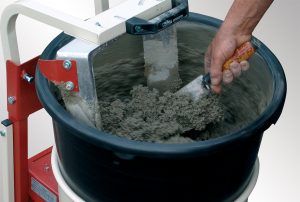
Marking for tiles is carried out according to the selected pattern and the glue is kneaded according to the recipe. Thorough mixing of the adhesive is carried out by a construction mixer and its quality is checked. The solution should be kept on the spatula when it is tilted. If there is no practice for laying tiles, knead the adhesive mass in small portions to prevent it from drying out.
The infused adhesive is applied to the surface of the tile and floor with a notched trowel to enhance adhesion. It is recommended to lay out the drawing from the middle of the room, so the proportions of the ornament are better observed. Protruding adhesive is immediately removed. The period of complete setting of the adhesive is about a week.
Summary: We consider how long it takes to turn on a warm floor after laying tiles - 28 days concrete screed strength of 40 mm, 7 days reliable setting of tile adhesive, a total of 35 days.
Underfloor heating is a type of modern residential heating that has tremendous economic benefits. To obtain comfortable temperature conditions in a house or apartment, you must follow the rules for the installation and operation of the structure.
Compliance with technical regulations subsequently leads to high-quality heating of a room with any floor covering. Next, consider the question of when you can turn on the floor after laying the tiles and how to do it right.
Next, consider the question of when you can turn on the floor after laying the tiles and how to do it right.
Design features
When laying ceramic tiles on an underfloor heating system, there are a few things to keep in mind. Even before installation begins, all necessary calculations must be made to ensure that the tiles do not exceed the level of the finished flooring in other rooms.
So, you should think over and choose the right diameter of the pipes of the purchased design. In some cases, the thickness of the screed layer on which the warm floor is laid increases, in other cases it is necessary to make strobes to deepen the structure.
 For the construction of high-quality flooring, you will need to make a screed both under the floor heating system and above it.
To fill the screed, you must use a cement-sand mixture or adhesive composition.
Experts say that the screed, made of tile adhesive, is characterized by increased strength.
Tile adhesive must be evenly distributed over the surface to protect the structure from subsequent cracking and premature failure.
The drying time of the screed after pouring will be several days. The composition gains strength within 3-5 days, after which you can start laying tiles.
To begin with, they measure the area of \u200b\u200bthe room and make a preliminary calculation, selecting a pattern. Then a layer of tile adhesive is applied to the screed, on which the first row will be laid. They work with glue using a notched trowel and trying to lay the tiles on a layer no more than 0.5 cm thick.
 For a warm floor, choose a special floor tile, usually porcelain stoneware.
It retains heat longer and gives off heat well.
The work is carried out using crosses, which guarantee the creation of even seams and the absence of unwanted joints.
When the screed dries
When it is planned to install the system, laying is carried out on a flat plane. If it has a horizontal curvature, then it is corrected with a screed. The optimal leveling layer of the mixture depends on the angle of difference and varies between 30-50 millimeters. To create a screed, a cement-sand or concrete type of mixture is used.
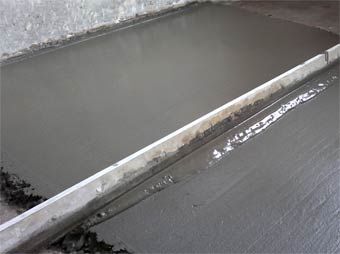
Since cement of any brand requires several days to harden, the greater the thickness of the layer, the longer the mixture will dry. However, it is worth remembering that for the subsequent installation of the "warm floor" system, plasticizers and other additives are added to the solution to ensure a high coefficient of thermal conductivity.
Drying should take place under certain conditions - this is an air temperature of +25 ⁰С and a moisture level in the environment within 60-70%. In this case, the "maturation" of the floor with installed heating will take about 30 days. It is impossible to turn on the warm floor early after pouring. During this time, the tile adhesive and grout will also dry.