What should be
It would seem that there is nothing easier than replacing the suitable surface of a brick oven with a metal insert with your own hands, getting a stove for cooking. In reality, everything is much more complicated. A stove is a complex device, and the thermophysical processes occurring in it depend on the correct arrangement of its elements.
Special requirements are placed on furnaces of this type. On the one hand, it must effectively accumulate heat in the thickness of the brickwork, on the other hand, it must take a significant part of the heat to heat the hob. In the summer, when heating the house is not required, the hob should warm up quickly with economical fuel consumption.
Requirements
Theoretically, the hob can be made from any material that can heat up to high temperatures when the furnace is fired. In practice, cast-iron plates with holes closed with a removable lid are used.
This design allows you to get zones with different temperatures on the stove. The thermal conductivity of cast iron, unlike steel, is not very high, so food can be heated on the plate plane, as well as boiled or stewed “over low heat”. And by opening the lid, you can achieve direct heating of the dishes with an open flame, which allows you to quickly boil water or fry food in a pan.
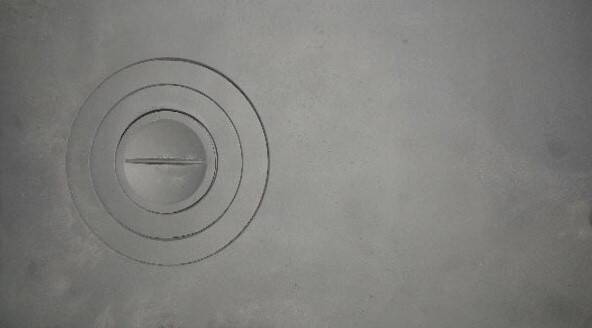
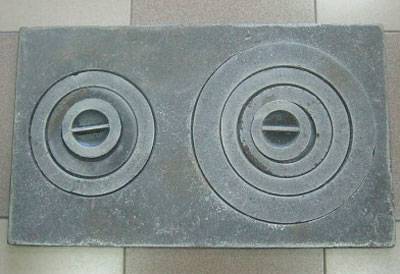 The most practical burners shown in the photo, consisting of concentric rings of different diameters - they can be matched to the size of the bottom of the dish. In addition, the gaps between the rings compensate for the thermal expansion of cast iron that occurs during overheating, and the plate can withstand repeated heating and cooling cycles without damage. Solid cast iron stoves are less reliable and require a more accurate firebox.
materials
Which brick is preferable for laying a stove equipped with a hob? In most cases, on the ordering schemes of furnaces for a house, cottage or bath, you can see two types of bricks: ordinary full-bodied ceramic and refractory fireclay - it is most often indicated in yellow. Do-it-yourself fireclay bricks lay out those parts that experience the greatest thermal loads during combustion: the firebox and the roof of the furnace, part of the smoke channel immediately after the combustion chamber.
The main difference between fireclay bricks is its increased heat capacity. It is able to accumulate and give off the received heat for a long time more efficiently than ceramic. For laying a heating stove, and especially a stove for a bath, this is an indisputable plus.
But if the stove is used mainly as a cooking stove, then the increased heat capacity of fireclay is rather a disadvantage: it will absorb a significant part of the heat, and it will take more time to cook food. In summer, it will be impossible to cook on such a stove - the room will become hot and stuffy.
If the oven is mainly used for cooking, it is recommended to use the minimum amount of fireclay bricks!
Features of cooking ovens
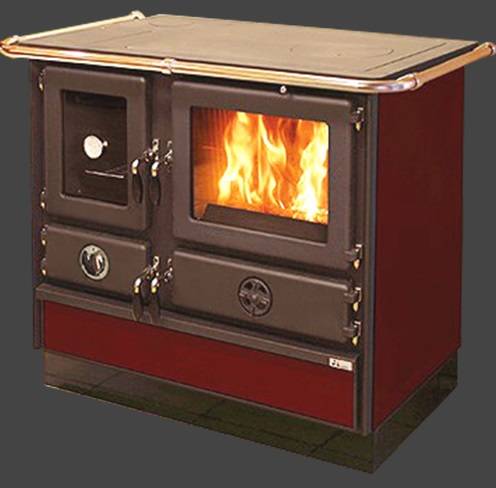
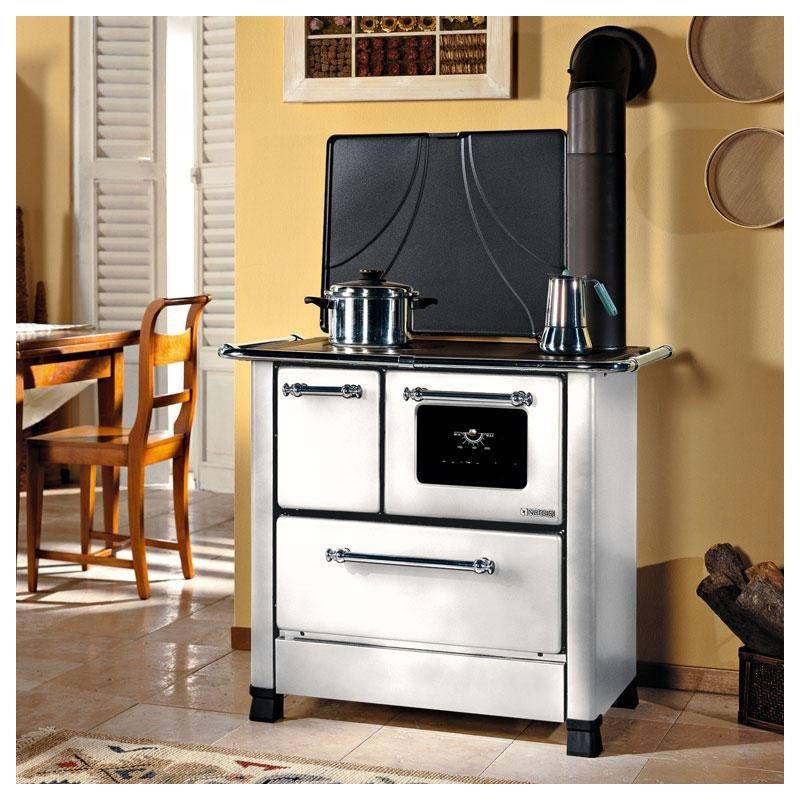
Depending on the model, cooking ovens combine a real oven, stove and oven, differing in quite compact dimensions. Most cooking ovens do not exceed the size of a standard gas stove. In addition, manufacturers of cooking ovens put great emphasis on the design of this equipment, which makes them a real decoration of the interior. The installation of the furnace is quite simple and does not take much time, but you need to entrust it to professionals, this guarantees a long and correct operation of the equipment. Modern cooking and heating is mobile and, if necessary, it will not be difficult to transport it to another place.
Typical heating and cooking oven
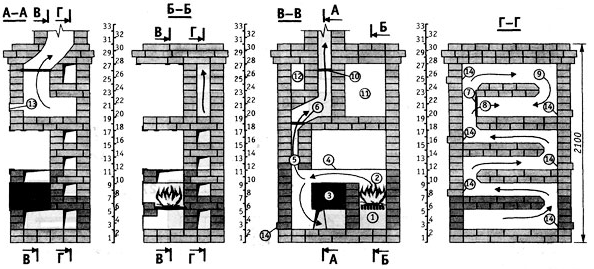
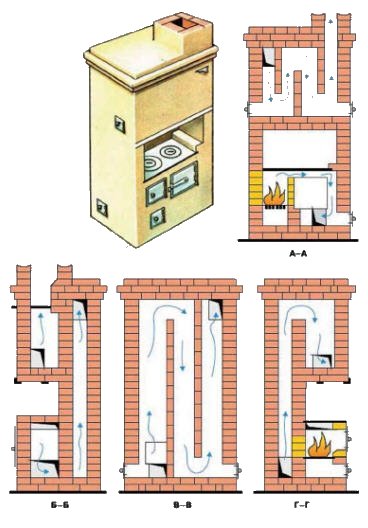
It is recommended to start familiarization with the stove skill by studying the instructions for laying the most popular version of the heating and cooking stove.
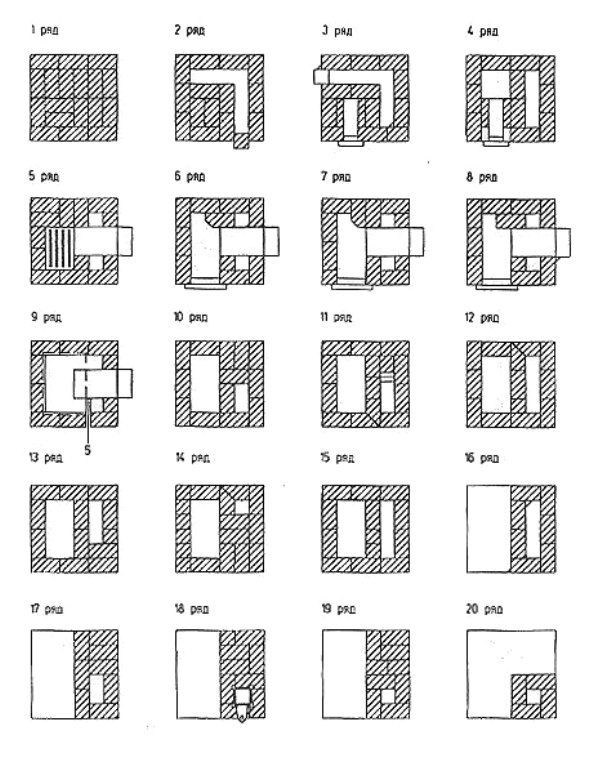
Scheme of the heating and cooking furnace
First step. Lay out the first row of the oven. At this stage, you must strictly monitor the perpendicularity of the corners and the evenness of the laying of bricks. The durability and, in general, the quality of the finished heating and cooking structure directly depend on the correctness of the device of the starting row.
Second step. After laying out the initial row, mount the blower door.
Third step. Lay out the 2nd row with regular masonry.
Fourth step. Proceed to laying out the third row. At this stage, you need to chop off your bricks from both sides so as to create an optimal blower configuration. Check that the row has a height corresponding to the height of the blower door.
Fifth step. Proceed to laying out the fourth row. It must be placed from left to right. Mount the ash pan door. During the laying process, be guided by the pre-selected scheme of the stove. On the same row, you need to close the blower door. Arrange a hole above the ash chamber.
Sixth step. Lay out the fifth row with the narrowing of the ash pan opening. Otherwise, the laying of this row is similar to the laying of the fourth.
Seventh step. Lay out the sixth row of fire-resistant bricks. You can also use a simple brick, but it will fail much faster than its fireclay counterpart.
You need to chip a brick in front of the grate. This will make it possible to stack the fuel better in the future. The grate itself will rest securely on the 5th row of oven masonry.
Leave about 1-1.5 cm gap between the sixth row and the grate. Fill the gap with sand.
Kitchen stove masonry
Eighth step. Lay out the seventh row. At this stage, you need to create a U-shaped channel and overlap it so that one channel turns into three at once.
Ninth step. Install the firebox door. For support under the door, use the 6th row of masonry.
Tenth step. Lay out the eighth and ninth rows by analogy with the seventh row. In height, the ninth row should correspond to the furnace door.
You need to close the left channel and the furnace baffle. Bricks for this should be prepared in a special way. Preparation comes down to squeezing bricks from both sides to ensure smooth and high-quality transportation of gases from the furnace to the furnace channel.
Eleventh step. Lay out the tenth row of fireclay bricks. In this case, the products themselves must be placed strictly vertically. Be sure to check the verticality with a level. On top of this row you will lay the hob.
Twelfth step. Close the furnace door. Only two square-shaped channels will remain in the structure.
Further laying of the heating and cooking unit is carried out in exactly the same way as laying out ordinary heating stoves. Follow the chosen ordering scheme.
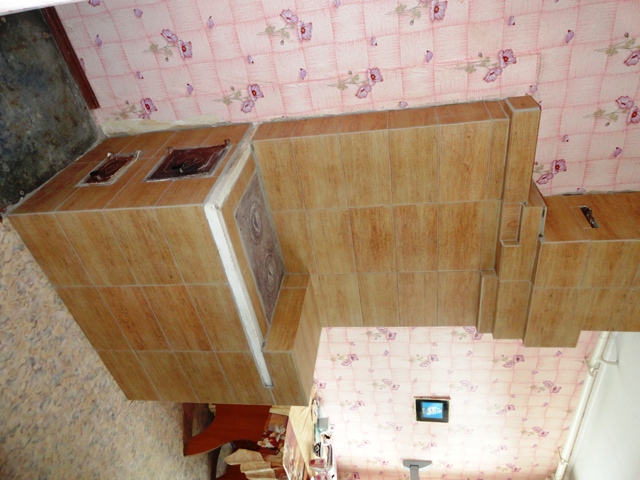
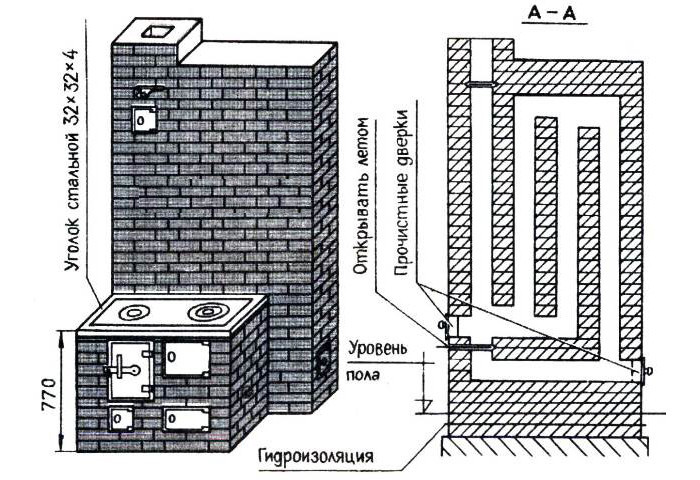
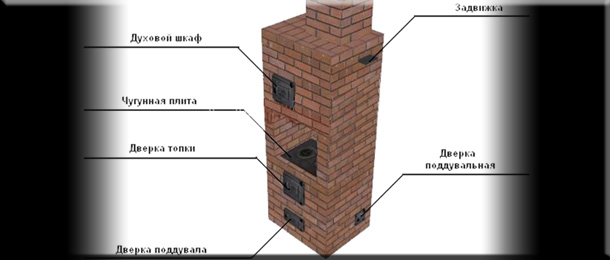
Example of a heating and cooking stove
Finally, install the hob with damper, firebox door and cover for this door. You also need to equip the ventilation chamber and chimney. Select the design and material for the manufacture of the chimney individually in accordance with the dimensions and other important characteristics of the furnace.
Orders of heating and cooking stoves
Benefits of wood burning stoves
Wood stoves have many advantages that make these designs popular both in the past and now. Among the advantages of such equipment:
- autonomy; wood-burning appliances do not need a main connection - heat generation is possible at any time; this is probably the main plus of such furnaces;
- financial savings; firewood in Russia is available to anyone, and those who live in rural areas are doubly lucky - the savings are even more significant;
- the ability to build an oven yourself; this is both a chance to test yourself, and, again, savings, and the reason for the exclusive design; autonomy turns into the possibility of absolute adjustment to the characteristics of the room in which the stove will be installed;
- the ability to connect the device to the heating system of the house;
- environmental friendliness of furnaces and fuel; both the stove and firewood are characterized by complete safety for health; the materials from which the stoves are made are harmless, and the combustion products are completely removed by means of air draft in the chimney.
The disadvantage of wood-burning equipment is the need for fuel supply. But if the stove is of high quality, and, moreover, designed for long-term burning of firewood, the frequency of throwing fuel is small. In addition, the benefits clearly outweigh the minuses.
Types of wood-burning kitchen stoves
Wood-burning stoves are divided into cast iron and steel according to the material of manufacture, and according to their location in the room - built-in, corner and freestanding. Their size can be very different, as well as the power, which varies from 6 kW to 30 kW. Some models perform mainly the function of a hob, while others allow not only cooking, but also heating the room, often combining this work with heating water for sanitary needs.
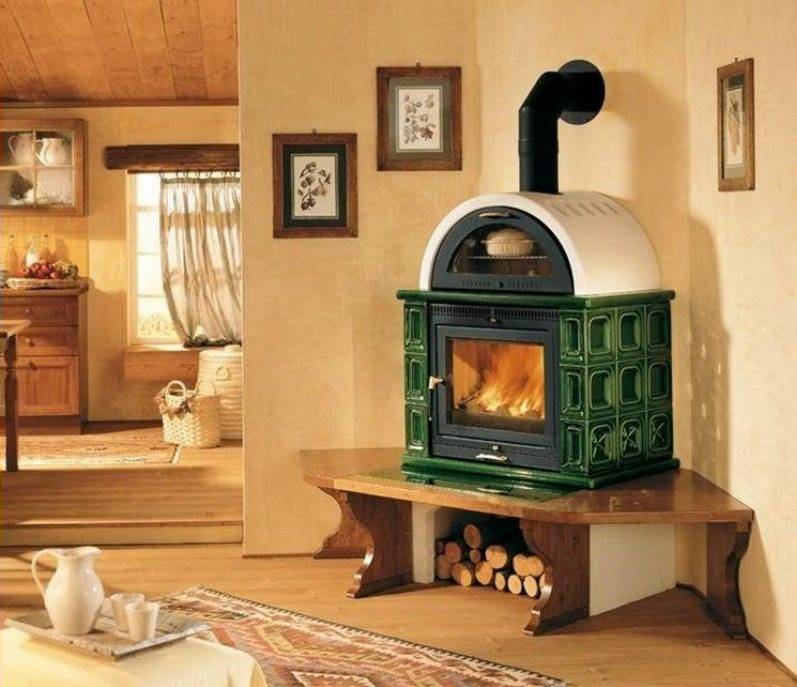
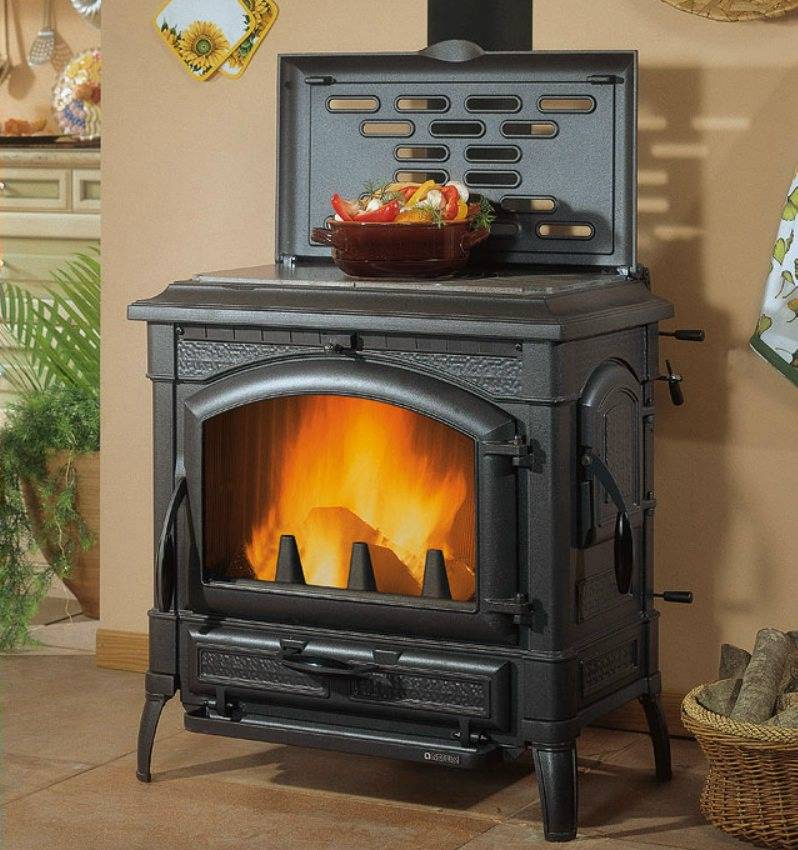
The smallest versions of wood-burning kitchen stoves are narrow and high fireplace stoves, with an oven in the upper part of the body, which makes them easy to install in very small rooms. Oversized wood-fired home stoves can combine a powerful fireplace with a domed oven that is convenient for baking traditional rustic bread, so they are installed either in spacious kitchens or in a patio or garden.
Scheme of an ordinary wood-burning stove
Such a heating device is completely built of brick. The pipe is brought out through the roof, and a metal sheet is used as a damper.
The main building element is a brick, which has the ability to accumulate and gradually release heat energy into the room. The more basic building material used in the manufacture of the furnace, the longer it will heat up and cool down.
When laying out the furnace, it is necessary to use refractory building material and mortar. If we are talking about a chimney, it must be laid out dry with the selection and layout of individual rows. When laying out the first, it is worth adhering to the rule of parallelism, which is checked with a special square.
To do this, you need to measure the opposite distances between the main angles. If these distances are equal, we can conclude that the masonry was correctly completed. The size of such a furnace is quite large, as a rule, the device occupies an area equal to 5 to 8 square meters.
Long burning stove
In the manufacture of the furnace, it must be taken into account that in the future it will work due to pyrolysis. This concept refers to the process of fuel combustion at a high temperature in the furnace and a lack of oxygen masses.
The peculiarity of the device is that the air to maintain the fire is supplied not from below, but from above. Such a supply is carried out in doses. Air masses enter only a thin layer of solid fuel. This prevents the ignition of the load. As a result, long-term operation of the furnace, complete combustion of gases is ensured.
To make such a unit with your own hands, you will have to acquire a metal barrel. It can be replaced by a gas cylinder, steel pipes of large diameter. The thickness of the walls should not be less than 4-5 mm. If they are thinner, they can burn out during the operation of the furnace. The height of the future unit is at least 1 m. The furnace is divided into three sections, namely: into the loading chamber, the combustion zone and the system responsible for the removal of gases.
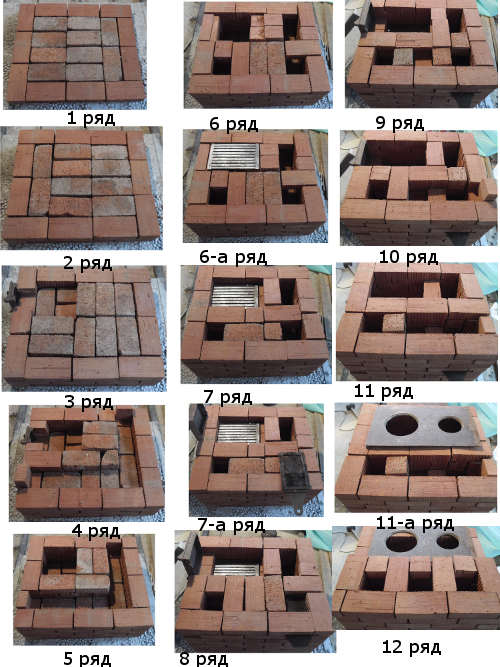
Stove with a stove for a summer residence
To assemble the main body of such a unit, you should use a special red oven brick. It has refractory properties and, with proper masonry, is able to ensure the durability of the future product.
Do not use cement mortar, as under the influence of high temperatures it tends to crack
In the manufacture of the case, special attention must be paid and a design check must be carried out by drying its parts.
During masonry, it is taken into account that a little heat will be enough to heat both the room and the hob. Element of the oven responsible for cooking, does not need large amount of thermal energy. Despite the relative complexity, it is possible to finish such a furnace with various building materials, for example:
- ceramics;
- facing brick;
- ordinary plaster.
You can also use modern glass wallpaper. But they are treated with distrust by many people who prefer to use elite material such as marble, granite or semi-precious stones. Thus, the oven consists of:
- of 230 red refractory bricks;
- from 200 kg of clay and fine sand;
- from a steel corner;
- from the doors of the blower and the combustion chamber;
- from a cast-iron stove with burners;
- from a box for heating water and an oven.
Tips for Extending the Life of Cast Iron Slabs
In order for the stove hob to last as long as possible, you should follow these simple rules:
- for laying the slab, use a liquid cement mortar, maintaining a distance of 5–6 mm from the upper edge of the oven;
- the largest burner should always be above the firebox;
- the brickwork of the upper row must be strengthened with a steel corner;
- do not forget that around the entire perimeter of the plate to prevent deformation and cracking of the metal, there should be gaps of up to 2 mm;
- correctly make the first load of the furnace and heat it, gradually warming up for about 8 hours, and increasing the temperature by 70–80 degrees every hour. For proper heating, it is necessary to start heating with chips and chips, and then throw in larger firewood. After heating the stove for 8 hours, it must be left to cool until the firewood is completely extinguished.
If the buyer himself is not sure of his competence regarding the installation of cast iron stoves, then it is better to resort to the help of professionals. Thanks to special knowledge and many years of experience, they will help save your time and nerves. This is the case when it is better to give way to a specialist, so that later you do not have to pay for your own inexperience.
And then, when a beautiful stove with a well-installed cast-iron stove on the surface appeared at your disposal, you can fully enjoy the warmth and comfort radiated by such a design.
The main manufacturers of cooking floors
Cast iron plates are produced by both foreign and domestic companies. Among foreign boards, the most popular and demanded boards of trade marks of Finnish origin are Pisla and HTT.
We can proudly note that domestic manufacturers do not lag behind and produce products no worse.
Among the range of Russian-made oven surfaces, NMK, Litkom, SibStalShar slabs stand out favorably. In addition to quality characteristics, along with strength and temperature resistance, one can note the aesthetic appearance of the cooking floors. Thanks to the desire to surprise and win over the buyer, manufacturers have done a great job of creating a top-level competitive product.
All stoves on the market are divided into two categories: prefabricated and solid cast iron stoves.
Cooking floors "Litkom"
Main advantages:
- Beautiful appearance in an elegant incarnation.
- Heat resistance - resistance to high temperatures up to 1000 ° C;
- Environmental friendliness - production using materials that are harmless to the life and health of users.
Below is a range of Litkom furnace surfaces
|
Name |
Bookmark size | Average weight | price, rub. |
Stove with one hole for burners under the cauldron up to 20 liters. P1 - 5
512x512x10
21.3 kg.
3 755.40
Stove with one hole for burners under a cauldron up to 40 liters. P1 - 6
600x600x16.5
46.16 kg.
8622.70
Stove stove "Warm stream" П1–7
413x340x8
9.32 kg.
1229,60
Stove with one hole for burners PS2–3/2
362.5x410x8
10.04 kg.
1 314,98
Solid stove with two holes for burners P2–3
710x410x12
24.56 kg
3140.25
Combined stove with two holes for burners PS2–3
710x410x8
19.98 kg.
2260.11
Furnace flooring
410x245x15
10.5 kg.
1 053,92
Stove with one hole for burners under the cauldron up to 20 l. Art. D-440
640*640*10
54.3 kg.
12526.26
Consider two more popular models of oven plates of the Balezinsky Casting and Mechanical Plant:
- Single-burner cast-iron stove stove P 1–2 (710 * 410): dimensions 710 * 410 mm, material - cast iron, price - 2180 rubles.
- Cast iron stove stove PS (710 * 410): dimensions 710 * 410 mm, material - cast iron, price - 2260 rubles.
 Pig-iron stove for P 1-2 furnacePig-iron stove for PS furnace
Fireplace plate design

A fireplace stove combines a combustion chamber, closed with glass ceramics, with an oven or hob, often with both together. In the lower part of the slab, there is most often an open or closed firewood rack, which greatly simplifies the task of storing fuel wood. Burners usually have removable rings - in case of cooking on an open fire. The oven of a fireplace stove is usually located at the top - in the above-furnace zone, and in stoves with a hob - next to the combustion chamber.


The firebox of the fireplace stove can be made of cast iron or high-temperature steel, and furerated from the inside with champon bricks, or cast-iron tiles - to improve the performance of the device. The same purpose is served by the “double afterburning” technology, which allows to lengthen the combustion process by re-igniting unburned wood residues.
The cladding of a kitchen wood-burning stove can be very different: from expensive majolica to polished steel or artificial / natural stone.
How to build a DIY site preparation
Before laying out such a structure in the house, you need to prepare:
- A special tile is laid on the floor in the place where the stove will stand. For better adhesion, you need to use a primer called Betokontakt. The first row of tiles is laid perfectly evenly, as the quality of the entire work depends on it. The grout is applied one day after laying.
- You can start facing the walls with special tiled tiles. For better adhesion, the same primer is used as in the first stage. Heat-resistant adhesive mastic is used. It is also necessary to apply the grout one day after laying the tiles in full.
- Let's start preparing the ceiling area. It is necessary to make a hole for the chimney so that its inner diameter matches the individual characteristics of the stove. A special flange must be screwed to the hole using self-tapping screws.
The construction of the furnace itself
The procedure is carried out taking into account the following algorithm:
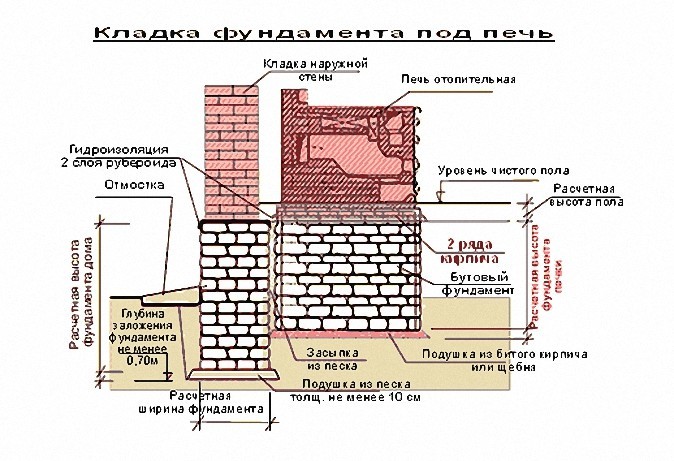
- The foundation is being laid. To do this, they find out how deep the freezing of soils in a certain area has. If the foundation is laid in an already finished house, the depth of the trench can reach half a meter. Measures are being taken to prevent freezing of the structure.
- The walls are being raised. It must be remembered that the dimensions of the blower must correspond to the dimensions of the furnace itself and ensure the supply of oxygen necessary for combustion. The grate should have a square shape and be installed at an angle to the firebox door.
- Final finishing is underway. If the owner is more concerned about the efficiency of the building than the appearance, he plasters the walls with a clay solution. After such treatment, a special mixture consisting of chalk, water and milk must be applied to the structure.
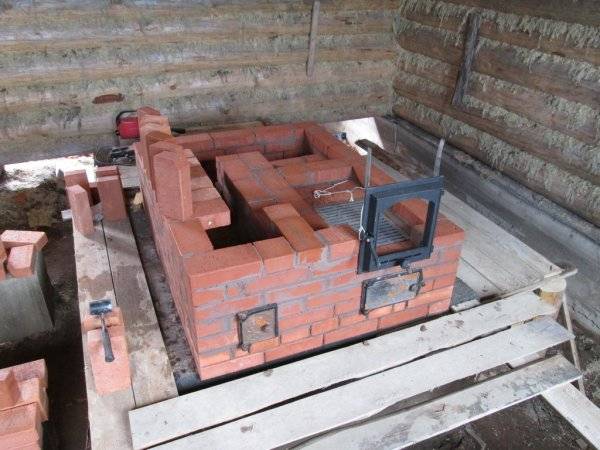
Photo 2. The process of building a brick oven. The image shows how the grate and the furnace door are installed.
If you follow the described algorithm, you can get an excellent stove that effectively heats the room.
Swede stove masonry

Masonry stove "Swede"
Swede is one of the most popular and most user-friendly stove options. The laying of such a stove is carried out in several simple steps.
Foundation scheme for a homemade Swede oven
First step. Prepare the brick for laying. To do this, just dip it in clean water and leave it there for about a day. The material will be saturated with moisture, and will not absorb it from the masonry mortar.
Second step. Prepare a mortar for masonry from clay, water and sifted sand. You should get a plastic homogeneous mixture. It takes about 20 liters of mortar to lay 100 bricks.
Third step. Lay out the starting row of bricks with a mandatory check of the perpendicularity of the corners, verticals and horizontals. The row must be continuous. For laying out the interior space, you can use a half brick.
Fourth step. Lay out the second row. This row should be the same as the first one.

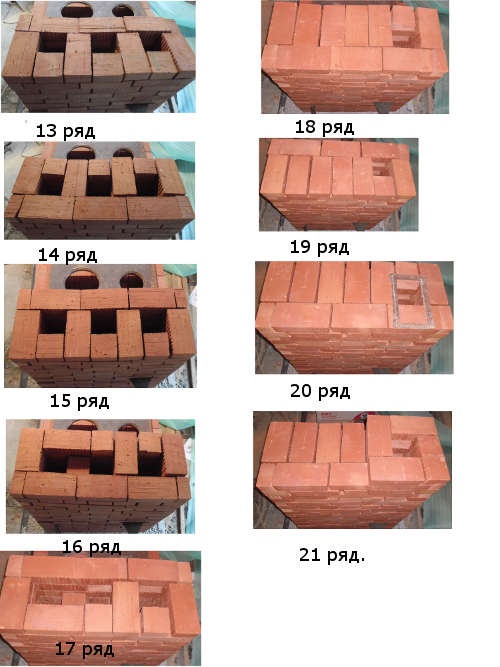
Swede oven ordering
Fifth step. Lay out the third and fourth rows. Start forming the ash pan compartment. Install a door for this chamber and three cleaning doors and one blower door. On the back of the stove, lay out the smoke turns. They must be vertical and communicate with the combustion chamber through a hole.
Sixth step. Install the grate and mount the oven chamber. Arrange the overlap of the blower door and cleaning holes.
Seventh step. Lay out rows 6 to 10. At this point, you should form the furnace compartment. Between the firebox and the oven, lay the bricks on edge. Install the walls of the combustion chamber and oven. Between them there should be a partition one row less than the height of the chamber.
After laying the 10th row, lay out the steel angle and cast iron tiles on the front side. Fasten the corner with wire and mortar.
Eighth step. Lay out row 11. At this stage, you should completely block the channel between the tile and the right wall.
Ninth step. Lay out rows 12 to 16. Form a brewhouse and three vertical flues. Lay out the chimney openings using fireclay bricks.
Tenth step. Lay out the 17th and 18th rows. Arrange the overlap of the cooking chamber.
Eleventh step. Lay out the 19th and 20th rows. At this stage, you need to place on the front of the stove the doors of two cleanings of the gas outlet channels.
Twelfth step. Lay out rows 21 to 28. Form the smoke channels in accordance with the chosen ordering scheme. Follow the correct dressing of the seams. When laying out the 27th row, install a chimney valve. Above it, leave a hole through which the gas ducts will be connected to the ventilation ducts.
Thirteenth step. Lay out rows 29-30. Shut off the top chimneys. At this stage, the masonry must be expanded by 50 mm around the perimeter. Due to this, a cornice will be formed.
Fourteenth step. Lay out the 31st row. At this stage, the dimensions of the overlap must be brought to the dimensions of the 27th row.
Fifteenth step. Lay out the 32nd row. At this stage, start laying out a chimney pipe measuring 130x250 mm.
Lay out the chimney of the required height, and your Swede type stove will be completely ready. In conclusion, it will remain to be lined with ceramics or painted.
Types of cast iron stove surfaces
Regardless of the configuration, all cast iron surfaces cope well with heat transfer functions and are suitable for cooking. The difference between a solid and prefabricated slab is the presence of thermal gaps between the elements, due to which the expansion of the metal when heated is compensated. You can understand in more detail the structure of the hobs by reading about each of them separately.
Prefabricated slabs
A prefabricated hob is a structure made of a cast iron surface and several rings that differ in diameter. They are inserted into each other and assembled into a single plane like a puzzle.
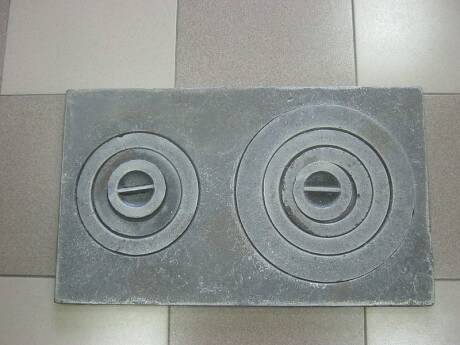 All prefabricated stoves can include from one to several burners, and thanks to the ability to remove and put on rings, you can choose the most suitable burner size for each specific dish.
This type of flooring is more durable and resistant to temperature fluctuations. Due to the presence of gaps between the rings, the metal can expand during heating without deformation or other damage. To give special strength, some boards are produced with additional stiffeners on the inside. A significant advantage of such an addition is an increase in the temperature of the hob, and, thus, an increase in the efficiency of the oven in cooking.
Solid slabs
A one-piece hob is presented in the form of a single sheet of metal, usually with 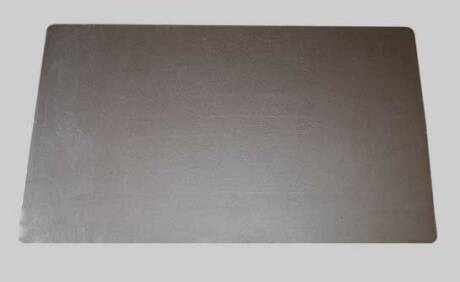 one or two burners with the same diameter. There are also blind stoves, which do not provide for the presence of burners.
This design of the oven stove has practically no thermal gaps, which makes it not as reliable and practical as the previous model. Due to the lack of free space during heating, deformation of the cast iron may occur.
However, an important advantage of solid slabs is ease of installation and loyal cost compared to prefabricated ones.
The main nuances when installing a cast-iron plate:
- In the manufacture of a furnace, it will be appropriate to compare the difference in the behavior of various materials under the influence of temperature. Metal and brick have different expansion, and during the heating process, the furnace may collapse. To prevent this from happening, it is necessary to provide gaps between the cast-iron plate and the brick surface up to 5 mm around the entire perimeter. Thus, the service life of the furnace can be significantly increased.
- A metal plate on the surface of the furnace is fixed with a liquid clay-asbestos solution. For its preparation, clay is mixed with crushed asbestos and by adding water, the solution is brought to the correct consistency (liquid sour cream).
- During the installation of the cast iron plate, it is imperative to control the process with a level. The largest burner is always placed above the firebox.
- To strengthen the structure of the furnace, the upper row of brickwork should be fixed with a steel corner around the perimeter.