The technology of laying laminate on a wooden floor
- After leveling, the floor surface is covered with a waterproofing film to protect wooden materials from decay, mold and mildew;
- Then a 3 mm thick substrate is installed. The substrate is made in strips of cork or polypropylene and mounted butt-to-butt, then fixed with construction tape or tape;
- The installation of the laminate is carried out from the window to the front door, starting from the corner. The first row is placed in the gap from the wall 8-10 mm from the walls, and a wedge is placed between the wall and the material. Such a gap is needed to compensate for the expansion of wooden plates during temperature or humidity changes;
- The first row is laid completely and starts with a whole panel. The second row starts half of the board. It also fits to the end. Thus, even rows start with whole panels, and odd rows start with half;
- If the “Click” lock is used, each next row is placed in the end lock to the previous one at an angle of 25 degrees. To do this, the last board of the first row must be cut;
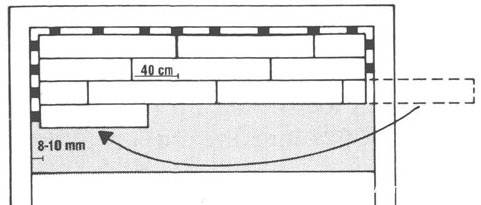
- Each next row of laminated panels is placed with a displacement of the joints of the previous one by 40 centimeters or more;
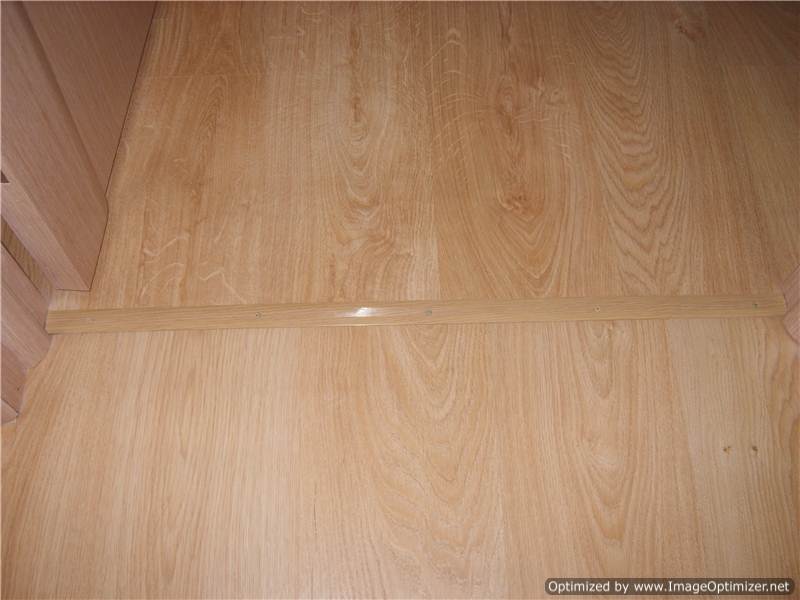
- After installing the laminate around the perimeter, the wedges are removed between the material and the wall, and then the plinth is installed.

Other selection options
 Everyone tries to choose a finish that will appeal to him personally. When making a purchase, we recommend that you consider the following nuances:
- There is a finish that imitates wood. A floor treated with such material is called traditional. In this case, the treated surface is smooth and even.
- The texture of a natural laminate has improved characteristics compared to a traditional product. Brightness and shine make the finish more like parquet. At the same time, such a solution has a lot of positive reviews, even from professionals.

To imitate wood finishes, a glossy laminate is often used. Keep in mind that after walking on such a surface, quite a lot of traces remain.
 To avoid errors during work, we recommend using the following recommendations:
- To ensure good strength, you need a completely flat floor. Since the cottage is not heated in winter, it is better to use a concrete screed for the foundation. Concrete has increased protection against moisture.
- It will be necessary to provide protection of the coating from moisture. For this, a substrate or film made of polyethylene is used. The best option would be waterproofing the floor using roofing material. It is also recommended to provide thermal insulation and seal the seams. Plywood under the laminate will be the perfect solution to all problems. It will even the surface, and prevent the deformation of the material under the influence of moisture.
- Laying laminate in the country is recommended to be done in a floating way. In this case, the distance from the wall should be greater than usual. This will compensate for dimensional changes at low temperatures. Check out this video for helpful styling tips:
 A wide variety of finishes quite often makes it difficult to choose.
To make a good purchase, first of all, decide on the goals that will be set for the laminate.
At the same time, keep in mind that the floor in the country should have increased strength and quality.
The desire to make a beautiful balcony, loggia, cottage is so natural. Why not bring beauty and comfort to such necessary premises? But the question arises: Is it possible to lay a laminate in an unheated room? The owners of suburban dacha buildings want to know the answer to this question. Many who have already ventured to lay a laminate floor in the country, share their experience, talk about the results. Some have been successful, while others have failed. What to do to get a good result?
What affects HDF quality
The structure of the board itself. It is also different: the wood is crushed either to the degree of dust, or to the fibers, then everything
it is glued together with a certain composition and pressed.
What is the fundamental difference?
A board that is made of wood dust is less stable to drops, since there are no connecting elements, except for the adhesive composition.
The one that is made from not completely recycled wood fibers is more stable, since in addition to the adhesive composition, it is held together by binder fibers.
What else affects HDF stability?
The stability of HDF board, when used in an unheated room, is affected by the type of wood that was used in its production. There are breeds that are more susceptible to changes, and there are less.
And the last point is the quality of the composition and the intensity of impregnation, which is responsible for the resistance to moisture.
But in most cases, a common person will not be able to find out all these points, since the manufacturer himself does not provide this information.
But again, it all depends on your perseverance, if you are persistent enough - then nothing is impossible, go to the manufacturer's website and send a letter with a request to provide you, as a consumer, with information.
Well, if you still couldn’t find out, and if you haven’t changed your mind about laying a laminate, for example, in an unheated cottage, and you want to minimize the likelihood of warping, etc., you need to exclude cheap options.
Since cheap laminate is made using the appropriate material, which does not always withstand under normal conditions, not to mention unheated conditions.
But even with the most expensive laminate, no one will give you a 100% guarantee, since all laminate manufacturers expect it to operate within certain temperature and humidity limits that correspond to normal home living conditions.
And in order to minimize losses in case of damage to the material from extreme conditions, you can take a cheap laminate, but you yourself understand that the likelihood of warping, swelling, etc. phenomena increases significantly.
In the end, you can follow a certain brand of laminate on various forums and find out how it behaves in certain conditions.
Pay special attention to the operating conditions - since this is a fundamental point that determines the margin of safety of the laminate. And the main thing in this case is a lot of patience!
And the main thing in this case is a lot of patience!
Before buying, nevertheless, try to find out more information about the likely consequences when using the laminate in an unheated room in order to avoid losing money.
Not one laminate, unfortunately, is not designed for negative temperatures.
It is possible that even more than one manufacturer has not conducted research in this direction, or so far they have been unsuccessful, since there is no frost-resistant laminate on sale.
Therefore, I think it is better to follow one brand: look for reviews, how he behaved in certain conditions. The more positive reviews, the more likely these reviews are true.
In summer tires, you don’t drive in winter (although someone manages to), and with a laminate - it also needs its own climate.
If you still haven't changed your mind about laying laminate in an unheated room
I wish you good luck and success in finding the strongest laminate!
Base leveling features
Before laying laminate flooring, you need to check the level of the floorboards. A small difference in height can be removed in two ways:
- Cycling. After this procedure, be sure to check the level with the help of special devices.
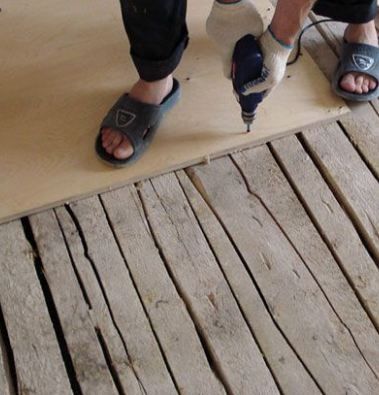
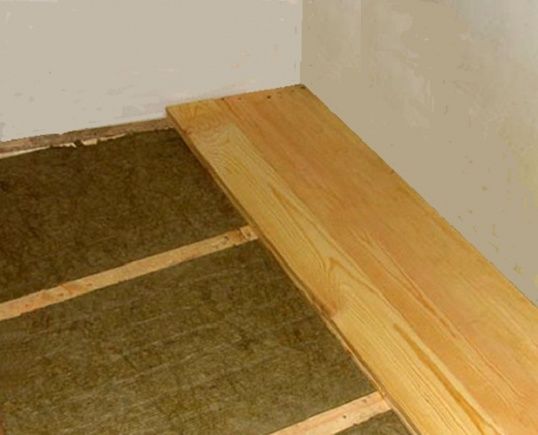
- Plywood laying. This alignment method is the easiest, but everything needs to be done correctly. First you need to level the subfloor. To do this, wooden wedges should be placed under the logs. In some cases, plastic elements can be used.Laying plywood is necessary, constantly controlling its horizontal position. If necessary, rails can be placed under this material.
Sheets of plywood are attached to the base so that the seams converge in different places.
You need to fix this material with self-tapping screws every 15 centimeters. This is necessary so that the plywood sheets fit snugly to the base.
In the photo, the process of installing plywood on a wooden base
Pay attention to the location of the seams between the sheets
The material should be laid, taking into account the technological gap between it and the walls. The fact is that wooden elements can expand and contract under the influence of temperature and moisture. Try to keep the seams as small as possible along the boards. In order for plywood sheets not to be exposed to fungal formations, they must be well treated with antiseptic agents or drying oil.
After completing the work, you need to vacuum the floor well. Otherwise, the remaining dust may cause squeaking after the laminate is laid.
Preparation of the subfloor in the country
The floors in the apartment never experience stress in the form of prolonged exposure to temperatures below -15 degrees. This should be taken into account so that in the future the coating does not deform or bend.
- The first and rather responsible step is to dismantle the old coating. All boards with a defect in the form of partial destruction or decay are subject to mandatory replacement. A frivolous attitude to this measure will require the replacement of the laminate in a couple of years. P
- Before proceeding to laying laminate flooring, the floors need to be leveled. Sheets of chipboard or plywood are laid on the floorboards. To derive an accurate level, laying several layers of sheets is allowed.
- Fastening plywood is effectively carried out using stainless steel self-tapping screws. They have a number of advantages over conventional nails. The screw thread secures the plywood tightly, preventing it from loosening. Rust resistance helps protect the plywood itself from further damage.
- A huge number of microorganisms wishing to taste a new floor can only be stopped by a high-quality substrate. She also has to protect the new coating from infections that occur on a wooden base. It is enough for owners of country houses with concrete floors to fill in a sand-cement screed.
The second option is to lay the laminate on the glue
The classic system for fastening laminated panels using click and lock systems fails in this case. At the dacha, it is successfully replaced by joining panels using glue. The special mixture is immune to moisture, providing reliable protection for the ends of the product. As a result, the structure retains its original shape even under a plentiful puddle.
The use of glue also has its disadvantages. Temperature fluctuations can destroy the structure of the adhesive, causing its destruction.
As soon as the glue cracks, the laminate will be able to move freely on the floor, remaining completely defenseless against an aggressive environment. The choice between expensive moisture-resistant material or glue always remains with the owner of the country house.
An unheated room dictates its own rules for laying laminate. Long-term operation can only be ensured by the presence of a flat surface and a special substrate. Otherwise, the owners will be able to enjoy their beautiful sex only for a few months.
Laminate flooring
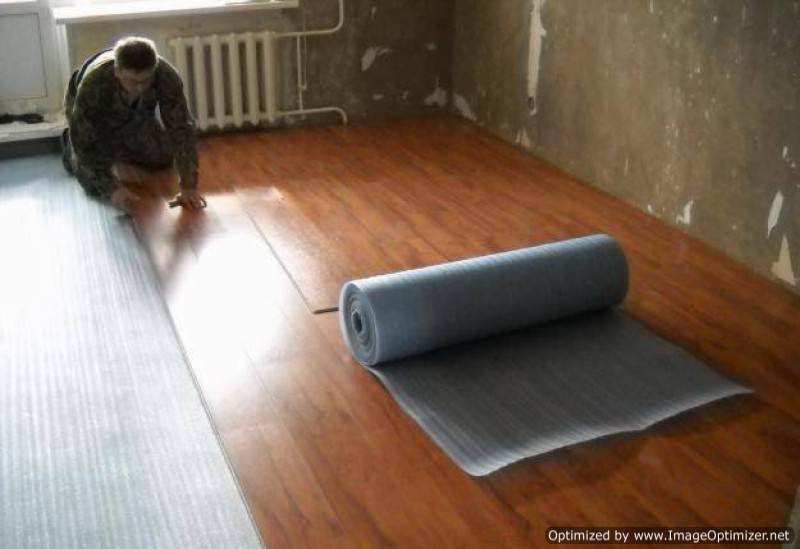
Laying a laminate floor begins with the laying of a soft polyethylene underlay that compensates for small imperfections in the wooden subfloor.
Laminate can be laid not only on a wooden floor, but also on a cement screed, but in this article we will briefly mention that the very structure of the wooden floor on which you intend to lay the laminate must be even. Therefore, the best substrate for laminate flooring is plywood, chipboard or OSB.
The substrate not only compensates for small errors (from 1-3 mm), but also performs the function of a vapor and waterproofing layer.
Laying the floor with laminate is done in the following sequence:
- first, the substrate spreads over the entire area of \u200b\u200bthe room. To do this, strips are cut from wall to wall with a slight approach to the walls. The strips of the base must be connected to each other in the longitudinal seams with adhesive tape, at least so that they do not move, do not warp, do not bubble during the installation of the laminate.
- along the longitudinal wall of the room it is necessary to lay the first dice of the laminate just to estimate the pattern (may not match) and to decide which side the lock will be on the longitudinal sides of the dice of the laminate
- joints in the end and longitudinal joints (any) are recommended to be additionally glued with a special sealant for laminate in order for the joints to last longer. Since the base of the laminate is fiberboard-shnaya, if water gets in, the joints will swell if they are not sealed.
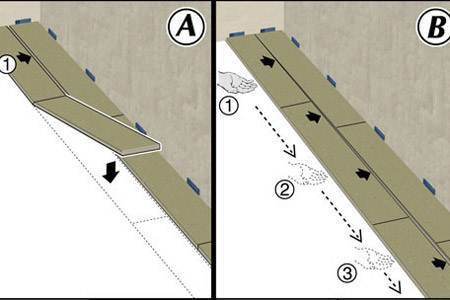
- in the first row, only the ends of the laminate dies need to be connected. The last board is cut and mounted in place
- the next assembled row of interconnected laminate boards at the ends (do not forget to coat with sealant) must be inserted along the entire longitudinal side into the previous row of laminate. This will require additional hands. With a room length of 4.8 m, four hands are enough. This moment is the most crucial: you need to manage to drive all the laminate boards into the longitudinal groove at once (we had 3.5 laminate boards in a row) and knock them down with the previous row so that there is not a single small crack and so that the picture is solid without a single gap
- do not forget to assemble the strips from the laminate so that the laminate boards (dice) in each row are staggered.
- Further, all actions are repeated according to the above scenario until the entire room is filled with rows of laminate
- the last row, extreme to the opposite wall of the room, is unlikely to converge along the width of the board. Therefore, you will have to cut all the boards of this row along the width that turned out in the remainder, minus 2 cm, which will then go under the plinth
How to lay a laminate with your own hands
In principle, the technology described above, just, was from a series of how to lay a laminate with your own hands. You probably noticed that it was described in your own words, as it is and as you could.
I just want to talk about a couple of chips that we thought of during the installation process.
At first they suffered for a long time when they joined the second row with the first. Somewhere the end joints did not converge (there is a millimeter gap), somewhere they just don’t want to enter the laminate boards into the longitudinal grooves. and those who invented it). However, from the fourth row, things went like clockwork.
Some recommendations on how to lay a laminate with your own hands:
-
In order to evenly, up to a millimeter (along the width of the laminate board), connect two laminate dies to each other, you just need to apply a level (even bar, etc.) to the joint from the longitudinal side and press the end joint to the level. A millimeter mismatch in the end connection is not you can see with your eyes until you start connecting the rows together and then you have to level them, disconnecting the longitudinal joint several times. And this is what you need?! It’s easier to just make end joints right away.
-
When joining two rows along the longitudinal groove, DO NOT hit with a hammer on a bar or book on the outside of the laminate board. With such rough work, not only is the thin fiberboard layer on the board itself damaged at the groove, but also the laminate substrate when you miss. It is better to use a thin (2mm) metal strip, which is convenient to simply insert into the groove and hit once so that the laminate board snaps into place and a tight joint is obtained. become simple and easy.
- from the walls you need to leave 1-2 cm for the expansion of the material and in order to fit into the dimensions with the errors of the wall itself, which can be crooked-oblique. These gaps will then be closed with a plinth.It is better to determine in advance how crooked your walls are, in order to at least by eye determine where it is better to start laying, in order to less bother with such shortcomings and inconveniences as crooked walls.
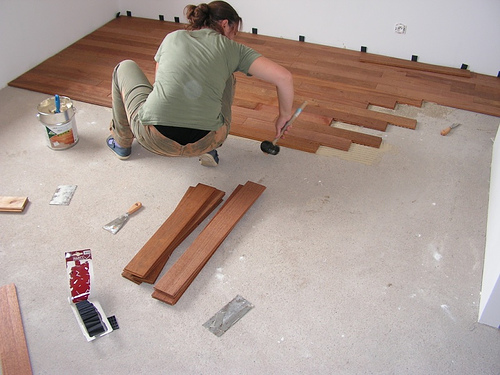
In the process of laying laminate on a wooden floor, sawing work will be required:
- cut off part of the board in order to lay out the joints in a checkerboard pattern. Such a segment is still obtained due to the non-standard length of the rooms. For example, the length of each plate (board) of the laminate is 1.39 m (1.38 m clean), and the room is 4.8 m long. Three solid boards and another piece 0.48 m long will fit in a row. In this case, a cross cut is required.
- longitudinal cuts will be required in the last row, when it turns out that there is 100mm of floor left against the wall, and the width of the laminate is 200mm.
Sawing is best done with an electric jigsaw, having previously measured the desired size and drawn a line with a pencil. Set the jigsaw to a low speed so that it runs smoothly.
Laying laminate on a wooden floor is easily done by hand. Even if you have never encountered such work, then there is nothing wrong with it: the eyes are afraid, but the hands are doing.

Rules for laying laminate
First of all, you need to read the rules for laying the laminate, which are indicated in the instructions that came with the boxes of the material you purchased. From there you can find out what kind of locks you have and what is the best way to connect laminate boards to each other.
Our laminated boxes had the following instructions:
 When laying laminate flooring, it is better to follow the instructions from the manufacturer.
Please note that according to the instructions, it is recommended to first assemble the first longitudinal strip along the length of the room, and then attach a second solid (for the entire length of the room) strip of laminate dies assembled in advance to it. And if the room is not 4.8m, like ours, but all 6m or 8m?
And if the room is not 4.8m, like ours, but all 6m or 8m?
We tried to attach a pair of laminate dies separately to the first longitudinal strip in the room, but the lock is such that when the last dies are inserted, the second one does not fit into the longitudinal seam. We decided not to invent anything and act according to the instructions. It's more reliable that way.
Stele flooring
It is easier, faster and “safer” for the material to work with a power tool. In this case, it is a jigsaw and a hacksaw. The lack of ownership of such a tool is easily solved with the help of companies offering it for rent.
- Before starting work, make sure that you have all the necessary tools and materials. You will definitely need a tape measure and a hammer.
- Considering that cold temperatures lead to the expansion of the laminate, special wall wedges should be used during installation.
- You should also pre-purchase wax that matches the color of the laminated panels. It is not always possible to avoid scratches or chips, and after waxing, the damaged areas are indistinguishable from the rest.
- To start work, the corner next to the interior door is not suitable. Correctly lay in the direction of the sun.
- The first panel is laid on the substrate to the corner. The second panel is applied in accordance with the selected fastening system.
- For click, you need to maintain an angle of 20 degrees, applying slight pressure, and for lock, you need a right angle with the installation with a bar and hammer (as in the photo).
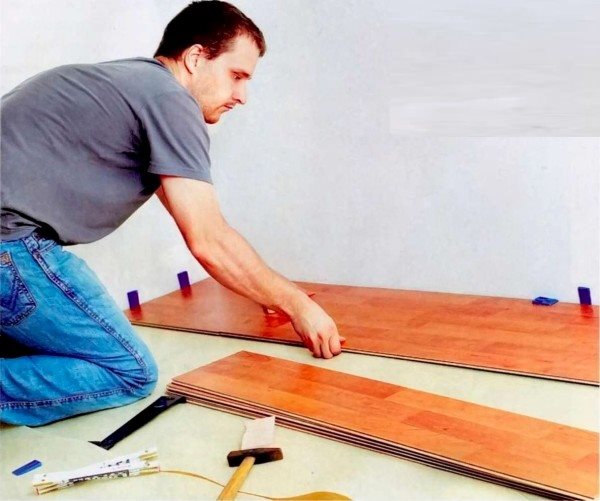
In the absence of a special bar, the ends can be pierced with any rectangular object without sharp edges. After the first row is laid out, the last panel is cut to the required size, and the remaining part gives rise to the second row.
Laying laminate near the wall at the last stage requires special care, because the panels have to be cut along.
Laminate for giving the possibility of laying in an unheated house School floor
- Choice of laminate
- Mounting technology
- Conclusion
Now the price of a laminate for a summer residence with a simple design and a low wear resistance class is much cheaper than all other coatings.According to sales in large hardware stores, you can buy it for only 150-200 rubles per square meter, which is comparable to the cheapest linoleum. But is it possible to lay laminate in a country house where there is no heating in winter?
Let's figure it out in this article.
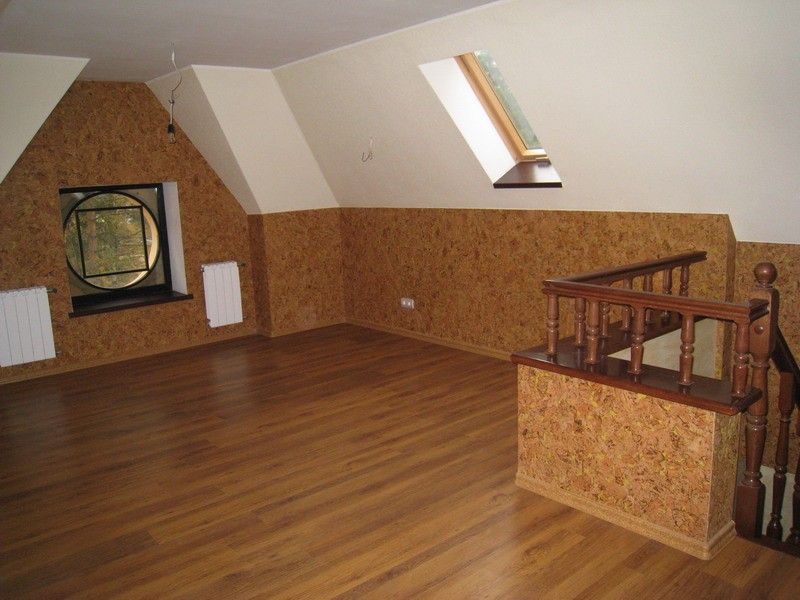
Laminate floors in a country house
Choice of laminate
When choosing a floor covering for a country house, the main criterion is its cost, simplicity and speed of installation.
Laminate in a wooden house in the photo
Laminate greatly benefits in appearance, ease of installation and delivery. Its disadvantage is a constant cold surface, even in the warm season with insulation on it it will be cool to stand barefoot.
Advice! For summer cottages, it is advisable to take only types of economy class 31-32 strength classes, or disassemble the old coating in the apartment.
The locking system allows you to reuse the laminate in different rooms.
In fact, manufacturers do not recommend laying laminate flooring at temperatures below 18 degrees and humidity over 70 degrees. Therefore, in case of violation of technical requirements, the warranty will not be valid.
Possible defects due to swelling or uneven base
However, in practice, laminate flooring in an unheated house can last from 3 to 10 years, if there is no excessive humidity and sudden temperature changes in winter.
If you want to get a high-quality and durable coating, then choose solid larch floors, it is not afraid of moisture, and after varnishing the floor it will have a very beautiful appearance. But this option will cost 3 times more.
Seam sealing
Sealant for laminate
If you are going to lay a laminate for medium and premium cottages, you should know that many manufacturers apply a layer of wax to the locks at the factory. This protects the joints from moisture penetration from below and from above.
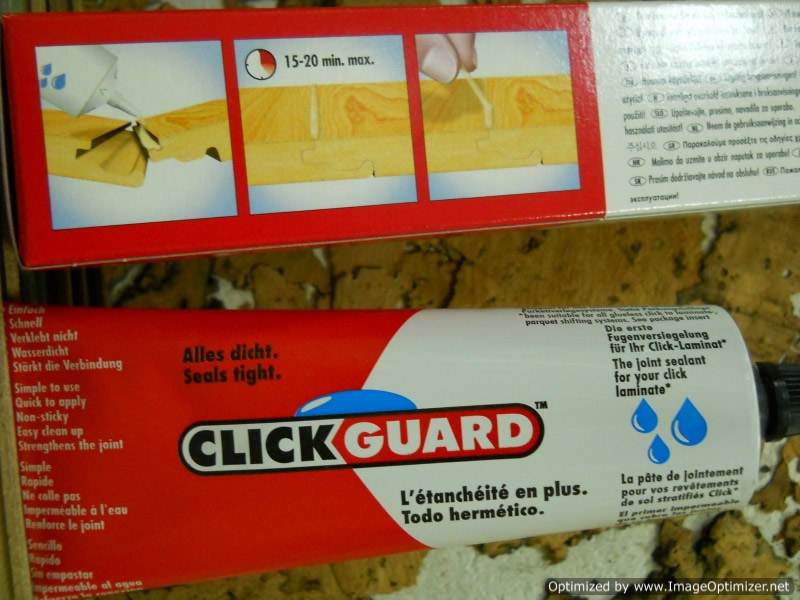
Please note! The presence of a wax layer does not negate the use of a base vapor barrier. If the joints are not processed in any way, then it is worth buying separately a special water-repellent Click Guard sealant, and manually process each end before connecting
If the joints are not processed in any way, then it is worth buying a special Click Guard water-repellent sealant separately, and manually process each end before connecting.
If, in addition to this, a waterproof backing is used in the laminate, then you can significantly increase its use in harsh environments.
Conclusion
Using laminate for summer cottages is a rather risky business, but if you are not afraid of possible damage to materials or there is a surplus, then it is quite possible to use it as a temporary coating. To increase its service life, try to avoid sudden changes in temperature in the house and protect it from moisture.
Mounting technology

- In order to reduce humidity, it is imperative to lay waterproofing made of polyethylene film on the floor before starting work. It should be laid overlapping each other and on the walls. Joints are sealed with adhesive tape.
- Lay the underlay on the floor "butt to joint" and fix it with adhesive tape.
- Laminate in the country must be laid with the maximum possible temperature gap against walls and other obstacles. During a change in humidity, it will greatly change its linear dimensions, so it should have enough space for free floating on the substrate.
- Rooms must be separated from each other by a gap with a threshold.
- The standard wedges that come with the kit are not suitable for installing laminate, as they make a gap of only 10 mm.
- You can make limiters of the same thickness of 20 mm with your own hands from scraps of plywood or old boards. Such a gap will be enough, and a plastic plinth can hide it.
- The first row is assembled in the usual way, by joining panels using locks. The last panel in the row is trimmed to the required clearance.
The second row begins to be laid with trimming, to offset the joints. They must move at least 30 cm.
- First, the second row is completely assembled, and then it is connected to the first.
- Before joining the panels, it is necessary to coat the locks with a special glue-sealant for laminate. It is simply evenly applied from the tube to the end and the panels are pressed against each other. The excess must then be removed with a clean cloth before it dries.
- The last row is cut to width and joined in the usual way. To simplify this process, you can use a special Z-shaped clamp.
The instructions in this video will show you how to lay the laminate in the country.
Seam sealing
If you are going to lay a laminate for medium and premium cottages, you should know that many manufacturers apply a layer of wax to the locks at the factory. This protects the joints from moisture penetration from below and from above.
If the joints are not processed in any way, then it is worth buying a special Click Guard water-repellent sealant separately, and manually process each end before connecting.
If, in addition to this, a waterproof backing is used in the laminate, then you can significantly increase its use in harsh environments.