How to carefully remove drywall tiles and its pitfalls
In most cases, the question of how to remove tiles from drywall is rather difficult to solve - it would be more accurate to say that it is not solved at all. The glue adheres to its surface so firmly that drywall also deteriorates with it. If we talk about one or more tiles, then this is still fixable - after removing the glue, the damaged section of drywall is cut out and replaced with a new one. But what if we are talking about replacing all the tiles in the bathroom, laid on drywall? Here it remains only to hope for luck and not very responsible masters.
In any case, you need to try - the method is the same as described above. A chisel is driven between the glue and the tile, and the tile, in theory, should fly off by itself. If not, then you will have to gnaw it out along with the plaster. At the end of the dismantling work, you will have to assess the damage caused to the drywall and decide what to do with it. It might make sense to replace it with a new one. The rest of the glue on drywall can also play a role here - of course, you can remove it, but this process is quite laborious. In fact, it will not have to be removed, but gradually cleaned off with the help of special attachments for the angle grinder.
And this must be done very carefully.
How to remove tiles from drywall photo
If the tile was laid on drywall under a comb, then the old glue can be left - in this situation, the walls are primed and covered with a thin layer of mortar, which will hide the irregularities left by a notched trowel
Particular attention with this approach to business should be paid to the strength of the old adhesive - if it crumbles or does not hold well, then the risk that the new tile will not last long is very high
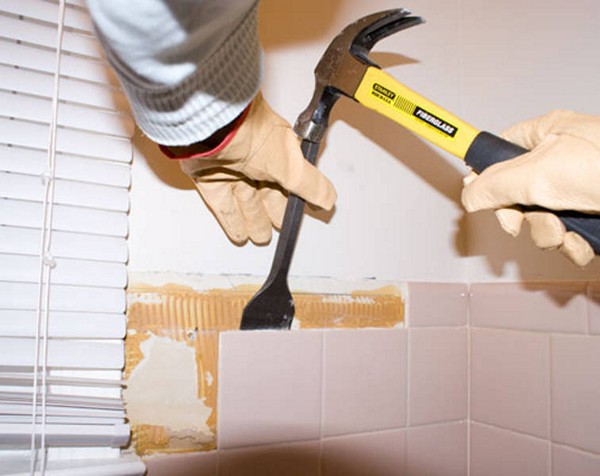
At the end of this topic, consider the question of how to remove glue from a tile? Here you can go in two ways - easy and difficult. In one situation, when it comes to just a few tiles, the problem can be solved with a hammer and a chisel, and in another case, when it becomes necessary to clean a large amount of tiles, it is better to use a special grinder attachment. In the case of a hammer and a chisel, it is better to pre-soak the tile in water for at least 20 minutes, and it is better to immerse it in liquid overnight - after such water procedures, it will be much easier to separate. As for the nozzle for the grinder, it is better not to use it at home, since this work is very dusty. In any case, you will need to purchase a respirator, goggles to protect your eyes and, of course, gloves that will protect your hands from damage.
How to remove old bathroom tiles
Finally, a few words about how to remove the old tiles in the bathroom in a single copy - I hope you have already understood that such a trick cannot be performed accurately. Even if you manage to remove the desired tile intact, then you will definitely damage the neighboring one - you may not crack it, but chips are guaranteed in such situations!
To do this, you first need to clean the seams - either a screwdriver or a special knife with interchangeable diamond blades will do. When the seam is cleaned, the tile is carefully picked with a chisel or chisel, while it is better to wrap the tool with electrical tape so that the metal does not chip on the adjacent tile. In any case, when performing a single tile replacement, make sure that there is something to replace another tile with.
This is how things stand with the question of how to remove the tiles from the wall. The extent to which you succeed in this fully depends on your skill and, of course, on the quality of its styling and other factors mentioned above.
Tiles ready to be replaced
After several holes have been made in the tile and the tile has become covered with small deep cracks, cover it with a rag and hit it several times with a hammer.
The remains of the tile are removed with an old knife or chisel. Perform all actions without applying great force and slowly, otherwise there is a risk of damaging adjacent tiles. If some fragments do not give in, they are broken into smaller ones - by the same method.
After removing the damaged tiles, you still need to clean the place of the old adhesive. This is done with a hammer and chisel (also keeping accuracy). Next, the place is thoroughly cleaned of dirt and dust. Before inserting a new tile, it is necessary to moisten the place so that the mineral surface of the wall does not draw moisture from the mortar. For the same reason, a new tile should lie in the water for some time.
Removing a few tiles
In some cases, you can do without removing several tiles: cracked or those whose coating has been damaged for some reason.
How to remove old tiles from the walls of the bathroom so as not to damage the rest, which does not need to be removed?
First of all, we break one of the upper tiles with a hammer, because it is better to remove it from top to bottom so that the upper tiles have some kind of support: otherwise, a whole layer of tiles may fall on your feet.
After that, we take a chisel, drive it between the tile and glue (cement or other) and try to separate the tile from the wall. If the tile does not move when struck, it is highly likely that it will burst soon. In this case, you need to try to pick it up from the other side, and if this does not lead to success, then come to terms with the fact that the tile will crack.
By the way, the same technology is used to dismantle the entire wall covering if you want to keep the tile intact and use it somewhere else.
Removing all old coating
This is a dirty job, but it can be done quickly enough, the main thing is not to damage the base on which the tile was laid, otherwise you will have to level the walls.
First, check how strong the cement mortar on which the tile is held is (and before it was laid on it).
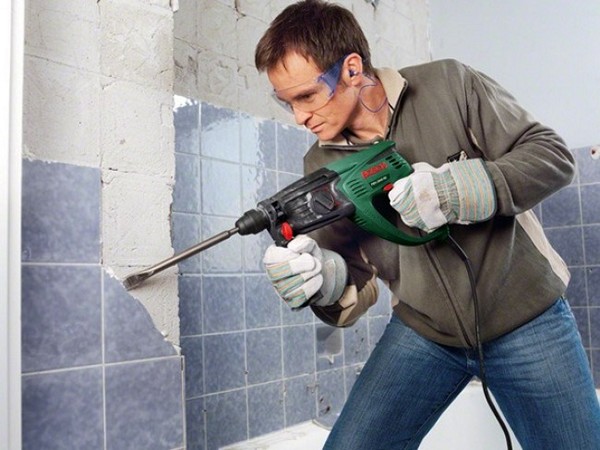
You can just take a puncher and remove everything quickly enough, but in this case there is a high probability of damage to the base.
A man removes tiles with just such a perforator
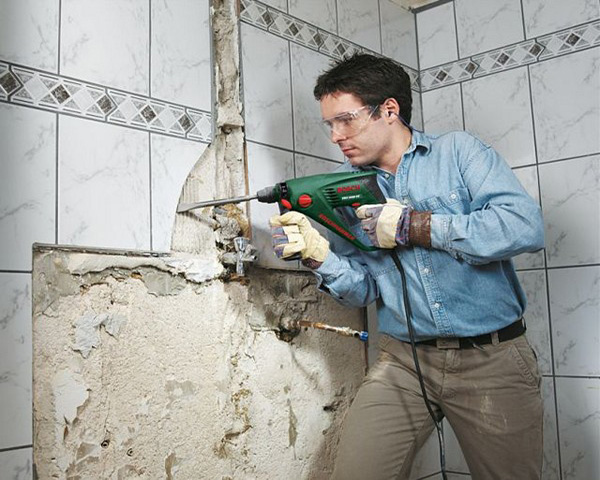
In this case, it is better to use a special puncher of a weight category of 3-4 kg, moreover, with smooth adjustment of the impact force and with a low level of vibration. This allows you to remove the entire tile while keeping the surface underneath.
If the coating has been applied with adhesive over well-prepared walls, an electric scraper can be used with a special thin steel spatula.
To determine whether it is possible to remove the tile carefully, you can tap the walls. If some of the tiles are "bumping", then they can be detached easily, and perhaps this will make it easier to remove the other tile. If there are large voids, be especially careful, as such a tile can lag behind and even collapse in layers.
If the tile was not properly aligned vertically or the neighbors heated you repeatedly, be prepared for the fact that it is unlikely that it will be possible to carefully remove it without damaging the base.
You can see the video instruction for removing the old tile in the video clip below.
We would be grateful if you click on the social media buttons below.
What is required for this job
For local repair of tiles, it is recommended to use ready-made adhesive mastic
. It is much more convenient than a dry mixture, which must be diluted in water, strictly observing the proportions. Moreover, when you knead a small amount of a dry mixture, it is very difficult to achieve the required consistency, especially if there is no experience in this matter. A mixture that is too thick or too thin simply won't hold the tile.
.
Keep in mind that mastic is an expensive pleasure, and just because you need very little of it, this will not be a disaster for you. In addition to mastic, you will need grout - exactly the same as on the wall being repaired, plastic crosses and some tools: spatulas, chisel, hammer, sponge and building level
.
Replacing cracked tiles
Take a new tile, attach it to the prepared place, check with a building level or ruler. If the tile is uneven, remove any spots or elevations that prevent the tile from adhering to the wall.
Before laying a new tile on the floor surface, it should be vacuumed and treated with an acrylic primer.
Ceramic tiles with glue applied to it are applied to the wall and are easily pressed down. Plastic crosses are inserted into the inter-joint space. Aligning tiles is best done with pressure or a rubber mallet, the main thing is not to overdo it.
Replacing cracked tiles is completed by applying grout and.
Getting started with tile replacement
Before replacing the tiles on the wall (read this about replacing the floor tiles), you need to scrape off the old grout around the damaged tiles.
But you need to do this very carefully - otherwise you can damage neighboring tiles.
Then we proceed to the most important task - removing the damaged module
Here I want to warn you that even if in tiles have deep cracks
do not try to immediately release it or pry it with a chisel. The adhesive still holds the tile tightly - this grip needs to be loosened. For this you can drill a few holes in the tile
drill with a special drill for stone. And so that during drilling the drill does not jump to the adjacent tile mark the drilling locations with a center punch
.
A chisel and a hammer into the "teeth", and let's beat off the tile - but only carefully - somewhere with confident filigree movements (in the center of the area to be replaced), somewhere gently and very carefully (at the edges where the tile adjoins the adjacent one, which does not require substitutions)
Replacing one damaged tile without removing the entire coating
In the modern world of finishing materials, the finishing of both vertical and horizontal surfaces with tiles is widely used. She looks great on the floor. This is a very simple and effective way to give a well-groomed appearance to both the bathroom and the kitchen, and even the hallway. But, unfortunately, there are life situations in which one of the tiles deteriorates. Many people believe that for replacement work it is necessary to remove all the coating and re-lay. Do not worry and despair.
As a rule, most of the tiles laid on the floor deteriorate. Moreover, tiles can crack from a light blow of a metal object much easier than other types of tiles.
And if you have the aforementioned type on the floor, then you need to be more careful about the floor and avoid situations in which the tile may be hit by a heavy object. Well, if all this happened, then you should not be upset because there are no hopeless situations
If there is a need to replace ceramic or tile, use the recommendations below.
Expert Answer: Procedure
So, we present you a step-by-step description of the workflow that helps to replace one cracked tile with a new one.
- It is necessary to remove the damaged tile. To do this, using a metal tool, we break it into small parts, which we then pull out and remove, cleaning the resulting hole. It should be noted that tile is much easier to remove than ceramic. The latter is almost impossible to break. To do this, you can use a drill and a drill. With the help of a drill, holes are made and the tile is already broken through them.Do not forget to also use a clerical knife to remove particles of grout on all four sides of the formed niche.
- After removing the debris, try to remove any remaining adhesive on the floor or on the wall.
- Then a new tile is tried on, which must be placed in place of the removed one. If everything looks like, proceed to the next stage of work.
- In a special container, dilute a small amount of special tile adhesive according to the instructions on the package. Then the finished composition must be applied with a notched trowel to the inner surface of the new tile. And without delay to place on the prepared place.
- Next, you need to use special plastic crosses that are placed on the four sides of the installed part of the canvas. It is necessary to give time during the day for complete drying of the replaced part.
- The next step is to remove the plastic crosses from the seams. They must be removed five hours after laying, while the adhesive is still wet. It should be noted that if there are no crosses at hand, and you don’t want to buy the whole package for the sake of four pieces, then they can be replaced with ordinary matches, from which the sulfuric head is first broken off.
- The resulting seams are grouted using a special grout, which must be matched in color so that it matches the color of the rest of the grout. In the event that your repair was made not so long ago, you should look for the remaining grout and use it to finish the resulting seam.
- Excess dried grout is washed off the tiles with a damp sponge after a day. For these works, a new sponge for washing dishes or a damp soft cloth is suitable.
If you accidentally broke the tile or it cracked from natural causes, then you do not need to completely change the tiling.
With the help of simple manipulations, you can independently remove the damaged piece. And then replace it with a new one with the same color and texture. In addition, the work is so simple that there is no need to call the master at home and spend money, paying for the services rendered. Everything can be done independently and in the shortest possible time.
Display all materials with a tag:
Go to section:
vopros-remont.ru
Grouting tiles
The last step in replacing tiles is. After the mastic has completely hardened, the crosses are removed, and the grout mass is placed in the inter-tile gaps and rubbed rubber spatula
(a metal spatula can scratch the enamel of the tile). The remains of the grout are not removed immediately, but after 20-30 minutes, when moisture begins to evaporate from it. A slightly dried mixture is easier to remove with a damp sponge. Finally, you can walk over the entire surface with a soft cloth.
Well, now you know how to change the damaged tiles in the bathroom, and if you do everything as written above, then even the most picky inspector will not notice the place of replacement.
If, by chance, the floor tiles were damaged, then you should not immediately panic, especially if you have spare modules left after the repair. We will tell you how to replace one tile on the floor, even without experience with this material. Even if there is no spare tile, you can go to the store and buy the most suitable analogue in color. In most hardware stores, it is possible to buy only one unit of material.
Tools and supplies for work
In order for the work to be done quickly and efficiently, you need to immediately prepare tools and supplies that can be folded side by side on a thick cloth or cardboard so as not to scratch the surface. We will need:
- Chisel with a flat and wide blade for chipping off tiles or a chisel;
- Rubber spatula for grouting;
- Notched trowel for applying adhesive to tiles;
- Deep penetration primer;
- Hammer;
- Grout for seams;
Important. Before replacing broken tiles on the floor, be sure to protect your eyes with special goggles and wear thick gloves, as the fragments can have sharp edges and cut your hands
If you do not have dry tile adhesive, then it is better to purchase a ready-made mixture in a sealed package from the store, these are specially sold in case of replacing one or more tiles.
You will also need grout of the same color, and if the replacement is done in the bathroom, then most likely white or transparent silicone was used instead of grout. It will not be superfluous to prepare dividing plastic crosses in order to withstand the thickness of the seam when laying a new tile. In extreme cases, you can use matches, paste from a pen, or another object of similar thickness to center the tile.
Removing a damaged tile
Since a damaged tile is no longer of value, it makes no sense to stand on ceremony with it. Before you replace 1 tile on the floor, you must first clean the seams from the old grout to the base. After cleaning, if the tile is not glued well, then you can try to lightly tap with a hammer on different places of the tile and it will fall behind, if not, you will have to break the module into several small parts using a hammer and chisel. To do this, put a chisel in the center of the tile and hit with a hammer to crack the tile.
Important. Before replacing cracked tiles on the floor, it is recommended to seal the edges of adjacent tiles with masking tape in several layers.
This will help avoid scratches from splinters. Before splitting the tiles, insert a few matches into the cleaned seams around the perimeter, this will soften the blow to adjacent tiles. In order to avoid scattering of fragments, you can cover the damaged tile with a rag before hitting it with a chisel.
It is advisable to break the tile into as many pieces as possible. After the tile has split, carefully remove one of the pieces that has fallen behind the adhesive. Remove all the rest with a chisel, inserting it between the floor and the tile.
Laying new tiles
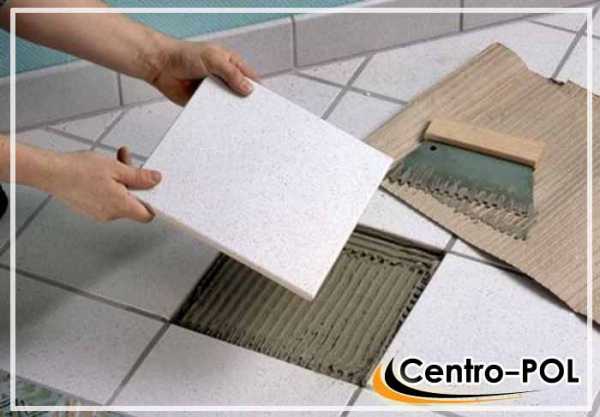
Before replacing the tile on the floor with a new one, it is necessary to completely clean the floor surface from adhesive residues and other irregularities with a chisel. Remove all dust with a vacuum cleaner and apply several coats of primer. Then, with a notched trowel, apply a new layer of adhesive to the floor surface and lay a new tile with equal gaps around the perimeter.
Make sure that the new tile does not stand out from the rest in height. If the tile is higher than the rest, then take a flat block of wood, lay it on a new tile and lightly tap with a hammer. To align the tiles horizontally, it is advisable to use the level. Then wait a few hours for the glue to set and apply the grout with a rubber spatula.
From the material, we learned how to replace cracked tiles on the floor on our own, and to consolidate the material, we recommend watching a video on the topic.

centro-pol.ru