Electric floor features and installation
Electric underfloor heating in the bathroom is a relatively modern type of heating. Unlike a water floor, an electric one is much easier to install and operate. Its advantages include:
- Easy installation. Laying a warm floor in a bathroom is much easier than a water floor. Preparatory work is minimal.
- Uniform heating. Due to the use of a cable, the entire surface of the floor will have the same temperature.
- No need for permits. Installation of an electric floor is not considered redevelopment.
- Price. The purchase of components and building materials will be much cheaper compared to water floors.
Despite the impressive list of advantages, the electric floor has its drawbacks:
- Communal payments. Eating from a common network, such a floor consumes a lot of energy.
- The need to conduct a separate branch of the electricity supply. This type of floor requires a certain voltage in the network.
- Restriction on the location of furniture. If it is planned to place a closet in the bathroom, then it should be noted that it will be subjected to intense exposure to sufficiently high temperatures.
In addition, many people have concerns about whether it is safe to install electric underfloor heating in the bathroom. Yes, it is absolutely safe, since the electrical cable is hidden under a layer of screed and will not have direct contact with water or with a person.
Installation of a warm floor in the bathroom begins with a separate power branch. It is to it that an electric cable and a thermostat will later be attached, with the help of which it will be possible to accurately regulate the temperature. A heat-insulating material is laid on the surface, due to which it is possible to avoid heat loss and direct it in the right direction.
After that, using a special mounting grid, the cable itself is attached. In this case, the angle of inflection does not affect the efficiency of the system. The final stage consists in pouring the screed and laying the floor covering.
Floor heating in the shower room
In the room where the shower is located, it is convenient to use both a cable in a coupler and heating mats. The latter are easier to install, since they do not need to be filled with a screed, and the cable itself is already attached to the grid, which just needs to be glued to the floor. Please note that the heating mats are only used for additional heating and are not used for main heating.
The power of the system is also 150-180 W/sq.m. The cable quality requirements are the same as in the case of a shower: double insulation and moisture protection. The system does not fit under a shower cabin with a tray, as well as under a washing machine, bathtub and other heavy stationary objects.
For installation in the shower room, you can use all brands of underfloor heating Energy, including heating mats Energy Mat and
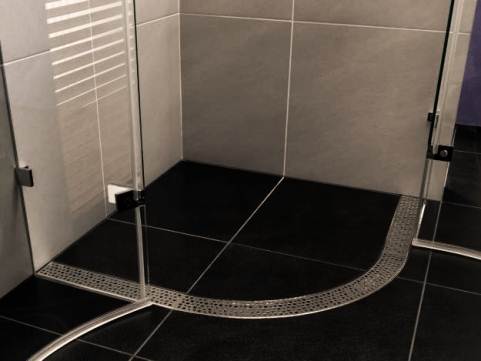
Due to the rather cramped bathrooms provided by developers from the times of the USSR, many apartment owners in high-rise buildings change baths for showers. There is more space in the bathroom, and an elegant shower cabin fits into modern interiors much better than an old bathtub.
When planning to install equipment of this type, you will certainly encounter the problem of installing it. Therefore, many home craftsmen are interested in installing the floor in the shower, because installing such a system with your own hands means saving a significant amount of money on the services of specialists. Below we will talk about how to arrange a shower on the floor.
Preparation of the base for laying tile material
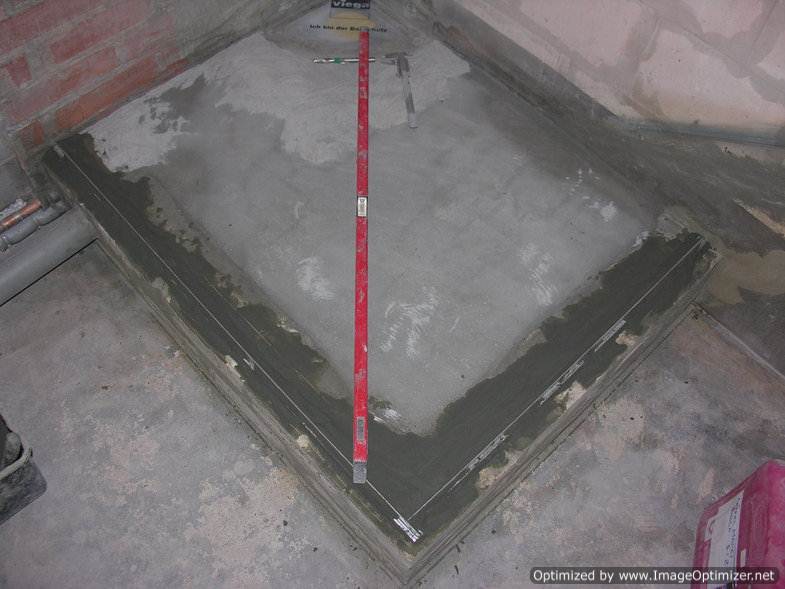
Before laying the tiles, it is necessary to level the floor surface and make a slope towards the drain. To ensure the necessary slope when pouring a concrete screed, guide rails are used.
Substrate preparation is an important stage of facing. You can not save on materials - the foundation must be strong. Be sure to waterproof the floor and slope to the drain.
Stages of work:
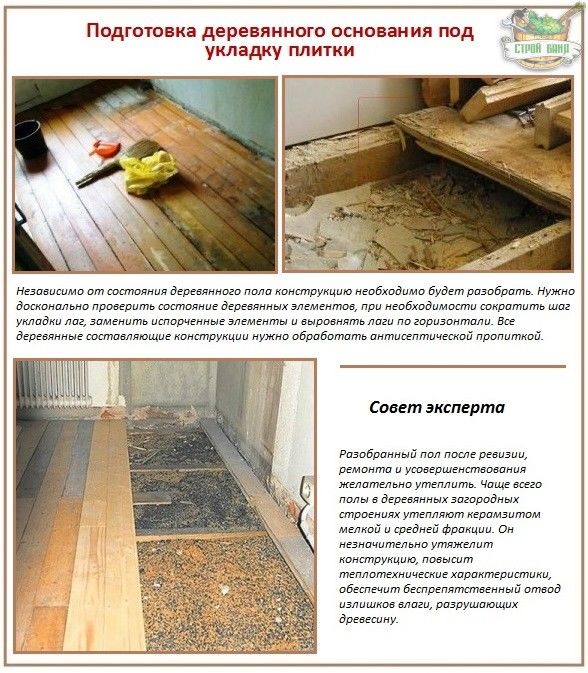 One of the options for preparing the floor for laying tiles
- the slope towards the drain hole is made at the rate of 1 cm of height difference per 1 meter of laying area;
- a drain hole must be made when constructing the foundation;
- so that air from the sewer does not enter the steam room, water seals are mounted in the sewer;
- the concrete base is poured with a cement-sand screed, and the tree requires more complex preparation;
- when preparing a wooden base, you need to make sure the strength of the floorboards and replace them if necessary;
- along the perimeter between the boards and the walls there should be a gap of 1 cm. In its absence, the movement of the boards during temperature changes will destroy the cladding;
- all existing holes must be puttied and the wood treated with heated drying oil. This will be the first layer of waterproofing;
- the second layer is performed using roofing material;
- a reinforcing mesh is laid on top of the roofing material and a screed is poured;
- when laying floor tiles on mortar, a slope can be created during the tiling process.
What is a ladder
A drain or shower drain is one of the elements of plumbing fixtures designed to organize a shower stall without any tray and perform several additional functions:
- draining water into the sewerage system;
- filtration of drained water from various objects, as well as debris;
- preventing the entry of unpleasant odors from the sewerage system into the bathroom and living quarters;
- ensuring the possibility of cleaning the sewer drain.
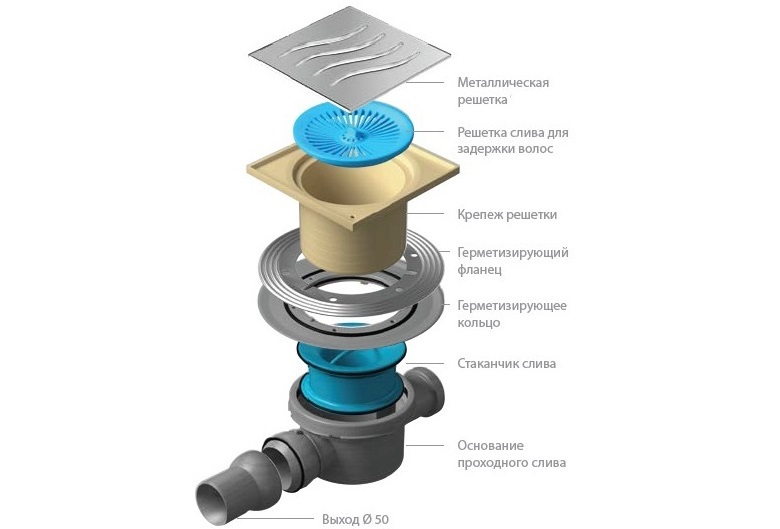
The design of the shower drain drain consists of:
- corps;
- siphon;
- outlet pipe;
- shutter;
- clamping flange;
- decorative lattice.
How to lay the cable
Experts warn that when organizing cable heating, the main is mounted only on the usable area. Cold zones remain under the bathtub, shower trays. Maintain a certain distance from DHW pipes, from walls and from electrical appliances.
- The circuit is taken out of a solid cable. All connections are made outside of a wet room.
- A temperature sensor is placed between the turns. A corrugated tube is provided for it. The sensor is recommended to be placed in a niche, which is made in insulating materials.
- The thermostat is placed on the wall opposite the shower room. I retreat 30 cm from the floor.
- The cable, sensor and network wires are connected through the RCD to the thermostat. Preliminary check the level of resistance of materials.
After testing the heating system, the cable is covered with tile adhesive, and the cladding is immediately performed. Use mixtures specifically for the "warm floor". They have added plasticizer or fiber. Fillers increase the thermal conductivity of the material and elasticity.
Water heated floor advantages and disadvantages, installation
The water heated floor in the bathroom is considered a classic, as it appeared before all other types. In fact, it is a continuation of the heating system.
The advantages of this floor include:
- Durability. With proper installation and properly selected pipes, such a system is able to operate in trouble-free mode for a long time.
- Uneven distribution of heat. The water gradually cools down, which makes it possible to intensively heat the areas near the walls facing the outside, and evenly heat the rest of the area.
- Savings on utility bills. Water heated floor in the bathroom will only slightly increase the final cost.
Mentioning the positive aspects, the disadvantages of this type of heating should also be given:
- Difficulty of installation. The installation requires floor leveling, good thermal insulation, reliable welding and well-thought-out piping. Violation of any of these points threatens with problems during operation.
- High cost. Taking into account all the materials involved and the expensive cost of the pipes themselves, laying a warm floor in a bathtub under a tile will cost a large amount.
- Installation restrictions. As mentioned above, such a system can not be installed in all apartments.
In order to install a water heated floor in the shower, you will need to carry out a number of works. First of all, for proper functioning, a perfectly flat floor is required.
If necessary, apply thermal insulation.
Additionally, a special apparatus is installed through which warm water enters the system, and cold water is heated. The temperature is also adjusted.
Pipe laying should be carried out by specialists, since the durability of the system depends on the quality of welding. The steepness of the turn is also taken into account - too sharp a bend increases the risk of leaks.
After the system is ready, water is let through it for testing. If everything is in order, then it turns off and is filled with a screed. The warm floor for the bathroom should not be turned on until the mixture has completely hardened. Otherwise, this may lead to the formation of cracks and cavities in the screed layers.
Already on top of the frozen surface is a floor covering. As a rule, such a system is connected from central heating, but it is also possible to carry out a warm floor in the bathroom from a heated towel rail
It is important to note that in any case, it is necessary to obtain a work permit, since such actions are considered redevelopment
Shower waterproofing materials
Mastic should be applied with smooth movements (not chaotically).
Regardless of whether you are waterproofing a shower room without a pallet or with a pallet, the laying of tiles is definitely assumed in the future. Therefore, a material that can be tiled should be chosen as a protective layer. Of all modern insulations, only latex mastic is optimal. Also, concrete can be pre-treated with penetrating compounds. Popular brands of latex mastics:
- Knauf Flechendicht;
- Ceresit CL 51;
- Grida HydroMEB Acrylic.
To waterproof a shower without a tray and with a tray, you can use special plasters or simply add additives to the cement that reduce its porosity, thereby making the material waterproof. But still, this method is not as reliable as mastics. Microcracks may appear in the structure of concrete due to mixtures of the building, which cannot be avoided. The elastic membrane made of mastics easily tolerates small vibrations of structural elements without any damage. At the same time, concrete additives and impregnations will be an excellent auxiliary measure for waterproofing a shower tray or floor screed.
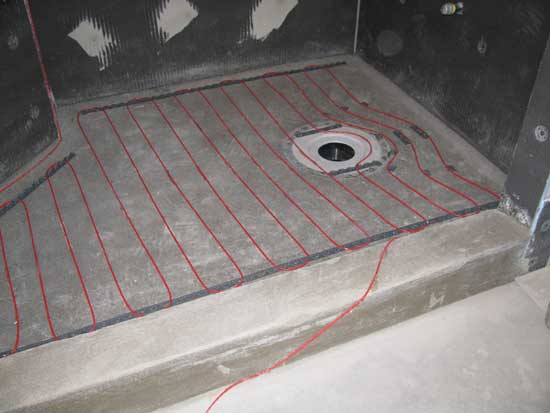
Warm floor in the shower
For arranging a warm floor in a shower cabin without a pallet, a heating cable in a screed is best suited. Screed systems are easier than mats to install in complex areas because the cable can be placed however you like (subject to installation requirements). The tie perfectly distributes heat and protects the cable from moisture, and thanks to its high power, it copes well with surface heating.
The screed layer is about 3-5 cm, it dries for about a month. Thermal insulation is additionally laid under the cable. The specific power of the system should be higher than when installed in dry rooms: 150-180 W/sq. meters.
How to lay cable flooring in wet areas
Only a qualified electrician who is well acquainted with the rules of the PUE can make a competent laying plan and provide protection against electric shock.At the same time, careful observance of the phased plan for laying the underfloor heating cake will be required.
Carrying out work as follows:
The floors are well tolerated by the winter period and retain their performance at sub-zero temperatures. After switching on, they quickly warm up the surface and the air in the room.
Which electric floor is better
Manufacturers offer several wire options: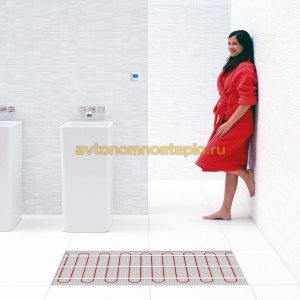 When choosing a suitable heating system, first of all, it is necessary to focus on the technical parameters of the heated room. Comprehensive information about the parameters of the wire and detailed correct step-by-step installation of cable underfloor heating is given in the operating instructions provided by the manufacturer.
Electric underfloor heating has many advantages over hydrofloor. Compliance with the manufacturer's recommendations makes the operation of the heating system as safe and efficient as possible.
Due to the rather cramped bathrooms provided by developers from the times of the USSR, many apartment owners in high-rise buildings change baths for showers. There is more space in the bathroom, and an elegant shower cabin fits into modern interiors much better than an old bathtub.
When planning to install equipment of this type, you will certainly encounter the problem of installing it. Therefore, many home craftsmen are interested in installing the floor in the shower, because installing such a system with your own hands means saving a significant amount of money on the services of specialists. Below we will talk about how to arrange a shower on the floor.
Location selection
It is equally important to decide where the shower cabin will be built with your own hands from tiles. The choice of the optimal location depends on several important factors:
Accessibility and location of communications. To organize the flow, sewerage should be carried out, as well as water pipes should be brought. If the plumbing does not pose any particular problems, then in order to ensure the proper slope of the sewer pipe, it is better that the riser is as close as possible. The size and shape of the building. In this case, much will depend on the individual parameters of the selected room. First of all, you need to make sure that in this place you can safely take a shower.
It is equally important to decide what shape the shower tray under the tiles will be. If there is a complex geometric shape, then it will be necessary to provide free access for its maintenance
In general, a do-it-yourself shower stall with a pallet can be installed directly in the bathroom, bath, workshop, garage, and the like. Moreover, it does not matter whether it is an apartment or a house. When performing high-quality waterproofing works, all these restrictions are removed.
Key points in shower installation
The most important thing in shower flooring is proper waterproofing to ensure that the connection between the drain, wall and floor is watertight. Most often, a special waterproofing sheet is used for this, which, with the help of an adhesive composition, is laid on a screed, after which tiles can be laid on it.
Also important is the correct installation of the drainage system and ensuring the necessary slope of the floor to ensure a constant outflow of water. Modern technology makes it possible to install an electric underfloor heating in the shower room, which is located directly under the floor covering and must be properly installed.
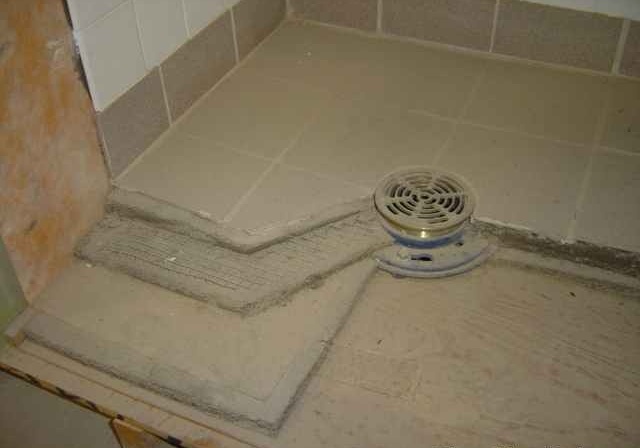
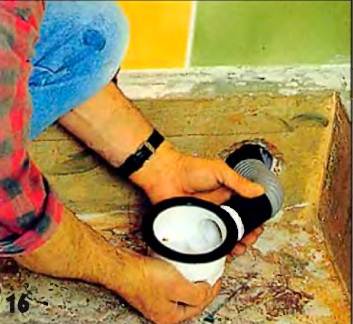
We mount the drain
Installation of a drain is a very important stage in the process of installing a shower cabin. The drain must be leveled with a level.
Main aspects of work
The easiest way to install a shower cabin is to use a special tray. It comes complete with a shower and has a slope for efficient water drainage.Thus, you do not need to make a slope for draining, as a result, installation is greatly simplified.
In addition, the plastic tray has a modern attractive appearance, and when using it, the floors in the shower will look great. Therefore, this installation option is the most desirable.
When installing a drain, a number of nuances should be taken into account.
And in order to avoid mistakes in your work, you should listen to a few tips:
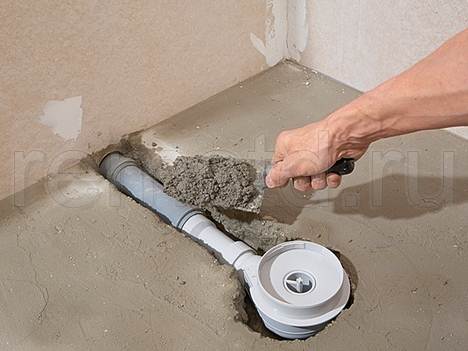
- The easiest way to install a drain is to make a recess in the floor screed that is necessary for it. The space around the drain is subsequently simply smeared with concrete mortar.
- Before installing the drain on the base film.
- In order to prevent possible leaks, you need to check the waterproofing at the installation stage. To do this, simply pour water into the siphon.
- Between the shower tray and the screed, it is necessary to lay a special sealing sheet, the fixation of which is carried out on the adhesive composition.
- The shower tray is glued to the ceiling. To do this, a special mounting adhesive is applied to the floor slab, thanks to which installation is quick and easy.
- To seal the seams between the shower tray and the screed, it is necessary to use an elastic profile that will prevent the appearance of cracks in the seams that occur due to high humidity.
- Please note that if you are planning to install a hydromassage panel or a large overhead shower, you will need a drain that absorbs about 50 liters per minute.
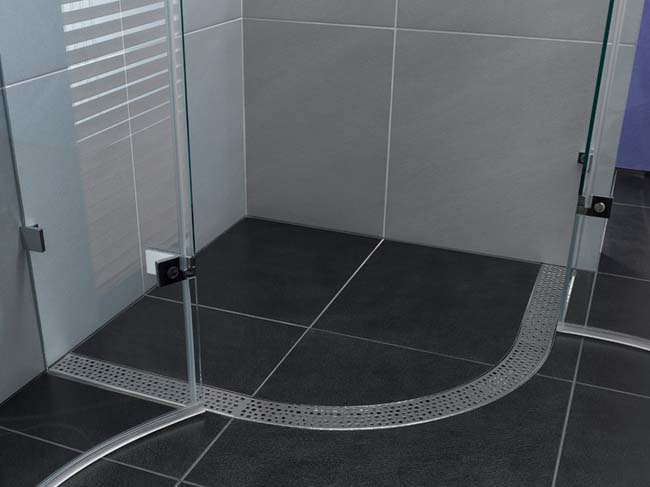
Drainage ladder device
In the event that you plan to install a shower without a tray (for example, you want to equip a warm floor in the shower room), you should equip a drainage ladder. This is a device for draining water, which is a slightly inclined base of the floor. To achieve this effect, a uniform floor slope of about 3% is arranged in the shower.
The instruction provides for the following stages of work:
- We equip the recess under the drain.
- We install waterproofing.
- Installing the drain.
- To check the waterproofing, we lower a certain amount of water. After you are convinced of the reliability of the installation, work can continue.
- We lay voids around the drain with concrete mortar.
- We build up the base to form a slope. Thus, the height of the shower cabin from the floor is set, while the slope of the floor in the shower should not exceed 3%.
- From above on such a basis it is possible. At the same time, the price of your shower will increase significantly, but in parallel with it, the comfort of using it will also increase. For showers, it is best to use a water heating system that fits under a thin layer.
- We cover the floor with non-slip tiles, which have an uneven, slightly rough surface. You can also use materials with an anti-slim coating.
To date, there are two options for arranging the drain:
- The gangway is in the center - this is the classic version, in which the slope of the base is carried out on all four sides.
Grouting tiles
It is produced not earlier than a day after facing. The gaps between the tiles and its surface are pre-cleaned from glue.
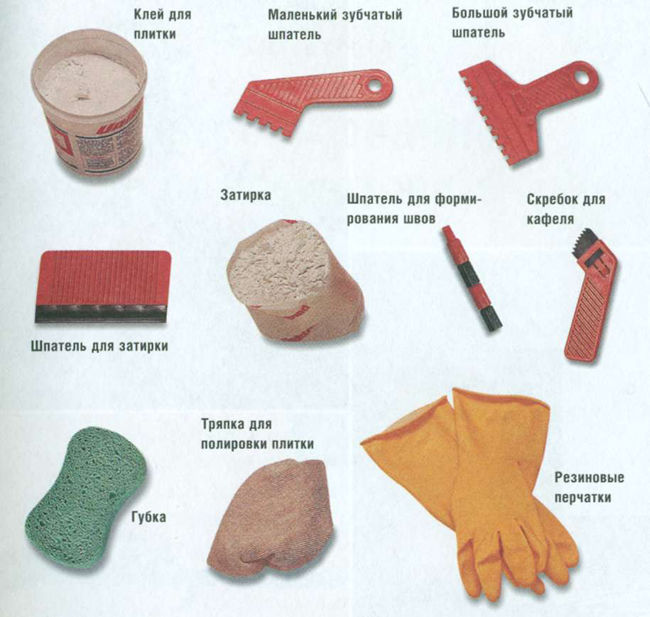 Grouting tools
The grout must be water repellent. After its application, the entire surface becomes waterproof. It is good to use a two-component epoxy grout. To give the desired shade, pigment is added to the grout mixture. It is better to make the tone of the grout a little darker than the tile. Light grout quickly gets dirty and becomes unattractive. The remains of the grout mixture must be immediately removed from the surface with a damp sponge.
For high-quality work, you need to choose the right material - durable and moisture-resistant tiles, porcelain stoneware, other moisture-resistant and heat-resistant materials, heat-resistant glue and moisture-resistant grout. And follow the installation instructions.
Related video: Do-it-yourself tile on the floor
A selection of questions
- Mikhail, Lipetsk — What discs for metal cutting should be used?
- Ivan, Moscow — What is the GOST of metal-rolled sheet steel?
- Maksim, Tver — What are the best racks for storing rolled metal products?
- Vladimir, Novosibirsk — What does ultrasonic processing of metals mean without the use of abrasive substances?
- Valery, Moscow — How to forge a knife from a bearing with your own hands?
- Stanislav, Voronezh — What equipment is used for the production of galvanized steel air ducts?
The choice of tiles for the bath
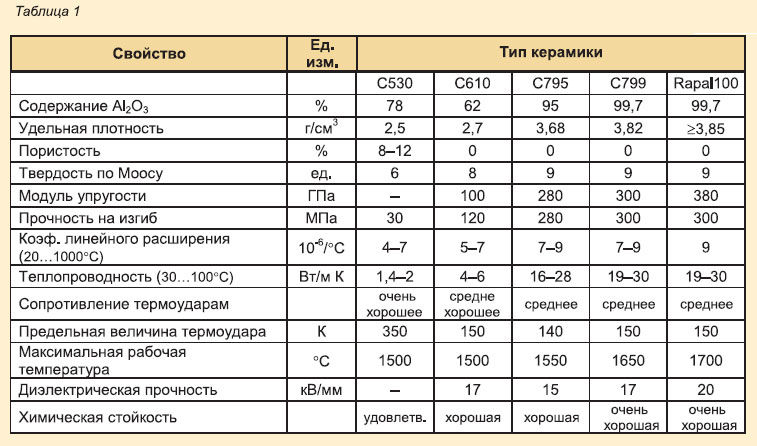 Table of types of ceramics from which tiles are made
Tiles are glazed and unglazed. Glazed is double fired, so it is more durable and resistant to temperature extremes.
The front side should be rough so that the coating does not turn out slippery. This will help prevent injury from falling.
On the back side, the tile should be embossed for better adhesion to the surface, using glue. In addition, this side should not be porous so that the lining does not absorb moisture and lasts as long as possible. The best option for the floor in the bath is porcelain stoneware or clinker
When choosing a regular glazed tile, you should pay attention to the brands: A1 and B1 have low moisture absorption
The dimensions of the tiles for the bath must be chosen taking into account the complexity of the configuration of the floor slope towards the drain. The more complex it is, the smaller the size of the tile should be. The ideal option for the floor in the bath is a ceramic mosaic, but it is not cheap.
The tiles for the floor must be thicker than for the walls and be at least 9 mm. Its quality can be determined visually. You need to choose tiles without defects, with even corners and edges. If you fold two tiles from the same batch with the back sides to each other, then their corners and sides should match perfectly. Floor tiles must be taken with a margin of 10% of the area. The stock is needed if trimming is necessary and a possible marriage. Rectangular tiles are suitable for do-it-yourself laying, it is better to entrust octahedrons to professionals.
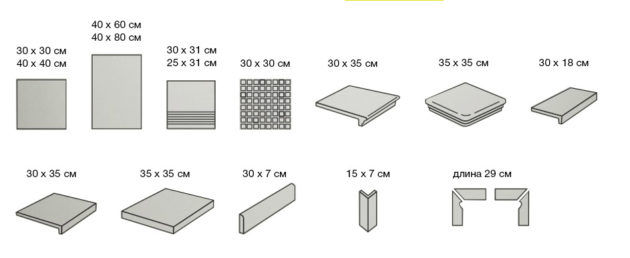 Tile shapes