What materials are used to make caps for their fasteners
Chimney caps are made of materials that are resistant to corrosion, tolerate high temperatures and have a long service life. The requirement for temperature conditions is valid only if the device will close the chimney. For ventilation ducts, a product made of polyester, pural, etc. is quite suitable. In all other cases, use:
- Galvanized steel
- stainless steel
- Copper
- Alloy zinc-titanium
Vanes (chimneys) made of copper serve for a long time, from 50 to 100 years. This is one of the most durable materials, but when installing it, it is necessary to use copper hardware. Otherwise, active corrosion processes will begin, which will significantly reduce the life of the device. Installing a zinc-titanium cap on the chimney provides for the same reasons the use of only galvanized hardware. Zinc-titanium is a new alloy that was recently used only for roofing materials, but today many companies have begun to produce chimney caps from it. They have a half-century warranty period and the price is much less than that of copper. You can install caps from other materials on the pipe with ordinary hardware, although it’s still better to take those that are not amenable to oxidation and destruction: most of the weather vanes can last for decades, and climbing onto the roof because it was torn off by the wind due to a collapsed fastening is not the best good time. If we talk about a brick pipe, then you can use either ordinary long nails or threaded ones (but it is almost impossible to dismantle them), you can use dowels. In each specific case, the fastening system is selected based on the shape and material of the pipe, the available fastening holes, etc.
Wrought iron chimney caps
The most popular type of this product is a stainless steel chimney with or without a polymer coating. The service life in this case is 20 years, but the price is much lower. The option with a polymer coating is especially popular - the color can be matched to the tone of the roof, and if the design is in the style of the roof, this option looks great.
Choosing and installing a chimney cap
The cap on the pipe (chimney, weather vane) was invented in the old days. Such an architectural solution has not only decorative properties, but also practical ones. The cap on the pipe is designed primarily to protect against external natural influences: rain, snow and additional ventilation. Nowadays, such an element of protection is actively used in the construction of private houses and cottages. The fantasy of modern designers knows no bounds. And therefore, such a seemingly simple detail has many forms that give the chimneys an original look.
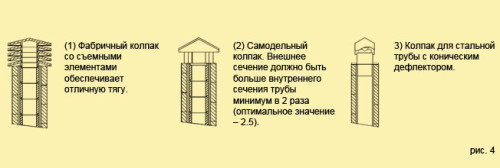
Types of chimney caps.
When choosing a cap for a chimney pipe, first look at its functionality and only then at the design. By the way, about the design: many modern weathervanes look very similar to their old counterparts.
How to make a fungus on a pipe with your own hands
Making a chimney cap yourself is not an easy task. If you do not have much experience in this area, you can first transfer the drawing to a sheet of cardboard, cut it out and think about ways to connect and fasten it. After the picture becomes more or less clear, you can cut out the parts from the metal and start assembling
It is very important to measure the chimney accurately and strictly adhere to the measured values during manufacture.
Here is one of the drawings of a chimney in the form of a small pitched roof. The angle is determined by the formula, which is indicated on the first sheet.
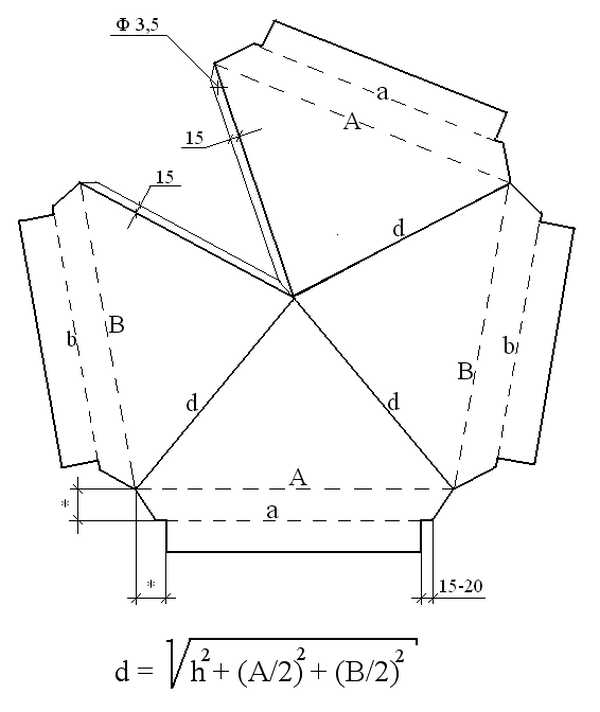
Chimney cap drawing
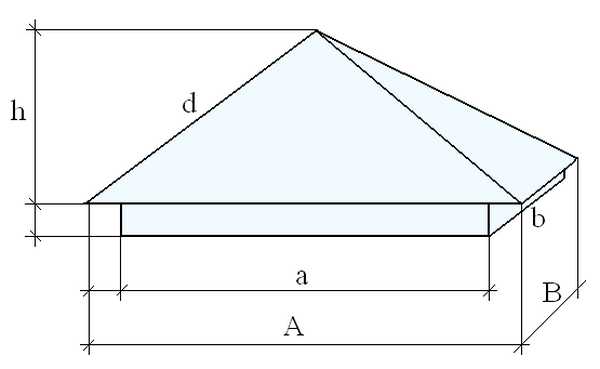
Chimney cap drawing
The procedure is as follows:
- Put the metal blank on the table face up, in the place indicated on the drawing, drill a hole with a diameter of 3.5 mm.
- Bend the part along all dotted lines by 90 o. For this, it is better to use a sheet bender. Then the lines will be clear, without dents. If there is no such device, you will have to use improvised means: fix a piece of the corner on the workbench with the shelf up. To be able to bend the entire (or almost entire) line at once, you can use a bar.
- Bend the part along the lines "d". The angle is determined experimentally: a solid cap should be obtained. The design should be even, without distortions (put it on the table to check). If everything “converged”, mark a point on the lower stiffener with a marker through the drilled hole, mark the future hole, then drill.
- Connect the cap and fix with a 3.2mm rivet.
- On the lines "a" and "b" bend everything so that you can install the legs.
- On the outer perimeter of the pipe, make the base of the cap from the corners. Position the corners so that one edge rests on the masonry, and the second is on the side. Prepare the "legs" for the cap. Everything is connected by welding.
- The finished base must be cleaned, coated with an anti-corrosion compound, then painted in several layers with exterior paint.
- Connect the cap to the base.
If making a square chimney seems difficult to you, maybe this option will be easier. Its implementation will be quite simple if you have a piece of bent sheet metal of the right size. If there is a regular sheet, you can bend it on a special device (usually tinsmiths have it).
Do-it-yourself chimney
The order of work is as follows: prepare the base of the cap from the corner according to the results of measurements of your chimney. Position the corner so that the structure holds well: one rib rests on the edge of the chimney, the other covers it from the outside. Make the legs that will support the cap and connect it to the base. Make them strong enough so that they can withstand wind loads and withstand snow masses. Treat all parts with an anti-corrosion compound and paint. Assemble the structure into a single whole. The collection method depends on the material.
Here is an example of how to make a deflector for a metal pipe. The author of this video has it installed on a basement ventilation pipe, although a similar design can be used on a metal pipe from a solid fuel boiler.
In this video, the manufacture of a conventional umbrella for a pipe.
You are always welcome)) And how to fix the cap depends on the material of the pipe. Judging by the fact that the scan is only for square or rectangular, you have a brick pipe. If so, you can fasten the weather vane to the dowels, but more often. And not in a seam, but only in a brick. If the winds are strong, you can make the lower part, which will be put on the pipe, wide and beat the fasteners not in one row, but in a checkerboard pattern: from top to bottom. If you did not guess with the material - unsubscribe.
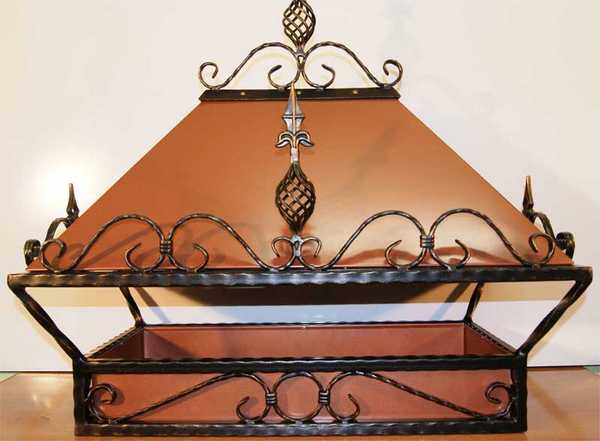
Forged chimney on the pipe
A forged top on a chimney not only turns such a utilitarian thing as a chimney into a work of art, but also helps the heater to work properly. This is especially true for fireplaces.
Ways to eliminate icing of the air duct
Provide air intake from the room
When air enters the combustion chamber from the room, fuel will burn, and when hot combustion products are released into the street, the frozen area will warm up. Most turbocharged boilers are equipped with additional points for installing separate supply and exhaust systems. Based on the passport data of your boiler, determine the location of the plug for the supply pipe. Slightly open it so that there is a slight suction of air from the room, and turn on the boiler. Leave the lid in this position until the environment warms up.
Decrease delta t
If the boiler works without special programmers or regulators, then it turns on and off according to the temperature difference (delta t) between the supply and return lines of the heating circuit. In programmable models, delta t can be corrected. To prevent freezing of the coaxial chimney, in winter, set the minimum allowable value of delta t. In this case, the time between stopping and turning on the boiler will decrease. The event is desirable to carry out at temperatures below -10 0C. For this period, exclude the inclusion of heating equipment according to the programmer or thermostat.
Increase the power of the heater
With an increase in boiler power, the temperature of the exhaust gases will increase, which will heat up the entire coaxial pipe more strongly. At the same time, gas consumption will increase slightly, but the problem will disappear. The boiler passport describes the procedure for setting its power. It is usually performed using a low pressure gauge (U-shaped), in the mode of operation of the equipment at maximum power. The photo below provides information on the placement of ports for connecting a U-shaped pressure gauge and adjusting nuts on a Sit Sigma 845 gas valve.
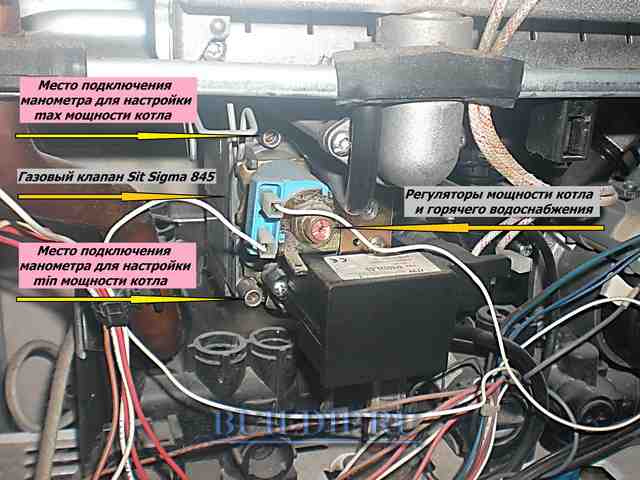
Placement of ports for connecting the U-shaped manometer and adjusting nuts, on the Sit Sigma 845 gas valve.
Setting up gas equipment without special training is a dangerous occupation. If you have never dealt with adjusting the gas flow on a gas valve, then it is better to invite a specialist for these purposes.
Some professionals adjust the burner flame by eye, it should barely touch the heat exchanger.
Changing the design of the coaxial pipe
This type of pipe should be mounted with an inclination towards the street, to drain the condensate that forms on the inner wall of the air duct due to sudden temperature changes between the removed, heated gas and the external environment. Sometimes the accumulation of water occurs due to severe deformation of the extreme part of the duct. Good de-icing results are achieved by making holes in the lower outer part of the pipe or cutting it by 15 - 20 centimeters, while the length of the inner pipe remains unchanged.
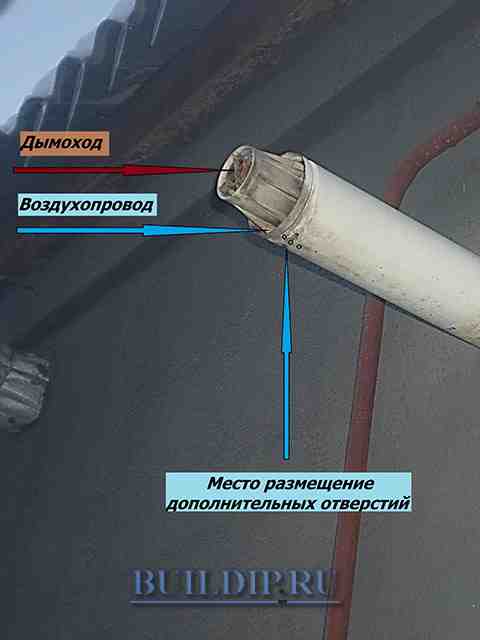
Condensate drain holes.
You can not cut the outer pipe, but by removing the tip, lengthen the inner chimney by the same 15 - 20 centimeters.
Insulation of the outer part of the air duct
When the outer part of the chimney is insulated with mineral wool, at least 50 mm thick, with a protective casing or penofol, at least 10 mm, the coaxial air duct does not freeze over even at -40 0C.
The listed measures have been tested in practice and will help the heating equipment to work smoothly in the winter season.
We make a weather vane with our own hands according to the drawing, we observe the dimensions
You can make a chimney for a gas pipe or other heating system at home. Special measurements are made. Be sure to take into account the diameter of the heating equipment.
Chimney drawing
A drawing is preliminarily drawn, which is applied to a piece of cardboard of the desired size. Cardboard elements will allow you to see how the design will look and help to take into account all the parameters of the product.
Using the prepared template, metal elements are cut out and assembled. Before installation work, the diameter of the pipe is measured with accuracy. When choosing a metal, the following requirements are met:
- The material is characterized by durability.
- Differs in durability.
- Resistant to elevated temperatures.
- Possesses resistance to an acid environment.
Pipe caps are made using sheet metal. It is worth stocking up with special tools: special hammers, scissors for cutting metal, mounting angles and metal rods. You will also need measuring instruments, electrical equipment, a drill and a rivet gun.
Manufacturing consists of the following steps:
- The workpiece is placed on the surface so that the frontal area is directed upwards.
- The element is bent along the drawn lines. For this, a sheet bender is used. In this case, the lines are smooth and without dents.
- If there is no special tool, then the edge of the corner is fixed on the workbench. To properly bend the sheet, a bar is used.
- After bending, the product is checked on a smooth surface. The element must stand straight and not have deformations and kinks. Then a marker is marked on the location of the hole, which is then drilled.
- Then the chimney is attached with paper clips.
- Given the cross-section of the outer channel of the chimney, a base is constructed for the structure using metal corners. The corners are mounted so that one side is in contact with the brickwork, and the second is located on the side of the structure. For the base you need a corner in the shape of a rectangle.
- Legs are prepared separately, which are fastened by welding. Holes are pre-drilled in them.
Then the base is cleaned and covered with a special anti-corrosion solution. Then several coats of exterior paint are applied. The cap is fixed on the base with the help of legs. It is mounted at the corners of the base. During installation, the edge of the leg is bent. Details are fastened with rivets.
WATCH VIDEO
The structure is being decorated. In this case, cuts are made along the edge of the canopy with scissors. The resulting elements are bent upwards in the form of petals.
The finished product is put on the chimney and mounted with anchor bolts. You can make designs of any shape and type. Forged chimneys are made or in the form of a weather vane. In some cases, a spark arrestor is installed on the pipe. Installing a cap will extend the life of the chimney system. In addition, the design will improve traction, which will positively affect the microclimate of the room. This design will give a cozy look to the whole house. Chimneys on the pipe must meet all safety requirements.
Why do you need a cap on the chimney pipe
The tradition of installing caps on chimneys came to us from the past. Back in the 19th century, they were only forged, because there were simply no other ways to make an iron product. Since the work of a blacksmith was not cheap, not everyone could afford such a decoration on the roof. But on rich houses and castles, chimney caps were decorated with whole metal compositions. Most often depicted figures of people, animals and birds. Sometimes the owners of a business ordered an image of an object as a weather vane, which symbolized the occupation of the owner. Such a visual advertisement.
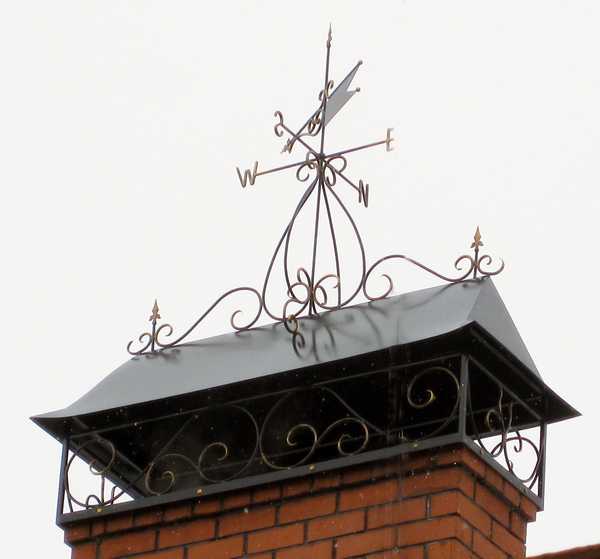
Wind vane on the chimney
In fact, the umbrella installed on the chimney has several functions:
- Protects the pipe from water and snow. With heavy rainfall, there may be enough moisture in the pipe to “lock” the draft. A cap worn on top, but not interfering with the exit of smoke, significantly reduces its amount. Therefore, the shape of the cap should be selected based not only on aesthetic considerations: if there is a lot of snow in your region, then the best option is a cap in the form of a small rolled roof with a sufficiently large angle. These umbrellas are good for snow removal.
- A cap on a brick chimney pipe protects the brick from destruction. Most modern products have special grooves to drain condensate, which inevitably forms on a cold metal surface upon contact with heated smoke (or air, if this is the outlet of the ventilation duct).
- Prevents insects, animals, birds, leaves and other objects that can be carried by the wind from entering the chimney.
- Improves traction. Deflectors of various modifications have been developed specifically to improve traction, but any fungus on the pipe also copes well with this task: it increases by about 20%.
Why you need an umbrella over the chimney pipe is now clear.It remains to understand what to make it from and what form is better to choose.
Do-it-yourself chimney cap installation
Consider, for example, how to install a chimney umbrella with your own hands on an asbestos-cement pipe with a diameter 120 mm.
- Using bolts and nuts M6 (pos.7,8
) it is necessary to fix the racks (pos.4
) on the lower cylinder (pos.9
). - With clamp (pos.5
) to the lower cylinder it is necessary to attach the upper cylinder (pos.3
), which expands downwards. - Assemble the reverse cone on the folds (pos.2
). - Install the cone cap (pos.6
) with rivets.
The cap, return cone and upper cylinder can be assembled by hand using a riveter with aluminum rivets or welded by contact welding.
This table shows the dimensions of the chimney cap according to the dimensions of the chimney pipes.