Work materials

- A few used disposable cigarettes (Pons or Uxlite will work)
- Silica cord, 2mm thick
- Wire 0.15 mm thick, nichrome or kanthal.
- Several copper wires, solid and stranded.
- RCA connector (popularly bell)
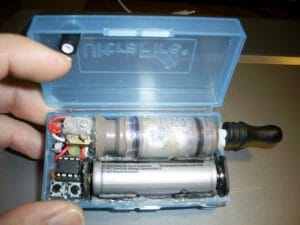
- The body of a flashlight powered by 2 batteries
- Battery "AA" for 1.2 V -4 pieces
- 4 mm wide tubing capable of withstanding thermal shrinkage
- Cambric (cable sheath) D=3.5
- Calipers
- Files
- Hacksaw for metal
- Syringe and two needles on it D=11mm
- Orthophosphoric acid, soldering irons, solder
- Drills of different diameters
Spiral
When choosing a wire, you can focus on two materials: nichrome - does not change in color and has good thermal conductivity;
Kanthal is heated evenly along the entire length and does not spring.
We need to know the resistance that we want to get at the output. So to get a value of 2.2, you need to take a wire with a cross section of 0.1 mm. To create dense puffs of steam, a diameter of 0.2 mm is required. To measure the resistance, you need a special device - a multimeter.
We thoroughly heat the wire over a conventional burner, it becomes plastic, then carefully wind a spiral from it onto a silica cord, aligning the turns with a syringe needle.
Liquid supply to the wick
Nichrome must be of a certain length, otherwise you will get a burnt taste at the output.
Copper rods are soldered to the ends of the nichrome spiral with phosphoric acid or by crimping. Next, the rods are inserted into the cambric, piercing it, and the wick is placed in a special hole in it. Metal conductors are soldered to the ends of the rods at the outlet and the evaporator is cut to the exact length - 63 mm. We solder the flexible wires to the heater connector and drill holes in the tube for the liquid to enter.
The liquid is supplied to the evaporator with a syringe through drilled holes in the mouthpiece.
Source of power
To assemble the power source, we will gut disposable cigarettes and leave a transparent tube. We sharpen the metal case of one of the cigarettes with a needle file, cut out the cylinder and insert the case from the RCA connector with a plug into it, having previously soldered the cable cores. Carefully insert the finished tube into the bell connector, and the finished design into the empty body of the flashlight, the homemade cigarette is ready.
Dripka
- An important point is the number of racks, the more there are, the more steam and the body heats up more.
- The second point: air flows, the lower the resistance of the spirals, the more they should be blown.
- Third - the presence of baths - reservoirs of liquid.
- Pin number four is better to be silver for better performance.
- Fifth: the thermal insulation of the top cap protects the lips from burns.
Smoke safely and enjoy.
What is a humidifier for?
Insufficient amount of moisture in the air negatively affects the human body. The following symptoms appear:
- sore throat;
- drying of the mucous membranes of the nose and lungs;
- dry skin;
- labored breathing;
- constant fatigue;
- drowsiness;
- runny nose;
- eye inflammation.
Other adverse factors
 Dry air adversely affects not only all living things, but also spoils all wooden furniture. People who play instruments are familiar with this problem. As soon as the tool material dries up, consider that it is irrevocably damaged.
That is why it is necessary to use an air humidifier in the premises, since it maintains optimal humidity, allowing indoor plants not to dry out, and wooden pieces of furniture not to dry out. It is the humidifier that will prevent the appearance of many problems not only with health, but also with the well-being of the household, since moisture “binds” the dust, and the heat emanating from the heaters does not drive it around the room.
Homemade humidifier from a plastic bottle
The simplest version of the device is a battery humidifier. To make it you need:
- plastic bottle with a volume of 2-2.5 liters;
- gauze;
- electrical tape or tape;
- stationery knife;
- wire or thick fabric;
- water.
Description of the manufacturing process:
- Lay the bottle on its side and make an oval or rectangular hole approximately in the middle. Its approximate dimensions are 10x5 centimeters.
- Now, using wire or strips cut out of fabric, tie the bottle to the pipe coming from the battery. And so that the device does not fall, fix the fasteners with electrical tape or tape.
- Cut a piece of gauze about 1x1 m and fold it several times in one direction or simply roll it into a bundle. As a result, you should get a strip one meter long and about 5-7 centimeters wide.
- Fill the bottle with water. Dip one end of the gauze rope into it, and wind the other end or simply put it on the battery.
The described device works very simply: water impregnates the gauze, and then, under the influence of the heat generated by the battery, it evaporates and passes into the air. And you can adjust the humidity level in different ways. The first is the approach of the structure to the battery or away from it: the closer the bottle, the higher the humidity. The second way is to use one tourniquet or several at the same time.
If you have a modern radiator, then you can make a decorative humidifier. To do this, fill a vase or any other beautiful container with water and fix it on the heater with a wire or rope. Water will also evaporate and increase humidity levels.
Reasons for the need to moisturize
Little attention is paid to the humidity of the air in the house, although the comfort of people, pets and plants depends on it. Few organisms are able to exist in conditions of low humidity - for example, in the desert it is only 25%, and most living creatures will not survive in such conditions. For a person, this figure should reach 50-60%, although fluctuations are also acceptable - from 40 to 70 percent will be a completely normal value.
If the air in the room is waterlogged, this can lead to many negative effects - the appearance of mold and fungi, and damage to objects. Almost everyone knows about this, but at the same time, they often turn a blind eye to the lack of moisture in the air. Nevertheless, this parameter also needs to be monitored - when the water level in the air drops to 30%, the following processes:
Ways to make humidifiers
The main condition is to have the necessary materials on hand. Most often, home-made devices are bulky, do not decorate the interior, and work noisily. But this does not prevent them from maintaining the humidity in the room within seventy percent.
The air is humidified by means of discs that are constantly moistened and pass through a container filled with water.
The surface is located above the water surface, which creates a "soft" humidification of the air masses. The process is regulated independently, the level of humidity depends on the temperature regime.
The next device is a container made of plastic material with a built-in fan from a computer.
As a result of mechanical vibrations, water droplets turn into steam, the dry air of the room is sucked in, passed through this "water vapor", saturated with moisture and distributed throughout the room.
Unfortunately, the weight of do-it-yourself humidifiers is united by one drawback - there are no automation and control functions. To avoid excessive moisture, you should purchase a device that measures humidity.
14.08.2017
3 014 views
Certain conditions must be maintained in the room, one of which is the level of humidity. Learn how to make your own humidifier at home to create a pleasant environment in your apartment or house.
Plastic Humidifier
Structurally, such a device resembles an old version, which makes it possible to increase the level of moisture in the air with the help of a wet towel, which is hung on a hot heating device. This method is easy, does not require the expenditure of electrical energy and the acquisition of parts, except for mineral water, in order to have a container made of plastic material. In addition, you will need clerical tape, gauze and strong fabric.
On the side of the bottle we cut a rectangular hole, the length of which is ten centimeters, the width is five. We cut off a couple of strips from a piece of fabric, with the help of which the bottle will be hung on the coolant supply to the radiator. In this case, it is necessary to turn the slot exactly up, and so that the container does not scroll, fix it with tape. Now you should take two pieces of gauze and fold them in layers, forming meter-long strips, the width of which is not more than a dozen centimeters. The first tip of the strip is placed in the bottle slot, the other is wound along the pipe to the right. We do the same with the second piece, only in the opposite direction.
Water is poured through the hole. Due to wetting, the gauze strip is moistened, moisture begins to evaporate from the heat of the pipe. This option of saturating the air with moisture is the cheapest, it does not require electricity. But the performance leaves much to be desired, and the design is not very beautiful.
How to make a heat pump calculation with your own hands
You can buy a heat pump completely ready for use, but you need to tune in to the fact that the price of the equipment will be at least 100-200 thousand rubles. There are also more expensive heat pumps, their cost depends mainly on the output power. Store employees and engineers help to make a calculation of a water-to-water heat pump in order to understand how economically profitable the purchase of such equipment is. There are also programs that determine the reduction in heating costs after the installation of a heat pump.
Having studied the device of the heat pump, you can try to make it yourself. It will take a lot of time, but money will be saved. To calculate the heat pump, download the equipment selection program or ask for help from a familiar engineer.
Compressor choice: price matters
A heat pump is like a refrigerator whose walls heat the air in the kitchen. The main part of the refrigerator is the compressor. Making a compressor with your own hands is extremely difficult
In order not to buy a new device, it can be removed from the old air conditioner, it is only important that the device is working
Pay attention to what refrigerant the compressor works with. You will need to run the same
It is unlikely that you can assemble a full-fledged heat pump from a refrigerator compressor with your own hands. The power of such a compressor is only enough to heat a small room.
Air compressor
There is an inverter type compressor that can smoothly change power, save energy, and operate silently. The cost of this type of compressor is quite high. If you specifically buy a new device designed for a heat pump, it will cost 3-5 thousand US dollars. It is clear that at this price, many seek to make a compressor out of an air conditioner. It is worth noting that it is wrong to say “water compressor”, since we are talking about compressing gas. It is more correct to speak of a compressor for a heat pump with a water-to-water heat exchanger.
Do-it-yourself capacitor according to the scheme
To make a capacitor, take a 100-120 l stainless steel barrel. Then the barrel is cut into two parts, a coil made of a copper tube is fixed inside, through which the refrigerant (freon) will move. The coil is obtained by winding a copper tube around any rigid cylindrical object (cylinder, tank, steel pipe), maintaining the pitch of the turns.
The wall thickness of the tube is 1-1.2 mm, the diameter is 0.5 inches (12 mm). Such tubes are used in refrigeration equipment.To calculate the exact length, calculate the area of the coil. The area, in turn, helps to determine the formula for thermal conductivity.
P=0.8*S*T, from it we get
S=P∕(0.8*T)
Here S is the area of the copper pipe, P is the useful power supplied by the heat pump, T is the difference between the water temperatures at the inlet to the heat exchanger and at the outlet of it, 0.8 is the thermal conductivity coefficient, provided that the coil is made of copper, and the working fluid is water. Adapter connections are soldered to the ends of the tube, the thread of which is 2 inches. When the coil is fixed, the two parts of the barrel are connected by welding.
Instead of a barrel, the coil is placed in a plastic pipe, and then in a foam rubber thermal insulation pipe. Water in this case will circulate between the walls of the pipe and the coil. Tee adapters are put on the ends of the pipe in exactly the same way, and the space between the adapter and the copper tube is filled with a sealant that prevents leakage. To calculate heat exchangers, you need to know the theory of heat transfer processes, be able to use formulas. If we take the example of an already assembled heat exchanger, the coil of which is laid in a plastic pipe, then 12 m of copper tube goes to the condenser, and 10 m to the evaporator. There are pipes 20 and 30 m long.
Copper tube serpentine
Evaporator
The evaporator is made from a plastic tank with a volume of 80-130 liters. Another coil is placed inside it, for which the copper pipe described in the previous section on the condenser is suitable. To make it convenient to place the coil inside, they take tanks for "water-water" with a wide opening. Here again, the coil can be placed in a plastic pipe instead of a tank. A tee adapter is placed on the ends of the evaporator coil. Water is supplied to the evaporator through sewer pipes. Subsequently, a thermostatic valve is inserted between the evaporator and the compressor.
Why it is good to humidify the air
Why humidify the air at all? The optimal humidity level varies from 40% to 60%, and if in summer the indicators are close to normal or are such, then in winter the situation changes for the worse. Due to the active use of heaters and heaters, as well as constantly closed windows, the air dries out and the humidity level decreases.
Maintaining an optimal level of humidity is necessary for several reasons:
A person is 60-80% water, it is an integral part of all tissues. And the liquid enters the body not only through the digestive tract, but also through the skin and mucous membranes. With its lack of health may worsen. There will be such problems as peeling of the skin, drying out and thinning of the mucous membranes, respiratory diseases, frequent colds, brittle hair and nails, nosebleeds and some others.
Normal humidity is necessary for plants that absorb moisture not only from the soil, but also from the air.
With a lack of fluid, they will begin to dry out and die.
When the humidity level decreases, the dust does not settle on the surface, but floats in the air and, accordingly, enters the respiratory tract.
Excessively dry air can spoil some interior elements, especially those made of wood.
Animals also suffer from insufficient moisture.
It is especially important to maintain an optimal level of humidity in the room of a newborn, because he enters this world almost from the water, and its deficiency can become a serious stress.
How to increase the humidity in the house
To increase the humidity in the room, it is necessary to evaporate a sufficient amount of water. There are a number of simple activities that you can do with your own hands to achieve the goal:
Option number 1
The easiest way to make your own humidifier is to use a wet towel. Hang a damp towel on the battery, and when the battery is hot, the moisture will begin to evaporate.Moisten the towel as it dries and hang it up again.
Advantages of this method:
- does not require electricity;
- the costs are minimal (nothing is needed except a piece of cloth or a towel).
Flaws:
- this method requires a constant “reboot”;
- humidification occurs directly near the place of evaporation;
- low efficiency of the method.
You can complicate this option with a towel a little: lower one end into a basin of water, and hang the other on the battery, so the water will soak the fabric and evaporate on the battery. The advantages of this option are as follows: it does not require investments, this humidifier is automated. The disadvantage is low efficiency.
Option number 2
If the first option seems unaesthetic and ineffective to you, then you can simply place water tanks around the room. It can be vases, jugs. Water from them will slowly but surely evaporate.
Option number 3
Distribute indoor plants around the apartment that moisturize the air. It can be:
- saintpaulia;
- phytonia;
- hypoesthesia;
- orchid;
- hibiscus;
- nephrolepis (house fern);
- ficus;
- fatsia;
- dracaena;
- cyperus.
 Keep pots with such tropical plants in expanded clay trays and, as they dry, fill with water. In addition, the process of regularly spraying plants will also help to humidify the air.
Option number 4
It may not seem strange, but constant wet cleaning will help humidify the air at home. And if after washing the laundry you dry it indoors, then the water, evaporating from the fabrics, will enter the air and automatically increase the humidity in the room.
Option number 5
Another way to not only make a humidifier with your own hands, but also transform the interior is to buy an aquarium. Its capacity will be a natural room humidifier. All aquariums are equipped with a special water filtration system and some of the liquid, passing through the filter and returning to the tank, evaporates. Also, evaporation of moisture occurs from the surface of the water in the aquarium. The larger the aquarium, the more water will evaporate.
In addition to being useful for the household of the apartment, the aquarium will also be a small piece of the biosphere, which is very informative and exciting for the kids.
Option number 6
A fairly simple but decorative way to increase moisture is an indoor fountain. The principle of operation of the fountain is quite simple: water circulates in a closed cycle. You only need to add water to the tank.
Ultrasonic Humidifier
Try making an ultrasonic humidifier at home. For this you need:
- ultrasonic transducer;
- a container with a volume of 5 to 10 liters with a lid (a bucket or a plastic container will do);
- a functioning cooler from an old disassembled computer;
- a plastic cup;
- power supply 24V;
- corrugated plastic pipe;
- an element from a children's pyramid (the so-called "donut");
- stationery knife;
- insulating tape;
- voltage regulator (it must convert 24V to 12);
- elastic;
- the cloth.
The scheme of an ultrasonic homemade humidifier is as follows:
- First, you need to make two holes in the lid of the container to fix the cooler. 5 millimeters is enough.
- In the opposite part of the cover, make two more holes: for the output corrugated pipe and the wire of the ultrasonic transducer.
- Fix the corrugated tube and the cooler on opposite sides. You can do this with tape. Place the transducer wire next to the corrugation.
- Place the glass inside the element from the children's pyramid, make a hole in its bottom. Also attach a piece of fabric to the bottom with an elastic band, which will act as a filter.
- Place the converter in the glass, connect the stabilizer to it so that the humidifier functions more productively.
- Now connect the power supply to the circuit so that the ultrasonic humidifier from the cooler and the converter starts working.
If you have never dealt with electrical appliances, then you should not take risks and use this method of making a humidifier, as mistakes made can lead to a short circuit due to the presence of water in the structure.
Best Answers
♕Master♕:
Drip on the evaporator itself before installation. There is mesh on the top and holes on the sides. You can lower the evaporator into e-liquid for 10 minutes.
Nikolay Gorelov:
In your ass.
-NINEL-:
Cartridge refilling.
In small cartridges, the liquid runs out pretty quickly and you need to be able to replenish it correctly. This is not difficult to do, but you need to adhere to certain rules for filling liquid
It is important to remember that for some cartridges it is important to drip the liquid NOT into the steam outlet, but nearby, onto the absorbent material, as shown in the figure.
Proper refilling of a cigarette cartridge Correct refilling of an electronic cigarette cartridge1 way.
For such refilling, we need tweezers to get the absorbent material out of the cartridge. In an upright position, fill the cartridge ¾ full with liquid, but not to the top. After that, you need to insert the absorbent material back and install the cartridge on the electronic cigarette. Take a few puffs to test it. If you can taste the liquid in your mouth or on your lips, you have put in too much liquid. Take out and clean the cartridge.
2 way
This type of filling is carried out using a syringe. It is better to use a needle with a large diameter. A needle that is too thin may not pass a thick liquid through itself, and you simply cannot squeeze it out of the syringe. The main thing in this process is not to squeeze out the liquid too quickly, but to let it soak in.
3 way
Refilling an Electronic Cigarette CartridgeRefilling an Electronic Cigarette CartridgeRemove the cartridge from the cigarette, turn it upside down and drip 2-3 drops into it directly from the e-liquid bottle, letting the e-liquid dissolve. On average, it takes about 10-20 drops to refill one cartridge.
4 way
This method is very similar to the third, it is needed if your vial does not have a dispenser. You will need a regular pipette, into which you will drip liquid into the cartridge.
Filling the clearomizer (atomizer).
The principle of refilling is the same as the cartridge, only with some nuances. All this can be seen in the photo:
Filling the clearomizer of an electronic cigaretteFilling the clearomizer of an electronic cigaretteFirst of all, you need to unscrew the mouthpiece and remove it. Tilt it so that it is at an angle of 45 degrees. Pour the liquid along the walls of the flask slowly, avoiding falling into the small central hole (air duct). Install the mouthpiece on place. Wait one minute, allowing the vaporizer to soak well. Sometimes, after refueling, liquid smudges may appear on your clearomizer; pokuri.by/kak-zapravlyat-elektronnuyu-sigaretu-zhidkostyu/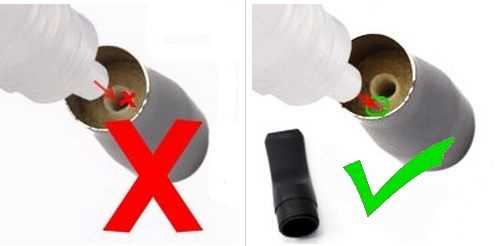
1 Main characteristics of moisturizing elements
Home batteries are constantly hot in winter. This leads to overdrying of the air in the apartment. Homemade, purchased humidifiers help the owners save the situation.
The design is simple, having the following characteristics:
- inside the device there is one flask, the integral design has 3-4 subsections;
- made of heat-resistant plastic, ceramic component, stainless steel;
- evaporates moisture gradually, distributing it throughout the room;
- capacity of 200 milliliters of water - the smallest, 2 liters of liquid - a large, stationary container;
- has filters, replacement of add-ons is necessary every 4 months - an option for large installations of the humidifier section;
- it is made in the form of animal figurines, simple flasks, stationary, rectangular containers;
- has reliable fasteners;
- suitable subconvector, battery, oil heating system;
- does not overheat when regularly located near a hot battery.
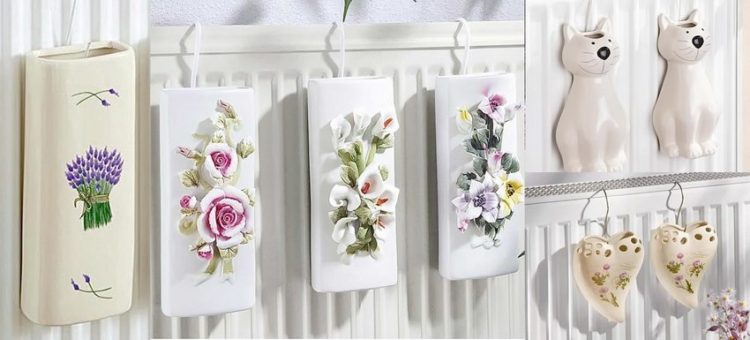
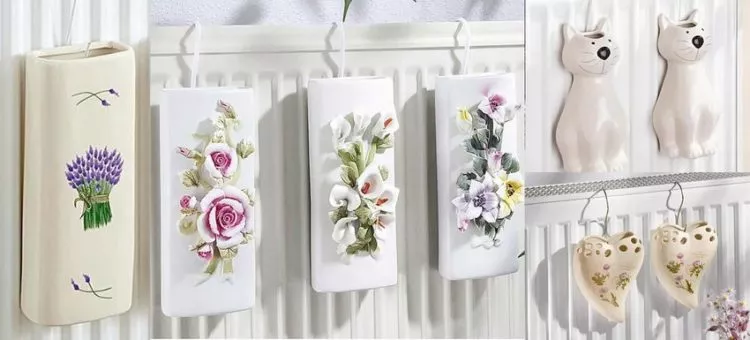
Varieties of humidifiers
Manufacturers offer customers a humidifier for a ceramic heating radiator in the form of a flask. There are options for the author's work, specially painted according to the original drawings.
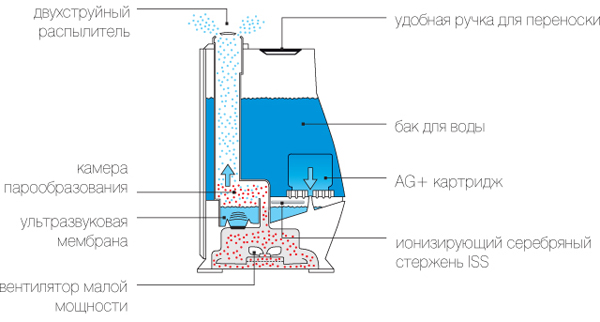
Atomizer
In simple terms, an evaporator (aka a steam generator, aka an atomizer) is a metal cylinder in which a ceramic bowl is placed, with a substance for evaporation in it. It is based on the principle of gradual heating of a liquid with subsequent transfer to steam.
The evaporation system is a piece of silica, which can withstand high temperatures well, wrapped with a nichrome coil of various sizes. The spiral is connected to the heating element using different contacts (buttons, puff sensors or microcircuits).
The liquid is supplied from the cartridge through a metal bridge to the evaporation system through a porous metal sponge, which serves as protection for the coil from various damage.
If you like to do everything with your own hands, then we will tell you how to assemble the evaporator yourself.
