Putting into work
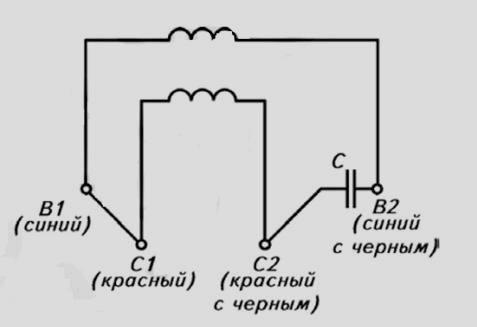
The first thing to do is to find where the middle of the coils is, in other words, the junction. If our asynchronous the device is in good condition, it will be easier to do this - by the color of the wires. See the sketch:
If what remains to be done by our client is so deduced, then there will be no problems. However, in most cases, you have to deal with the units removed from the washing machine, it is not clear when, and it is not clear by whom. Here, of course, it will be more difficult.
It is worth trying to ring out the ends with an ohmmeter. The greatest resistance is two coils connected in turn. We mark them. Next, look at the values that the device indicates. The starting coil has more resistance than just a working one.
How to connect a 380 to 220 volt engine.
Now we take a capacitor. In general, they are different on various electronic machines, but for AVE it is 6 microfarads, 400 volts.
If there is no such thing, there is an option to take it with similar parameters, but with a voltage not lower than 350 V!
Let's pay attention: the button in the figure is used to start the ABE asynchronous motor when it is already connected to the 220 network! In other words, it is necessary to make two switches: one is general, the other is a starting one, which, after releasing it, would turn itself off. Otherwise, burn the device
If you need a reverse, then it is done according to the following scheme:
If what remains to be done to our client is made correctly, then it works. True, of course, one snag. In boro, not all ends are bred. Then there will be difficulties with the reverse. Just disassemble and bring them out without the help of others.
Here are some points on how to connect asynchronous electronic machines to a 220 volt network. The schemes are easy, and with some effort it is possible to make a complete set with your own hands.
Using a magnetic starter
The use of a 380 motor connection diagram through a starter is good in that it can be started remotely. The advantage of the starter over a knife switch (or other device) is that the starter can be placed in a cabinet, and the controls can be moved into the working area, while the voltage and currents are minimal, therefore, the wires will fit a smaller section.
In addition, the connection using the starter ensures safety in case the voltage “disappears”, since the power contacts are opened in this case, when the voltage reappears, the starter will not supply it to the equipment without pressing the start button.
Wiring diagram for a 380v electric asynchronous motor starter:

On contacts 1,2,3 and start button 1 (open), voltage is present at the initial moment. Then it is fed through the closed contacts of this button (when you press "Start") to the contacts of the starter K2 of the coil, closing it. The coil creates a magnetic field, the core is attracted, the starter contacts close, setting the motor in motion.
At the same time, the NO contact closes, from which the phase is supplied to the coil through the Stop button. It turns out that when the "Start" button is released, the coil circuit remains closed, as well as the power contacts.
By pressing "Stop", the circuit is broken, returning opening the power contacts. Voltage disappears from the conductors supplying the motor and NO.
Video: Connecting an asynchronous motor. Determining the type of engine.
Wiring diagrams for three-phase motors for 220 volts
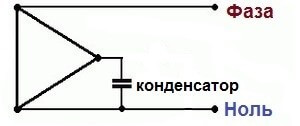
If the motor is low-power (less than 1.5 kW), and the connection is made without load, then for successful operation it is enough to simply connect a capacitor to the circuit. For example, solder one terminal to the input of the neutral wire, and the other to the free end of the winding, or the third terminal of the triangle. If the direction of rotation does not suit you, then you just need to attach the second terminal of the capacitor to the input of the phase wire.
To start a loaded or powerful engine, a more powerful “push” is needed, which an additional (start) capacitor can provide. It is soldered into the circuit parallel to the main one, but it does not work constantly, but only for a few seconds, at the time the engine starts. Usually it is connected through a button or a two-position toggle switch. To start, you need to press the button (turn on the toggle switch) for a while until the engine starts and picks up speed. Then the button is released, breaking the network and turning off the capacity.
The engine can be made to work in direct and reverse modes. To do this, a toggle switch is added in the connection diagram, which in one position connects the capacitor to zero, and in the other to the phase wire. In a reverse circuit, if the motor starts slowly or does not start at all, a start capacitor can also be added. It is connected in the same way in parallel to the main one and is turned on with the "Start" button.
You can often hear the question, is it possible, in principle, to start a three-phase motor without a capacitor? Unfortunately, this cannot be done. So you can only start the motor, originally designed to work with a single-phase 220 V network.
Engine reversal
In order to make the motor rotate in the other direction, it is enough to “turn over” the phase arriving at the junction point of the windings B and C (the “Delta” connection) or to the winding B (“Star” circuit). The scheme, which allows you to change the direction of rotation of the rotor with a simple click of the switch SB2, will look like this.
Reversing a 380 V three-phase motor operating on a single-phase network
It should be noted here that almost any three-phase motor is reverse, but you need to choose the direction of rotation of the motor before starting it. Do not reverse the motor while it is running! First you need to de-energize the electric motor, wait for it to stop completely, select the desired direction of rotation with the SВ1 toggle switch and only then apply voltage to the circuit and briefly press the B1 button.
A way to increase the power developed by the motor
It turns out that it is possible to increase the power of the motor, and, moreover, significantly. To do this, you don’t even have to complicate the design, but just connect a three-phase motor according to the diagram below.
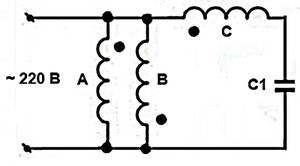
Asynchronous motor - 220 V connection according to an improved scheme
Here, windings A and B are already operating in nominal mode, and only winding C gives a quarter of the power:
33,3 + 33,3 + 8,325 = 74.92%.
Quite good, isn't it? The only condition for this inclusion is that the windings A and B must be turned on in antiphase (marked with dots). The reversal of such a circuit is carried out in the usual way - by switching the polarity of the capacitor-winding circuit C.
And the last remark. In place of the phase-shifting and starting capacitor, only non-polar paper devices, for example, MBGCH, can operate, which can withstand a voltage one and a half to two times higher than the mains voltage.
Features and methods of connecting to a single-phase network
A single-phase current of 220V supplied to the electric motor, more precisely to its stator and rotor, forms two equivalent magnetic fields rotating in opposite directions. In order to make the rotor rotate, it is necessary to organize a phase shift manually or at the expense of starting devices. The power will be lower than the nominal one (50…70%), but the engine will work.
Obviously, by directly connecting one of the phase windings to a 220V network, with the others not working, it will not be possible to start the engine. Therefore, all three phases must be connected via an intermediate circuit. You can do this in two main ways:
- capacitive circuit. One of the motor windings is connected through a capacitance, which forms a forward phase shift of the current by 90º. After starting, this circuit can be disconnected;
- inductive circuit. It works in much the same way as the previous one, only the phase shift occurs in the opposite direction.
Sometimes even a mechanical turn of the rotor is enough to make a 380 engine work from 220.
https://youtube.com/watch?v=ukl8nctMpTI
Star-delta circuit
In domestic motors, the “star” is often already assembled, and the triangle needs to be implemented, i.e. connect three phases, and assemble a star from the remaining six ends of the winding. Below is a drawing to make it easier to understand.

Nevertheless, amateurs “love” such a connection, but are not often used in production, since the connection scheme is complex.
For it to work, three starters are needed:

The stator winding is connected to the first of them -K1 on one side, and the current on the other. The remaining ends of the stator are connected to starters K2 and K3, and then, to obtain a "triangle", the winding with K2 is also connected to the phases.
By connecting to phase K3, the remaining ends are slightly shortened to obtain a star circuit.
Reconnection from 380 volts to 220
It is very important to understand how a three-phase electric motor is connected to a 220v network. To connect a three-phase motor to 220v, note that it has six leads, which corresponds to three windings
With the help of a tester, the wires are called to find the coils. We connect their ends in two - we get a “triangle” connection (and three ends).
To begin with, we connect the two ends of the network wire (220 V) to any two ends of our "triangle". The remaining end (the remaining pair of twisted coil wires) is connected to the end of the capacitor, and the remaining capacitor wire is also connected to one of the ends of the mains wire and coils.
From whether we choose one or the other, it will depend in which direction the engine will start to rotate. Having done all these steps, we start the engine by applying 220 V to it.
If, when turned on, the motor hums, but does not spin, it is required to additionally install (via a button) a capacitor. It will, at the time of starting, give the engine a push, forcing it to spin.
Video:
Video: How to connect an electric motor from 380 to 220
Calling, i.e. resistance measurement is carried out by a tester. If this is not available, you can use a battery and an ordinary lamp for a flashlight: the wires to be determined are connected to the circuit, in series with the lamp. If the ends of one winding are found, the lamp lights up.

It is much more difficult to find to determine the beginning and ends of the windings. You can't do without a voltmeter with an arrow.

By breaking the contact of the wire with the battery, they observe whether the arrow deviates and in which direction. The same actions are carried out with the remaining windings, changing the polarity if necessary. Achieve that the arrow deviates in the same direction as during the first measurement.
Increasing voltage
Imagine the tag says: Δ/Ỵ220/380. This means we need a triangle inclusion because most often the connection is usually 380 volts. How to do it? If the electric motor in the bore has a terminal box, then it is not difficult. There are jumpers, all that is needed is to switch them to the desired position.
Alas, what if three wires are simply displayed? Then you have to disassemble the device. On the stator, you need to find three ends that are soldered to each other. This and of course a star connection. The wires must be disconnected and connected in a triangle.
In this situation, this does not cause difficulties. The main thing to keep in mind is that there are beginning and end of coils. For example, let's take as the beginning the ends that were brought into the boron of an electric motor. It means what is soldered - these are the ends. Now fundamentally do not confuse.
We connect it like this: we connect the beginning of one coil to the end of the other, and so on.
As we have seen, the scheme is conventional. Now engine, which was connected for 380, of course plug in 220 volts.
Capacitor selection
The operating voltage of the capacitor must be at least 300 V. Capacitors of the BGT, MBCHG, MBPG and MBGO brands are best suited for the circuit. All data (type, Uwork, capacity) are indicated on the case.
To calculate the required capacity, use the formula:
- for connection with a "triangle" C \u003d (I / U) x4800;
- for star connection С = (I/U)x2800.
Where C is the capacitance of the capacitor in microfarads (uF), I is the rated current in the windings (according to the passport), U is the supply voltage (220 V), and the numbers are the coefficients for different types of winding connection.
As for starting capacitors, their capacitance must be selected by experiment. Usually it is 2-3 of the working face value.
Let's give an example of calculation
The connection is a triangle. Consumed rated passport current - 3 A. Substituting the values into the formula, we get C \u003d (3/220) x4800 \u003d 65 microfarads. In this case, the capacitance of the starting capacitor must be selected in the range of 130-180 microfarads. However, there are no 65 uF capacitors for sale, so we assemble a set of 6 pcs. 10 uF each and add another one - 5 uF.
It should be borne in mind that the data for the rated power were used in the calculation. If the engine is underloaded, it will overheat. In this case, it is necessary to reduce the capacitance of the capacitors in order to reduce the current in the winding. But with a decrease in capacity, the power that the engine can develop will also decrease.
Therefore, when connecting, it is recommended to use the selection method. Start with the minimum required capacity, and then gradually increase it until optimal performance is obtained.
Additional notes and cautions:
- It should be remembered that a motor converted from 380 to 220 V can simply burn out when running without load.
- Motors more powerful than 3 kW are not recommended to be connected to the standard wiring of a residential building. Due to the high power consumption, it will knock out plugs and machines, and if you put more powerful machines, the insulation on the wires may simply melt. This may result in fire or electric shock.
- Even after disconnection, the capacitors retain voltage at the terminals for a long time. Therefore, during installation, they must be protected to prevent accidental contact. Before working with capacitors, be sure to carry out their “control” discharge.
single phase
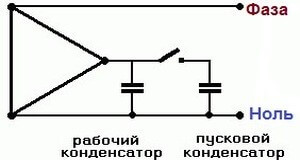
Now let's talk about another type of asynchronous electric motors. These are single-phase AC capacitor machines. They have two windings, where, after starting, only one of them works. Such engines have their own characteristics. Let's consider them on the example of the ABE-071-4C model.
In another way, they are also called split-phase asynchronous engines. They have another auxiliary winding wound on the stator, offset relative to the main winding. Starting is done using a phase-shifting capacitor.
Scheme of a single-phase asynchronous motor
It can be seen from the diagram that ABE electronic machines differ from their own three-phase brothers, also from single-phase collector units.
Always read the label carefully! The fact that three wires are brought out does not completely mean that this is for connecting to 380 V. Just burn a good thing!
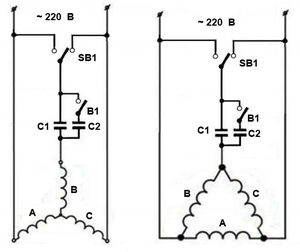
General wiring diagrams for motors from 380V to 220V through a capacitor
Most often, if it is necessary to solve such a problem, working and starting capacitors (capacitor banks) are used. Basic delta and star connection diagrams for 380V can be seen in the following illustration:
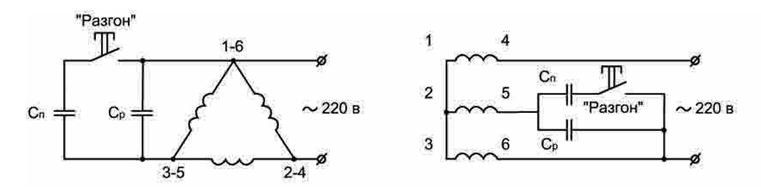
The non-fixed "Acceleration" button is used to activate a parallel-connected starting capacitor. It must be held until the engine reaches maximum speed. After that, the starting circuit must be disconnected to prevent overheating of the windings. If the engine power is low, the starting capacitor can be neglected, working only through the working one.
The calculation of the capacitance of capacitors is carried out according to the following formulas:
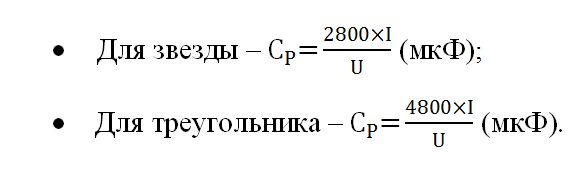
The capacity of the starting capacitor in this case should be twice as high as the working one. If you do not resort to calculation by formulas, then you can use the value of 7 μF / kW.
Practical application shows that a delta connection is more efficient, since in this case the voltage distribution in the windings will be more uniform, and the power will decrease less. There is, however, one limitation that concerns the layout of the motor terminal block. If there are only three 380 outputs under its cover, then there is a pre-installed connection scheme that cannot be changed. If there are six conclusions there, then you can choose which option to organize. A characteristic designation is applied to a metal plate with characteristics.
If a 380-volt motor is supposed to be used at 220V in a mode with frequent starts and stops, then the basic circuit can be modified with the organization of a dynamic braking circuit:
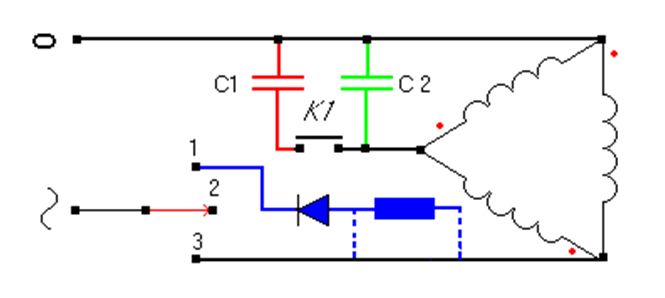
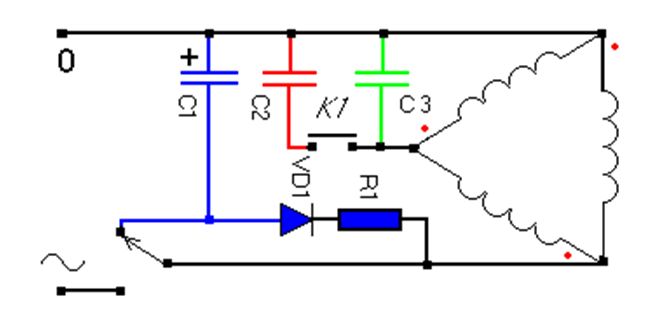
Here you can see the inclusion of the engine in a triangle through the capacitive circuit of capacitors C1 (starting) and C2 (working). Additionally, a circuit is organized on a transistor and a resistance element, which is connected by a three-position key. When it is in position "3", the mains voltage of 220V is supplied to the stator windings and with the K1 button you can start it. To stop the engine, the key is moved to position "1", after which a direct current is supplied to the windings and braking is carried out. It should be noted that this switch has only two fixed positions "2" and "3". To use a conventional on/off switch, one more capacitor will need to be added to this circuit. It looks like this:
The fact that a single-phase current leads to the organization of multidirectional equivalent magnetic fields of the stator and rotor, which can be shifted (made to rotate) in one direction or another, has already been mentioned. Therefore, it is possible to put into practice a reverse connection scheme for a 380V electric motor:

The circuit is in some way a combination of the two previous ones, only here a dual switch and start through relay P1 are used.
https://youtube.com/watch?v=tqwz6Uv7mlE
The circuits considered in the article are basic, but depending on the specific case, they can be modified in any way to achieve the inclusion of a three-phase 380V asynchronous electric motor in a single-phase 220V network.
How else can you connect the electric motor
In addition to the star-delta connection, there are also several more options that are used more often:
Many electricians advise to put a capacitor. Of course, this is the simplest solution, but at the same time, you will immediately get a sharp decrease in the power of the electric motor. To implement it, you only need a serviceable capacitor. It is necessary to connect two contacts of the capacitor to zero and the third output of the electric motor. The result is a low-power unit up to 1.5 watts. But if your electric motor produces more power, then you need to add a starting capacitor to the circuit. But at the same time, if you have a single-phase connection, then the capacitor simply compensates for the lack of a third output; Photo - motor connection diagram with capacitors
If you have an asynchronous electric motor, then you can easily connect it to a star or a triangle, if desired, from 380 to 220 V
In such motors, three windings are installed, which are connected to each other in a star or triangle, to change the voltage, you just need to change the conclusions that go to the tops of the connections;
It is very important to carefully read the instructions for the engine, its certificate and passport. For many imported models, only a wiring diagram for connecting a triangle to our voltage of 220 V is possible
If you ignore this rule and connect them to the 220 network using a star connection, then the motors will simply burn out under high load. It is also impossible to connect an engine with a power of more than three kilowatts to the home network, otherwise short circuits will begin or even the RCD will burn out.
Complementing the paragraph about capacitors, it should be noted that it is necessary to select this component based on the minimum allowable capacity, gradually increasing it by trial methods to the optimal one required by the engine. If the electric motor is idle for a very long time, then it can simply burn out when connected to the network. Also remember that even after you have turned off the electric motors, capacitors store voltage at their contacts.
In no case do not touch them, and preferably protect them with a special insulating layer that will help avoid accidents. Also, before working with them, you need to do a discharge.
This is interesting: Do-it-yourself electric underfloor heating - we analyze in detail