Distribution scheme of apartment group circuits
The distribution diagram of the group circuits of the apartment in this visual diagram is quite simple.
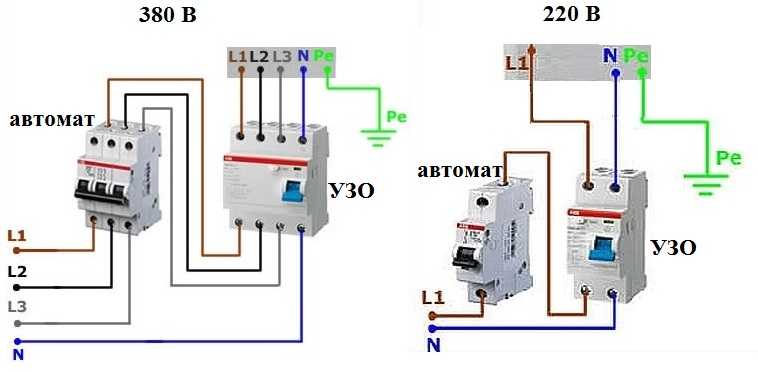
All electrical wiring of the apartment is protected by a residual current device (RCD).
The differential residual current device combines the functions of a simple RCD and a circuit breaker. That is, RCD-D protects not only people from leakage currents, but also electrical wiring from overloads and short circuit currents.
It should be noted that in this scheme, installing a simple RCD instead of an RCD-D is a mistake. A simple RCD should be installed in the wiring diagram after the circuit breaker. Moreover, the rating of the RCD for operating current must be greater than or equal to the rating of the circuit breaker. This is done so that when overloaded, the circuit breaker is the first to turn off, and not the RCD.
Let's go back to the diagram. The group electrical network of the apartment is divided into three groups: lighting, sockets and a washing machine. The wires of each group are protected by single-pole circuit breakers.
conclusions
The presented illustrative power supply diagram of a small apartment with a TN-C grounding system. That is, in the presented diagram, the zero working and zero protective conductors are combined in one conductor throughout its entire length.
The diagram does not show the cross-sections of the wires of the electrical wiring. But they can be calculated according to the selected ratings of automatic protection devices. The spreadsheet can be viewed HERE.
elesant.ru
Other Wiring Diagrams and Electrical Projects:
-
May 2012
Wiring diagram in the apartment
-
June 2012
-
Electric project of a private two-story house, #1 (36 sheets). PDF,DWG,Jpeg
-
Electric project of a large apartment, No. 1. View and download
-
-
October 2012
-
Symbols on the diagrams, designation of sockets, switches, equipment
-
Lighting schemes for 3 floors of a three-story private house
-
Wiring diagram of the floor of a private house
-
Wiring diagram for a standard two-room apartment
-
Wiring diagram for a one-room apartment
-
Wiring diagram of a round apartment
-
Layout of electrical equipment in the interior of a large apartment
-
Lighting scheme for the floor of a private house
-
Lighting scheme for a 3-room apartment with a kitchen
-
General wiring diagram of a four-room apartment with a kitchen
-
New wiring diagrams
-
Visual diagram of the power supply of the apartment without a separate protective conductor, TN-C
-
-
November 2012
-
Scheme of an apartment electrical panel with a 380 Volt power supply and a protective conductor
-
A visual three-phase diagram of the input switchboard of a private house
-
Visual diagram of the electrical panel of the apartment with a voltage relay
-
Visual wiring diagram of a standard apartment
-
A visual diagram of the power supply of an apartment with grounding
-
A visual diagram of the distribution switchboard of a private house with zeroing errors
-
A visual diagram of the switchboard of an apartment with a three-phase power supply without grounding
-
A visual diagram of the principle of operation of the RCD device in the TN-S system
-
-
A visual diagram of the principle of operation of the RCD device in the TN-S system
-
A visual diagram of the switchboard of an apartment with a three-phase power supply without grounding
-
A visual diagram of the distribution switchboard of a private house with zeroing errors
-
Visual diagram of the power supply of the apartment without a separate protective conductor, TN-C
-
A visual diagram of the power supply of an apartment with grounding
-
Visual wiring diagram of a standard apartment
-
Visual diagram of the electrical panel of the apartment with a voltage relay
Choice of cable and machines
As you already understood, a separate line will have to be laid from the shield to the hob. Most likely you will lay it covertly, in a box, corrugated hose or strobe. In this case, only copper cable is allowed:
- for a single-phase network with electrical equipment power from 5.5 kW to 7.7 kW cable with a core cross section of 6 mm2 (VVG 3 * 6 or PVS 3 * 6);
- for three-phase up to a power of 16.4 kW, 5 * 2.5 mm2 is sufficient (KuVV 5 * 2.5 or KuGVV 5 * 2.5);
After exiting the meter, you must install the machine. This requirement is mandatory. There are more recommendations - to protect the equipment and ensure proper safety, install an RCD (residual current device). Such a bundle allows you to turn off the power not only in case of overload (the machine is triggered), but also in case of problems with insulation (the RCD is triggered). RCD is not the cheapest thing, but the hob is incomparably more expensive, so it's better not to save.
Schemes for connecting the hob to the electric meter
About the parameters of this equipment:
- for a single-phase network, we take an automatic machine for 32 A, an RCD for 40 A with a differential shutdown current of 30 mA.
- for three-phase - automatic 16 A and RCD for 25 A with a differential tripping current of 30 mA.
They are connected to each other by segments of wires of the same section (diagram in the photo above): in a 220 V network 6 mm2, in a 380 V network 2.5 mm2.
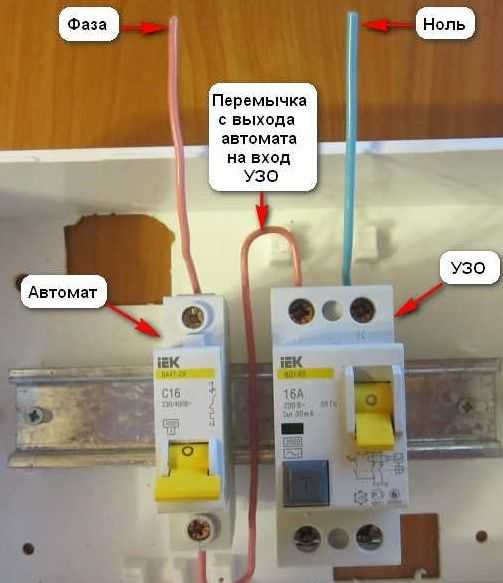
Connection of the machine and RCD
Connecting to the network of the washing machine
As a rule, the washing machine is connected to the electrical network after all other appliances.
First, it is connected to the sewer and water supply. To do this, a tee is installed on the water supply, equipped with a tap and a filter, a hose is subsequently screwed to it, through which tap water will be poured into the washing machine. The other end of the hose is screwed to the machine itself.
To connect the washing machine to the electrical network, you will need a fuse, a separate outlet and an electrician's tool. First, determine which wire section is suitable for connecting a household appliance. The power of washing machines is usually 2000-2500 watts. Using table 4 above, you can easily determine what section the supply wires should have.
If the power outlet for the washing machine is made of a two-core aluminum cable, then a new three-core copper cable must be laid through the new TN-C-S or TN-S systems.
Often in houses, a three-core copper cable with a cross section of 2.5 mm2 is laid on sockets, since in addition to a washing machine, an electric razor, a hair dryer, etc. are included in the same socket.
When connecting the washing machine, it is imperative to perform grounding, for which they purchase a euro socket with a grounding contact. It is desirable that she had ceramic fittings.
It is not recommended to use a tee, adapter, extension cords when connecting such a household appliance, since if contact is weak, they can cause a fire.
A socket designed for use in wet rooms has a higher protection class than usual, so if the washing machine is to be installed in a bathroom, this socket will be required.
It is better to power the socket intended for the washing machine in the electrical panel with a separate group.
When connecting this household appliance, it is forbidden to connect its body to water or heating pipes.
Connecting to the refrigerator network
In every house, including summer cottages, there is always a refrigerator in the kitchen. In order for it to operate as long as possible, it is necessary to correctly connect it.
First of all, they choose the place where the unit will stand, correlating the area of \u200b\u200bthe kitchen with its size.To install the refrigerator, an exceptionally flat surface is required, only in this case it will stand strictly vertically, without falling to one side.
Refrigerators should not be placed near light sources. It must be kept in a cool and dry place. In this case, the risk that it may suddenly fail will not arise.
Be sure to carefully inspect the wire of the household unit. If at least minor damage is found on it, they will certainly be eliminated, otherwise the equipment may burn out.
If no damage was found, proceed to connecting the refrigerator to the mains.
First, the voltage level in the refrigerator and the electrical network are correlated. Usually there is a table on the back of the case that indicates the operating voltage of the device. The same data is present in the passport of the refrigerator along with its technical characteristics and warranty card. In a household electrical network, the voltage is usually 220 V.
It is also necessary to provide a sufficient ground level for the refrigerator. If the voltage levels do not match, then the connection should be made through a household autotransformer. It will help to avoid the negative consequences of power surges in the electrical network, which are inevitable.
As a rule, each refrigerator model and each manufacturer has its own compressor connection diagram and relay connection diagram, which are indicated in the accompanying documents of the device.
When installing the refrigerator, pay attention to how the power cord is located. If it is pinched or during operation, its sheath is rubbed, then later this can cause wires to be exposed and, as a result, a short circuit, fire or electric shock
The accompanying documents must indicate how long it will take to freeze or cool the products placed in the refrigerator. Having connected the equipment to the network for the first time, you should not immediately put food, first you need to make sure that the refrigerator is working properly.
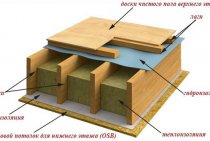
Installation options for electric underfloor heating
Depending on the selected flooring and the type of electric “warm floor”, there are several options for its installation:
- mounting in a screed layer, after which the floor covering is laid on it;
- if it is planned to put ceramic tiles on the floor, then the “warm floor” is laid on the screed, and then on top of it - tiles;
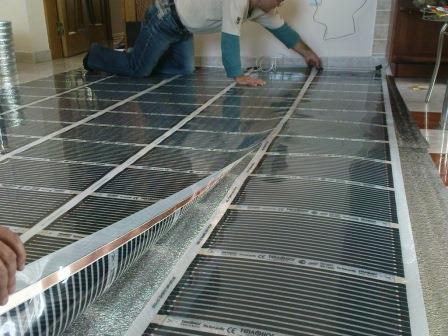
- A “warm film” is laid directly under the floor covering (wooden floor, linoleum, laminate, carpet).
The features of the first two laying options are that the waterproofing layer is initially spread, and then the insulation. A layer of screed is poured on top. If the apartment, equipped with underfloor heating, is not located on the ground floor, but the room located on the floor below is insulated; then you can save on waterproofing, insulation and screed and lay the “warm floor” directly under the tile. However, in any case, you should first thoroughly study the instructions.
When laying a film "warm floor", additional pouring of the screed is not required. First, the entire surface of the floor is covered with insulation, which is better to use polyethylene foam with a foil surface. Then electrical elements are installed, and then, if necessary, a layer of waterproofing.