How to fill the floors in the apartment
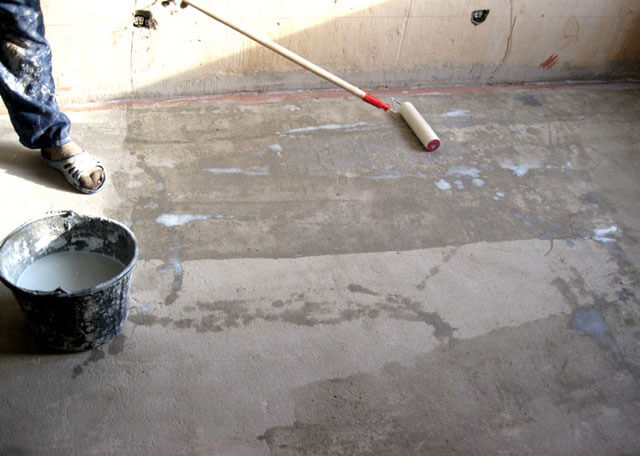
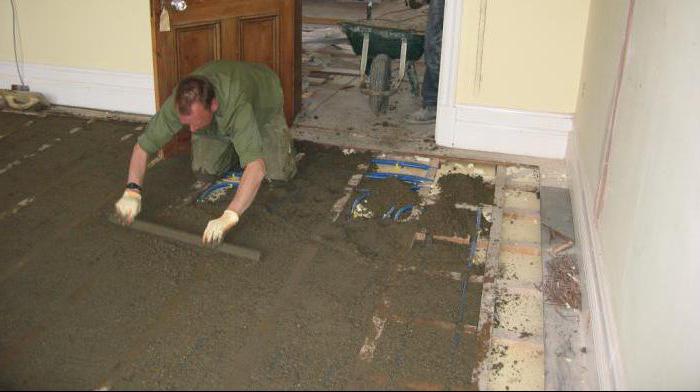
The cement mixture is poured over the floor, moving from the corner of the room. To better distribute the solution, it is necessary to level it using a spatula or trowel. This will control the thickness of the layer.
It is important to make sure that all gaps are filled so that no unevenness occurs during shrinkage. 30-40 minutes after pouring, it is recommended to wipe and finally level the surface
The flooded floor will gain full strength after 28 days. It dries for about 3 days, depending on the temperature in the room and a number of other factors.
There is another option. First, you can create a screed, and in order to eliminate irregularities and defects in its surface, put a layer of self-leveling floor on top. This will allow you not to suffer with the rule. Self-leveling floor mixes are diluted with water to the consistency of liquid sour cream or thick kefir. Then they are pulled apart along the base with a spiked roller.

15 Symptoms of Cancer Women Most Often Ignore Many of the signs of cancer are similar to those of other diseases or conditions, so they are often ignored.
Pay attention to your body. If you notice

13 Signs You Have the Best Husband Husbands are truly great people. What a pity that good spouses do not grow on trees. If your significant other does these 13 things, then you can.

15 most beautiful wives of millionaires Check out the list of wives of the most successful people in the world. They are stunning beauties and often successful in business.

What people regret on their deathbed: revelations from nurses Human life is short. But often people think about what could have been done and done when it's too late.

10 Adorable Celebrity Kids Who Look Very Different Today Time flies and one day little celebrities become unrecognizable adults Pretty boys and girls turn into s.

Unforgivable Movie Mistakes You Probably Never Noticed There are probably very few people who don't like watching movies. However, even in the best cinema there are errors that the viewer can notice.
Advice 2 How to fill the floor with a self-leveling mixture
For laying any floor covering, it is necessary to level the surface. High accuracy and ease of this operation is ensured by the use of a self-leveling mixture. Working with it consists of several stages.
- — dry self-leveling mixture;
- - primer;
- - water;
- - container for mixing;
- - drill with a nozzle;
- - putty knife;
- - needle roller;
- - paint roller.
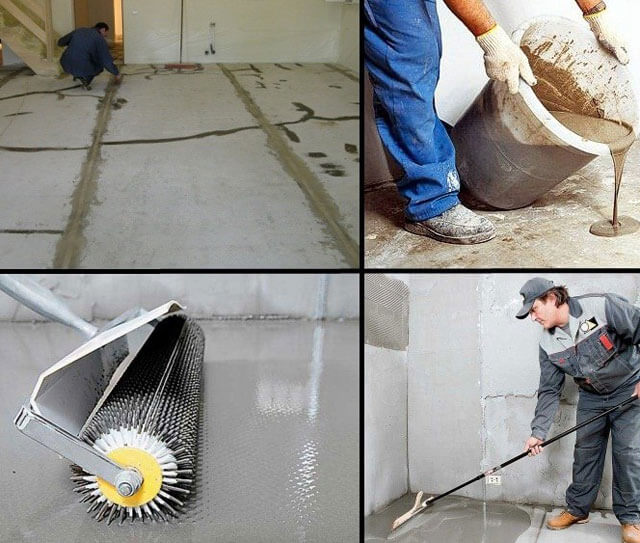
To fill the floor with a self-leveling mixture, its surface must be carefully prepared: remove debris and dirt, remnants of the old coating, varnish, paint, thoroughly clean the surface. Cracks and holes must be repaired with a special putty or pre-screed. After that, a primer is applied to the floor with a paint roller.
It is important to maintain the optimal level of humidity in the room. It is easy to control it by the state of the primer: it changes its shade and foams if the humidity is too high.
In this case, it is advisable to ventilate the room or use heating appliances. The primer composition must fill all the pores in the floor surface so that the self-leveling mixture lies perfectly even. To do this, the primer is applied in two layers. A properly prepared surface will have a characteristic sheen. It should dry well during the day. Only after this time has elapsed can you proceed to the next stage of work.
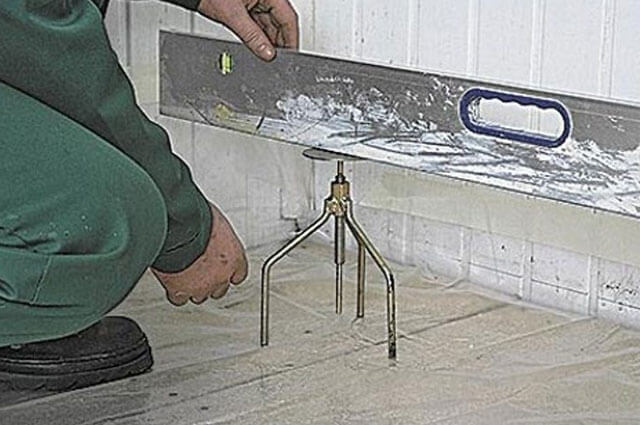
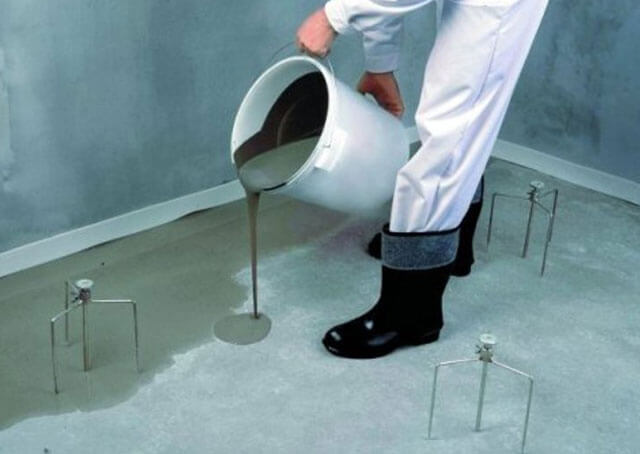
Using the level, determine the highest point of the floor in height.It is a control for the installation of beacons and marking on the walls of the room, which subsequently monitor the maximum level of filling and alignment accuracy.
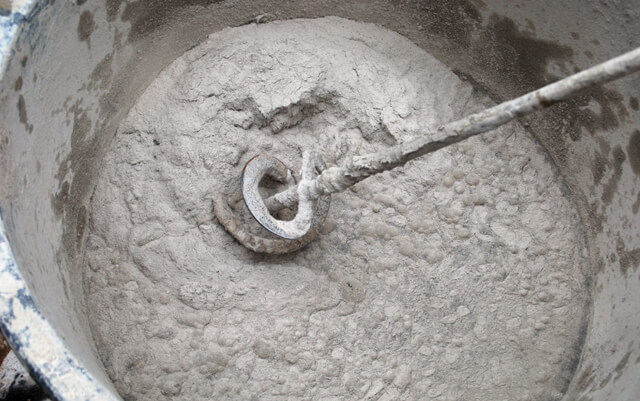
It is necessary to prepare the mixture immediately before performing the work on pouring the floor, because the finished solution retains its fluidity for half an hour. In order for the surface to turn out to be of high quality, you need to carefully study the instructions of the manufacturer of the mixture and strictly observe the proportions. If the prepared composition is too liquid, the screed made by him may crack over time and chips and potholes will appear on it. A thick mortar does not fulfill its practical properties at all, losing the ability to spread freely and level the floor
Also, when preparing the solution, it is important to follow the order of mixing the components: the dry mixture is poured into water to avoid the appearance of lumps. The finished solution is allowed to settle for some time.
To carry out the pouring process, the container with the prepared mixture is turned over, spilling on the surface, and the solution is helped to be evenly distributed with a spatula. When the screed is leveled, it is passed through with a special spiked roller. This helps to remove bubbles and other defects, and also improves the adhesion of the solution to the base surface. The self-levelling compound dries for several days or weeks before the top coat is applied to the floor. Drying time depends on various factors, including layer thickness, type of screed, etc.
When can pepper seedlings be planted in the ground
Bulgarian pepper does not tolerate frost, cool weather and sudden changes in temperature. Therefore, do not rush.
How to plant pepper seedlings in open ground
How to care for an orchid: 5 secrets
How to plant eggplant in open ground seedlings
How to plant strawberries under black covering material
pouring self-leveling floors
In addition to studying the technology of self-leveling floors, it is necessary to understand how to build a self-leveling floor, because the solution consists mainly of two components that should be properly kneaded. It is best to pour both substances into one container and mix with a construction mixer or a drill with a special nozzle.
Use a plastic bucket as a container. The manufacturer usually attaches instructions to the set of substances so that the basic proportions are observed when kneading.
It is important that the solution is prepared in the volume that is enough for a one-time filling. The mixture begins to cool after about half an hour and then becomes unsuitable for pouring.
Next, the prepared solution is poured onto the floor, having previously broken it into sections (strips). You can also pour the mixture from the far corner of the room, leveling with a spatula with teeth on a long holder or a wooden slat (rule). When a homogeneous layer is filled, it is rolled with a spiked roller to remove airy swollen areas.
Now it remains only to wait for the complete drying of the filled layer, the timing of which depends on the thickness and composition of the components in the layer. Also a very important condition is the optimal temperature regime in the room, the framework for which is indicated by the manufacturer.
After hardening, you can move on the surface only in shoes with large spikes or special “paint shoes”. Once the base has dried, you can start applying the top coat from those listed above.
From the foregoing, we can conclude that self-leveling floors are available to almost every owner. You can fill them up on your own. If you do not deviate from the proposed instructions and the one that will be indicated on the packaging with the main materials used, then the result will be a high-quality, strong and durable coating.
If you turn to specialists, they will take responsibility for all stages of work - from the purchase of the necessary substances and materials to laying and commissioning self-leveling floors.
Stages of work
They start pouring the floor after the activities associated with the walls and ceiling are completed, but before wallpapering.
The arrangement of the screed takes place in several successive stages:
- Prepare the surface (remove the old coating, clean it of dust and debris).
- The base is primed to improve adhesion with subsequent materials and strengthen the subfloor.
- They make waterproofing (several types of materials are suitable for this purpose, each of which has its own characteristics).
- Lay thermal insulation (if necessary, if you want to make the floor surface warmer).
- Check the horizontal level.
- Prepare a concrete or cement-sand mortar, it is also possible to use a dry mix.
- Perform a screed.
- Wait for the surface to dry. Then proceed to the installation of the finish coating.
Surface primer
Thanks to the primer, the surface becomes stronger, adhesion to subsequent materials increases, so the floor becomes rough. For traditional concrete-sand mass, any of the universal primers can be used. In small rooms, the composition is applied with a brush, and in large rooms it is more convenient to use a roller. Before starting other work, the primer must dry out - this will take about two hours.
Dry and porous surfaces must be primed again. Before applying the next layer, be sure to let the previous one dry. In the case when the alignment occurs in several passes, a primer is applied before each.
When mounting on the ground, reinforcement is used to strengthen the screed. As it, experts often use a special steel mesh. Also, a fibrous material, fibrin, which is plastic or metal and is added to the solution intended for pouring the floor, is capable of providing the effect of reinforcement. At this stage, various equipment is also being installed - wiring, creating a heating system for floor surfaces.
Determining the level of the surface and placing beacons
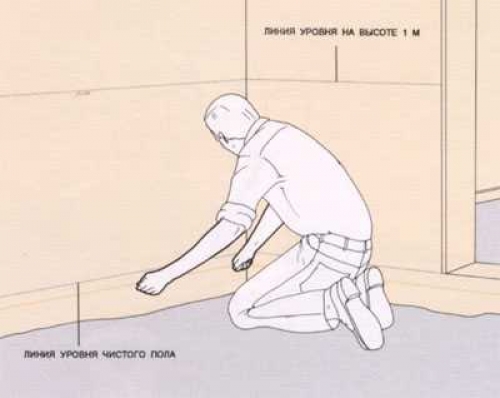
Remove plaster from plastered surfaces 0.25 cm above this line. It is more convenient to perform this procedure when the room is in order. The level is determined to detect the highest point of the surface and the correct pouring of the screed (read: “How to beat off the level of the floor correctly and how to check it“).
- Measure along the wall 100 centimeters up from the door threshold and draw a line.
- A line is drawn along the perimeter of the room, checking its parallelism with a level.
- The second parallel is applied at a distance of 100 centimeters below the control markings.
- In the corners of the room, to make it easier to navigate, nails are driven in on the bottom line and a cord is pulled.
Marks on the supporting structures will help when placing beacons, which will be metal profiles or wood slats placed on the edge. The gaps between them should not exceed the length of the rule with which the mixture will be leveled.
Thanks to the use of landmarks, the process is simplified, and the result is a flat surface. Beacons are installed even if the filling takes place in a small area.
The technology of pouring the floor with concrete the main stages
- Waterproofing and thermal insulation of the base;
- Reinforcement;
- Arrangement of beacons;
- Subfloor device;
- Screed filling.
The cost of the entire complex of works depends on the thickness of the layer and the composition of the applied solution, as well as the complexity of the work. The most affordable option is a cement-sand screed. Using a reinforcing mesh will cost a little more.The most expensive option is the one in which the upper hardened layer is applied; in comparison with a conventional floor, it is 30-40% more expensive.
If it is necessary to pour a concrete floor on the ground, at the preparatory stage, a “zero” marking of the finishing floor is made (the level to which the mortar will be poured is noted). To do this, from the lowest point on the doorway, set aside 1 meter upwards and draw a horizontal line on the walls using a level and a ruler. Down from this line, set aside 1 meter and draw another horizontal line on all the walls of the room. This will be the level of the finishing floor. We hammer nails in the corners and pull the cord.
We remove the top layer of soil to a depth of 35 cm below the mark. We carry out compaction of the soil using improvised means or a vibrating machine.
If the building stands on a strip foundation, and the distance from the finishing level to the ground exceeds 35 cm, we pour a layer of sand, after which we carry out tamping.
- We fall asleep gravel (5-10 cm) and pour it with water, after which we compact it.
- We arrange a layer of sand 10 cm thick, spill it with water and ram.
- We create a layer of crushed stone of a fraction of 40-50 mm (10 cm), which we carefully level and compact, sprinkle with sand or crushed stone on top.
Carrying out preparatory work
You can make a floor screed in the apartment with your own hands, but first you need to decide on some nuances. First, you should practice in the correct preparation of the working mixture. Secondly, you need to know that even floors can be made if beacons are installed before pouring. Proper floor screed in the apartment is not a problem if you purchase all the necessary tools and fixtures.
For this you will need:
- Water level.
- Roulette and knife.
- Trowel and spatula.
- Brush for applying waterproofing (or roller).
- Construction mixer.
- Dishes with a capacity of about 30 liters.
Correct technology: stages
The following steps show how to properly screed the floor in the apartment.
They assume the following:
- Prepare the base.
- Calculate level differences.
- Install beacons.
- Prepare a solution.
- Make a fill.
- Allow the screed to dry.
Waterproofing and reinforcement
You can fill the floor yourself. The cement screed for this is prepared according to a certain proportion. The ratio of materials will be mentioned below, and at this stage the waterproofing should be laid. To do this, you can use roofing felt and other similar materials that are combined with a screed
It is important to remember that the mortar must adhere well to the base, most often a universal primer is used to increase the adhesion characteristics. It takes about 4 hours to dry the surface after applying the primer.
If the floor absorbs moisture well, then it should be primed twice, otherwise it will not be possible to achieve a positive result.
When arranging a floating floor system, it is better to use a plastic film. Filling the floor screed with concrete must be accompanied by a preliminary laying of the reinforcing cage. For this, it is best to prepare a grid with square cells with a side of 100 or 150 mm. The diameter of the rods should be 5 mm.
Filling the floor on the lighthouses
If a bonded screed is planned, then the surface must be primed. Compositions such as "Betonkontakt" will be ideal for this, but other cheaper domestic analogues can be used.
For the arrangement of screeds, a classic cement-sand mortar is used. Three to four parts of sand will require one part of Portland cement grade M400. You can also use ready-made dry mixes for screeds, which additionally include polymer components to improve their properties, but the price of the finished screed will then increase significantly.
It is better to buy sand for screed washed, since the clay, which is part of quarry sand, weakens the screed. To make a strong screed that will carry significant loads, it is necessary to use sand with cement in a ratio of 1 to 3, with lower requirements, the proportion of sand can increase, but not more than four parts.
It is highly desirable to use special substances in the preparation of the screed solution - plasticizers, which greatly improve the properties of the solution, reduce the proportion of water and make the mixture more mobile. The drying time of such screeds is significantly reduced.
When arranging screeds in “warm floor” structures, in addition to the plasticizer, fiber should also be used: polypropylene or basalt. Fiberglass ties do not crack and withstand temperature extremes. It is desirable to use fiberglass in all other types of screeds. Its price is low, and for 1 cubic meter of the finished solution, only 900 grams of fiber are required.
How to fill the floor on the lighthouses? To fill the screed, you will need the following tool:
- For high-quality preparation of the mixture, it is desirable to use a concrete mixer or a construction mixer. But if they are not there, then you can mix the solution manually in a special trough with a shovel.
- To level the screed, you will need a building rule, a spatula, a trowel and a grater.
- In bonded screeds, it is good to use a contact layer, which is applied with a notched trowel.
- To carry the finished solution to the place of work, you will need buckets or a wheelbarrow.
To prepare the solution by hand, dry ingredients should be mixed in a special trough in the required proportion. The fiber is immediately added, and the plasticizer is dissolved in water. After that, water is added at the rate of not more than 15 liters per 50 kg of cement, and even less with a plasticizer. The solution is thoroughly mixed with a shovel, the consistency should be the same as that of plaster solutions. With the mechanized method, everything is simplified and the quality of the solution will be better.
Ready-made screed solution is supplied to the place of work and poured out between the beacons. Work should start from the farthest corner and gradually move towards the door. First, one strip is made between the lines of beacons, and then they switch to another. After the solution has been poured out, it should be evenly distributed with a trowel or shovel so that its level is slightly higher than the lighthouse level. With a sharp edge of the rule, holding it perpendicular to the beacons, starting from the farthest point, the solution "stretches" towards itself.
To make the rule move more easily. it is swayed to the left - to the right and simultaneously pulled. Excess mortar is cut off, and its shortage is compensated with a trowel - the right amount is placed in the pits. The result should be a flat surface without bumps and holes. Thus, a coupler is consistently equipped on all lanes between the beacons. The process ends at the door.
 Substrate under the laminate - cork. You will read about this in our next article.
And here is an article that will tell you about modular parquet.
How to fill the floors in the apartment yourself Video
[ Click on photo
It is no secret that even in new buildings, in panel houses, floor differences reach 10 cm. And modern technologies for laying panel slabs provide that the interfloor overlap lies with the smooth side towards the ceiling, and the rough and bumpy side towards the floor. And on this tuberosity it is not possible to put any other coating other than linoleum. Residents face the problem of how to fill the floors in the apartment.
Preparation for pouring the floor
In such conditions, it is quite possible to pour the floors in the apartment on your own. The modern market for building dry mixes offers a huge number of self-leveling self-leveling floors or levelers from well-known manufacturers, both imported and domestic.
The main feature of such floors is that when pouring them, careful work on beacons and guides is not required, which takes a lot of time and effort. Correctly, according to technology, diluted mixtures, under the influence of gravity and surface tension forces, spread over the surface of the base, hiding all the bumps and bumps, and create a uniform, seamless, shiny coating.
To fill the floor in the apartment, it is necessary to prepare the base. It is cleaned of dirt, dust, too large dents are better to putty to save material. At this stage, if the room is filled without a threshold, it is necessary to make a threshold from the rails to prevent the leveling fluid from flowing into neighboring rooms. Before pouring, it is necessary to remove the old skirting boards and glue the wall-floor joints with damper tape.
After that, the floors must be primed. The primer will provide the necessary level of adhesion of the floor to the base. Primers must be applied at least 2 layers with a roller, after waiting for the complete drying of the previous layer. Priming is usually done until the primer stops soaking into the base. After priming, at least a day must pass before the start of work.
At this intermediate stage, it is worth walking around the room with the level and putting contour marks on the walls for orientation during pouring.
Mixing the solution
After installing the beacons, you can decide what is needed for the floor screed in the apartment, or rather, what material. To prepare the solution, cement, sand and water are required. At the same time, the following proportions are adhered to: 1 part of cement, 3 parts of sand. Water is added gradually to get the desired density, convenient for work.
The mixture is prepared as follows:
- At 30 l. containers (or any other) are preparing dry ingredients. Sand and cement are mixed without adding water. The quality of the solution as a whole depends on how well this is done. It is better to mix not by hand, but with a construction mixer, then the quality of work can be guaranteed.
- After adding water to the dry solution, the mixture is again mixed to the desired density. To find out if the mixture is ready to work, it is taken by hand and squeezed in a fist. If it does not spread and does not disintegrate, then the consistency is normal.
- If plasticizers are added to the finished mixture, this will only improve the mechanical characteristics of the screed. How and how much you can add such components to the solution is written on the package.
- Before use, the solution must be mixed, as sand can settle to the bottom of the container, which makes it heterogeneous.
Technology nuances
The technology of laying the filler floor implies several features that will be useful for everyone to know:
Surface preparation
Since the self-leveling floor screed is always thin, it is critical for a quality result that it has good adhesion to the base. Therefore, surface preparation cannot be underestimated.
There are two frequently encountered difficult cases for which we can suggest proven solutions:
In the kitchen, the old linoleum was torn off and after it there was a jute pile. It is necessary to remove the most shaggy residues, carefully sweep everything with a wet hard broom, and then treat the surface with “concrete contact”, carefully rubbing it into the pile. Pour the screed after the primer has completely dried.
Linoleum lay on sheets of hardboard glued to the base with bitumen. If you intend to lay tiles in the future, then the hardboard and bituminous layer must be removed. It is a very long and hard work; a light, sharply sharpened ax copes well with it. In conclusion, the surface is also primed with "concrete contact".
proportion of water. Sometimes, in order for the composition to spread better, performers increase the amount of water in the solution. This should not be allowed for the following reasons:
Firstly. excess water dramatically reduces the strength of the screed.If this is not essential for laying linoleum and laminate, then when tiling this “trick” can ruin everything and the tile will fall off along with pieces of the self-leveling floor.
Secondly. the solution consists of a mixture of many components - binder, surfactants, filler (fine sand), etc. In a liquid solution, they begin to separate into layers - the sand settles down, the smallest components float up and, when dried, form a layer of loose dust, similar to silt. The quality of the screed is getting worse.
The key to success in pouring a self-leveling floor with your own hands is accuracy and thoroughness. For the correct filling of the self-leveling floor, just follow our "recipe".
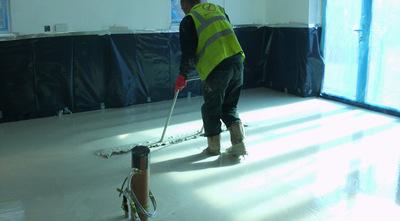
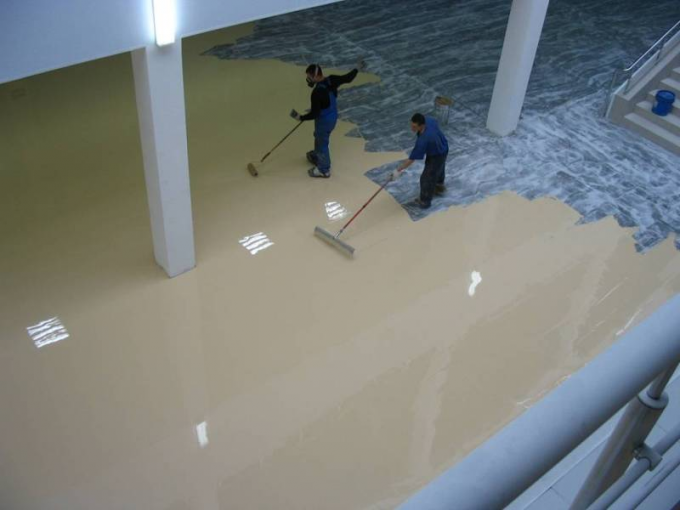
Filling the floor
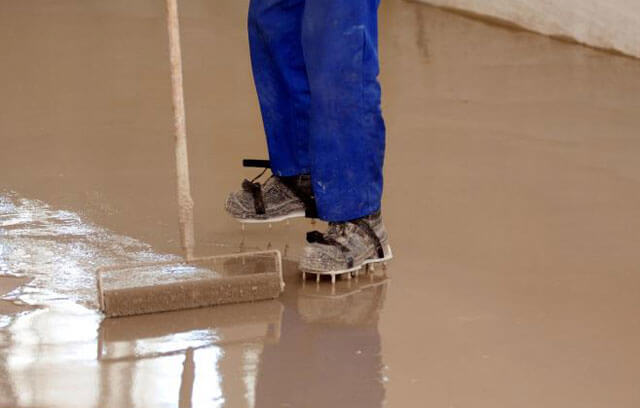
The surface of the base in one room is recommended to be poured for one day. In this case, the floor will be homogeneous in composition. Pour the mass begin from the far corner of the room. In order to level the solution layer, they use the rule, evenly distributing the material within the fixed beacons.
A needle roller is required to remove air in order to avoid the formation of voids inside. After the surface is treated with it, the screed is finally leveled. These steps are repeated until the base is completely filled.
When choosing the better to fill the floors in the apartment, you need to take into account that the sand-cement mortar sets in an hour. After that, it is extremely difficult to level it. Therefore, it is recommended to work with liquid mixtures for the floor together. One worker prepares the solution, and the other at this time is engaged in pouring and leveling.
Ready mixtures have a different consistency, more liquid. They spread, leveling horizontally, and as a result, the surface is smoother.
The work does not end with filling and leveling. The surface must be protected from temperature extremes, air currents and the penetration of sunlight. The solution is covered with a film from time to time or moistened so that the surface does not become cracked.
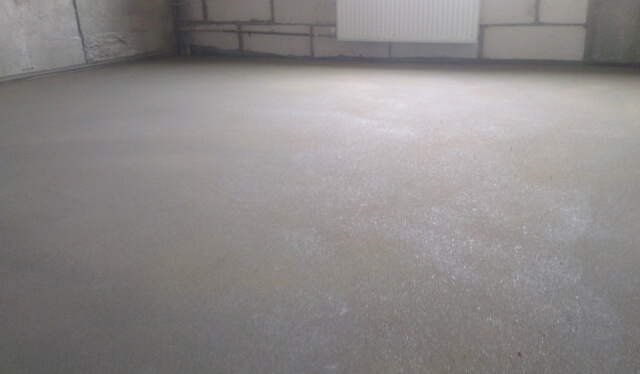
Concrete gains the required strength in 28 days, and cement-sand mortar is much faster - within two days. This should also be taken into account when choosing how to fill the floor in the apartment. It is not difficult to check whether the screed is dry - there should not be a trace on it when pressed. However, so that traces are not visible on the flooded floor, it is recommended to use a special supporting island made of some materials.
Be sure to remove the slats that served as reference points. The voids formed as a result are also filled with a mixture.
Sanding is needed on the concrete floor when it is completely dry. After that, the base is ready for the installation of any floor covering. Those floors that were filled with self-leveling compounds can be used after 6-12 hours.
However, do not rush to lay the flooring and put the furniture. To withstand such a load, the coating must stand for several days. Laying tiles, linoleum, laminate and other modern materials is possible only a week after completion of work.
There is nothing complicated in how to pour a screed in an apartment. You only need to follow the instructions given, although it is possible that in the process of work your own developments will appear. But before proceeding with the implementation of the planned event, you need to deal with some issues - this will help save money and at the same time optimize the process.
First of all, you need to decide on the components for pouring, and choose the preferred option - cement-sand mortar, concrete or ready-mix. The latter one is more expensive, but it is much easier and more convenient to use. But in order to prepare a solution from the first two materials, you will have to comply with the required proportions recommended by the manufacturer.
In addition, in order not to be distracted during the work, it is recommended to prepare all the necessary materials and tools in advance.And you also need to find an assistant in advance, since it is impossible to fill the floors alone. The solution dries quickly enough, and therefore one person should be engaged in pouring and leveling the floor, and the other should prepare the mixture. Alone, it will not be possible to have time to level the mass before it hardens.
You can pour the floor in the apartment with your own hands if you have minimal repair skills. The first time this work will take a lot of time, but after the filling is done in one room, in another it will go much faster.