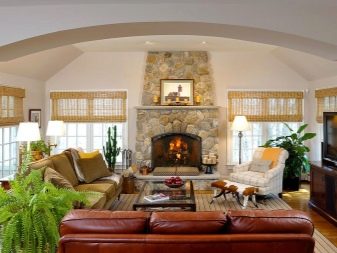
False fireplace trim
Not everyone knows how to make a decorative fireplace with their own hands so that it differs little from the real one. Finishing plays an important role in the design of the portal. So, with the help of the same putty, you can make a variety of textures. If you pick up putty with a foam sponge and apply it to the surface with jerky movements, you will get an interesting rough texture.
You can leave it as it is, but it is better to paint the surface with dark acrylic paint and immediately walk over it with a damp cloth, so the dark color will remain only in the recesses. Then apply silver or gold paint to the tip of a brush or foam rubber sponge and walk lightly, barely touching the surface.
If you have leftover drywall, then you can cut bricks out of them to decorate a false fireplace. It is better to give them a not quite correct shape, then it will be possible to make an imitation of the old, already lived, masonry. The surface and side of the bricks are decorated with putty, it is applied with a spatula, deliberately leaving irregularities, allowed to dry, then painted in a suitable color.
With beech wood filler, you can imitate a stone surface. It is applied to the fireplace portal with a spatula in chaotic movements. Then they draw the outlines of the stones with some kind of stick, take a bristly brush and, as it were, pierce the still raw putty with it, thus obtaining the texture of the stone, and let it dry. To make the stones look more natural, they are shaded with dark brown and black acrylic paint.
Do-it-yourself imitation of a foam plastic fireplace
The choice in favor of foam plastic makes it possible to create a lightweight, mobile imitation of a fireplace in a limited time and practically for nothing. For the construction of a fireplace portal, you can use standard square slabs 100x100x5 cm in size. The base and countertop are made of 100 cm long slabs. Since the foam plastic easily bends under load, it is advisable to reinforce the countertop with plywood or boards.
To assemble a foam fireplace you will need:
- roulette;
- level;
- stationery knife;
- marker;
- square;
- rasp;
- glue or liquid nails;
- thick wire for the manufacture of gratings and pokers;
- finishing;
- rechargeable lamp that simulates a flame.
If it is planned to finish the product with plaster, then a reinforcing mesh, a set of steel spatulas and a gypsum mixture will be required. However, if a decorative fireplace is conceived as a mobile or temporary structure, then its decoration is carried out with wallpaper or adhesive tape.
When it is planned to build a stationary hearth, the work is carried out in the following sequence:

- A project is being made. It consists of a scheme for fixing plates, a type of finish and a calculation of building materials.
- The work site is being prepared. Carpets are removed from the floor, furniture and household appliances are covered with a protective film.
- Blanks are cut to assemble the portal. They are attached to the base and glued together. Raised walls are covered with countertops.
- A curved opening for the hearth is cut out. Irregularities are carefully removed with a rasp. The product is cleaned of dust and grains of foam.
- The portal is pasted over with a reinforcing mesh from the inside and outside. A thin layer of plaster is applied to it. The putty is leveled and treated with a liquid primer.
The final stage is the finishing of the portal and the internal arrangement of the hearth. The fireplace is pasted over with decorative strips and decorated with various crafts.
Installation rules
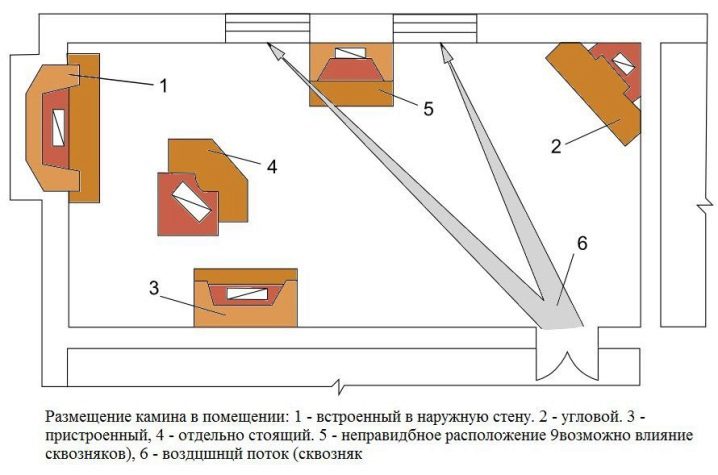
The rules for installing any fireplace require choosing a good location. For example, an essential detail for corner options is the presence of a quarter-meter indent from the fireplace wall.This space should be left for the free circulation of oxygen. Although you will need quite a lot of space, installing this particular type of hearth will significantly improve heat exchange.
The rules require an accurate calculation of the dimensions of the furnace unit. The heating part must correspond to the heat loss of the room.
In most cases, the calculations assumed by SNiP should take into account:
- number of window openings;
- type of glazing;
- characteristics of the used insulation;
- number of storeys of the building;
- wall thickness and material.
Installation rules suggest that one stove is used to heat a room no larger than 40 square meters. m. You should not expect to heat 100 square meters with one fireplace. m in a townhouse. The option with one fireplace on several floors is also undesirable. In this case, it is impossible to ensure uniform heating, as warm air rises. On several floors it is better to build different fireplaces, albeit smaller ones.
A significantly reduced size of the fireplace in relation to the dimensions of the room will lead to large temperature fluctuations in the room. A greatly increased size of the fireplace will lead to stuffy rooms, as well as an overuse of firewood.
The rules for choosing the size of the furnace for a specific room require precise handling of numbers and indicators. The heat loss of the room is calculated from the indicators of heat loss of one cubic meter of the room - 21 kcal / hour. For calculations, it is enough to multiply the external dimensions of the room by 21. For example, in a wooden house, these figures can be 5.5 meters wide, 6.5 meters long and 3 meters high. The conditional volume of heat losses is 107.25 * 21 \u003d 2252.25 kcal / hour.
It is known that 1 cu. m fireplace produces an average of 300 kcal / hour. This means that the heat loss of the room must be divided by 300. 2252.25 / 300 \u003d 7.5075 cubic meters. m. The permissible height of the fireplace in the room is up to 2 meters. If you divide 7.5 by 2, you get the area of \u200b\u200bthe stove, equal to 3.75 square meters. m.
Protection against external influences
Since aerated concrete has a high water absorption, for its use in the open air, protective measures are required. Canopy or gazebo
protect outdoor fireplace from direct exposure to snow or rain. However, the high humidity on the street still exists. There are three common ways to protect aerated concrete surfaces:
- Facing;
- Hydrophobization
; - Waterproofing.
Facing can serve as a tile or brick. In the first case, additional protection is not required; in the second, hydrophobic impregnation can also be applied to the brick.
Hydrophobization
involves the use of a special water-repellent composition (impregnation), which does not form a surface film
, but penetrates into the protected surface by several millimeters.
An important rule for the use of aerated concrete blocks in the construction of outdoor fireplaces is the construction of a high foundation 10–20 cm above ground level. Such that the earth and puddles in no case come into contact with the blocks.
So, subject to the technology of erection and finishing, the use of aerated concrete blocks saves money on bricks and speeds up the laying process.
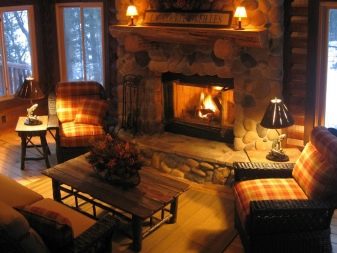
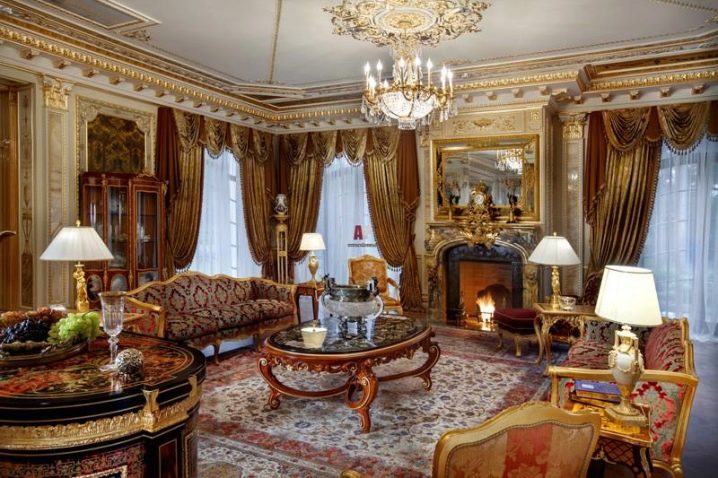
What could be more pleasant than a moment in the cold season when family or friends gather in front of a cozy fireplace. Having a fireplace in the house is no longer a luxury, but only an additional element of decor.
Today, in new buildings, a fireplace is often developed at the planning stage. Last but not least, this is due to rising energy prices. Aerated concrete is easily processed and therefore can be used to create all the structural elements of a stove or fireplace in your home. Autoclaved cellular concrete is as light as wood but as strong as stone. It belongs to non-combustible building materials and, therefore, an aerated concrete fireplace will be completely fireproof.
Step 1: choose a location.
Determination of the construction site is an important component of the whole process, since the decision made will then be impossible to change. You need to make sure that the fireplace visually matches your interior and is safe in the place allotted to it.
Try to answer the following questions for yourself: will the fireplace be too close to the furniture? Is there a possibility in the appropriate place for the chimney outlet? Preliminary planning will help to avoid blunders in the following stages.
Step 2: Marking the floor for the construction of a fireplace.
If you have already decided on the project and materials, then the surface marking is carried out. Using a pencil, outline the plan of the fireplace.
Step 3: Processing the material.
As for the processing of aerated concrete, with the help you can give it almost any shape. The corners of the blocks are cut off, polished to the required size. This is done using a gas block saw and a grater to process its surface. In principle, it is possible to build a fireplace or stove yourself, but this will require significant technical skills, knowledge and a high level of maintenance to ensure safe operation.
Step 5: Fireplace Insert
A fireplace insert is called a plinth (elevation) for a cast-iron firebox, which can be laid out of aerated concrete and plastered upon completion of work. Before mounting the cast-iron firebox, a stainless and asbestos cardboard sheet is laid on the horizontal surface of the fireplace insert.
Step 7: Fireplace Exterior.
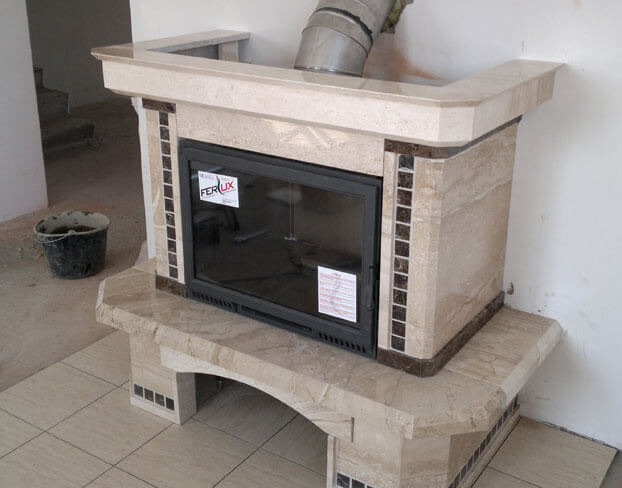
When choosing facing materials, you need to make sure that they are fireproof and fireproof. There are many options for decorating a fireplace. Suitable for example, refractory bricks or artificial stones of industrial production, which will give the fireplace a unique look.
Rules for installing a fireplace insert
The quality of the fireplace operation largely depends on how correctly all instructions were followed during installation.
So, professional masters recommend to be guided by the following rules:
when determining the place where the fireplace will be located, it is important to make sure that the walls adjacent to it and the ceiling surface endure high temperatures;
the arrangement of the fireplace involves the presence of a flat stone or ceramic base;
as a safety measure, the base of the furnace should be equipped with a sheet of steel, the thickness of which should be more than 2 mm;
the role of a heat-insulating material will be perfectly performed by basalt-based wool, which must be laid between the surfaces of the floor and ceiling. Such cotton wool is characterized by high heat resistance (heating up to 900 ° C will not cause any harm to it);
one of the features of laying the firebox is the need for its gradual rounding, for which each of the subsequent bricks must be laid 6 cm closer to the beginning of the previous brick;
the remains of the mortar mixture formed after laying a row of bricks must be removed with a sponge;
speaking about such a parameter as the thickness of the walls of the furnace, it should be remembered that this parameter should be 20 cm at the side walls, and 10 cm at the rear edge;
provided that if the fireplace is mounted in a structure made of stone, then its arrangement can be carried out near any desired wall
But if wood is the main structural element of the house, then a special layer of protection must be built before installation. For these purposes, you can use either standard bricks or building blocks;
the diameter of the grates mounted in the decompression chamber must correspond to the power of the firebox used;
in order for the surface not to be damaged during the operation of the fireplace, it is important to bring the chimney pipe beyond the roof by at least 1 meter;
those sections of the chimney that cross the attic must be treated with a layer of thermal insulation;
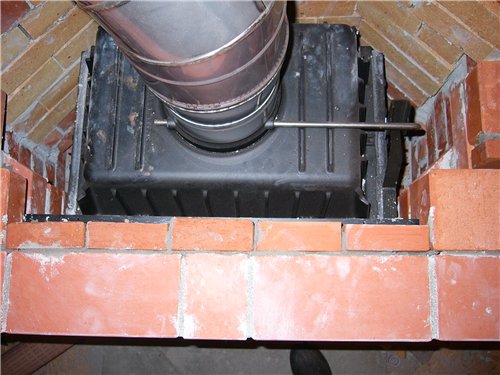
the junction of the fireplace insert and the chimney pipe must be completely sealed;
in order for the air necessary for ventilation to enter the gas outlet channel, it is required to provide a gap of 5 cm at the outlet of the fireplace;
the minimum height of the firebox above the floor surface is 20 cm;
control over the air supply to the furnace will help improve the installation of a special throttle-type damper mounted in the blower;
excess condensate can harm the system, so it is important to provide for the possibility of draining it from the pipe.
How to lay a fireplace insert with your own hands.
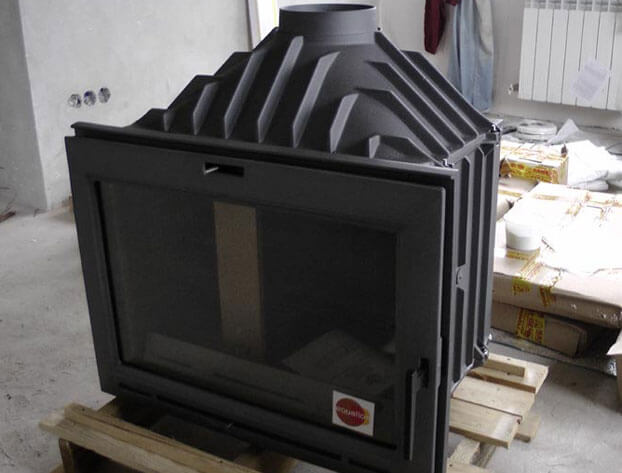
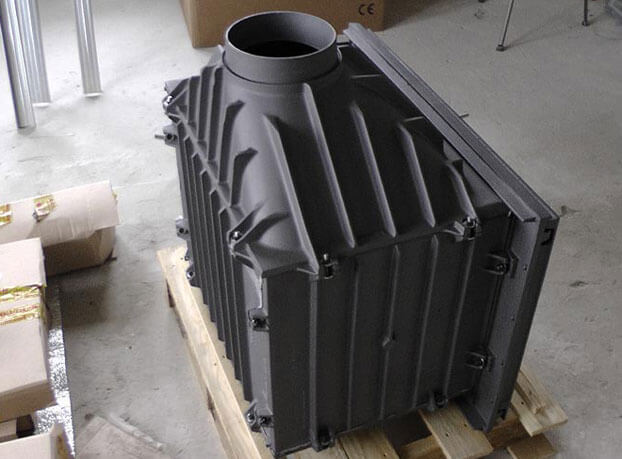
A fireplace is not only a decoration in the house, but also an excellent climate equipment that can heat the whole house. The main component of this design is a cast-iron or steel fireplace insert; the process of fuel combustion will take place directly in it. Room air will pass between the body of the firebox and the cladding, after which it will heat up. In the air chamber, the air is accumulated and distributed through the air ducts throughout the house. All harmful products of combustion exit through the chimney without penetrating into the room.
When choosing fireplace inserts, you should consider several factors:
- The material of the firebox must be massive and of high quality.
- The tightness of the structure plays an important role
- A good supply of outside air for combustion is essential for the quality of the fireplace.
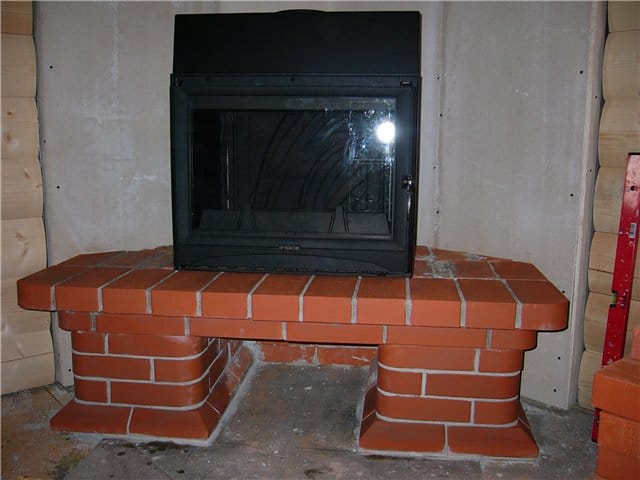
The weight and wall thickness of the cast-iron structure should be approximately 0.8-1 cm, it is better to choose a cast-in-place device, then the passage of smoke through the seams will be impossible. The best thickness of a steel firebox is at least 4 mm. Both types of these heaters must be overlaid with fireclay bricks that accumulate heat.
How to overlay a fireplace insert with bricks - step by step instructions
The imposition of a fireplace insert, using a brick, can improve its heat transfer several times. Preparatory work begins with the selection of the project and the preparation of the material. The Moscow Engineering Center does not recommend using a double silicate brick (M150): the material reacts very poorly to sudden temperature changes. The most optimal choice is oven or refractory bricks, due to their ability to retain heat for a long period even after the fire is extinguished, giving it to the room and resistance to temperature changes. After the fireplace is extinguished, such a brick will continue to give off heat to the house. In addition, with such material, it is not necessary to create insulation in the firebox, and the imposition process will be much faster. The masonry mixture is chosen by the owner - it can be a cement-sand mortar with the addition of a plasticizer or clay, which is best added after it is well soaked. To do this, leave it in the water for at least a day. Let's get to work:
- The overlay starts at the base of the fireplace. The first row serves as a ruler for the entire structure. An error in this part can provoke problems in further work. Each next row should be laid with a distance of about half a brick, with the formation of joints similar to the "T".
- On the upper compartment, it is necessary to carefully make a gap for air to enter the structure. These openings must be large, as the air must then circulate completely freely.
- After that, we create a countertop (resistance of the furnace part). For its implementation, it is necessary to prepare a wooden formwork that meets the dimensions of the fireplace circumference. We cut the brick, taking into account the actual size of the formwork, carefully lay it out, while reinforcing the structure with rods of 3-6 mm. Next, fill the entire formwork with a mixture of cement, carefully tamping it to avoid voids. The solution flowing in the process is necessarily removed, after which the structure must dry for two days. After that, we lay the countertops from above and below.It is necessary to take into account the weight of the top tabletop, without a counterweight as a top masonry, it may not hold well.
- Laying out the chimney can be made in two forms - straight and narrowed. When creating a complex tapering version, it is necessary to calculate the required angle of its decrease, and when erecting a straight chimney, we lay out the material in straight lines. At a height of about 30-40 cm to the ceiling, holes are created that guarantee the exit of heated air. At least 3 rows below the holes, the chimney is connected to a steel pipe.
The process is not particularly complicated, but requires a careful approach and accurate calculations.

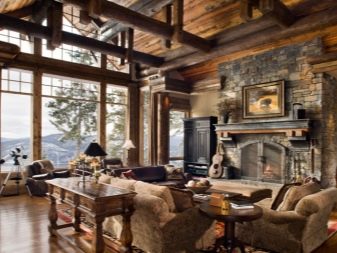
Imitation of a fireplace from foam blocks
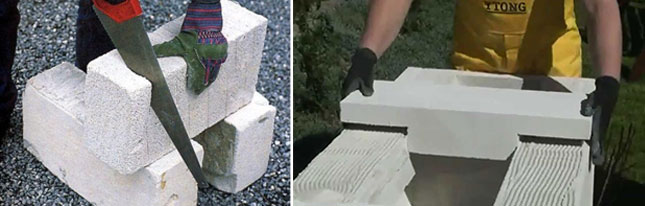
In a city apartment, it is impractical to build heavy structures made of brick and concrete in order to simulate. This will create excessive pressure on the floor slab, which can cause uneven shrinkage of the house and the appearance of cracks in the walls. Foam blocks are ideal for simulating a fireplace. They have a low specific gravity, large volume and clear geometric shapes. Working with such stones is easy and simple. Their surface can be finished with almost any type of cladding.
 Fireplace portal from foam blocks
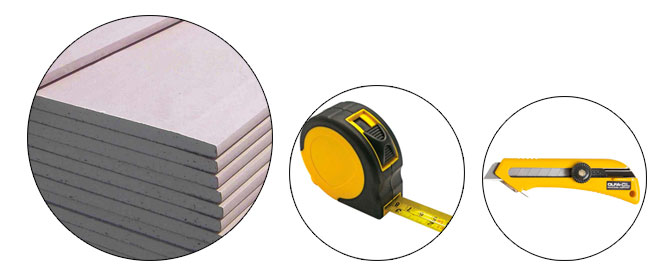
For work, you will need the following materials and devices:
- building level;
- roulette;
- hacksaw;
- steel spatulas;
- rasp;
- marker;
- glue for concrete;
- paint brush;
- liquid primer;
- putty;
- sandpaper and abrasive mesh;
- skirting boards and moldings.
In order to build your apartment fireplace from foam blocks, there is no need to create a solid foundation or remove the flooring to concrete. It is enough to lay a sheet of plywood on the floor.
You are offered step-by-step and detailed instructions for simulating a decorative foam concrete fireplace:
- Make markings on the floor and walls. Make a base and fix it to the floor. To do this, it is better to use double-sided tape so as not to damage the coating.
- Lay out the first row of stones without gluing them. If necessary, adjust the masonry fragments.
- Connect the wiring to the base. There is no connection to the network at this stage.
- Glue the starting row of foam blocks to the base. Check its horizontal level. For gluing, 1 mm of adhesive solution is sufficient, since the edges of the blocks are perfectly even.
- Lay out the portal in accordance with the project. If an arched shape of the hearth is provided, then it is made with a narrow hacksaw. Remove roughness with a rasp.
- The table top is installed. A large aerated concrete slab or a custom-made product is used. It is fashionable to make a countertop from a board or a bar.
- Treat the foam blocks with a liquid primer. Since this material is porous, the procedure must be repeated twice. The primer will make the surface of the fireplace resistant to moisture.
- Knead the solution and cover the fireplace with a layer of 2-3 mm. After the putty dries, it is sanded and polished.
- The portal is faced with finishing. It matches the interior of the room. Adhesive film, wallpaper, paint, ceramic tile or artificial stone is used.
The final stage of construction is the arrangement of the hearth. One of the advantages of aerated concrete structures is its mobility. At any time, a light fireplace can be moved to a new location. Such a need arises when installing new furniture or carrying out repairs in the apartment.
Features and varieties of fireplace inserts
It is important to remember that the fireplace insert will work as efficiently as possible if certain conditions are met:
- the chimney must work reliably;
- the fuel used to kindle the fireplace must be of high quality and not have any harmful impurities;
- the skill of operating the fireplace is welcome.
The high-quality operation of the chimney is extremely important so that the draft is continuous, and all harmful combustion products formed during the combustion of fuel are freely removed to the outside. Therefore, the device for the chimney for the fireplace must be impeccable.
Certain requirements are also imposed on the chimney due to the fact that during the operation of the furnace it is necessary to take into account the following features of the chimney:
- the height of the chimney is directly proportional to the draft forces, therefore, in order to increase this parameter, a longer chimney system should be equipped;
- Many small nuances, which are far from always immediately noticeable, contribute to a decrease in thrust: various cracks and chips in the pipe body, structural elements that are poorly adjacent to each other, an open furnace door, etc.
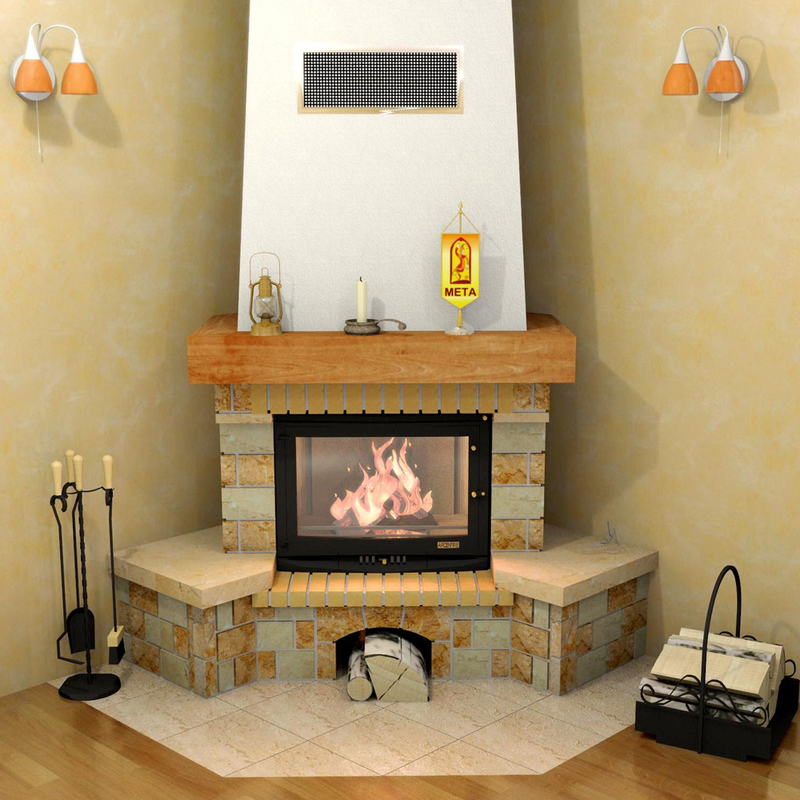
If we talk about the types of fireboxes, then it is customary to distinguish between two main categories: the most common open fireboxes and closed fireboxes. Each of these structures has both its advantages and disadvantages, which should be discussed in more detail.
A fireplace with an open firebox is different in that the owners can easily see the fire burning in it, which is often quite effective.
According to the type of construction, such a firebox is a niche in the surface of the wall, for the arrangement of which it is first necessary to strengthen the fireplace foundation. Closed hearth fireplaces have a higher heat output compared to open hearth units because the heated air does not escape to the outside as it does in models without a door, but the aesthetics are certainly higher with an open fireplace.
A fireplace with a closed firebox has a number of undeniable advantages:
- the whole structure is very convenient to use due to its compactness;
- installation of such equipment does not carry any complexity;
- it is much easier to regulate the process of fuel combustion in such designs than with open-type systems;
- thanks to the heat-resistant glass included in the design of such a firebox, any ignition due to the emission of sparks and other unpleasant situations is excluded;
- The performance of fireplaces with a closed firebox is very high (as a rule, the efficiency is more than 80%).
In addition, all installation work, which includes both the lining of the fireplace insert and the external design, for a closed firebox is more expensive and more complex.
Best Answers
Brother Ivanushka:
No. Firstly, concrete contact is not intended for that at all. It is a suspension of coarse sand in a polymeric binder and serves to roughen reinforced concrete products (which is what its name says!) - the method is not very convenient, but no one has suggested anything better yet. The brick itself perfectly “holds” binders - much better than surfaces treated with concrete contact. Secondly, in the furnace business, only clay is used as a binder. Because only it has a coefficient of thermal expansion exactly the same as that of a brick. And like ceramic tiles, made from the same clay. Porcelain stoneware, on the other hand, has a different coefficient of thermal expansion, and it will not stick to a heated brick surface than its glue. And besides, he himself tolerates heat very painfully - he can burst (I had this).
Maybe, of course, your idea will work. That is, no matter what, it will still hold. First of all - if the surface of your fireplace does not heat up at all. But to make it reliable, you need to do it the way it is supposed to, as all people who are literate in this matter have been doing for centuries. And do not invent in a field that is completely unfamiliar to you. No offense to you be told!
For the information of those who answered before me: 1) Porcelain stoneware has nothing in common, except for the name, with granite.And, in particular, it is not radioactive. 2) It is just as unacceptable to treat the oven with a primer as with any other polymer binder.
Andrey:
i.e. inside the fireplace or outside? if from the inside, then everything can not fall off.
Observer:
You can ... Just do not forget that granite and all its derivatives are radioactive ... That is, they have an increased background ...
Clara:
Can primer it exactly
IlKhan, Or just Khan:
There is no need to apply any primer at all for facing the fireplace. Tiles, stone, porcelain tiles are glued to heat-resistant mastic for stoves and fireplaces, according to the instructions. I copied the characteristics of concrete contact from different sites
Pay attention to the operating temperature and the area of application (smooth dense concrete): Specifications BOLARS Betonokontakt Name Value Color Light pink ph 8.0-9.0 Drying time 3 hours Work temperature -40 С +60 С Operating temperature +5 C +30 C Frost resistance 5 cycles Consumption kg/sq. m 300 g/sq.
m Maximum particle size 0.3; 0.6 mm Betokontakt (Betonokontakt) Knauf is a polymer dispersion with the addition of quartz sand, used for pre-treatment of walls and ceilings made of monolithic concrete, floors. Used for interior work. Consumption of concrete contact primer: 0.4 kg/m2.
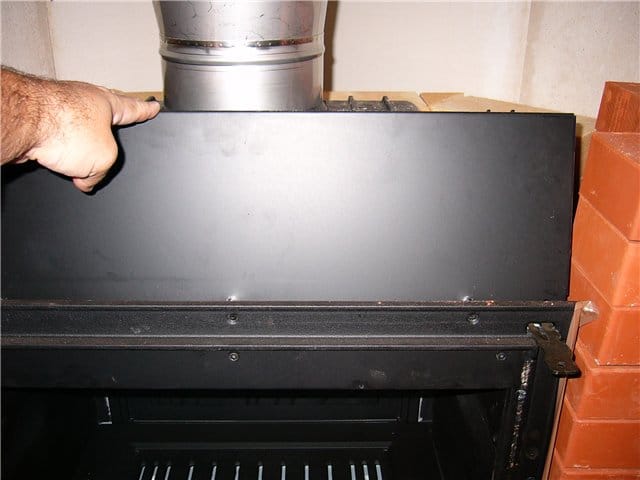
Furnace lining process
The supply and removal of heat are very important points in the operation of any fireplace, so it is important to remember that in cast iron samples about 30% of the heated air escapes through the base, and the rest leaves the furnace through the walls of the body. To align all the indicators, a special pipe should be attached to the furnace, designed to remove air
For these purposes, a pipe made of PVC with a minimum cross section of 150 mm is quite suitable. Further, the firebox must be equipped with a door on the back of the entire structure for more convenient access to the fireplace and removal of combustion products. Upon completion of the installation of the combustion chamber, it is required to responsibly approach the device of the chimney.
Building a fake fireplace from foam concrete
You will need:
- foam concrete blocks and slabs;
- hacksaw;
- adhesive for porous concrete;
- GKL putty;
- trowel;
- fiberboard sheet;
- putty knife.
It is easy to build a false fireplace with your own hands from foam blocks. This is a fairly light material that can be easily cut with a conventional hand saw. The first step is to decide on a place for the future hearth.
Example 1. The device of a decorative fireplace.
The appearance of the fireplace will depend on your wishes, imagination and the size of the home.
First, a foam concrete slab is laid on the floor, it can be put on glue, but this is not at all necessary. The outer corners, which will be located directly in front of the false fireplace, should preferably be rounded for safety reasons. The height of the base should not exceed 10 cm.
Next, the side walls are made, the foam blocks can be installed vertically - in this case, the structure will turn out to be narrower - or laid in a horizontal position - for a wider false fireplace. If you wish, you can saw foam concrete blocks and imitate brickwork. The parts are fastened together with a special glue for foam concrete or a sand-cement mixture.
After the side walls are installed, a foam concrete slab is glued on top of them, which will serve as a mantelpiece. You have an almost finished frame of a decorative fireplace, in which the space for the firebox takes up too much space. In order to reduce it, the front of the fireplace with a window for the firebox is cut out of a sheet of fiberboard or plywood.
If desired, the arch can be given the appearance of an arch or made even. Fiberboard is glued to the same glue as the blocks. If neither plywood nor hardboard was found in the household, then the front panel can be cut out of corrugated cardboard, but in this case it must be treated several times with a solution of PVA glue and water, and also thoroughly puttied.
Next, you need to apply a thin layer of putty over the entire surface, paying special attention to the seams and joints. With a flat spatula, the mixture is applied to the trowel, then at an angle - from the bottom up - the putty is distributed
Corners are best puttied with a spatula. Now you need to let the first layer dry, and then apply the finishing layer of putty.After drying, they are passed with fine sandpaper, the surface is completely ready for decoration.
Finishing
Aerated concrete masonry will be attractive if, at least
her
the surface will be smooth, and the seams will be even. Further surface finishing or cladding will provide aesthetic appeal.
Since aerated concrete is used as a maximum material for lining a metal firebox, that is, it is not exposed to high temperatures, the surface finish does not have to be made of refractory materials. Enough high-quality plastering or cladding.
To give the surface an attractive look, the following materials are used:
- Plastering followed by painting. Surface plastering is a budget option, the advantage of which is a low price.
- Cladding with tiles or bricks. The cost of facing material is offset by the representative appearance of a beautiful fireplace.
Thus, you can both save on masonry finishing and turn the fireplace into a central piece of a chic interior.
How to make a fireplace with a cast-iron firebox
One of the undeniable advantages of such fireplaces, which were not mentioned above, is the ability to mount the base for them directly on the floor of the room. The only exceptions are the floors of a floating structure. In addition, you do not have to think about how to equip the fireplace with good draft or arrange an ash pan. All this is already provided by the design. In a word, making a fireplace with a cast-iron firebox with your own hands is easier than laying out the simplest open brick fireplace.
Base device for a cast-iron firebox
- You need to choose the right place to install the fireplace. First, the room must have sufficient space. Experts do not recommend installing this heating equipment in rooms with an area of \u200b\u200bless than 20 squares. In addition, when choosing a place, do not place the fireplace in line with the openings of windows and doors.
- In the event that the room is ventilated through a ventilation system or with an air conditioner, it is necessary to provide additional air flow to the room. For example, install a ventilation pipe with an automatic ventilation system. A closed hearth fireplace requires an average of 500 cubic meters of air
After choosing a place to install the fireplace, make a base for it.
To do the work with your own hands, you need to put a layer of waterproofing, and arrange a reinforced cement screed on top. If the floors are wooden, then a layer of thermal insulation is also needed. The thickness of the screed is at least 10–15 mm; a metal mesh can be used as reinforcement.
After the base reaches the desired strength, you can proceed to the device with your own hands a pedestal under the cast-iron firebox itself
. It can be made of brick, aerated concrete blocks or other material, or you can purchase and install a ready-made plinth made of natural stone.
If the floors do not differ in strength, then it is better to give preference to aerated concrete
as a sufficiently strong and light material, which can be effortlessly given any desired shape and size. Subsequently, it can be plastered or lined with ceramic tiles, natural or artificial stone.
Blocks are laid on special glue or ordinary cement-sand mortar
. The surface of the pedestal is leveled with a layer of plaster 1–1.5 cm thick.
Please note: the pedestal for installing the fireplace must be perfectly flat. Installing the hearth on an uneven surface is prohibited, since with a significant skew, the risk of damage to the internal elements of the fireplace increases
In addition, the heating unit will work unevenly.
Installation of a cast-iron firebox
Regardless of what the base for the firebox is made of, a layer of thermal insulation is laid on it, for example, asbestos cardboard and a sheet of roofing iron.
To properly install the firebox with your own hands, place the bars in place of its installation, align the firebox in place, and then carefully remove the lining. The chimney of the firebox, made in the form of a metal sleeve or pipe, is installed in the hole intended for it and taken out through the ceilings and roof to the outside in compliance with all fire safety rules.
Exterior finish of the fireplace
If the lower part of the fireplace is already ready and needs only a decorative finish, then you only have to close it on the sides and top (see Finishing the fireplace).
Answering the question of how to build a fireplace with a cast-iron firebox with your own hands, you need to know what the installation will be made of. If it is completely made of brick, then it is necessary to continue laying, stepping back from the walls of the firebox for a certain distance and leaving several holes in it for hot air to escape.
But you can do it easier and cheaper, at the same time significantly facilitating the design - to arrange a frame for sheathing.
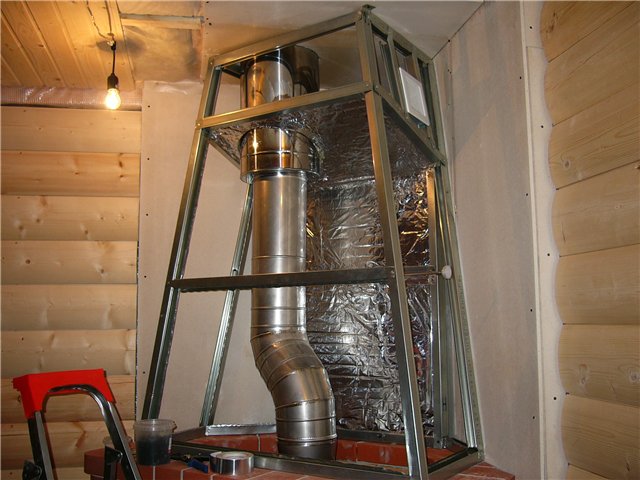
- The frame is easy to assemble with your own hands from thin-walled metal profiles or duralumin corners, interconnected by metal screws. Its design should provide for fastening the skin from the outside and thermal insulation from the inside.
- Thermal insulation mats made of non-combustible material are attached to the frame in such a way that the foil side faces the firebox and chimney.
- You can sheathe the frame with your own hands using any materials: drywall, wood, asbestos-cement boards, etc.
- Holes are made in the thermal insulation and cladding for the exit of heated air into the room