Swede stove with three do-it-yourself firebox modes
Swede stoves differ from other heating and cooking stoves by the presence of a heating shield in the rear. This brick shield has a system of gas ducts: from vertical or horizontal. The smoke passing through them warms up the structure, and the rooms are already heated from it. The system turns out to be efficient and economical: the heat that went into the chimney in a traditional Russian stove is used for space heating. But both systems for constructing a shield (vertical and horizontal) have disadvantages.
With a horizontal arrangement of gas ducts, the entire shield is heated evenly. But, such a system needs a large number of cleaning holes and, accordingly, doors on them. Given that furnace casting is quite expensive today, these doors significantly affect the final cost.
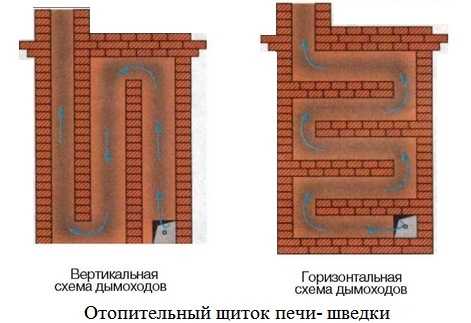
Heating shield of the Swedish oven with horizontal and vertical gas ducts
With a vertical arrangement of gas ducts in a Swede, there can be one cleaning hatch. But there is another problem here: while the stove is heating, in the first channel, on the side where hot gases from the furnace enter, the shield will be noticeably hotter than in the third - at the exit. Since the shield is usually located in two rooms, one of them will be much warmer than the other.
There is also a third type of shield device: bell-shaped. It combines the advantages of both systems: one cleaning window is required, the entire surface is heated evenly, and less brick is required for construction. Moreover, with this construction, the stove cools down more slowly: the warmest air is kept in the tops of the caps for a long time, and the “draft” from the doors passes only in the center.
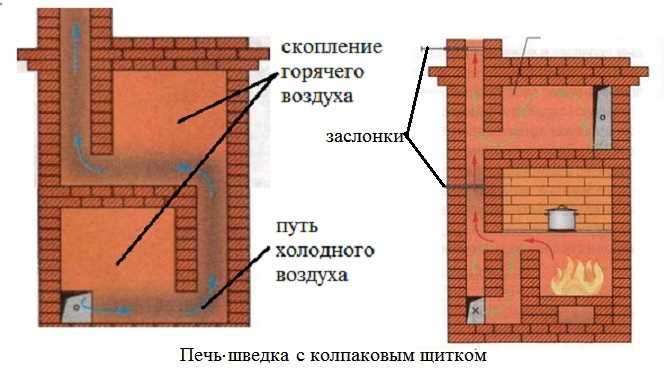
When using the bell-shaped principle of constructing a shield, heat is retained longer
From all of the above, it follows that the most economical and efficient Swedes with shields built according to the bell principle. They are also easier to manage: it is possible to organize a “summer” and “winter” mode of operation, in which either only a small part of the shield (in summer) or the entire heating power is switched on: in winter. There is even a variant of a Swedish stove with three firing modes: an “autumn” mode is also added, in which a little more than half of the chimney channels participate in the smoke circulation.
Clay, sand, water and additives
In the first part of the book, I already briefly talked about a number of parameters by which you need to choose clay, sand and brick. Here I will only supplement this information with information necessary for every stove-maker.
Before packing fresh clay for transportation to the work site, its quality should first be assessed.
It is important to know that too oily clay and clay with even the slightest presence of stones will increase the laboriousness of preparing the furnace solution (with manual kneading). Too thin clay will seriously weaken the strength of the furnace seam
And clay, which is heterogeneous in the soil or with impurities of earth and foreign fractions, will create inevitable problems in the preparation of a high-quality furnace solution.
Too oily clay feels like a very sticky plasticine to the touch. It is impossible to tear off the freshly cut plastic of such clay from a shovel either with hands or feet. It can only be cleaned with an additional small spatula or trowel. Such clay will give a ratio of clay and sand from 1:4.5 to 1:6. After the hardening time has elapsed, the furnace mortar will be very strong, but in the absence of an electric clay mixer, the process of preparing a high-quality furnace mortar (manual kneading) will be extremely time-consuming.
Pulled from the ground overly skinny clay its properties are more like sticky dusty sand.The stickiness of such material is very weak. However, if there is no choice, what to do. There is no need to add sand to such clay. The two types of clay mentioned above are very rare in central Russia.
Medium oil clay gives (in the vast majority of cases) the ratio of clay and sand 1:1.5 and 1:2 (and very rarely 1:2.5 and 1:3).
The rules for the use of sand and water are described in detail in Chapter 1.
Additives. Abroad, some stove-makers traditionally add 10–15% cement to the furnace mortar. Salt is also recommended (100–200 g per 10 liters of water). However, according to my long-term observations of the processes occurring in the furnace masonry, a well-tested clay-sand furnace mortar does not need any special additives. He will be strong enough. And if the furnace furnace and the zones adjacent to it are torn at the seams due to severe temperature changes, then not some special additive is needed here, but a special procedure for laying bricks in the furnace (lining). The lining that has been proven for centuries and the competent selection of the cross section of the smoke channels (see chapters 15 and 28) will protect the furnace from serious ruptures in the furnace seams more reliably than the use of some special additives, and even more so the wire piping of the furnace.
I also heard about some particularly complex and even “secret” additives in the most intricate compositions and proportions: ash, cement, chicken eggs, etc. But I did not consider it necessary to show interest in them.
Experience shows that the best "additive" for furnace solutions is the ability to correctly select the ratio of clay, sand and water, as well as the reasonable use of fireclay mixture and fireclay bricks in cases where technical standards and common sense require it.
How to build an oven
The scheme for laying out a brick oven is a sequence of actions. Their observance is an important condition. The material needs to be processed and accurately laid in order to avoid flaws as much as possible, which will then affect functionality. The furnace is a heavy structure that needs a solid concrete foundation, which must be insulated with roofing material. If the house is already based on a monolithic base, which makes up the entire floor area, you can not make a special foundation for the stove.
Work should begin with the fact that a row of bricks or large gravel is laid, which is covered with mortar and smoothed out. The next row will already make up the oven. Experts advise, to begin with, lay out the bricks in the place where it is supposed to lie in order to fit all the dimensions and the exact location. Also, you need to soak each in water for ten minutes. If fireclay is used, then it is enough to wipe it with a wet cloth. Before starting work, you need to calculate where the chimney will go. If construction takes place in an already finished building, it is worth calculating the place so that it is convenient to make a hole in the roof and interfloor ceilings.
 The first row is laid out in order to orient the horizontal lines along one of the walls. In a place where the oven is as close as possible to the walls, you need to lay out a second brick. This will ensure fire safety. A metal grate is installed in place of the firebox. There will be several of them in the design. One of them will share the firebox with a compartment for collecting ash. In the second row, you should take into account the free space for the chimney and the slot in the masonry under the lower door. There will be two. The small one is for cleaning up the ashes, the second one opens the firebox and is large. The doors are securely fixed with a wire between the bricks and the joint is smoothed with mortar. After the third row, you need to lay out two rows of bricks on a spoon, cover it with a row of fireclay refractory bricks. This will serve as the base for the grate of the firebox. After that, the door of the future furnace is strengthened, and its walls are laid out. The vault is formed from fireclay bricks. A fireplace will be located next to the firebox.
This design requires significant reinforcement.This can be achieved by laying horizontal metal corners, securing them with refractory bricks. The fireplace grate is flush with the masonry. When this part of the furnace is ready, they start laying out the chimney and dividing it into wells. The arch of the fireplace is laid so that it goes to the chimney. At this stage, after the formation of the first row of its walls, the space is divided into wells, the doors are fixed, with the help of which soot is removed from the chimney. When everything is ready, the bricks that formed the wells, which were previously removed for convenience, are returned and fixed with mortar. The chimney is laid out to the very ceiling, periodically laying reinforcement
Under the top it is very important to make an empty space and a cornice. A sheet of tin is placed on top of the wells, fixed with two rows of masonry.
These works are already being done in the attic. Here the chimney is divided into two compartments, to each of which valves are mounted. The walls of the chimney that comes from the stove need to be strengthened and when it reaches the roof, bring it out a little higher than the ridge.
Furnace ordering
Before proceeding with the self-laying of the furnace, perform a few simple preparatory steps.
Soak the brick first. To do this, the bricks need to be dipped in clean water and left there for about a day. Water will fill the pores in the brick structure. Due to this, in the future, the building material will not absorb water from the clay solution.
Prepare clay solution. It will consist of ground clay, some sand and clean water. The specific ratio of components is selected in accordance with the characteristics of the clay.
It is important that the finished solution has normal plasticity and a uniform structure. On average, it takes about 20 liters of mortar to lay hundreds of bricks.
1 row. It was previously noted that this row should be laid out exclusively on the building level with additional verification using a square. Lay out this row with a solid masonry. Inside, the use of halves of bricks is allowed.
2 row. Lay out in the same way as the 1st row. Be careful and do everything in strict accordance with the technology, because. the first two rows serve as the base of the furnace, which should be as reliable as possible.
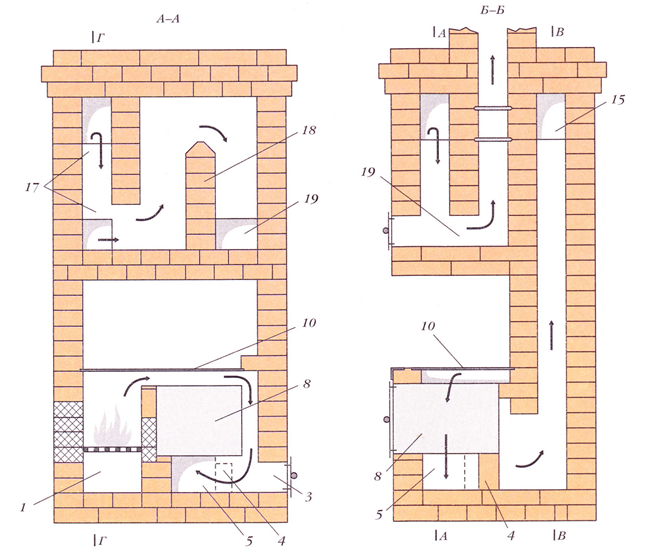
3-4 rows. Continue laying, gradually forming an ash chamber. At the same stage of masonry, the door of the said chamber is installed. Additionally, 3 doors for cleaning hatches and a door for a blower are mounted. On the reverse side of the Swede, lay out the smoke turns. They are placed in a vertical position and communicate with the combustion chamber through a hole, which is equipped during the laying out of the furnace.
5 row. Install the finished oven and place a suitable grate in it. Form an overlap for the cleaning hatches and the blower door.
6-10 row. Lay out the walls of the chamber of the firebox and oven. Between the furnace compartment and the oven, a partition made of fire-resistant bricks is laid out. The brick must be laid out on the edge. The partition should be a row lower than the cameras themselves. After the tenth row is ready, lay a standard steel corner and an additional cast iron plate from the front of the structure. To fix the corner, use steel wire and a 2-centimeter layer of clay mortar.
11 row. Complete to the end the overlap of the channel through which the cast iron plate and the right wall of the furnace are separated.
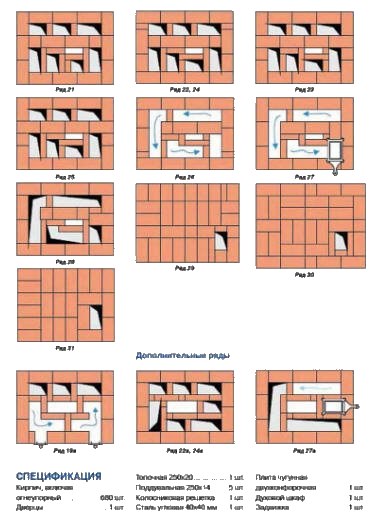
12-16 row. Lay out the brewing compartment and 3 vertical flues. Lay out the chimney openings from refractory bricks.
17-18 row. Form an overlap over the brewing compartment. To form the floor, use the sheet steel laid in the previous steps and a corner of the same material.
19-20 row. Fix 2 hatches on the front of the door structure for cleaning the gas outlet channels.
21-28 row. Lay out the chimneys. Do not forget about dressing the seams.In the process of laying out the 27th row, install a convenient valve. Above the installed smoke damper, leave a technological hole through which the gas ducts will interface with the air ducts.
29-30 row. Lay out the overlap of the chimney channels. At this stage, the width of the masonry along the perimeter must be increased by 50 mm. Thanks to such an expansion, a cornice will be formed.
31 row. Bring the dimensions of the overlap of the design dimensions of the 27th row.
32 row. Start laying out the chimney. The standard design of the chimney has dimensions equal to 130x250 mm.
On this, the layout of the furnace can be considered complete. In the end, it remains only to complete the chimney device, as well as, if desired, finish the stove, for example, with paint or ceramic tiles. In addition, you can buy a variety of accessories, for example, for fuel storage.
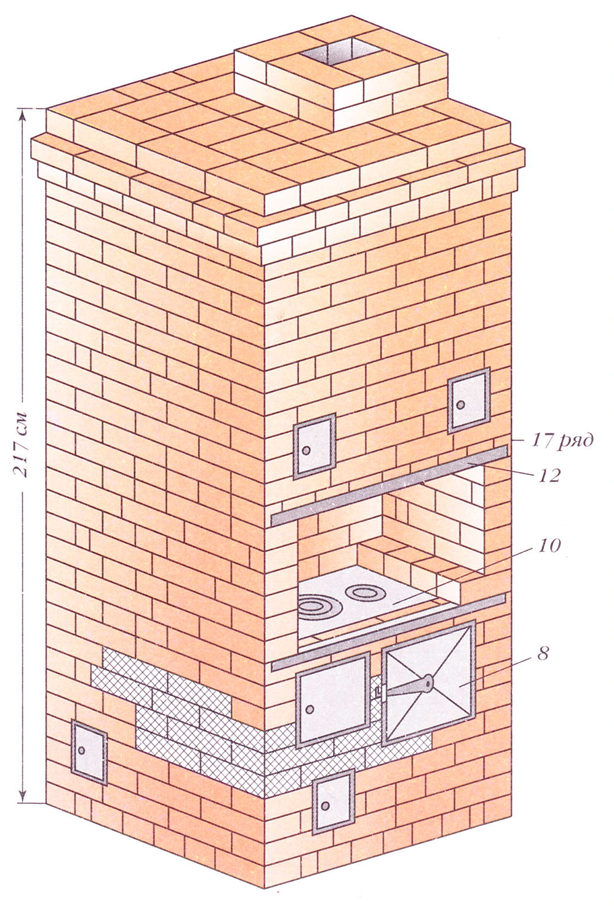
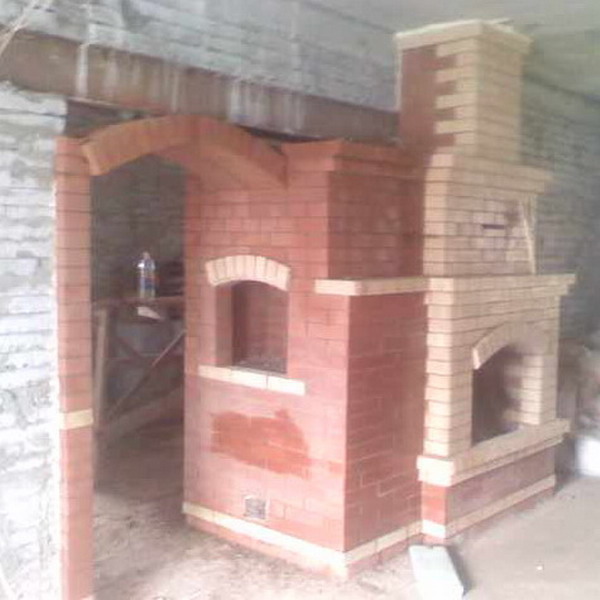
Swede oven (front view)
The construction of stairs in the house is not an easy process, but doable. The main difficulty lies in calculating the angle of inclination and span parameters, because not only ease of use, but also the durability of the structure depends on this. Durable and beautiful ladder…
Materials for the Swede oven
When creating this design, two types of bricks are used: red and fireclay (refractory) - raw brick is sometimes used instead. Before laying, the material is soaked in water for 24 hours. The foundation of the unit is laid on a cement mortar, and the structure itself is laid on clay. The durability of the "Swede" depends on the quality of the clay solution - the higher it is, the longer the stove will last.
Whatever the order of the Swede stove, metal parts are necessarily present in the design - dampers, doors, valves. Most often they are made by the method of cast iron. For floors, metal corners, reinforcing mesh, tires and metal sheets are used. Various finishing materials are often used, but the "Swede" is usually simply painted with lime. But there are also designs decorated with decorative stone, tiles and other things.
To order the oven you will need:
- solution container;
- metal sieve with cells 1-2 mm;
- hammer;
- bayonet shovel;
- Master OK;
- plumb;
- level.

Furnace design procedure
The layout of the stove in question is carried out in accordance with the order. This, as already noted, is a special scheme, which indicates the order of laying out each row of the structure. There are standard orders. In the absence of skills in laying out furnaces, it is strongly recommended to use exactly one of the standard schemes.
A well-designed order will allow you to significantly reduce the time and money spent on building a stove. Work will be carried out according to an accurate and easy-to-understand pattern for maximum efficiency.
Having figured out the order of the Swede-type furnace before the start of construction, you can lay out the unit on your own, without involving third-party craftsmen and without spending money on paying their labor.
In the expanded order, it is additionally indicated which materials and at what stage of work must be used.
Study the proposed order and additionally pay attention to the following points:
- the design of the Swede stove includes a blower. This moment must be remembered in the process of self-arrangement of the stove;
- the first row of bricks should be laid out perfectly evenly. Any displacements will lead to the appearance of various violations, which will negatively affect the quality and reliability of the finished furnace unit. To check the evenness of the masonry, use the building level;
- the correctness of the layout of the angles must be checked - they must be strictly 90 degrees. Check the corners with the appropriate tool called a square.
The reliability, efficiency and durability of the Swede-type oven largely depend on the correct layout of the first row, remember this.