How to connect infrared underfloor heating correctly steps
As mentioned above, it is extremely important to observe all the correct installation technology of a warm floor system, the stages of which are:
- Cleaning of debris and dirt, removing bumps, checking the horizontal. Remember that a warm infrared pod should only be mounted on a clean, perfectly flat surface, with a horizontal deviation of no more than three millimeters. If the slope is greater, it will be necessary to correct the defect with a self-leveling floor.
- Drilling a place for a thermal regulator. It is necessary to perform vertical drilling of the strobe from the floor to the point of installation of the thermostat. The next step is to make a hole for the thermostatic apparatus. Then free the surfaces from debris and dust. Be sure to connect power to the unit from the nearest outlet. The thermal controller of the infrared floor is connected using the same technology as other types of electric floor heating systems. Grounding cables are fastened with a terminal and are not mounted in contact.
- Installation of a heat-insulating layer. You can use reflective heat-insulating materials or others. Remember that the thickness of the thermal insulation was three to five millimeters. In this layer there will be holes for mounting cables and clamps with a film. When installing the heat-insulating layer, connect it with construction tape.
- Installing an IR floor. Lay the film in the direction of the wall with a thermostat (in order to reduce the length of the cable). The masonry distance from the walls should be ten to twenty millimeters, from powerful heaters - about one meter. You can cut the coating only in those light stripes that are located between darker fabrics. Lay the film end-to-end, then carefully glue the joint with adhesive tape. The film must be placed with copper heating elements down.
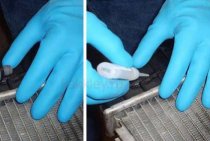
- Reliable insulation of the ends of the film coating. In order to avoid any problems when some liquid gets on the warm floor, it is necessary to insulate the “bare” elements at the cut points of the copper material with high quality. This is best done with bituminous material in the form of a film. Be sure to drown the segments - clamp the thermal insulation into the holes made earlier.
- Mounting clamps. Attach metal clamps to bare copper elements. Note that one side of the clip should be between the copper strip and the film. Clamping the wire from below and above is strongly not recommended: you can damage the film, which will lead to a quick breakdown of the warm floor.
- Coloring of cables and their gluing by parallel method to the cable clamps.
- Installation of wires in a heat-insulating layer.
- Mounting the thermostat sensor.
- Connecting an infrared floor heating and checking its functionality.
- Installation of a soundproof layer.
- Floor covering.
To fix it, watch a couple of video installation instructions.
How to install infrared underfloor heating
In this case, we will talk about rod infrared warm floors. This design is quite simple, so it will not be difficult to install an infrared floor heating with your own hands. First of all, you need to level the base. The maximum allowable height difference is 1 cm per 1 m2. The remaining preparatory operations are performed in the same volume as for film floors.
After laying the thermal insulation, all joints are glued with adhesive tape. Further, rod mats are rolled on top of it, which should not reach the opposite wall by about 15-20 cm.At the turns, one of the lateral connecting cables is cut between the rods in the middle and the entire roll is turned in the desired direction. When rolling out the roll, make sure that the wires do not intersect and do not touch each other. The rods and conductors are attached to the thermal insulation with adhesive tape, and then fastened together.
Further, unlike the film system, you will need a screed device that is laid on top of the core floor. Therefore, in the thermal insulation between the rods, windows are cut out in certain places, arranged in a checkerboard pattern, to connect the screed and the subfloor together. Their area is 20-25% of the total area of thermal insulation. To reduce heat loss, it is recommended to cut small holes, but in large numbers.
When installing a core floor under a tile, you can do without a screed, and lay the coating directly on the adhesive. The total thickness of the tile and adhesive must be at least 2 cm. During drying, underfloor heating should not be turned on to speed up the process. This will lead to the formation of cracks and reduce the efficiency of the entire system.
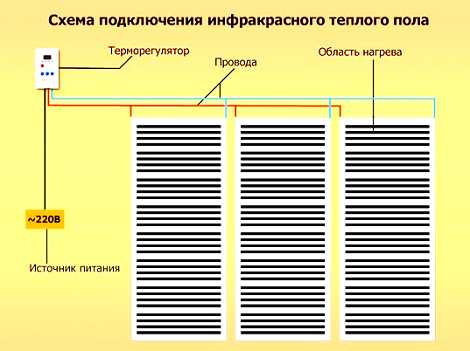
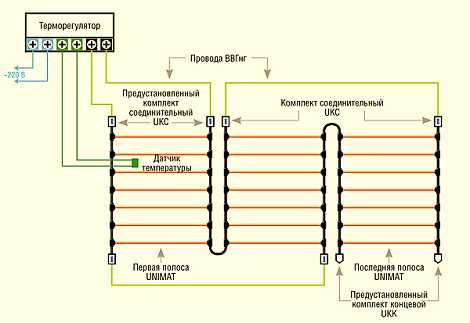
Wiring diagram for infrared floor heating
There are two main types of infrared underfloor heating - film and rod. When deciding how to connect an infrared warm floor, it should be borne in mind that each of them has its own distinctive features and is connected according to its own scheme. Installation of film floors is carried out without the use of concrete or cement mortar. This allows you to complete all the work within one day.
To draw up a connection diagram, you need to perform preliminary calculations. First, a plan of the room should be drawn with the allocation of areas for the location of furniture, household appliances and other heavy objects. On the same diagram, the installation location of the thermostat is predetermined, as well as the lines of power wires and the connection of the temperature sensor.
Further, on the free area, the location of the film strips is marked in such a way that they do not intersect and do not overlap each other. However, they should fill the space allotted for them as much as possible.
The heating intensity is selected depending on the heating function - whether it will be main or additional. In the first case, systems with more power are selected, and in the second case, systems with less power. In addition, the choice of power depends on the type of flooring. For example, tiles require a stronger film due to the intense heat absorption.
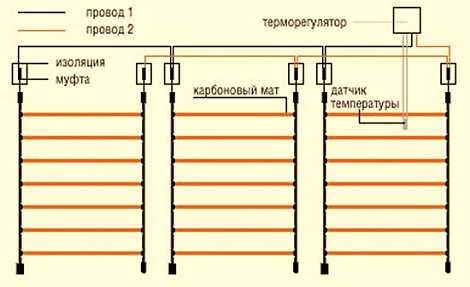
The scheme for connecting rod infrared floors has its own characteristics. The system got its name because of the heating elements made in the form of rods. Inside the shell of each rod there is a composite material consisting of carbon, silver and graphite. This combination enables self-regulation, that is, an independent increase or decrease in the amount of heat generated in different parts of the floor.
The connection scheme involves connecting IR rods to each other with insulated copper wires. Heating elements are connected in parallel, so if one or more elements are damaged, the rest will function normally. However, this condition applies only to the connection of rods. If the power cable connected to the side is damaged, the entire system will stop working.
Materials and tools for mounting the infrared floor
To install the floor, you will need the simplest tools that are likely to be found in any home: wire cutters, a screwdriver, pliers, scissors and a mounting knife. In addition, materials will be needed, the list of which is given below:
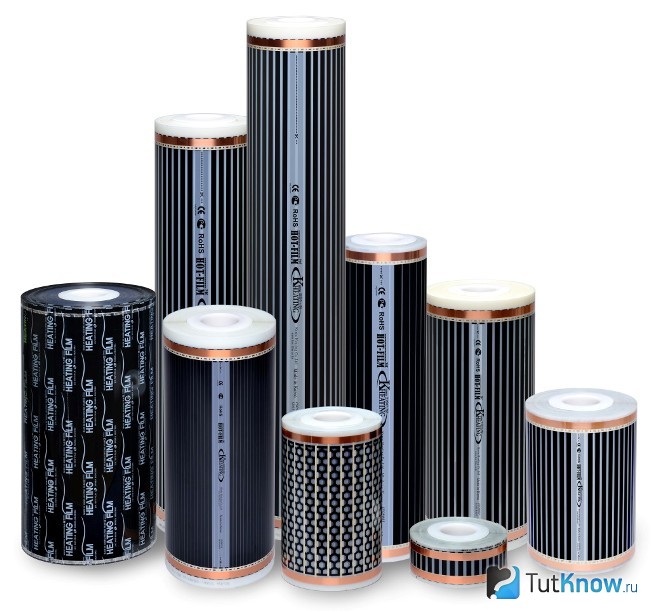
- Infrared floor film and connecting clips;
Temperature controllers equipped with temperature sensors;
Vinyl mastic insulation;
Thermal insulation material, its basis should be lavsan or polypropylene film, but not foil.
Depending on the type of coating, you can also add to this list: chipboard sheets with a thickness of at least 5 mm or plywood - under linoleum; reinforcing metal mesh - under the tile.
Preparation for work
Any work begins with preparation. The first step is to clean the base from dust and dirt. Be sure to make a calculation and graphically mark the installation locations of the regulator and wiring. After making holes for mounting the thermostat and passages for laying wiring to the sensor and the floor. With the ability to independently handle a power tool, preparing channels for wiring and installing a sensor with your own hands is not difficult. Be sure to use insulation. Reflective or cork insulation can be used, the thickness of which is 3-5 mm. Substrate under the infrared heat-insulated floor is required. It will be necessary to cut holes in it, in which the laying of wires will go. It is not recommended to use a material whose front side is made of foil, as such a coating is of poor quality.

Cork backing