Expert answers
Ivan Ivanov:
Sewing boldly. I advise you to use IsospanA film. It has one-sided moisture conductivity.
Sergei:
no, if everything is done correctly according to science (as it should be according to technology), nothing will rot
Skorpi:
On the timber, first they stuff the slats, and there is already siding on them, so no, not true!
Alexey Filatov:
the main thing is that there should be ventilation between the siding and the wall. and go!!!
Strickulist:
wood needs to be treated with a special liquid. And boldly forward
Elena Kuznetsova:
I guarantee you won't wait for it to rot, so don't worry.
serge:
If you do everything right, it won't rot.
Ivan Petrov:
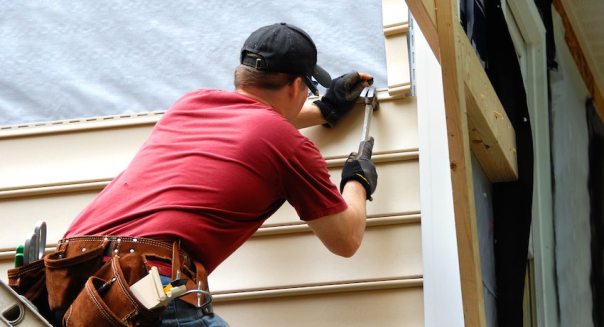
If it's installed correctly, this won't happen. The fact is that the siding is attached to a crate made of boards or bars, and a ventilated space remains between it and the wall. Naturally, before installing the crate, all rotten parts of the old finish must be replaced.
Ruslan Nazarov:
won't rot.
User deleted:
sheathe! won't rot! on the contrary, the tree will dry up!
User deleted:
first treat the beam with anti-caries and the ground around the foundation, and only then sheathe it with anything
UNDERTAKER:
Better not do this, why spoil the tree with this plastic, sheathe it better with a wooden sheath. It is clear that more expensive, but the view will be what you need. And siding is just dust in the eye. And as the Russian says. people. the saying "a fool loves a red school." So what do you think, the owner is a gentleman. Well, if you still decide to upholster with siding, the tree must be treated with an antiseptic for outdoor work, for example, with PINOTEX or other impregnation, there are now all sorts of them on the market.
Nikolay Sukhodoev:
The person who told you that the tree will rot was partly right. The dew point will move inward, and the wood will be at additional risk of rotting, but only if you close your eyes to the finishing technology. With proper pre-construction preparation, with proper installation and with the combination of the quality of work and siding, we can conclude - in general, this will help for the durability of the tree, increase noise and waterproofing, and increase the thermal conductivity of the walls. But just do not forget that when the dew point shifts, excessive defrosting of the building can do its bad deed.
Andrey Vishnyakov:
Hello. It will definitely be, it is necessary to do ventilation between the wall and the sheathing (wood rots under the paint) C / a Andrey
Aleksandrov Sergey:
I would still first cover the beam with an antiseptic, but not on a water back, it will be more whole ...
pirate:
those who write are not familiar with elementary technologies for the use of siding, vapor barrier films and the construction of ventilated facades.
Kitten:
little air, poor ventilation, no light... dampness builds up. this is where the rot comes from.
Nikolay Ivanov:
There is distance, but there is no air movement. Condensation and stagnant air. It is better to soak some rubbish….
simply simple:
Because very often they forget that this distance is called the VENTILATED gap. This, by the way, does not only apply to siding.
foreman:
because a characteristic mistake was made, which excludes the possibility of free ventilation of air between the beam and the facade coating ... after all, it is not for nothing that the facade is called VENTILATED. To avoid this, there should be a gap above and below ... then it will not rot. And so, with a temperature difference, condensate forms, so the process has begun !!! At least with what you process it will start to rot !!!
Egor Razborov:
Nothing threatens a wooden house simply sheathed with siding. Just before sheathing with siding, it is necessary to pull the IZOSPAN “A” membrane onto the leveling (frame) bar, then nail the counter rail on top of the same bar, and the siding is already on it.Condensation can form on the inside of the siding, but isospan A will not let it through. and the gap between the wall and the isospan will provide an opportunity for airing the wood and evaporating condensate. Even if you do not have this membrane, then there will be nothing terrible for your house. The condensate from the siding, even running away in a stream, will go to the blind area. There is no heater outside! Personally, I am against the insulation of wooden houses from the side of the street. HERE is an example from the Internet on working with isospans and vent. facades. By the way, the manufacturer of isospan recommends working with it in exactly this way. 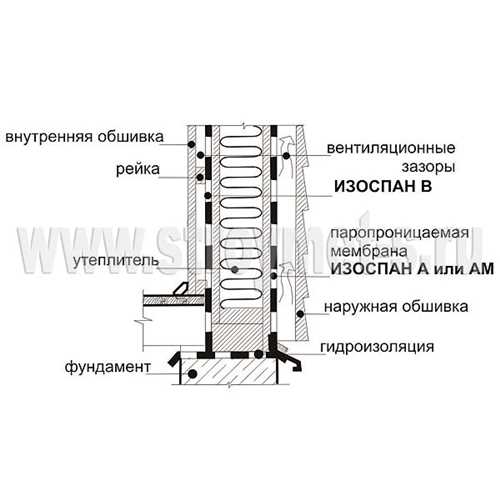
Special opinion:
Because these "many" have neither theoretical knowledge about the movement of moisture in outdoor fences, nor practical experience, but there is confidence that they can guess about it.
the beam under the siding laid according to the developed technology is not threatened by rot. (technology was described by Yegor Razborov)
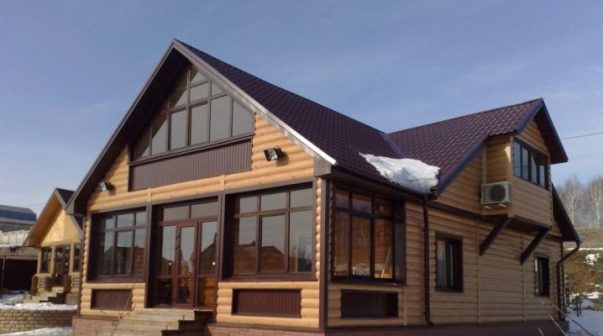
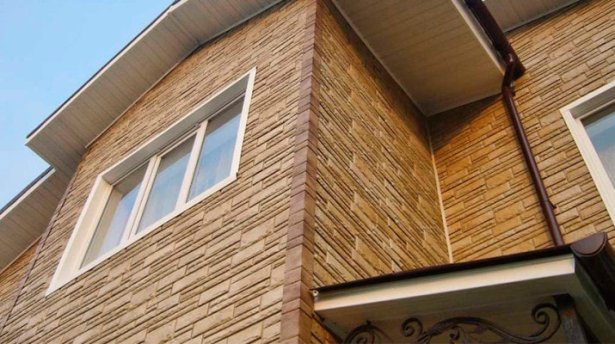
Types of siding
The range of siding is very large. The buyer will be pleased not only with the color scheme, but also with the type of material of manufacture. The main types of siding are:
- vinyl: the most budgetary and common type of siding;
- acrylic: the top layer of the panel contains acrylic, which improves the performance of the siding;
- metal: made of cold-rolled galvanized steel;
- basement: mainly used for cladding the basement of the house;
- wooden: it is considered the most expensive decoration of the facade of the house;
- cement: imitates natural stone in glaze;
- ceramic: very reliable and expensive facade coating.

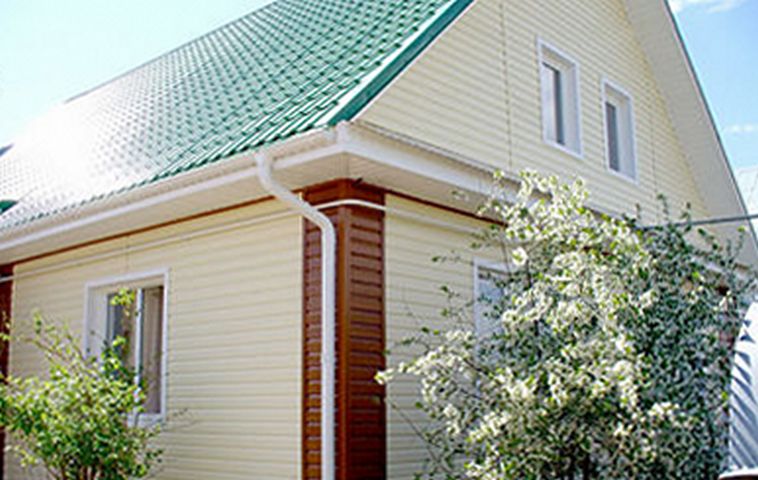
Best Time to Vinyl Siding Your Home
This article will focus on the conditions for installing vinyl siding. When is it better to sheathe a house with siding, what is the price of turnkey siding installation and where should I start?
Based on the temperature regime and working conditions, it is better to sheathe a house with siding in late spring until early autumn. Each manufacturer has its own temperature regime for the operation of this material. As a rule, the range is 50 - + 50C. However, to avoid deformation of the panels, it is not recommended to keep them in direct sunlight. Therefore, when it is above +30 degrees outside, it is better to postpone work. The thing is that under such conditions, siding panels can heat up to + 50C. Such overheating can lead to the fact that after installing the heated lining at night, it cools down, and as a result, the siding can “lead” along the wall. It follows from this that the gaps made on overheated panels, after cooling, can give cracks.
Thus, the first conclusion is this: in extreme heat, it is better to work with siding panels in the shade.
What to do when it's cold outside? It has been proven that when the temperature outside is below zero, the material becomes brittle. We note right away that for panels such an indicator is absolutely not terrible, since they are attached to the wall. But, if at a temperature of -20C and below a mechanical blow is applied to an already nailed siding, then it can burst. In addition, in frost it is impossible to work with a near-window frame, which you simply cannot bend. When the deadlines are compressed and you did not have time to sheathe the house before the onset of frost, then the most correct option would be to cut and bend the material in a warm room. In some cases, a building hair dryer is used.
The second conclusion: the installation of vinyl siding at low temperatures is best postponed if possible.
What to do when it rains? For siding, this is absolutely not a hindrance. The only point: when work is underway with a heater, then they should be slowed down. The insulation must remain dry.
When is the best time to wrap vinyl siding? This is the period when the outside temperature is above +5C.
Best Answers
User deleted:
If the tree is not treated with an antiseptic and there is no ventilation between wood and plastic, then it can rot even faster than without siding for two reasons: 1) the penetration of rain moisture (wherever there is a place for such penetration,especially if the builder is self-taught), the evaporation of moisture, of course, is difficult; 2) the penetration of moisture from inside the room (if people live in the house all the time, then this is always there) through the pores of the wood, evaporation is again difficult. In short, wood that has not been treated with an antiseptic must constantly have a moisture content of no more than 20%, then there will be no decay.
vov4ik:
Notttttttttttt
aniken skywalker:
of course rots, but not so fast
Denis Tarabukin:
high-quality processed wood does not rot, and siding is not a protection but a decor
User deleted:
much slower than without
Andrey Zhupikov:
a wooden house during construction or cladding must be treated with special solutions that slow down these processes, and under siding it rots faster, as a greenhouse effect occurs
Tanya Pupkina:
When it collapses.
Duve Teux Blanc:
everything in this life comes to an end.
Inessa Sorokina:
Yes, it rots. The tree needs to breathe, and the siding interferes with this (either iron or polymer). If you treat the tree, this will slow down the process, but not for long.
virtual mag:
If the siding is installed with a gap for ventilation (with your own hands or under relentless supervision), no! And if he was nailed by chocks, he might rot! It is very important for a tree to "breathe" - to come into contact with air. Not necessarily - with rain - siding also protects against precipitation. Well, it's beautiful... SIM:
SIM:
siding is just a little protection
Shipaklyak:
No. Does not rot. Siding is nailed to the so-called. "beacons" that provide a gap between it and the wall.
User deleted:
If not processed, of course it rots!
button:
gotta do it right!
Dmitriy:
If the tree is dry, then nothing will happen to it.
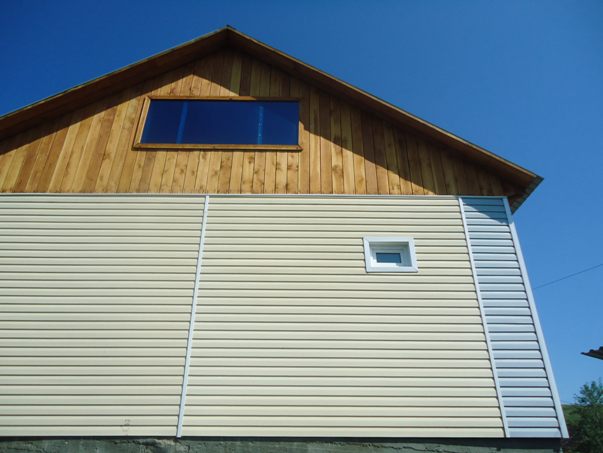
How to sheathe a house with siding
You need to start cladding your house with siding by preparing the walls. All dust, dirt and old lining on the surface is removed. Then comes the surface treatment of the walls with a primer and an antiseptic. If there is mold on the walls, it is removed with sandpaper, and the existing gaps must be covered with cement.
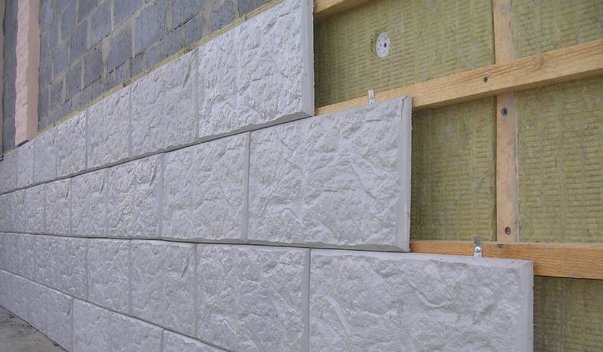
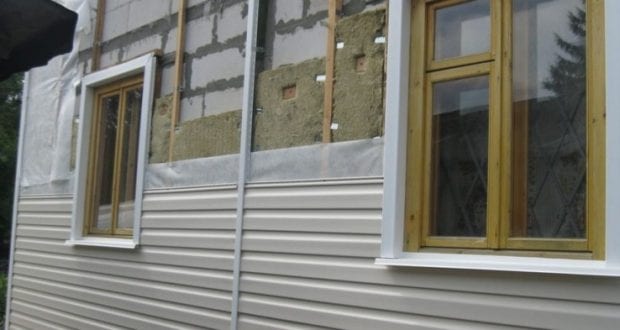
After preparation, the installation of the frame begins. It can be metal or wood. If the walls of the house are made of wood, then it is additionally necessary to waterproof them. Waterproofing under siding is made with a special material for this, which will prevent moisture from entering the walls of the house, and, accordingly, protect them from further destruction.
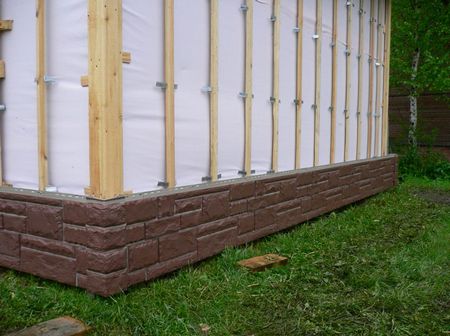
It is best to start sheathing the walls of the house with siding from the basement of the drainage system, gradually moving to other areas. After drainage, profiles are fixed at the corners, and the starting bar is fastened. To fix the profiles, depending on what material the walls of the house are made of, the appropriate type of fastener is selected.
Then windows and doors are processed, it is better to use J-profiles for doors. Further, with the help of a level, vertical profile strips are fixed, and the last finishing board is attached under the roof itself.

Starting from the starting bar with the help of self-tapping screws and in increments of 40 cm, the first row of siding panels is laid out. Actually, all rows are laid out in the same way, up to the finishing bar.
When sheathing a house with siding with your own hands, you should remember and take into account such things as:
1. It is better to cover the house with siding in the warm season, since when the air temperature is below 10 degrees, the siding begins to break easily. Therefore, you should work with it very, very carefully.
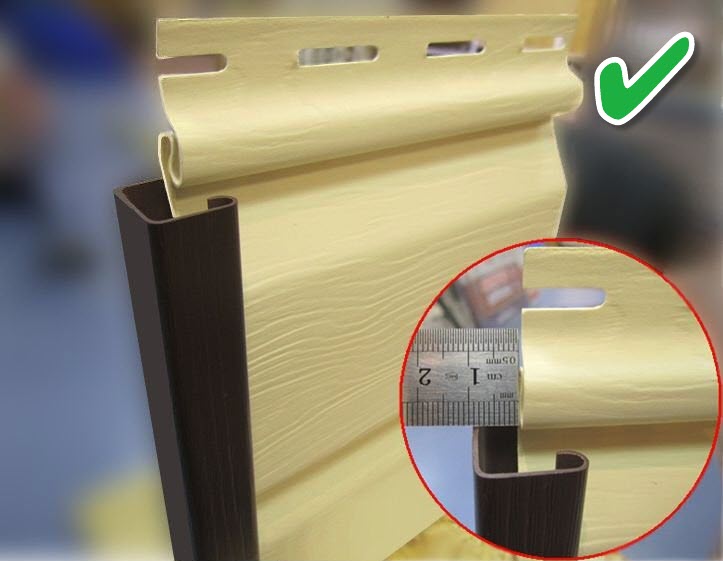
2. It is necessary to fasten the siding panels with a gap, since various thermal expansions are possible during the operation of the material. When working in autumn or winter, the gap should be at least 10 mm. In the heat, this distance can be reduced.
3. Siding fasteners need to be screwed only through holes specially made for this purpose, not forgetting about the gap between the panel and the screw head somewhere in 1 mm. Otherwise, the material can easily be deformed, and in cold weather it can even burst.
Observing such simple rules, you can quite easily and simply sheathe the house with siding, thereby embellishing it from all sides. The main thing is to clearly follow the technology for sheathing the walls of the house with siding, and then everything will definitely work out.
The main mistakes when installing vinyl siding
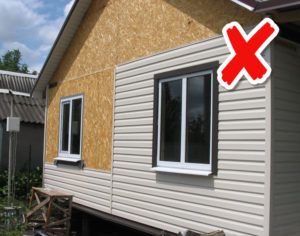
1. Installation of siding without crates directly on the wall.
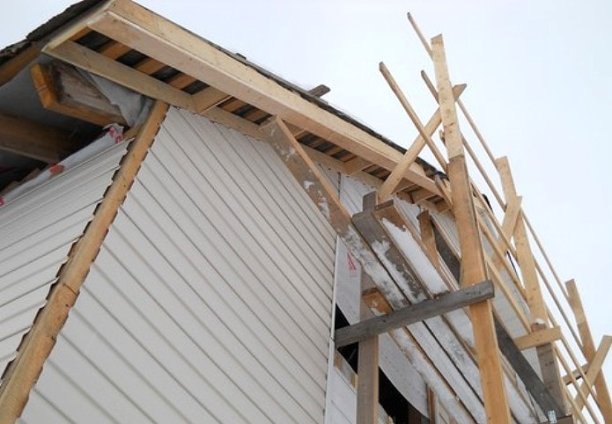
In America, they do this, they simply attach the panels to the OSB boards that the frame houses are sheathed with. But in Russia the climate is different, for example, in areas with a humid climate, this is definitely not possible. There should be a ventilated gap of about 20-30 mm between the siding and the wall, through which condensate will be removed through the soffit in the roof. It is also very rare that the walls of the house are not perfectly even, so the crate is necessary.

2. Curved subsystem (framework) for siding.
The main task of the frame is to even out the unevenness of the walls of the building and provide a ventilated gap. Therefore, the frame for the siding must be perfectly even, since after the installation of the siding, all irregularities will be easily noticeable.
3. Wooden frame without antiseptic.
Siding can be installed on a metal and wooden frame. If you are installing a wooden frame, then it is necessary to treat all the bars with an antiseptic to prevent the growth of mold and the appearance of fungus.

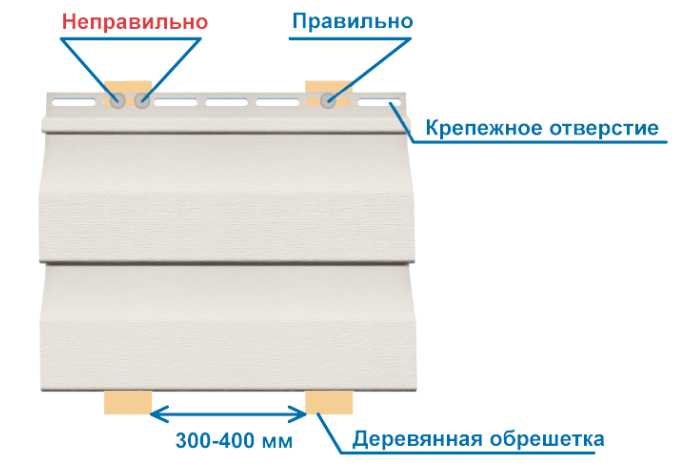
4. Long distance for fastening panels.
A self-tapping screw or nail is installed every 300-400 mm, always in the center of the hole. Increasing the fastening distance can contribute to sagging of the siding and deterioration in the appearance of the facade.
5. Fully driven self-tapping screws or driven nails.
Vinyl siding expands when heated. To avoid deformation of the siding during linear expansion, for this purpose, oval slots are provided on each panel in the upper part. Therefore, it is necessary to fasten it strictly in the middle of the oval hole and do not completely tighten the screw (do not drive the nail all the way) so that the siding panel moves freely in a horizontal plane. Then waves will not form on the facade in the summer.

6. Use of conventional screws and nails.
Be sure to use galvanized screws (nails), as fasteners should not be subject to corrosion. When using ordinary self-tapping screws (nails), rusty streaks appear on the facade over time, and subsequently the panels may collapse.
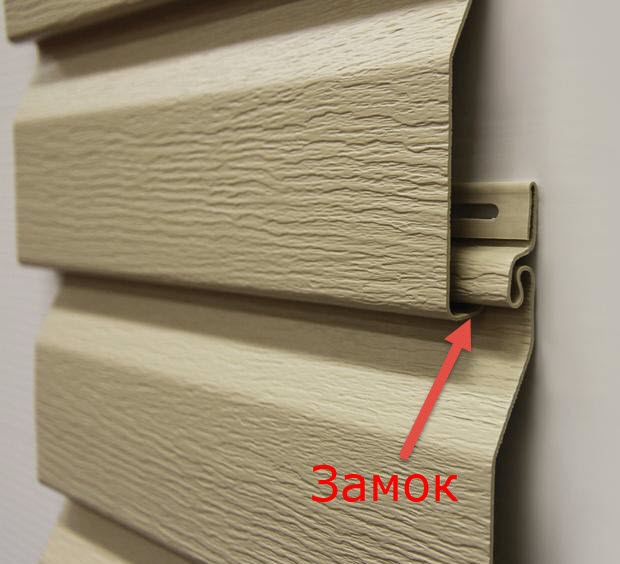
7. The locks between the panels are not latched.
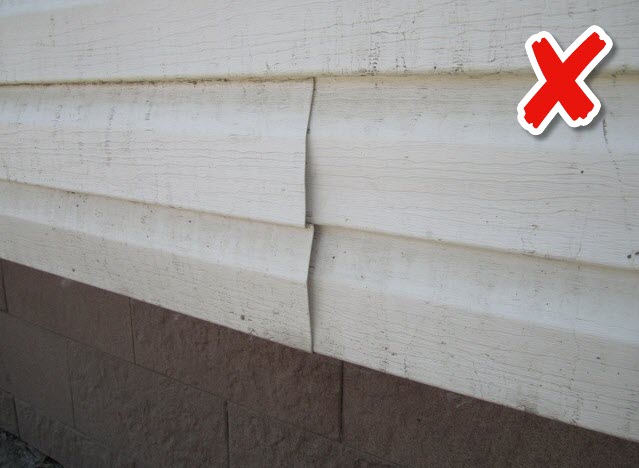
On each panel in the lower part there are so-called locks. When mounting the panels, each next panel is locked with a lock with the previous one or with the starting bar. At the same time, a characteristic click is heard. If the lock is not fully latched, then when heated from the sun, the connection opens and the panels diverge. If you make such a mistake, you will have to disassemble part of the facade to eliminate it.
8. Installation of panels close to the slats, corners.
When siding panels are inserted into additional elements, it is imperative to leave a gap for thermal expansion: 5-6 mm in summer and 9-10 mm in winter. If there is no room for contraction or expansion, then your panels can “lead” when the temperature changes. Therefore, it is imperative that during installation it is necessary to take into account the temperature and climatic conditions of the area.
9. Installation of siding without a connecting strip (H profile).
The siding is mounted without a connecting strip (H profile), overlapped. After 2-3 years, cracks may appear at the junction, the divergence of the planks. Therefore, it is better to avoid different advice from installers who claim that this type of installation is acceptable.

10. Incorrect calculation of the number of panels and additional elements.
Before purchasing material, think carefully about the design of the project and make a drawing of the house, indicating ALL dimensions on the wall (windows, doors, pipes, protruding elements, etc.). Better yet, order a design project for your home in some company.What is the drawing for? If the supplier calculates the consumption of material for you without visiting the site, then he will calculate it according to your drawn scheme and all errors will lead to excessive or insufficient purchase of material. So take it seriously.
When calculating the material, add + 10%, do not count “back to back”. What for? For the fact that you will spoil 1-3 bars by 100%, and you will have to go after them again. The panels may no longer be from your batch, and as a result, they are “differing” in color, i.e. new slats may be slightly lighter or darker in hue.

Now you know the main mistakes when installing siding, I think this will help you during construction. We wish you a pleasant renovation and a beautiful facade for your home!
Expert answers
Arcana:
And the question is really interesting. Why put an interventional sealant at all? In a log house, the longitudinal groove is narrower than a log. The sealant is "warmer" than wood and evens out the heat resistance of the wall in the seam and in the body of the log. And here is the beam. The cross section is the same everywhere. So the seal is only from blowing. But you are going to insulate and close the walls, there should not seem to be any draft. And your question is quite reasonable. But.. . that's the trouble with the walls, it's called air infiltration. This is the movement of air masses through the wall due to the pressure difference between warm internal and cold external air. The pressure difference is not great and the infiltration is scanty, but only with solid walls. Hoping that the beam will sit down and clamp the cracks, I would not. No matter how he presses against each other, the gap will remain, its width will be enough for air. You already seem to have asked whether to put an interventional sealant. Apparently between the bar you already have it. well, nail him down. Wrap with a roller and hammer into the cracks.
Roman Chernousov:
Necessary. Don't be lazy, it will be warmer.
Yogi:
Definitely a must if it's not Africa.
Olesya Koroleva:
It is a must to caulk. And as a result, break through the hemp rope along the seam and it is better to close the outer walls with shingles (preferably aspen) with scales at your discretion (the northern churches of the dome and bulbs were covered with aspen shingles and have been standing for more than one hundred years)
yuri morozenkov:
necessary. otherwise the inside will get damp and moldy
NOT WANTED:
It is better not to be lazy….
Sergei:
necessarily
Nikolay Ryaposov:
sure))))))) if you don’t do it yourself, then follow the workers to do it (you need to caulk not only for heat, but so that the crowns do not rot)
Alexander Chernykh:
thanks everyone!!!! You'll have to hustle. So the lining inside is canceled !!!!
Nikolay Sorokin:
This siding finished me last year. And with a heater. The siding itself is now very expensive, all the components for it are even more expensive, and all the fasteners are not cheap. I can only say that with my large volume, I agreed on an inexpensive job. You have 56 - is this the entire area of \u200b\u200bthe walls or the perimeter of the house? Through the company will be 2 times more expensive. Firms all operations are divided into separate tariffs, it turns out incredibly expensive. The siding itself (if only it is from the USA, and not domestic) is an excellent material. Although this is a rarity these days. There are plenty of analogues, but it is made using other technologies, has other characteristics.
Sergey Sidorenko:
50000
grandfather mikhey:
Such, 90 thousand will be with work ... look, which is easier ..
kisunya):
I would overlay with red brick
Alexander:
The cheapest basement siding of this type is to sheathe 56 sq. m. of a flat wall without windows, doors, corners from 50,000 rubles. The rest is calculated from the configuration of the wall: windows, doors, corners, etc. I would recommend another, but only the panel will cost more than 80,000
Wind:
that's expensive siding!
Valery Petrovsky:
Well, contact the people who are engaged in such sheathing, they will correctly calculate how much it will cost, and it’s up to you to decide whether such a price suits you for the work done.
Good Dobrynya:
Hello, well, if you want to sheathe your house with siding and do it well.Then I can tell you a great company where you can apply. I called them myself, they did everything quickly and inexpensively
Natalya Denisova:
The cost calculator for siding and other materials for house cladding is available on the website of the Parade company; id="nickname">Elena Parshikova:
In what order to perform work when sheathing a house with siding
Sometimes the customer decides to update the entire house: replace the roof, windows, sheathe the house with siding and install a drainage system.
In this case, it is better to start with windows.
Siding: first - windows
When sheathed with siding, the near-window plank comes close to the frame.
Therefore, if you change windows after the siding is installed, you will not be able to provide a beautiful tight contact between the already installed plank and the new window frame.
After you change the windows (usually they install metal-plastic instead of old wooden frames), you can start all other work.
Next comes the roof and gutter brackets.
Such brackets are wound under the roof and attached to the rafters. They are stronger and more durable than plastic ones.
After the roof is mounted, these brackets cannot be fixed to the rafters.
Therefore, brackets for the drainage system are attached during the installation of the roof.
After the roof - siding and plinth
After the windows and roofing are installed, you can proceed with the installation of siding and plinth panels.
Sometimes this is done in two stages (for example, if there is not enough money for everything): first they mount the siding, leave the conclusions of the frame racks for the plinth panels, and the next year they mount the plinth panels.
Blind area - to siding
If you need to make a blind area around the house, then it is better to pour it before starting work on the siding. There are two reasons for this.
Firstly, the siding is mounted from the scaffolding (sometimes from the stairs), and the scaffolding must be installed on the facade of your house. Therefore, while the scaffolding is standing, you will not be able to carry out work on the blind area.
Secondly, if you plan to close the basement with basement panels, then the frame for them will need to be brought to the blind area, and for this it is better if it is already flooded.
Therefore, the blind area is in front of the siding.
How to plan work?
If you are determined to do everything that I have listed in the previous paragraphs, then your actions should be as follows:
1. Call the measurer on the windows.
2. Call a measurer on the roof.
3. Call a siding measurer.
4. Pay for windows to be put into production. You will already know when the window installers will be able to complete the installation.
5. Pay for the roof and gutter system and deliver it all.
6. Start the installation of the roof, if it is not related to the windows in any way (don't forget about the brackets!).
7. Pay for the siding and have it delivered to your home.
8. Four days before the scheduled installation of windows, invite siding installers to begin installing the frame. This is just enough time for the window installers to install the windows by the time the siding installers start installing the siding and accessories.
Can it be easier?
Of course you can.
In order not to strain your head with planning, you can contact a professional siding and roofing company (for example, STK Etalon), and its employees will solve all these issues for you.
This will save you time and effort, and it will also save you from mistakes.
Still, everyone should mind their own business, and the planning and organization of work is the concern of professionals.
We carry out installation and roofing, and siding, and socle panels, and drainage systems.
And it is much more convenient for you if one manager is responsible for all the work, and not four different people.
In order to ask questions or call a measurer, call us at 608-91-45 or 956-17-30 in St. Petersburg.
That's all.
Ready to install siding?
Call the phone in St. Petersburg 956-17-30 or click on the button on the right "CALCULATE ESTIMATE".
CALCULATE AN ESTIMATE
Was this article helpful? Share it with your friends on social networks! Click on the button of your favorite social network to the left of this article.