What causes excess moisture in the soil
You can see the results of this phenomenon yourself - trees and shrubs are dying. Why is this happening?
- the oxygen content in the soil decreases and the content of carbon dioxide increases, which leads to a violation of the processes of air exchange, water regime and nutrition in the soil;
- oxygen starvation of the root-forming layer occurs, which leads to the death of plant roots;
- the intake of macro and microelements by plants (nitrogen, phosphorus, potassium, etc.) is disrupted, because excess water washes out mobile forms of elements from the soil, and they become inaccessible for assimilation;
- there is an intensive breakdown of proteins and, accordingly, the processes of decay are activated.
Plants can tell at what level groundwater occurs
Take a close look at the flora in your area. The species inhabiting it will tell you at what depth the groundwater layers are located:
- top water - in this place it is best to dig a reservoir;
- at a depth of up to 0.5 m - grow marigold, horsetail, varieties of sedge - blister, holly, fox, Langsdorf reed grass;
- at a depth of 0.5 m to 1 m - meadowsweet, canary grass,;
- from 1 m to 1.5 m - favorable conditions for meadow fescue, bluegrass, mouse pea, rank;
- from 1.5 m - wheatgrass, clover, wormwood, plantain.
What is important to know when planning site drainage
Each group of plants has its own moisture needs:
- with a groundwater depth of 0.5 to 1 m, vegetables and annual flowers can grow on high beds;
- the depth of the water reservoir up to 1.5 m is well tolerated by vegetable crops, cereals, annuals and perennials (flowers), ornamental and fruit and berry shrubs, trees on a dwarf rootstock;
- if groundwater at a depth of more than 2 m, you can grow fruit trees;
- the optimal depth of groundwater for agriculture is from 3.5 m.
Do you need site drainage?
Record your observations at least for a while. You yourself will be able to understand how much drainage is needed.
Maybe it makes sense to simply redirect melt and sediment water along a bypass channel, and not let it flow through your site?
Perhaps it is necessary to design and equip a storm drain and improve the composition of the soil, and will this be enough?
Or is it worth making a drainage system only for fruit and ornamental trees?
The exact answer will be given to you by a specialist, whom we strongly recommend calling. But after reading this article, you will gain some awareness in this matter.
At the end of the technological and production tasks associated with the arrangement of the sewer system in an apartment building, an industrial building, as well as in a private household, it is required to test the system involved using the forced spill method. This task was applied to identify possible defects or improper installation of the entire sewer part involved, and the act of testing the internal sewerage and drain systems will be material evidence of work on the acceptance of the object.
A visual check should be accompanied by entering into the test report of internal sewerage and drain systems according to SNIP, which is currently represented by the current regulations of the appendix of the D series, which corresponds to SP 73.13330.2012 "Internal sanitary systems of the building", recently a new one has been applied updated working version according to SNiP 3.05.01-85.
The vegetable pit is intended for storage of vegetables and fruit. It is not difficult to build it with your own hands. Important criteria for crop conservation are dryness and good air exchange. Creating conditions for a good microclimate, it is necessary to be wary of sudden changes in temperature.Ventilation in the vegetable pit will help to avoid unpleasant odors and stale air, as well as mold fungi.
What is it intended for and what characteristics should it have
Fruit and vegetable products purchased or grown by oneself must be stored somewhere in the winter. Refrigerators are used to store winter preparations and fresh vegetables in small quantities. However, a bag of potatoes and several boxes of garlic and onions will not fit in the refrigerator. Therefore, you have to independently build a special room where you can put twists with vegetables. The microclimate in such cellars allows you to keep the crop fresh for 4-5 months.
The constructed storage should have the following features and characteristics:
- temperature indicators should not exceed four degrees of heat;
- the humidity level inside the cellar should be in the range of 90-95%;
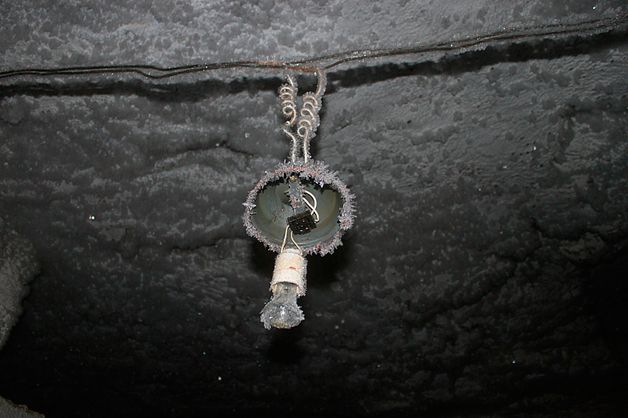
- it should always be dark inside the vegetable pit, and therefore the lighting is turned on only when a person is inside;
- the cellar is equipped with a high-quality ventilation system that will ensure normal air circulation.
Sizing
Before equipping the garage space with a vegetable pit, you need to decide on its size.
When determining the area of \u200b\u200bthe cellar, the thickness of the base with walls is taken into account. Also, when calculating the optimal area, it is taken into account that the size of the room for the preservation of vegetables should be comfortable for the person inside. Therefore, experts advise digging a pit, the width of which will be equal to 70-80 centimeters.
Since the pit should be located under the garage, its length directly depends on the length of the garage space, as well as on the amount of food that will be stored in it. For example, if a cellar is built for a small amount of salting, then its length can be 2-3 meters.
The minimum depth of the cellar for storing pickles is one and a half meters. However, if the owner of the premises is too tall, they dig a foundation pit 160-170 centimeters deep.
Location selection
A facility for storing stocks of vegetables and fruits should serve for more than one year. For quality construction, you need to choose a suitable place. When carrying out such work, it is necessary to take into account some features. For example, the site must be on a hill so that groundwater does not fall into the pit, so they find out in advance the level of their occurrence.
The check can be done independently by drilling a well about 2.5 meters deep. In this form, it is left for several days and then it is checked whether water has appeared there. If the place is dry, then you can safely proceed to the arrangement of the storage. Another test option is to measure the depth in adjacent wells.
Experienced craftsmen advise you to make a plan for yourself before starting construction. It will allow you to better navigate the work.
Site selection and subsequent planning
First, you need to decide on the choice of the place where it is planned to equip the vegetable pit. Traditionally, it is equipped under a pantry in a private house or under a garden house. For residents of apartment buildings, it is possible to organize a convenient storage place by equipping a vegetable pit in the garage.
It is important to note that with the seeming simplicity of the design, it is not enough to simply dig a pit to equip this type of cellar.
If you are interested in information on how to make a vegetable pit, you must take into account the following information
When planning construction, it is necessary to take into account a number of points:
in order not to damage an electrical cable or pipes accidentally lying in the ground, you will need to make sure that there are no engineering communications laid in this place
From this point of view, it is more convenient to equip a hole in the basement or garage;
soil features should be determined - it is important to collect information about the level of groundwater distribution at the planned construction site (for this you may need to seek help from a specialist). In order for the structure to be durable enough, it is necessary to choose a place with a level of groundwater below the bottom of the planned storage - at least half a meter
If they are placed close enough, you should not ignore this problem - in this case, you will need to equip a reliable waterproofing system (otherwise you can get a vegetable pit that is regularly heated with water). Such an arrangement will entail significant financial and labor costs, and water can still find a loophole and eventually seep inside;
in the vegetable store, you will need to provide a suitable temperature and humidity regime. So that the fruits do not wrinkle and dry out, a humidity of 85-95% is optimal, as well as a temperature regime slightly above zero (from 2 to 5 ° C). Storage in these conditions will protect products from spoilage and allow them to retain the maximum of useful substances. A thermometer placed there will help to monitor the temperature in the vegetable pit;
to ensure the flow of fresh air into the storage, it is necessary to equip it with ventilation - bring the supply and exhaust pipes outside;
in addition, in order to exclude the germination of vegetables during storage, it will be required that the room be dark.
Arrangement of a vegetable pit make the cellar perfect
The pit for storing crops in the garage, as we said, must be waterproofed. You may even need to make a circular drainage system in the cellar. Such activities are carried out in cases where groundwater is close to the bottom of the vegetable store.
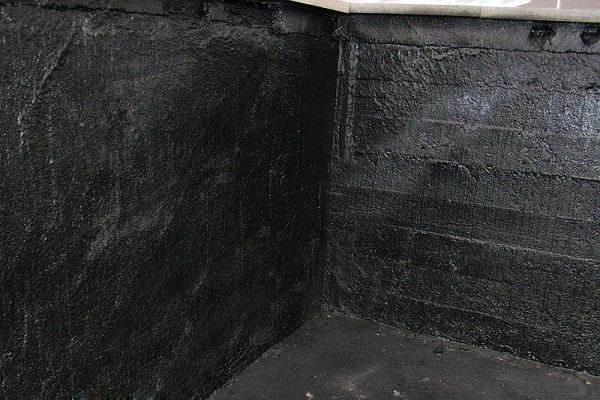
Waterproofing a storage pit
The easiest way to protect the floor surface of a vegetable pit from moisture is as follows:
- treat the floor with a bituminous solution (for reliability - twice);
- lay sheets of roofing material on bitumen;
- apply the solution again;
- make a filling on the roofing material, using sand of a large fraction.
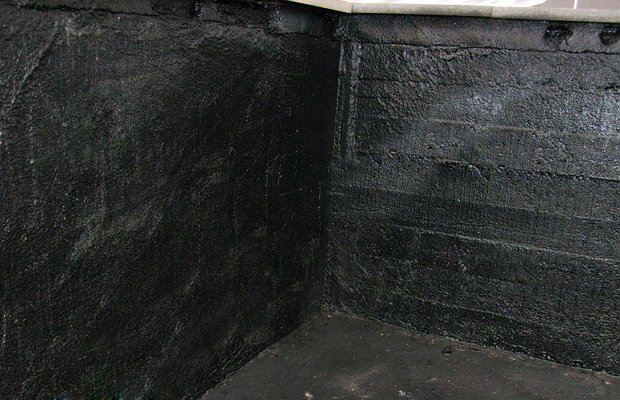
The storage walls can also be coated with bitumen or more expensive penetrating type waterproofing can be used.
The final touch is the installation of ventilation in the basement. The easiest way is to make a natural supply and exhaust system. To do this, you will need to place two pipes (for exhaust and fresh air) at a certain height from the floor. More costs will require the installation of forced ventilation. You will need to buy a special electric fan and put it in a pipe with two flaps. Your cellar for storing vegetables is ready!
This is interesting: How many bricks are needed for a garage - we will write in all the details
Forced ventilation of the vegetable pit
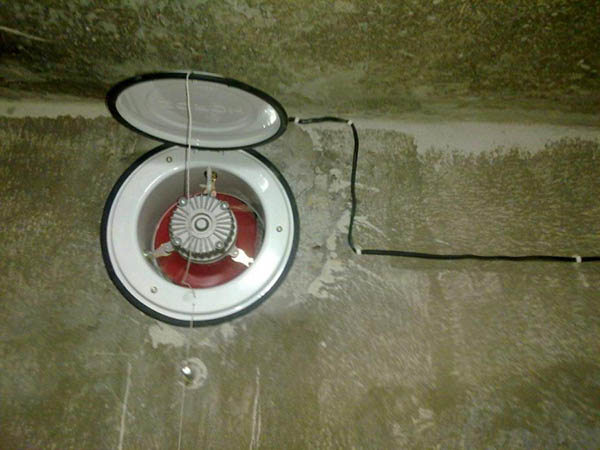
If the vegetable pit is in the garage, it is worth giving preference to forced air exchange. The arrangement of such ventilation involves the installation of not only air ducts, but also fans.
Device Algorithm
- An air duct is installed near the ceiling of the pit to remove air. The end of this pipe should be 0.5 m above the roof level of the garage.
- At the very bottom of the vegetable pit, at a distance of 10 cm from the floor, a supply veterinary duct is installed. It extends 0.25 cm outside, connects to a 90° elbow and exits through the wall at the bottom of the building to the outside.
- With forced ventilation, this circuit is enhanced by fans. The performance of mechanical devices must correspond to the volume of the ventilated room.
- A good option may be a combination of natural and forced air exchange systems. To do this, an exhaust fan is mounted in the ventilation duct designed to remove air. It creates an air vortex, forcibly expelling air currents from the vegetable pit. Therefore, while providing an influx of fresh air from the supply ventilation duct.
Natural ventilation in the vegetable pit
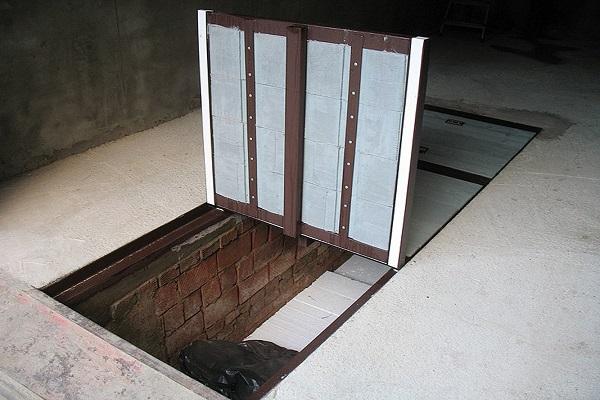
A vegetable pit can be built in a garage or on the street. If it is located in the garage, then it will certainly be divided by a partition with a viewing hole. However, wherever it is built, it is necessary to think over the ventilation system. An important point is the material from which it was equipped. It could be:
- wood;
- concrete plates;
- brick.
High-quality natural ventilation of vegetable pits largely depends on the insulation of the room.
The simplest option, if the pit is located on the street, may be the installation of two air ducts of the same cross-sectional diameter. They should be equipped in opposite corners. The ventilation duct for air supply is mounted at a distance of 0.2 m from the floor. This duct will pass through the ceiling. Outside, the pipe should rise above the ground by at least 0.2 m. The exhaust pipe is mounted under the ceiling in the ceiling. It is brought out as high as possible from the ceiling surface.
Due to the inflow and outflow of air through the ventilation ducts, natural air circulation will be carried out. It is based on the pressure difference between inside and outside the room. If there are severe frosts on the street in winter, then the ventilation is blocked with the help of dampers.
The only disadvantage of natural air exchange is the dependence on weather conditions. In the warm season, the air can stagnate due to the lack of normal draft. Another important point is the protection of ventilation pipes from pests and precipitation. In the first option, you can use a grid, in the second, a special umbrella made of metal or plastic.
Pit construction
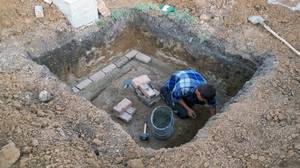 After careful planning, you can start building a vegetable pit with your own hands. The first step is to dig a foundation pit for the future cellar. Then you need to dig a trench in it, in which the foundation will be installed. Crushed stone is poured at the bottom (the thickness of its layer should be at least ten centimeters), and on top of it - building sand with a layer of fifteen centimeters. Both levels must be properly tamped and leveled.
Then you can fill the base with heated bitumen or another similar composition. If you want to make the storage very reliable, you can put a waterproofing material directly on the sand - for example, roofing material - and cover it with reinforced concrete on top. However, such work will be more time-consuming and cost much more. Not all cases require such a powerful waterproofing. Sometimes wooden boards are placed on the floor over concrete.
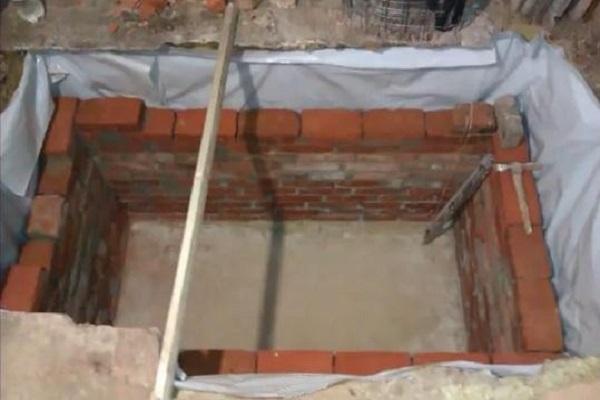
After the floor in the vegetable pit of a garage or a private house is flooded, you can move on to the walls. They are most often erected from concrete or brick. The following requirements are set for them:
- for strength, concrete must be tied with steel reinforcement bars;
- brickwork should be at least half a brick thick, but better - a whole or even one and a half.
The strength of the ceiling is especially important if there is any building above the cellar. Having made a vegetable pit in the garage, it is worth remembering that a car will stand above it. In the case of a private house, everything is even more serious. If the area above is empty, then the requirements for the structure are somewhat reduced - the main thing is that it is reliable and does not collapse down.
The ceiling can be laid out either from bricks laid on boards, or from concrete - in this case, you will need a frame made of reinforcement. At this stage, it is necessary to provide all the required openings: the entrance, where the ladder and the hatch will be installed, and the ventilation passages. The most convenient place for a manhole is the center of the underground. At the same time, all walls will remain free, along which it will be possible to install many racks. The final stage is the insulation of the ceiling. To do this, it is coated with bitumen and thermally insulated with foam plastic or expanded clay.
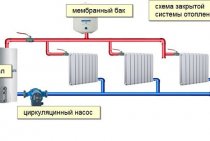
Do-it-yourself water heating in a private house and its installation
How to design a vegetable pit in the garage with your own hands
To build a vegetable pit correctly, you will have to deal with the main stages of construction.
We build a hole
The cellar begins to be created with the digging of a foundation pit, in which a basement will be built for storing vegetables with canned food. After that, the arrangement of the floor is carried out. To make the flooring reliable, it is made of several layers. First, the bottom is covered with a small layer of gravel, which is compacted with a vibrating plate. Then the compacted rubble is covered with building sand and poured with concrete.
When the flooring hardens, the walls are finished. For this, a solid brick is suitable, which is resistant to high humidity. The walls are laid out in such a way that the seams of each subsequent row of bricks do not coincide with the previous one.
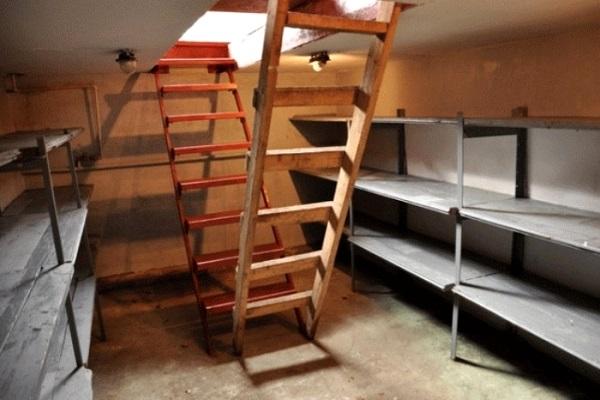
After creating the walls, a reliable ceiling is made that can withstand any load. In the manufacture of the ceiling at the top of the pit, boards are laid on which reinforcement is laid and concrete is poured. Having finished with the ceiling, you can make a ladder, which is installed near the entrance inside.
dehumidification
Before using the vegetable pit, the room is dried so that the walls with the ceiling and floor are completely dry. There are several methods that contribute to the drying of the cellar:
- Install a metal bucket in the center of the basement, fill it with firewood and make a fire. When using this method, you will have to maintain the fire for an hour and a half.
- Bring a metal pipe outside and place a burning candle under it, which will provide natural draft.
Waterproofing
Sometimes vegetable pits are made in areas with high groundwater levels, which increase humidity. In this case, waterproofing should be installed inside the basement, which will help keep the humidity level within normal limits.
The choice of insulation
In order to maintain the optimum temperature inside the cellar, additional thermal insulation will be required. The selected thermal insulation material must have the following properties:
- environmental friendliness;
- chemical safety;
- reliability;
- moisture protection.
To insulate storage for vegetables, use foam or polystyrene foam.
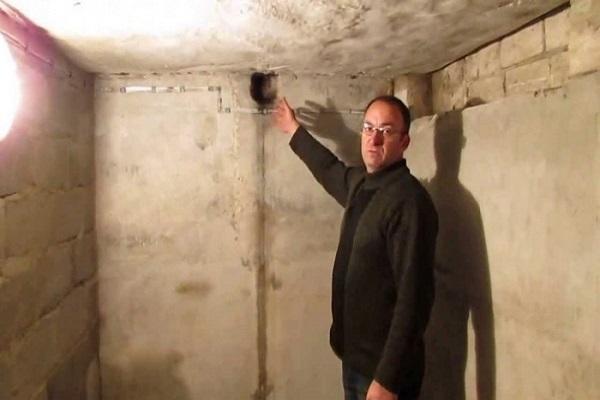
Ventilation device
Any cellar should have ventilation, since it is she who is responsible for the circulation of oxygen inside. When organizing a ventilation system, they are engaged in the installation of supply and exhaust pipes. The supply air is located near the floor, and the exhaust air is led out through the roof.
Supply pipe device
The correct location of the pipe is close, but not close to the cellar wall. The end of the channel will be about 20 - 50 centimeters from the floor. The end of the pipe must be brought out through the foundation block of the garage. To protect the room from the penetration of rodents and other pests, it is necessary to install a fine mesh mesh on the ventilation outlet. The exit should be located just above the foundation blocks, a little further than the main walls of the building. In this way, you can get an optimal flow of fresh air into the cellar. This scheme is used in the organization of forced and natural ventilation.
Important tips when installing supply ventilation:
- Air intake should take place outside the walls of the garage and other premises, preferably away from the gate, so that exhaust gases do not enter the pipe when entering. You can consider the option for the supply pipe to be located further from the walls of the garage, but you need to consider placement without bends and right angles.
- You can make such a ventilation duct even at the stage of building the cellar. For this, a place in the wall is limited in brickwork, with dimensions of about half a brick. The masonry must be done in accordance with all the rules, using the same mortar, but at the bottom have a sufficiently large hole, the end of which will be brought out into the street through the garage block.
- The hole in the masonry wall or pipe must be at least 25 centimeters from the walls of the garage. Thus, normal air exchange is ensured.
- The diameter of the pipe also matters. Too small will not provide normal air flow, and a large diameter will make operation inefficient due to heat loss. The calculation can be taken as follows: for each cubic meter of the room there must be at least 15 mm of pipe. Simple calculations will allow you to get a more or less correct section size. The same rules apply to the calculation of the exhaust pipe, so it is better that they are the same. This will additionally help to properly organize air exchange without unnecessary problems.
- For winter time, it is necessary to provide insulation for the outer part of the pipe. For these purposes, you can use any insulating material, up to rags. With regular freezing, you can consider a quick defrosting system, for example, insulate the end with non-combustible materials and build a fire under it.
- From the inside of the supply ventilation, it is necessary to provide a damper that prevents the products from freezing at a negative outside temperature. It is advisable not to completely close the hole, even in severe frost, fresh air should get inside the cellar.
- In order to prevent snow from closing the hole in winter, you need to periodically clear the area or use a large plywood box. It will provide the necessary protection, besides, the air will not be as cold compared to the other option.
As a suitable material for mounting the supply pipe, you can use the plastic version. The cross section of the pipe should be from 8 centimeters, depending on the size of the cellar, you can take more. Plastic pipes have proven themselves well for such work. They do not corrode, do not accumulate mold and do not rot. Even if a fungus or mold has appeared on the surface, they are easy enough to process with the annual disinfection of the basement.
The most simple design of the exhaust pipe: in the foundation block of the garage, you need to make a hole with a diameter of at least 8 - 10 cm. Then bring out a pipe of a suitable section, and also install a pest net. Such a scheme will not help to ensure a good air flow, but in the absence of another, basement ventilation will be provided.
A condensate of cause and effect
Condensation in a vegetable pit is a danger to humans
How to make ventilation in a vegetable pit so that condensation does not occur in the room during demi-season periods. Indeed, due to its formation, not only air ducts can collapse, but also the wet walls of the vegetable pit can collapse. To protect yourself, you need to insulate the ventilation pipe. Ideally all the way. If this is not possible, thermal insulation is carried out only in the area from the ceiling to the umbrella equipped at the end of the duct. With proper insulation, the life of the ventilation duct will increase, plus condensate will also be removed.
Do not forget about the insulation of the walls of the vegetable pit, because this factor also prevents the formation of condensate. This can be done with polyurethane foam. It helps to achieve complete sealing of the pit. It is a foamy consistency. It freezes upon contact with the surface. Does not form seams and joints, retains its properties up to 50 years.
Proper ventilation contributes to the preservation of vegetables in the autumn-spring period. In order for air exchange to be carried out as expected, you need to know that its multiplicity in the garage and other outbuildings must comply with the norms of SNiP and be equal to 180 m3 / per 1 hour.
n - the frequency of air exchange of this room
V is the volume of the vegetable pit, expressed in m3.
L is the air flow.
After all the work done, it is worth testing the ventilation system - check the draft with a piece of paper.
At the end of the gardening period, the problem of long-term storage of vitamin preparations arises. It is not difficult to get a suitable place to place the crop by equipping a vegetable pit - it can be placed under the house, in the basement, garage, and even under the loggia. Your supplies will stay fresh for a long time without any energy consumption. It is quite possible to equip such a storage for vegetables on your own, while you can use the simplest tools and materials.
Self-grown or purchased for the winter fruits and vegetables will need to be stored somewhere. No refrigerator can hold several boxes of onions and carrots or bags of potatoes. It is possible to make your life easier by equipping a convenient cellar for placing vegetables - in a similar way, you can organize a place for storage in natural conditions, with a certain microclimate. In such storage, the crop will remain fresh for a long time.
The most convenient to use is the so-called underground - a vegetable pit in a house or in a garage, because it will not take up additional space on the site, moreover, it will be much more convenient to use such storage for vitamin preparations, including in cold weather, than a cellar on the street .
Basic requirements for construction technology
There are several key requirements for a vegetable pit
When implementing the project, it is necessary to indicate in it the dimensions of the future pit. Ideally, its depth should be approximately 2-2.2 meters, width - 1.5. It will be quite comfortable to be in it, and the temperature can be easily maintained at +5 degrees.
This is optimal for storing vegetables - they will not deteriorate and retain a maximum of useful substances. Humidity must be maintained at 90% - vegetables will not wrinkle and dry out.
If the groundwater level fluctuates at around 1-1.5 meters from the surface, and it is difficult to choose another place for the pit, you can try to arrange a drainage system. In some cases, it may also be necessary to arrange good waterproofing.
Of course, this will result in some costs both in terms of finance and labor. But if you neglect this stage, you should prepare for the fact that sooner or later the water will find a loophole for itself and penetrate inside.
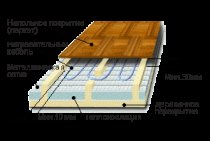
It is recommended to perform wall insulation - any heat-insulating material in the form of plates that resists moisture well, for example, polystyrene foam, is suitable for this.
Sand and gravel are laid at the bottom, then bitumen or other similar material is poured onto this pillow. The flooring is best arranged in the form of a reinforced concrete slab. If it is impossible to provide such an option, strong boards are laid on the base.
The simplest option is to build natural ventilation, for which two pipes are used, placing them at different heights from the floor surface in the garage. One pipe is supply, the other is exhaust, and their outer ends should be brought out as high as possible.
This ensures a constant supply of fresh air. This helps keep the vegetables fresh for longer.
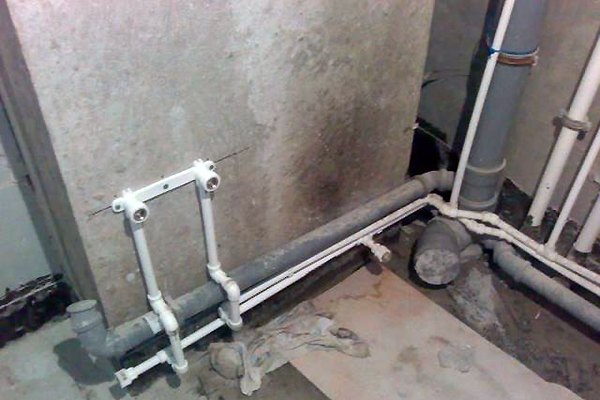
Characteristics and types
Flexible hose for plumbing is a hose of different lengths, made of non-toxic synthetic rubber. Due to the elasticity and softness of the material, it easily takes the desired position and allows installation in hard-to-reach places. To protect the flexible hose, the upper reinforcing layer is designed in the form of a braid, which is made of the following materials:
- aluminum. Such models withstand no more than +80 ° C and retain functionality for 3 years. In high humidity, aluminum braid is prone to rust.
- Of stainless steel.Thanks to this reinforcing layer, the service life of the flexible water supply is at least 10 years, and the maximum temperature of the transported medium is +95 °C.
- Nylon. Such a braid is used for the manufacture of reinforced models that can withstand temperatures up to +110 ° C and are designed for intensive use for 15 years.
Nut-nut and nut-nipple pairs are used as fasteners, which are made of brass or stainless steel. Devices with different indicators of permissible temperature differ in the color of the braid. Blue ones are used to connect to a pipeline with cold water, and red ones - to hot water.
When choosing a water supply, you need to pay attention to its elasticity, reliability of fasteners and purpose. It is also mandatory to have a certificate that excludes the release of toxic components by rubber during operation.
Falling asleep, ramming and leveling the floor
If several types of backfill are used, each backfill layer must be compacted with a manual rammer. Consider the situation when crushed stone with sand is used. First, crushed stone is poured into the bottom of the pit, tamping is carried out. The thickness of the compacted layer must be at least one hundred millimeters.
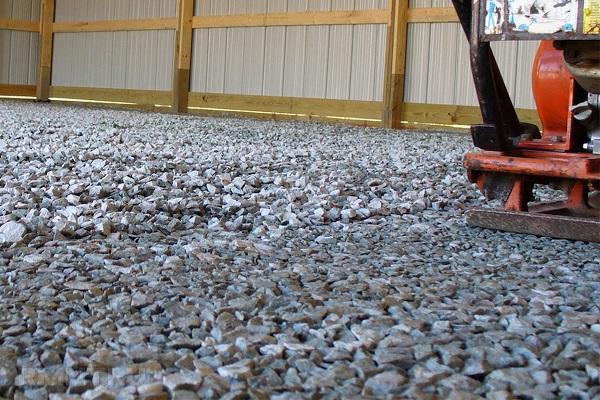
Then sand is poured and rammed (layer thickness - fifty millimeters). After that, crushed stone is poured (layer thickness - five centimeters). You can only make 2 layers of one hundred millimeters. It all depends on how wet the soil is. After backfilling and tamping, the floor is leveled, for which you can use the same manual tamper.