What is vapor barrier
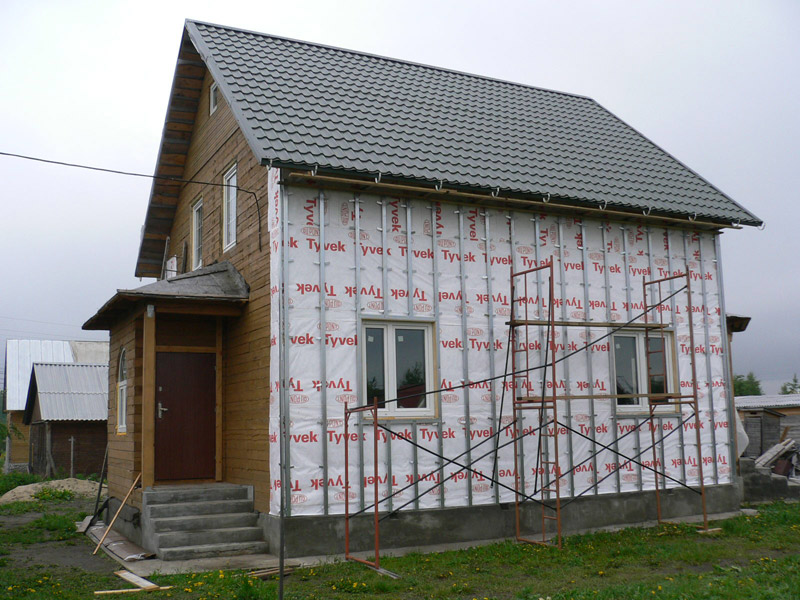
Siding protects the walls of the house from rain and wind. However, the panels are not sealed, so moisture somehow penetrates under the finish. To protect the walls and insulation from its negative effects, a ventilation gap is left between the ventilated facade and the wall (insulation), and a vapor barrier and wind and moisture protection are also installed.
The vapor barrier is mounted between the wall and the insulation. To describe the principle of its operation, first we will understand where steam and water come from.
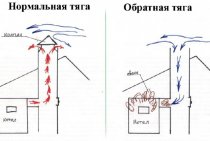
Almost all walls “breathe”, that is, they pass air and steam to a greater or lesser extent. Steam penetrates from a warm room to the street, where the air is much colder most of the year. Accordingly, the temperature inside the wall is not uniform: at the inner surface it is higher, at the outer surface it is lower. At a certain level of cooling, the steam turns into water - this is the so-called dew point. To calculate it, use special tables.
The location of the dew point depends on the temperature and humidity indoors and outdoors. If it is on the inner or outer surface of the wall, condensation will form there. If the house is insulated from the outside, the dew point moves closer to the insulation. As a result, the resulting condensate will penetrate into the structure of the material. For polystyrene, this is not scary (it itself has a low vapor permeability and is often used as a vapor barrier). And mineral wool and mineral slab will get wet. At the same time, their thermal insulation properties deteriorate significantly. In practice, it has been proven that an increase in the humidity of a heater by only 5% reduces its effectiveness by half.
In addition, wet insulation becomes an excellent habitat for fungus and mold, contributing to their spread to the walls of the building. If this is not dealt with, then in the future moisture will cause their premature destruction.
Now it becomes clear why you need a vapor barrier under the siding. Firstly, it protects the insulation from condensation. Secondly, the vapor barrier film does not allow steam to reach the dew point, which means that condensate does not form not only in the heat-insulating material, but also on the inner surface of the walls.
Types and properties of insulation
Dense slabs of mineral fiber (“basalt wool”) are an ideal insulating material for a wooden house for siding. The thermal conductivity index is not inferior to either brick or wood. Good breathability allows cotton wool to "breathe" no worse than wood. Standard dimensions allow you to accurately determine the amount and area of \u200b\u200binsulation.
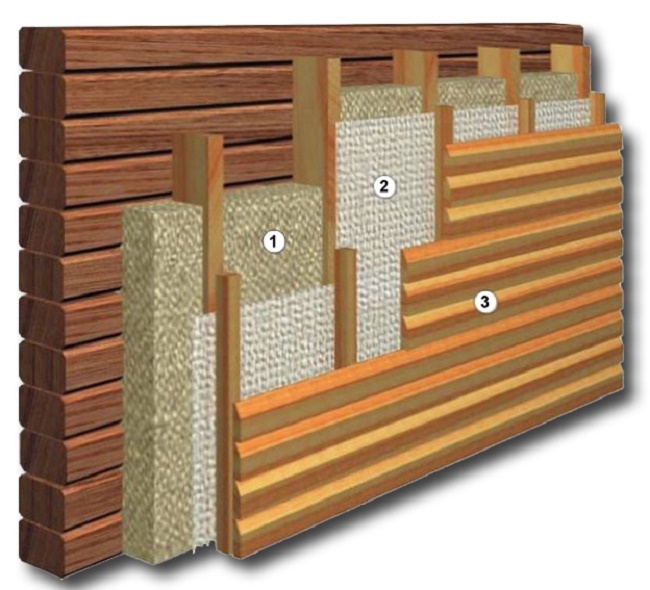
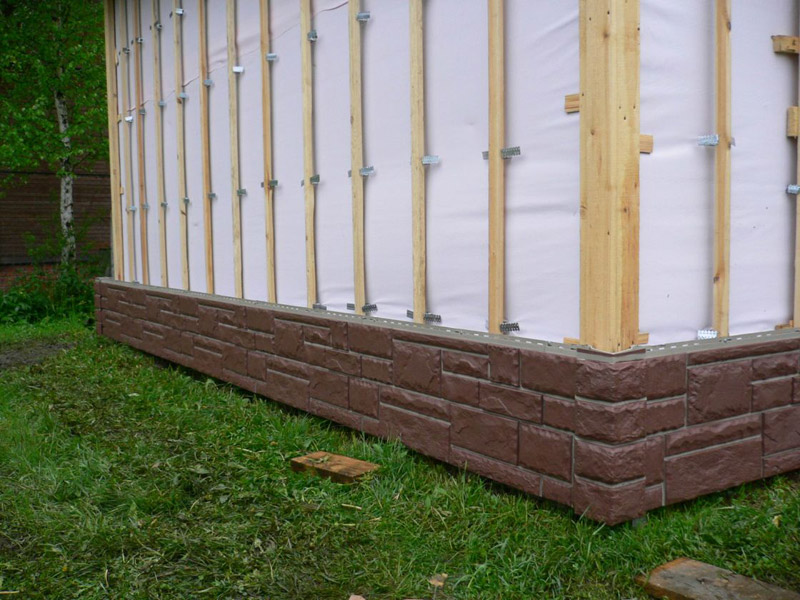
Plates marked PZH-150 (semi-rigid), PZH-175 (rigid) and PZH-200 (high rigidity) are designed for insulation of external walls (the numbers indicate the average density of the material in kg / m3). The first and second are more often used in insulation, the latter are usually used for enhanced fire protection. The dimensions of the plate are 60×125 cm and the thickness is from 2 to 12 cm depending on the density. PZh-175 with a thickness of 5–8 cm is suitable for a wooden house. The insulation can be pasted over with paper or fiberglass, stitched with a thread. Mineral fiber does not decompose, does not burn, does not shrink. Depending on the binder pressed with the fiber, the hygroscopicity changes. The only drawback of the plates is that when wet, the thermal conductivity decreases. Therefore, two types of protection are required: a vapor barrier membrane is laid between the wall and the insulation, and a hydroprotection (dense film) is laid under the siding.
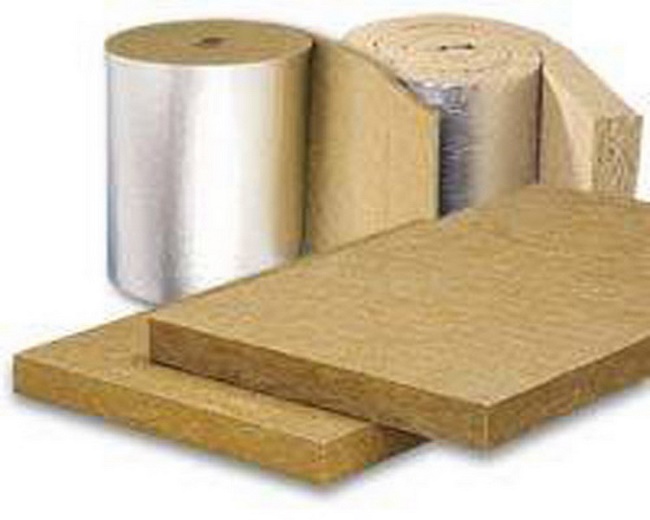
In Russia, the most popular, and well-deserved, heaters are URSA (URSA) from Uralita, Izover (Izhevsk), TechnoNIKOL (Nazarovo). For fastening to walls, long nails and round plates with a diameter of 3-4 cm are required for hats. On sale there is a special fixture.
How to properly protect your home from moisture and steam
In most regions of Russia, the house needs insulation, which means vapor barrier. The correct moisture protection technology in this case resembles a layer cake and looks like this:
Layer 1. Vapor barrier.
The vapor barrier film is attached directly to the wall of the house. For high-quality protection of the insulation, it is mounted with an overlap. By the way, modern vapor barrier films are made according to the principle of a membrane: steam does not penetrate into the insulation, but at the same time can be removed from it
When using such material, it is important to lay it on the correct side.
Layer 2. Insulation.
A heater is installed on the vapor barrier film. Detailed technology of its installation with a crate for siding can be found in the instructions on our website.
We especially note that it is important to avoid cold bridges
Layer 3. Wind protection.
To protect the insulation from moisture during rains and snowfalls, a wind and moisture protection is installed on top of it.
Layer 4. Ventilation gap.
To prevent moisture stagnation under the finish between the panels and the insulation, there must be a ventilation gap. Freely circulating air promotes the evaporation of moisture and prevents the occurrence of fungi.
Layer 5. Siding or facade panels.
The final step is the installation of siding or facade panels. The technology of their installation is described in detail in the instructions. By the way, if you have not yet chosen which siding to use for finishing your home, take a look at our catalog. In it you will find a huge selection of materials for decoration. You can try them on your home in the Alta Planner online program. It's easy to do - the result is very visual!
The pie is ready. The insulation is protected from moisture on all sides and will keep you warm even in harsh winters.
Assortment and calculation of materials
To determine the amount of materials, you first need to select the type of finish. How to mount siding with your own hands with the insulation of a wooden house, consider the example of installing the Döcke Extrusion system, since their fastening system is universal
When choosing a finish style, pay attention to the area of the panels
We recommend making a sketch of the future skin with dimensions. It will allow you to calculate the area and the number of joints. You will know the number of panels with an accuracy of one or two pieces.
A rich assortment can be an example of a skilful combination of profiles and fasteners.
- S7 vertical panels have a usable area of 0.55 m², length - 3050 mm.
- Horizontal panels D4.5 "Ship timber" (S - 0.85 m², L - 3660 mm).
- "Blockhaus" (S - 0.88 m², L - 3660 mm.).
- D5C "Herringbone" (S - 0.78 m², L - 3050 mm.).
The "anti-hurricane" lock (increased strength) ensures that the panels do not disperse in the strongest gust of wind. Finishing of window and door openings is done with complete profiles: slopes, platbands, near-window profiles. Corner elements, start and finish rails, moldings and H-profile allow you to fix the ends of the panels.
The calculation of the crate is made taking into account the distance between the slats - 20 cm. The thickness of the bars should be no less than the thickness of the insulating materials by 0.5 cm, and the width should be 3-4 cm. If you want to increase the space between the plastic and the insulation up to 2-3 cm, you will need a thin rail (2-3 cm) the same width as the bar. It is sewn onto each crate over the waterproofing. A small space will make the circulation of air with water vapor more active, which is useful for mineral mats.
The bars must be dried to 15 - 20% moisture and treated two or three times with protection against decay and fire. Nails should be 3 times the thickness of the bar in length. For fastening siding and other elements, purchase galvanized screws with a wide flat head (length 25 - 35 mm, head up to 0.8 cm).Starting and corner elements are fastened after 20 cm, and the main skin can be screwed after 40 cm, but we recommend purchasing 20% more fasteners.
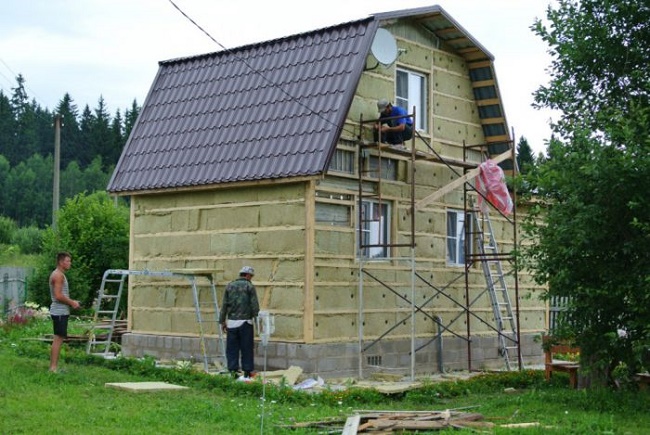
Do-it-yourself installation of insulation for siding
Basalt insulation is of high quality and has a special fiber structure. One of the methods for making cotton wool is the method of heating and melting various rocks by electrolysis. The required fiber structure can be obtained by blowing the melt with cold air or by using the duplex process. Expanded polystyrene foam is more suitable for basement insulation. Glass wool is made from silica sand using a process that is different from the technology used to make stone siding insulation. The equipment of a complete production line can have more than thirty units.
After choosing a heater, it is imperative to calculate the required amount of materials, taking into account the technique of its use - end-to-end, overlap, in one or more layers. It should be borne in mind that with a simplified installation of insulation under siding using a metal crate and insulation applied end-to-end in one layer, it is impossible to achieve the expected high insulation effect. Installation of insulation under the siding begins with the vertical installation of a wooden crate. The most common material for crates is timber. Its thickness is selected depending on the thickness of the insulation. You can use profiled steel strips or wooden slats for lathing. Fastening to the wall is carried out with dowels.
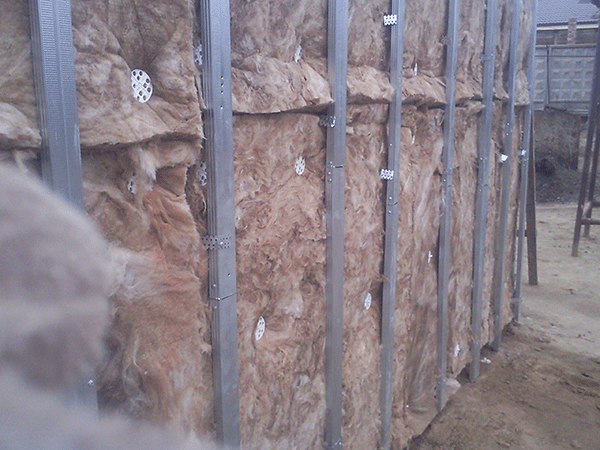
It is necessary to carry out installation, moving along the perimeter, bypassing door and window openings. Installed evenly with the help of a level, the crate will not create problems with further siding. For an improved result of work, it is recommended to use a cross crate. Not only wooden blanks are used for the crate, but also a galvanized metal profile with hangers. The metal profile is mounted on perforated strips (suspensions) attached to the wall in order to eliminate possible irregularities in the outer walls of the building. When installing insulation under siding, it is recommended to lay insulation between the crate and the wall without using other materials that do not have the qualities of a heater. You can attach the insulation to the wall with mastic, glue, screws. When laying in two or three layers, the joints of the individual parts of the insulation overlap, which makes the insulation ideal.
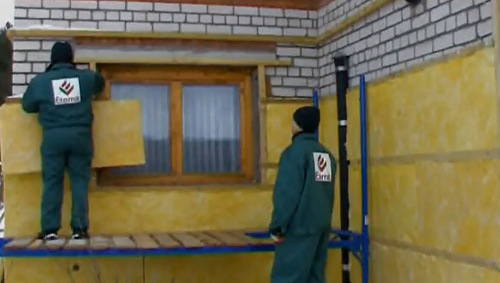
The wall with the laid insulation is covered with a diffusion hydrophobic membrane. The advantage of the membrane is the ability to remove internal moisture and not let in external moisture. The membrane is fastened with staples of a construction stapler to the crate. After the completed work on the insulation of the walls, they proceed to the siding, which begins with the installation of the crate.
Siding characteristics, manufacturers
Canadian and North American sidings are considered the best, but limited imports make them a rare guest on our walls. Mitten (Canada), Variform (USA), Vytec (Canada) have been on the market for more than 40 years and have earned all the awards that a finishing material could receive. But their prices are high, and the color range is not rich. They do not like bright colors, they prefer light pastel and brown tones.

In our country, there are manufacturers that can compete with overseas finishes. The German concern Döcke Extrusion has built a plant in Moscow that produces the entire range. Good quality and 50 years plastic quality assurance. The company "Alta - Profile" produces siding and facade panels (the mount is the same, but a different shape). The price is quite affordable, and the Economy series is not inferior in quality to Canadians. The St. Petersburg company "Nordside" confidently takes the third place.
Each manufacturer has exclusive offers (unique panel profile, colors, shapes and textures, own fastening system).
How wind protection works
The windscreen actually does two things. Not only does it prevent air masses from penetrating into the insulation during wind, but also acts as a moisture barrier.
A separate type of film is used for arranging insulated roofs. Such films are often called a roofing membrane, by the way, for some reason, many builders neglect it, as it turns out in vain ...
 roofing membrane
The windproof membrane consists of polymer fibers specially sintered. The film itself is designed in such a way that on the one hand it is smooth, and does not allow moisture to penetrate from the street into the house, on the other hand it has a rough surface.
Installation of siding from preparation to the last rail
Clean the surface of the walls from all protruding objects. Remove all nails and remove spillways and cornices. Paint the walls with a primer, and treat with fire and mold protection agents twice.
The crate is attached to the wall vertically (on a plumb line) after 20 cm between the axes - the centers from the base to the very top. Along the perimeter for fastening moldings, starting and finishing elements, a horizontal row of bars is nailed. Their horizontal fastening is done according to the level and twine from corner to corner, without deviations and sags. It is recommended to skip two bars on top.
Thermal insulation mats are joined without gaps. For hydro and vapor barriers, Döcke has produced several types of D-folie films and membranes. Lay them according to the instructions. Nail a thin lath over the crates. Sealant is recommended to treat places through which water can penetrate: window and door openings, entrances of all highways.
Installation of panels begins with openings. A U-shaped profile is closely attached to the surface of the window and door frames, slopes and window profiles are fixed into it, and the second joint is covered with a casing. Adjustment in width and length is made with scissors and a saw. The corners of the platband are sawn on the miter box, the joints are very even.
An ebb is attached along the lower bar, above it after 3-4 mm - a starting rail. If the tide is joined, then overlap by 2 cm. A gap of 5-8 mm should be made between the starting rails. From heat, the plastic expands and the rail can bend when the ends rest against each other. Finishing profiles are mounted according to the same scheme. The starting rail is set according to the level, and the straightness can be checked with twine.
Corner elements are mounted with fastening every 20 cm. Screw in the screws in the center of the holes and do not tighten until fully fixed, leave 1 mm for free movement of the panel. After installing all the corner elements and openings, you can begin to close the main surfaces. When you've finished piling up the wall to the very last panel on top, cut it to length and fix it with a finishing strip or molding. For the strength of this lock, hooks are made with a punch in the plane of the panel.
Soffits under the roof are closed last. Ventilation through the holes will improve the removal of vapors from under the plastic.
Manufacturers give warranties for their products for decades. And all this time, to care for the surface of the plastic, it is recommended to wash it with warm water and detergents.