Aerated concrete fireplace. What you need to know when building a fireplace from aerated concrete
It is difficult to find a person who would not dream of a fireplace, but not everyone has the opportunity to fulfill their dream. Therefore, many residents of city apartments often thought about how to make a false fireplace with their own hands? The construction of a decorative fireplace is a simple matter that does not require in-depth knowledge of the furnace business, but some nuances still need to be taken into account.
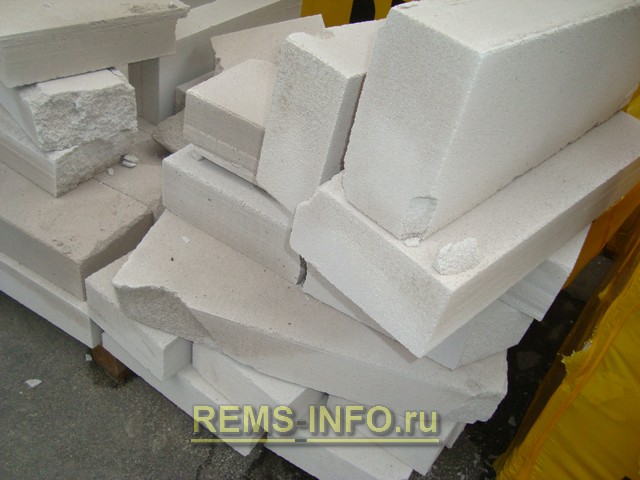
Building a fake fireplace from foam concrete
You will need:
- foam concrete blocks and slabs;
- hacksaw;
- adhesive for porous concrete;
- GKL putty;
- trowel;
- fiberboard sheet;
- putty knife.
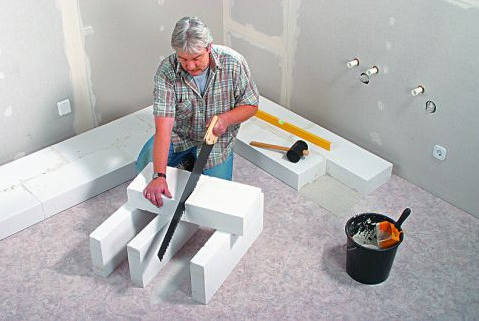
It is easy to build a false fireplace with your own hands from foam blocks. This is a fairly light material that can be easily cut with a conventional hand saw. The first step is to decide on a place for the future hearth.
Example 1. The device of a decorative fireplace.
The appearance of the fireplace will depend on your wishes, imagination and the size of the home.
First, a foam concrete slab is laid on the floor, it can be put on glue, but this is not at all necessary. The outer corners, which will be located directly in front of the false fireplace, should preferably be rounded for safety reasons. The height of the base should not exceed 10 cm.
Next, the side walls are made, the foam blocks can be installed vertically - in this case, the structure will turn out to be narrower - or laid in a horizontal position - for a wider false fireplace. If you wish, you can saw foam concrete blocks and imitate brickwork. The parts are fastened together with a special glue for foam concrete or a sand-cement mixture.
After the side walls are installed, a foam concrete slab is glued on top of them, which will serve as a mantelpiece. You have an almost finished frame of a decorative fireplace, in which the space for the firebox takes up too much space. In order to reduce it, the front of the fireplace with a window for the firebox is cut out of a sheet of fiberboard or plywood.
If desired, the arch can be given the appearance of an arch or made even. Fiberboard is glued to the same glue as the blocks. If neither plywood nor hardboard was found in the household, then the front panel can be cut out of corrugated cardboard, but in this case it must be treated several times with a solution of PVA glue and water, and also thoroughly puttied.
Next, you need to apply a thin layer of putty over the entire surface, paying special attention to the seams and joints. With a flat spatula, the mixture is applied to the trowel, then at an angle - from the bottom up - the putty is distributed
Corners are best puttied with a spatula. Now you need to let the first layer dry, and then apply the finishing layer of putty. After drying, they are passed with fine sandpaper, the surface is completely ready for decoration.
False fireplace trim
Not everyone knows how to make a decorative fireplace with their own hands so that it differs little from the real one. Finishing plays an important role in the design of the portal. So, with the help of the same putty, you can make a variety of textures. If you pick up putty with a foam sponge and apply it to the surface with jerky movements, you will get an interesting rough texture.
You can leave it as it is, but it is better to paint the surface with dark acrylic paint and immediately walk over it with a damp cloth, so the dark color will remain only in the recesses. Then apply silver or gold paint to the tip of a brush or foam rubber sponge and walk lightly, barely touching the surface.
If you have leftover drywall, then you can cut bricks out of them to decorate a false fireplace.It is better to give them a not quite correct shape, then it will be possible to make an imitation of the old, already lived, masonry. The surface and side of the bricks are decorated with putty, it is applied with a spatula, deliberately leaving irregularities, allowed to dry, then painted in a suitable color.
With beech wood filler, you can imitate a stone surface. It is applied to the fireplace portal with a spatula in chaotic movements. Then they draw the outlines of the stones with some kind of stick, take a bristly brush and, as it were, pierce the still raw putty with it, thus obtaining the texture of the stone, and let it dry. To make the stones look more natural, they are shaded with dark brown and black acrylic paint.
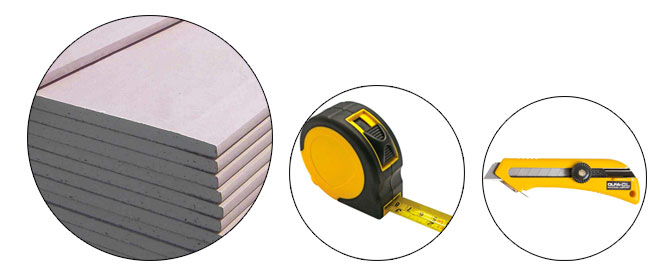
Do-it-yourself false plasterboard fireplace
You will need:
- drywall;
- rack and guide metal profiles;
- self-tapping screws for plasterboard and for metal;
- screwdriver;
- knife and metal ruler;
- GKL putty;
- putty knife.
Before you make a false drywall fireplace, you need to decide on its time.
Imitation of wood in the interior of the apartment
A wood fireplace will look great in the interior of the apartment. With this variant of imitation, decoration and furniture made from natural materials predominate, which has a positive effect on Feng Shui. You can raise the texture of the tree with stain and varnish. In addition, in the event of a change in the situation in the apartment, the portal can be finished with almost any facing material.
For work you will need:
- roulette;
- electric jigsaw;
- plane;
- belt grinder;
- building level;
- screwdriver;
- hammer;
- self-tapping screws and nails without hats;
- straight or rounded lining;
- beam 25 × 25 mm.
Before starting work, the lining must be treated with an antiseptic.
Assembly is carried out in the following sequence:
- Billets are sawn from a bar. The frame is assembled using nails and self-tapping screws for fastening.
- The frame is sheathed with clapboard. The portal is ground and polished. After that, the fireplace is cleaned of chips and sawdust.
- The wood is varnished or water-based. To achieve the desired effect, this procedure is performed 2-3 times.
During operation, decorative shelves and other accessories can be screwed to the portal.
Check out the video on how you can create a home decorative fireplace using ordinary boards
Building a house from aerated concrete is not exactly an easy undertaking, but compared to brick or the same log house, much less effort will have to be applied. We will build a simple one-story house on a strip foundation.
If you wish, you can change the characteristics of the building at your discretion - you just need to master the procedure for laying out the walls, all other activities are carried out as standard for houses made of any materials.

Construction set
- 1 We make the foundation
- 1.1 We mark the site
- 1.2 We prepare trenches
- 1.3 Swarm trenches
- 1.4 Installing the formwork
- 1.5 Laying reinforcement
- 1.6 Pouring concrete
- 1.7 Building walls
- 1.10 Interfloor armored belt. Photo
- 1.11 We equip windows and window sills
- 1.12 Making jumpers
- 1.13 Making an armored belt
- Band-saw.
- Drill.
- Hand saw.
- Manual wall chaser.
- Mixer.
- Electromill.
- Scraper bucket.
- Glue cartons.
- Toothed trowel.
- Rubber mallet.
- Grinding grater (board).
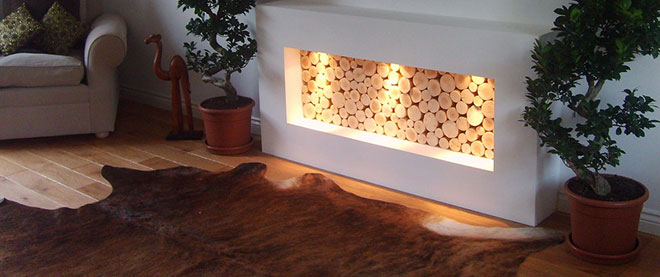
Do-it-yourself imitation of a foam plastic fireplace
The choice in favor of foam plastic makes it possible to create a lightweight, mobile imitation of a fireplace in a limited time and practically for nothing. For the construction of a fireplace portal, you can use standard square slabs 100x100x5 cm in size. The base and countertop are made of 100 cm long slabs. Since the foam plastic easily bends under load, it is advisable to reinforce the countertop with plywood or boards.
To assemble a foam fireplace you will need:
- roulette;
- level;
- stationery knife;
- marker;
- square;
- rasp;
- glue or liquid nails;
- thick wire for the manufacture of gratings and pokers;
- finishing;
- rechargeable lamp that simulates a flame.
If it is planned to finish the product with plaster, then a reinforcing mesh, a set of steel spatulas and a gypsum mixture will be required. However, if a decorative fireplace is conceived as a mobile or temporary structure, then its decoration is carried out with wallpaper or adhesive tape.
When it is planned to build a stationary hearth, the work is carried out in the following sequence:
- A project is being made. It consists of a scheme for fixing plates, a type of finish and a calculation of building materials.
- The work site is being prepared. Carpets are removed from the floor, furniture and household appliances are covered with a protective film.
- Blanks are cut to assemble the portal. They are attached to the base and glued together. Raised walls are covered with countertops.
- A curved opening for the hearth is cut out. Irregularities are carefully removed with a rasp. The product is cleaned of dust and grains of foam.
- The portal is pasted over with a reinforcing mesh from the inside and outside. A thin layer of plaster is applied to it. The putty is leveled and treated with a liquid primer.
The final stage is the finishing of the portal and the internal arrangement of the hearth. The fireplace is pasted over with decorative strips and decorated with various crafts.
Fireplace in the house from the foam block of the gas block. Do-it-yourself aerated concrete house
It is not easy to lay out a real brick fireplace, but everyone can install a ready-made firebox in the house and decorate it beautifully if desired.
It is very important to choose the right place, prepare a solid reliable foundation, close the adjacent walls with non-combustible materials. It is also necessary to think over the fastening of the chimney pipe and ensure its fire safety.
Subject to the technology, installing a fireplace insert with your own hands will not cause any trouble.
The weight of the firebox and the fireplace body is very large, so the base under it must be as strong and reliable as possible.
It is especially important that this base does not have differences in height, otherwise the structure will settle unevenly and cracks will appear. In addition, the walls adjacent to the firebox should be lined with non-combustible materials or sheathed with refractory insulation and galvanized sheets.
At the preparatory stage you will need:
- cement-sand mortar;
- brick;
- metal mesh for reinforcement;
- building level;
- trowel;
- insulation;
- waterproofing material;
- roulette.
Step 1. Marking under the fireplace
The area where the fireplace will be mounted must be free and clean. Measure the width and length of the fireplace with a tape measure, draw markings on the floor with chalk. If the load-bearing wall is made of wood, it is recommended to either cut out its section and replace it with brickwork, or lay out an additional brick partition butt.
If the second option is chosen, the partition should be installed on the same foundation as the firebox. This must be taken into account when marking the base in the floor and add the thickness of the masonry around the perimeter. Lines are also drawn on the wall indicating the width of the fireplace.
Step 2. Foundation pouring
The area of the foundation should be larger than the area of \u200b\u200bthe fireplace, so 30-40 cm are added on each side. The depth of the foundation is approximately 50 cm, a thinner base will not withstand the load. If the floor in the house is made of boards, a fragment of the coating is cut out according to the marking along with the lags. The cement mortar is kneaded, then a small amount is poured onto the prepared area. It is leveled, a reinforcing mesh is laid on top and again poured with a solution.
You can make a brick foundation: red brick is laid out in several rows with mandatory dressing until the base rises to the level of the finished floor. The surface of the foundation is checked with a level, if necessary, leveling with a solution. When the solution dries well, the base is covered with a waterproofing material.
Step 3. Building a partition
Masonry is made of brick, aerated concrete or tongue-and-groove slabs - refractory materials. Between the masonry and the firebox, there must be free space for the exit of warm air. It is impossible to lay bricks or blocks close to the pedestal and the walls of the furnace. For a bunch of refractory masonry with a bearing wall, metal rods are used, which are laid between bricks and driven into the wall.
The finished brickwork is plastered with cement mortar or laid with mineral wool, and covered with foil material from above with foil outward. You can upholster the masonry with galvanized sheets. If the fireplace is mounted in a corner, the seam between the walls is sealed with a special sealant.
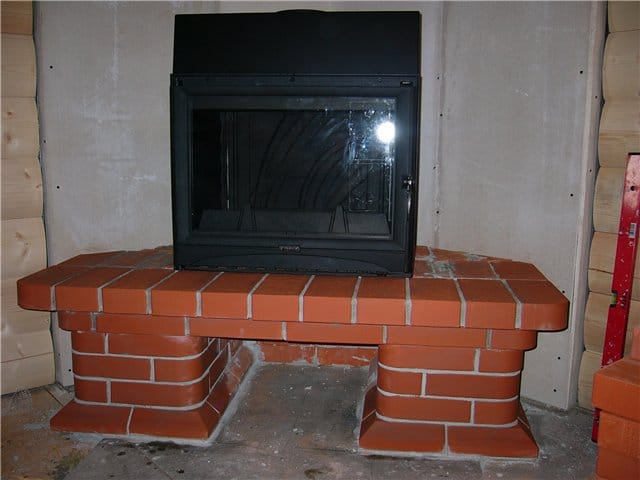
Step 3. Making a pedestal for a firebox
A U-shaped pedestal is laid out on the red brick floor. It consists of 3-4 rows, depending on the desired height of the fireplace. A mixture of clay and sand is taken as a binder solution. To reduce the load on the floors, instead of bricks, you can take aerated concrete blocks, and then plaster them with a cement mortar. Each row must be checked with a level, the bricks are corrected with a rubber mallet. Excess solution is immediately removed with a trowel.
Steel corners are laid on the bricks of the fourth row so that they connect opposite walls. The corners are placed at a distance of 15-15 cm with a protrusion upwards. The bricks are placed on the edge and the grooves are cut, then they are laid so that the protrusions of the corners fit tightly into the cuts. Only 2/3 of the top of the pedestal is laid with bricks, leaving the space near the wall free. Strengthen all this with a solution and level. The surface must be perfectly horizontal.
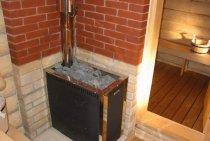
Furnace and chimney installation
When the solution is strengthened, you can proceed to the main part - the installation of a fireplace insert. Accuracy is very important here, because it is unlikely that it will be possible to correct errors without dismantling the structure.
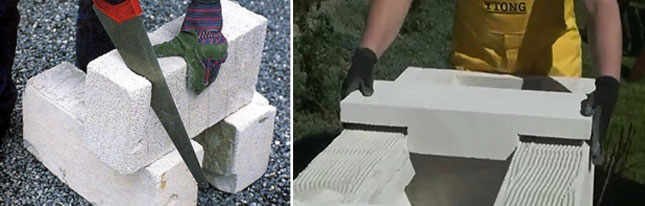
Draw and cut
Whatever complex design the future owner of the fireplace conceives, it will be easy to make it from aerated concrete. After all, it can be cut with a conventional hacksaw for wood or drywall. Such a hacksaw is not enough for a large amount of material, but this is quite enough for a fireplace. True, the hacksaw will then either have to be sharpened well, or thrown away. Here are some tips on how to think through and build the main structure:
The drawing is done on paper or directly on the walls and ceiling, if the design is not complicated;
In the process of drawing lines and forming the material, great attention is paid to the coincidence of angles, for which a three-dimensional square for gas blocks is usually taken;
When designing a fireplace, it should be taken into account that flammable objects must be at a distance specified in SNiP, and the outer side of the fireplace should be covered with additional insulation, for example, gas silicate;
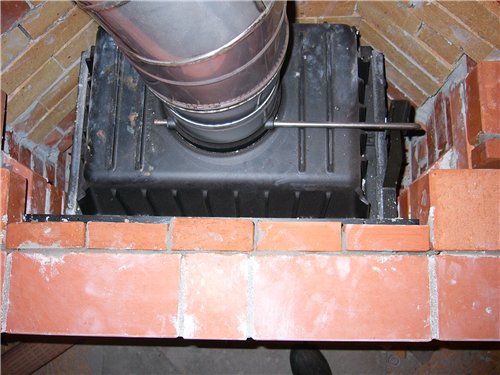
The interior of the fireplace is usually made of cast iron (sold separately), which can be replaced with heat-resistant sheet metal lined with asbestos board;
The connection of the firebox with the pipe is made before the completion of the back of the fireplace (the metal sleeve is lined with aerated concrete after connecting to the main pipe).
As for the purchase itself, the calculator for calculating aerated concrete blocks in Ufa will help you. You enter the parameters - it does the rest!
How to make a fireplace with a cast-iron firebox
One of the undeniable advantages of such fireplaces, which were not mentioned above, is the ability to mount the base for them directly on the floor of the room. The only exceptions are the floors of a floating structure. In addition, you do not have to think about how to equip the fireplace with good draft or arrange an ash pan. All this is already provided by the design. In a word, making a fireplace with a cast-iron firebox with your own hands is easier than laying out the simplest open brick fireplace.
Base device for a cast-iron firebox
- You need to choose the right place to install the fireplace.First, the room must have sufficient space. Experts do not recommend installing this heating equipment in rooms with an area of \u200b\u200bless than 20 squares. In addition, when choosing a place, do not place the fireplace in line with the openings of windows and doors.
- In the event that the room is ventilated through a ventilation system or with an air conditioner, it is necessary to provide additional air flow to the room. For example, install a ventilation pipe with an automatic ventilation system. A closed hearth fireplace requires an average of 500 cubic meters of air
After choosing a place to install the fireplace, make a base for it.
To do the work with your own hands, you need to put a layer of waterproofing, and arrange a reinforced cement screed on top. If the floors are wooden, then a layer of thermal insulation is also needed. The thickness of the screed is at least 10–15 mm; a metal mesh can be used as reinforcement.
After the base reaches the desired strength, you can proceed to the device with your own hands a pedestal under the cast-iron firebox itself
. It can be made of brick, aerated concrete blocks or other material, or you can purchase and install a ready-made plinth made of natural stone.
If the floors do not differ in strength, then it is better to give preference to aerated concrete
as a sufficiently strong and light material, which can be easily given any desired shape and size. Subsequently, it can be plastered or lined with ceramic tiles, natural or artificial stone.
Blocks are laid on special glue or ordinary cement-sand mortar
. The surface of the pedestal is leveled with a layer of plaster 1–1.5 cm thick.
Please note: the pedestal for installing the fireplace must be perfectly flat. Installing the hearth on an uneven surface is prohibited, since with a significant skew, the risk of damage to the internal elements of the fireplace increases
In addition, the heating unit will work unevenly.
Installation of a cast-iron firebox
Regardless of what the base for the firebox is made of, a layer of thermal insulation is laid on it, for example, asbestos cardboard and a sheet of roofing iron.
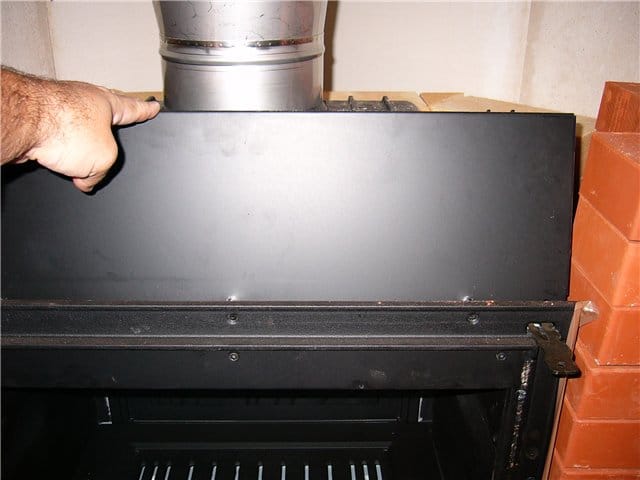
To properly install the firebox with your own hands, place the bars in place of its installation, align the firebox in place, and then carefully remove the lining. The chimney of the firebox, made in the form of a metal sleeve or pipe, is installed in the hole intended for it and taken out through the ceilings and roof to the outside in compliance with all fire safety rules.
Exterior finish of the fireplace
If the lower part of the fireplace is already ready and needs only a decorative finish, then you only have to close it on the sides and top (see Finishing the fireplace).
Answering the question of how to build a fireplace with a cast-iron firebox with your own hands, you need to know what the installation will be made of. If it is completely made of brick, then it is necessary to continue laying, stepping back from the walls of the firebox for a certain distance and leaving several holes in it for hot air to escape.
But you can do it easier and cheaper, at the same time significantly facilitating the design - to arrange a frame for sheathing.
- The frame is easy to assemble with your own hands from thin-walled metal profiles or duralumin corners, interconnected by metal screws. Its design should provide for fastening the skin from the outside and thermal insulation from the inside.
- Thermal insulation mats made of non-combustible material are attached to the frame in such a way that the foil side faces the firebox and chimney.
- You can sheathe the frame with your own hands using any materials: drywall, wood, asbestos-cement boards, etc.
- Openings are made in the thermal insulation and cladding for the exit of heated air into the room
It is difficult to find a person who would not dream of a fireplace, but not everyone has the opportunity to fulfill their dream. Therefore, many residents of city apartments often thought about how to make a false fireplace with their own hands? The construction of a decorative fireplace is a simple matter that does not require in-depth knowledge of the furnace business, but some nuances still need to be taken into account.
masonry
A foam concrete slab with a base height of not more than 10 cm is laid on the floor with glue. Vertical blocks for the sides are installed, for a wider structure, the foam blocks should be laid horizontally. The block is well sawn, so it can be sawn into bricks, you get an imitation of brickwork, you can fasten the parts with the same glue, you can use a mixture of sand and cement. After installing the side walls, a block slab is glued on top, which will serve as the top shelf, the frame structure is ready. If the place for the firebox is too large, then the front part is cut out of a plywood sheet, also a window for the size of your firebox, the vault can be made arched or simply even. Tiled sheets, like blocks, also sit on glue, you can use corrugation for the front panel, coat it well with glue and apply putty, coat the entire surface with it, especially seams and joints. Using a spatula, the composition is placed on the trowel and then - a layer of putty from the bottom up, leave the first applied layer until completely dry, the next layer will be the finish. When the work is dry, go over it with sandpaper, and you can decorate.
Protection against external influences
Since aerated concrete has a high water absorption, for its use in the open air, protective measures are required. Canopy or gazebo
protect outdoor fireplace from direct exposure to snow or rain. However, the high humidity on the street still exists. There are three common ways to protect aerated concrete surfaces:
- Facing;
- Hydrophobization
; - Waterproofing.
Facing can serve as a tile or brick. In the first case, additional protection is not required; in the second, hydrophobic impregnation can also be applied to the brick.
Hydrophobization
involves the use of a special water-repellent composition (impregnation), which does not form a surface film
, but penetrates into the protected surface by several millimeters.
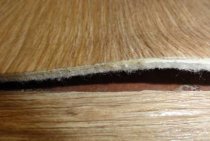
An important rule for the use of aerated concrete blocks in the construction of outdoor fireplaces is the construction of a high foundation 10–20 cm above ground level. Such that the earth and puddles in no case come into contact with the blocks.
So, subject to the technology of erection and finishing, the use of aerated concrete blocks saves money on bricks and speeds up the laying process.
Aerated concrete is a versatile material that is also suitable for equipping fireplaces. But most often, gas blocks are used precisely to create the frame of finished cast-iron furnaces, and not open furnaces. They lay out the base, form the body for the firebox and chimney.
As you know, aerated concrete retains heat well, but at the same time it does not heat up. Therefore, the aerated concrete fireplace body will not heat up, respectively, the heating of the room will be weak and inefficient. Open fireplaces are best built from bricks. When using a closed cast-iron firebox, the house is heated not from the fireplace body, but from hot air, which is distributed through the ventilation ducts.
Therefore, aerated concrete with low thermal conductivity is excellent for this option. And given the simplicity of working with the material, many people can make a fireplace out of aerated concrete with their own hands.
How to make a fireplace from a gas block?
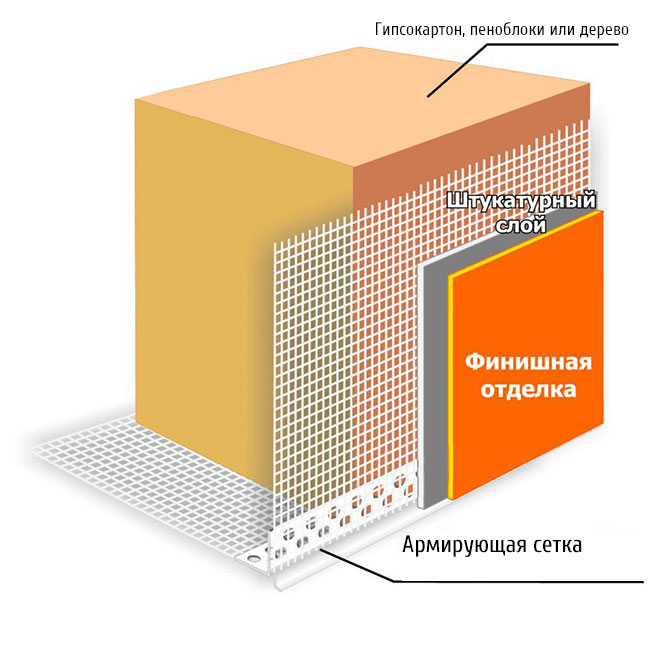
To build a fireplace from aerated concrete, you need to prepare the adjacent walls for high temperatures.It is recommended to close them with foil basalt wool - it is fireproof and will effectively retain heat inside the fireplace frame.
The firebox itself should be located at a distance of 15-20 cm from the walls for free air convection.
A base is formed under the firebox - a fireplace insert. You can make a concrete reinforced screed up to 20 cm high, or you can use aerated concrete blocks. They are especially good for wooden floors or ceilings with low strength, since foamed concrete has a small weight. The base can be reinforced with a reinforced mesh, but this is not a mandatory requirement, since an aerated concrete fireplace will be light.
Aerated concrete is simply and quickly processed, it can be given any shape with an improvised tool, so the base under the fireplace can be absolutely any geometry.
For laying a fireplace made of aerated concrete, it is permissible to use cement mortar or mounting adhesive.
The foundation is being plastered. A steel sheet 2 mm thick is laid on its horizontal surface, and an additional refractory gasket made of asbestos cardboard is placed under the combustion chamber.
After the firebox is installed, it is connected to the chimney. And the building work begins. Each new row is checked with a level.
In order for the aerated concrete fireplace to serve for a long time, it is recommended to close the inner surface of the masonry with basalt foil thermal insulation.
The body of the fireplace can be completely laid out from aerated concrete up to the ceiling, leaving a vent for the exit of heated air. It is covered with a decorative mesh.
You can combine materials: cover the firebox with aerated concrete, and close the part of the fireplace with the chimney with drywall on a metal frame.
You should not immediately give the maximum load on the fireplace, the temperature is increased with each new firebox.
So, an aerated concrete fireplace is an inexpensive, fast and reliable option for a private house or cottage.
To make a gas block fireplace, it is important to choose a quality material that has been autoclaved, has sufficient strength and fire resistance. You can easily find this one in the shopping center "Porablok"
Calculate the amount of material and place an order easily on our website.
Imitation of a fireplace from foam blocks
In a city apartment, it is impractical to build heavy structures made of brick and concrete in order to simulate. This will create excessive pressure on the floor slab, which can cause uneven shrinkage of the house and the appearance of cracks in the walls. Foam blocks are ideal for simulating a fireplace. They have a low specific gravity, large volume and clear geometric shapes. Working with such stones is easy and simple. Their surface can be finished with almost any type of cladding.
 Fireplace portal from foam blocks
For work, you will need the following materials and devices:
- building level;
- roulette;
- hacksaw;
- steel spatulas;
- rasp;
- marker;
- glue for concrete;
- paint brush;
- liquid primer;
- putty;
- sandpaper and abrasive mesh;
- skirting boards and moldings.
In order to build your apartment fireplace from foam blocks, there is no need to create a solid foundation or remove the flooring to concrete. It is enough to lay a sheet of plywood on the floor.
You are offered step-by-step and detailed instructions for simulating a decorative foam concrete fireplace:
- Make markings on the floor and walls. Make a base and fix it to the floor. To do this, it is better to use double-sided tape so as not to damage the coating.
- Lay out the first row of stones without gluing them. If necessary, adjust the masonry fragments.
- Connect the wiring to the base. There is no connection to the network at this stage.
- Glue the starting row of foam blocks to the base. Check its horizontal level. For gluing, 1 mm of adhesive solution is sufficient, since the edges of the blocks are perfectly even.
- Lay out the portal in accordance with the project. If an arched shape of the hearth is provided, then it is made with a narrow hacksaw. Remove roughness with a rasp.
- The table top is installed. A large aerated concrete slab or a custom-made product is used. It is fashionable to make a countertop from a board or a bar.
- Treat the foam blocks with a liquid primer. Since this material is porous, the procedure must be repeated twice. The primer will make the surface of the fireplace resistant to moisture.
- Knead the solution and cover the fireplace with a layer of 2-3 mm. After the putty dries, it is sanded and polished.
- The portal is faced with finishing. It matches the interior of the room. Adhesive film, wallpaper, paint, ceramic tile or artificial stone is used.
The final stage of construction is the arrangement of the hearth. One of the advantages of aerated concrete structures is its mobility. At any time, a light fireplace can be moved to a new location. Such a need arises when installing new furniture or carrying out repairs in the apartment.
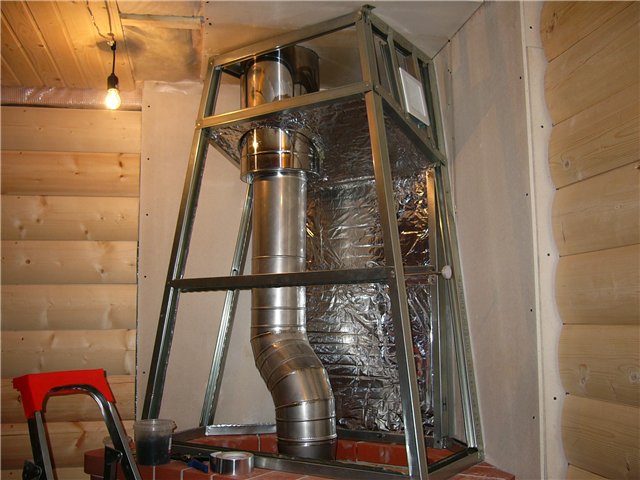
The next stage of work is the installation of the firebox on the base, and the installation of the chimney
For greater heat transfer, pieces of sheet iron are welded to the chimney pipe connecting the furnace with the chimney in the wall
We pay special attention to the tightness of the connections
We lay out the entire fireplace wall from aerated concrete blocks to the very ceiling. Why did we stop on aerated concrete blocks, because this material has a porous structure with high thermal insulation properties and fairly good strength.
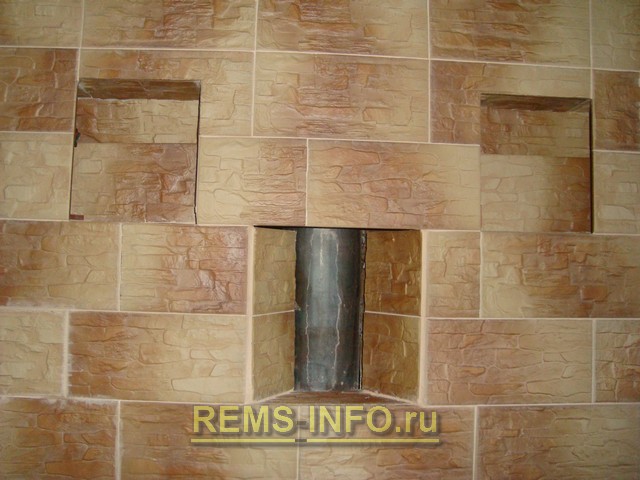
The process of laying a fireplace is not fast, and you have to lay out one level in order for everything to dry well. Be sure to monitor the evenness of the surface, and do not forget to leave pre-planned niches for air circulation behind the fireplace wall. Approaching the ceiling, we gradually make an inclination at a slight degree forward, and, not reaching 5 cm to the ceiling, we finish the work.
Thus, we leave a gap between the ceiling and the fireplace wall for air circulation.
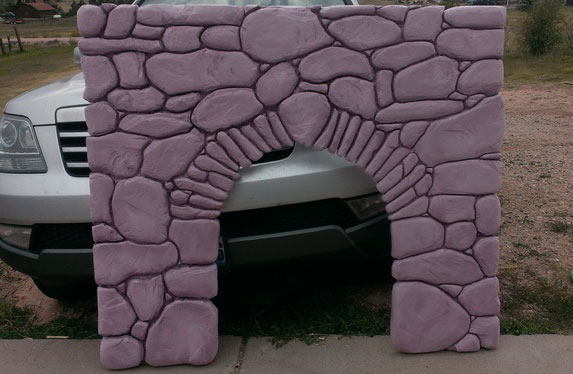
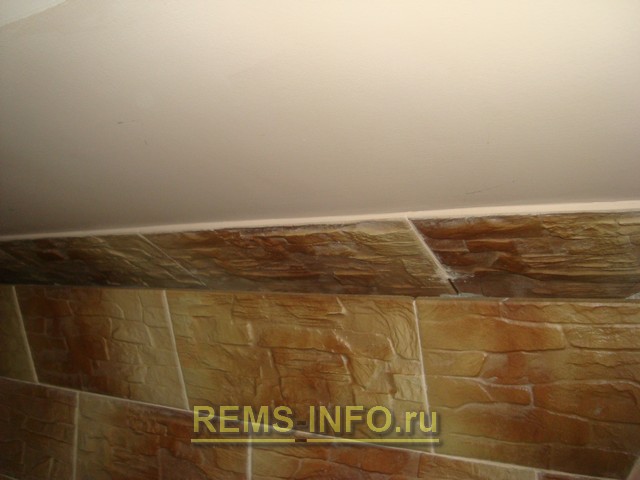
Fireplace cladding is done with stone tiles.
Once at the top of the wall, glue another row of tiles onto the ceiling itself, giving the fireplace wall a slightly curved look. It creates the impression of a single wall passing into the ceiling. We also cover niches. Three of them will be designed in the form of shelves and another one will be a niche for storing firewood. A chimney will be visible in one of the niches.
Then we will put some object in front of it (a vase, a figurine or any other decorative thing).