Why insulate a wooden floor
Compared to concrete, wood is a fairly warm material, but when building a frame private house or a house from a bar with your own hands, it is not always possible to achieve a rational balance of the thickness of the structure in terms of strength and thermal conductivity. To reduce the consumption of materials for walls and foundations, thermal insulation is necessary. It is possible to carry out work on insulation both in an old building put into operation long ago and in new construction.
Floor insulation in a wooden house can prevent the following problems:
- the appearance of excessive dampness in the room;
- decrease in temperature in the task;
- condensation, which results in mold;
- the appearance of fungus and other microorganisms dangerous to humans;
- increase in heating costs;
- destruction of wooden structures from the inside.
By doing the work yourself, you can significantly reduce costs. Now there are many materials, the use of which does not require special skills and high qualifications.
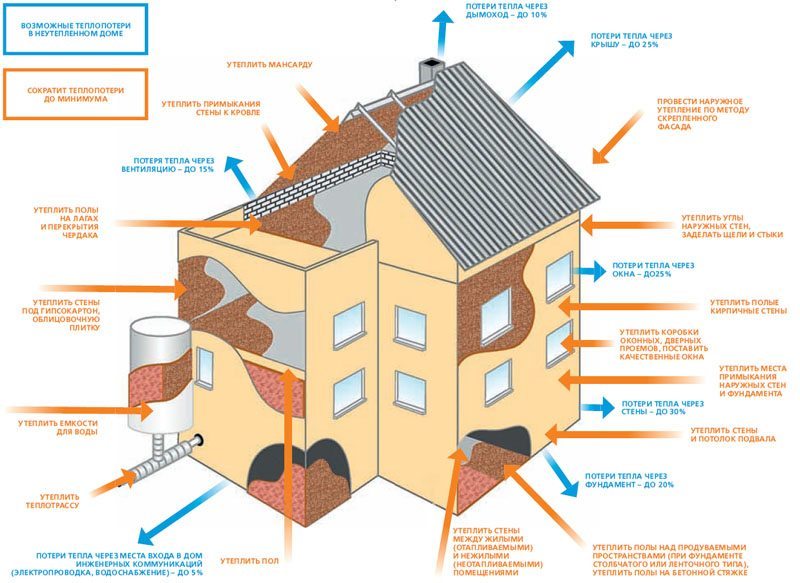 Scheme of all heat losses of a wooden house
Options for improving the bearing capacity of interfloor floors
It has already been written about what materials are available that can block the space between the rooms of the first and second and basement floors, but there is still a way to improve the load-bearing capacity of the floor, due to which it is possible to exert large operational loads.
- A popular option is to mount, using brackets, additional overlays in the form of boards of medium thickness. Their support is specially made pillars, the height of which should not be too large.
- Also, the structure can be made stronger with an additional U-shaped channel (the operational load increases). They are installed on beams from the sides.
- The ideal way to strengthen is the choice of additional blocks, so the design can withstand heavy loads, eliminates unsteadiness. The process is laborious but very effective.
 It is possible to strengthen interfloor ceilings with the help of metal products
Be sure to think about finishing or applying a fine coating. To do this, you can use wooden canvases made according to the lining principle, plywood, OSB boards, GKL sheets and more. Linoleum, tiles, laminate and other coatings are subsequently placed on them.
The process of warming the interfloor ceiling on wooden beams
For this, we chose corners with a shelf of 100 mm and a width of 90 mm. It was decided to fix all this economy with self-tapping screws and special dowels for foam concrete.
To simplify our lives, after it became clear where the holes were located, we made a template from a piece of an unnecessary board.
The corners were fixed only around the perimeter of the house. Due to the fact that the width of the house is 12 m, and a beam overhang of 30 cm is required on each side of the house, three 6-meter beams are required to cover the entire width of the house, which are twisted with bolts. In the place where the porch is planned, overhangs were made about one and a half meters
We mounted the beams with an overhang of a little more than 30 cm, so that later we could pull the thread and saw off evenly.
Pay attention to the left side of the house: according to the project, the kitchen is a whole meter longer than the next room and the boiler room. Question: what to rest the beams on? After all, the roof should cover the house completely
At our own peril and risk, we put these corners 70x70x5 (pictured below), 3.5 meters each - 2.5 meters lies on the wall and is pressed against the beams, and the meter sticks out, and two extreme beams rest on it. For clarity, I'm attaching a screenshot from the sketchup. The corner is shown in blue.
Additionally, we strengthened these hanging beams in the following way: in a section of 3 meters from the corner of the future roof, we cut off not 30 cm of overhang, but 25 cm.After that, they screwed a 3-meter piece of timber similar to the beams to the perpendicularly lying beams ... (it is green in the pictures).
Uff ... I hope I wrote clearly)) Thus, we got an even more rigid structure, and those beams that rest on the corner, with their ends also rest against the beam and are rigidly connected.
The picture shows that the beam runs along the edge of the kitchen, this is not scary, because according to the project there will be a veranda.
Now back to another part of the house.
Since the pediment is planned to be wooden, it must be visually separated from the brick wall. To do this, it was decided to make a box, which will be equal in height to the hemmed box and recede from the wall by the same 30 cm from the house. Perpendicular to the main outer beam, we screwed beams of shorter length onto the perforated corners. With the extreme beams (green in the picture) did the same.
Thus, a plane was obtained that covers the house and corresponds to the edges of the future roof. This completed the installation of the beams.
Then we started to make a truss system
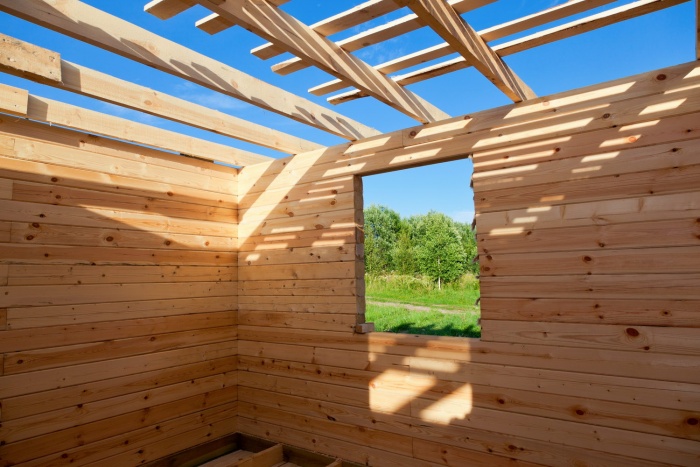
When building a house, many people prefer instead of reinforced concrete interfloor ceilings to arrange floors on wooden beams or logs.
This is entirely justified. After all, wooden floors along the logs are much lighter than reinforced concrete ones, and with a low bearing capacity of the soil, it becomes possible to build less massive foundations.
 Also important is the cost of a wooden interfloor ceiling. It is several times cheaper than reinforced concrete. The price of a tree is much lower, while there is no need to use cranes, and the floor beams can be laid on their own.
Many people ask themselves the question “How to calculate the floor beams?”, “What section should the beam have?”, “At what distance should they be installed?”
In this article, we will try to answer these questions, as well as talk about how a wooden floor is arranged along the beams, how they should be correctly fixed in the wall and give a table by which you can easily calculate the floor beams.
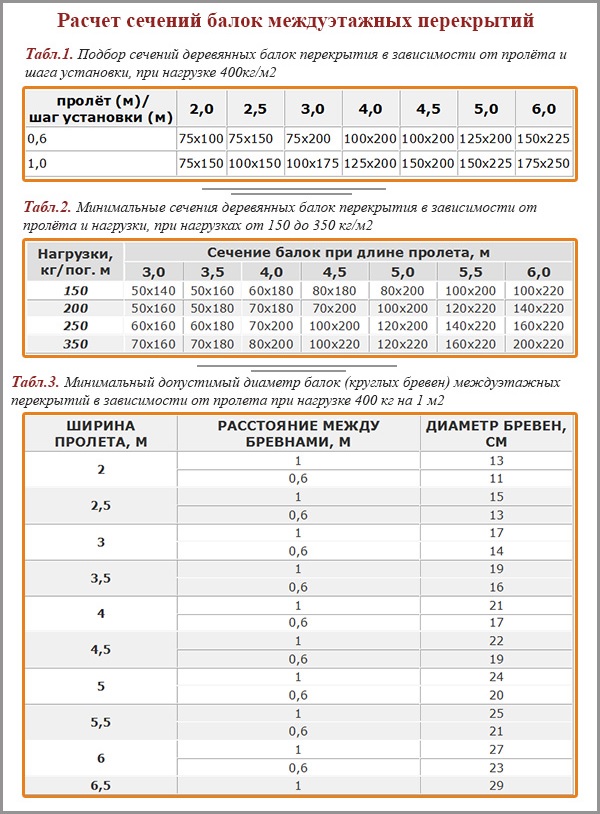
Let's start with the main bearing element - floor beams. As a rule, a beam is a wooden beam, from 100 mm to 300 mm high and 75-200 mm thick. It is laid in increments of 60 to 100 cm. The cross section of the beam is selected individually in each individual case and depends on the length of the span and possible loads. A table will be presented below for calculating wooden floor beams.
In addition to timber, for wooden floor beams, you can use boards knocked together, placed on edge. The most economical option would be to use logs hewn on three sides as beams.
Protection device for wooden floors between floors
Types of private houses are very different in the same way as their internal composition. However, in order to build it and live without problems, you need to carefully take care of the choice of materials, the construction of floors, and the competent protection of materials.
At the design stage, a diagram of the future structure is drawn up, as well as a plan that should take into account not only the size of the building, but also how it will be protected from various kinds of consequences. Protection is required against fire and biological influences from the environment.
As for combustibility, each canvas has its own degree of fire resistance, however, when choosing such banal materials as OSB boards, OSB boards or glued laminated timber, you need a special deep penetration antiseptic that will prevent not only rotting and mold, but also flammability.
It is better to decorate the room in which the stove or fireplace will be installed with a metal sheet, so that the spread of fire can be prevented.
 You can protect the wooden floors between floors from the negative effects of moisture with the help of oilcloth
A variety of compositions are on sale that can prevent the fire of a tree, and you need to choose them according to:
- penetration depth;
- Service life;
- fire resistance.
Impregnation is carried out at the stage when rough repairs are carried out, and it is better to carry out processing at least two times after each layer has dried thoroughly. At the design stage, it is also necessary to take into account the moment how much a certain type of wood can withstand the effects of fire.
The best fire resistant materials have a cross section of 11x24 cm, if the span in width is 5.8-5.85 m.
It is equally important to protect the wood from biological influences, such as water, which cause wood decay, mold and micro-organisms such as fungus. It is very rare, but possible to find insects in houses made of wooden beams, which are formed, first of all, in canvases that were not processed during construction and began to gradually moisten
Floor pie on wooden beams
The overlap between floors plays the role of both the ceiling of the lower and the floor of the upper floor. The sound and vapor barrier between the rooms, and its reliability, depend on how correctly the interfloor pie is arranged. The structure may be based on reinforced concrete slabs, monolithic concrete pouring, or wooden beams.
Wooden floors have their own drawbacks - they are flammable, can rot or be affected by insects, and therefore require special additional processing. But they also have significant advantages - they can be mounted without a construction crane and other special tools almost anywhere, and the ceiling itself is light and fairly economical.

Types of structures for wooden floors
The design of the floor will depend on its length and maximum load requirements. The overlap of the second floor can be arranged on wooden beams, ribs, or combine both beams and ribs in one structure.
The traditional beam ceiling is still considered the most reliable, but it is also the most expensive in terms of the cost of materials. It is allowed to span from 6 to 15 m. If the second floor is intended for residential premises, then the cross section of the beams must be at least 150 mm.
Overlapping on the ribs with a step of 30-60 cm is well suited for a frame house with a span of up to 5 m, and in the case of two-tee ribs - up to 12 m. Rectangular wood products are used as ribs. In order to ensure proper rigidity, steel tapes are added to the structure, which are used for bandaging in the form of screeds-bindings.
The beam-ribbed design allows you to increase the allowable span up to 15 m. In this case, the beams are laid with a large step, and reinforced perpendicular to them with installed ribs. For pairing, metal clamps, mounting brackets and threaded fasteners are used.
In such a system, the consumption of wood materials is less, so this design seems to be more economically attractive. But in this case, the amount of fasteners and mounting materials, as well as the applied labor, increases, so it is difficult to say that such a design will be cheaper.
Floor insulation
Important points to consider before starting work:
- The distance from the chimney to the nearest beam must be at least 40 cm to ensure fire safety.
- The wood must be absolutely dry. Otherwise, it must be left on a stand, in a dry and ventilated place for six months.
- All beams must be treated with antiseptic protective materials against fungi, rot and insects.

The hardwood floor cake between floors includes 6 layers:
- Beams are laid or ribs are attached, depending on the chosen design.
- Further, boards are stuffed from the side of the ceiling of the lower floor. This rough finish of the ceiling becomes the basis for further laying the layers of the "pie".
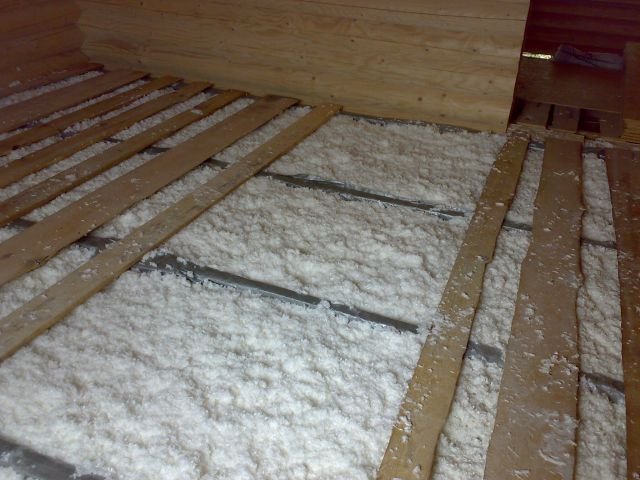
- The next layer is heat and sound insulation - it can be mineral wool, expanded clay, slag, sand or foam, and so on.
- After it, a waterproofing material spreads, the role of which can be played by dense polyethylene or rolled rubber.
- On wooden beams (if this design is chosen), a rough and finishing floor is rolled up.
- From the side of the ceiling, a layer of vapor barrier is laid with the shiny side out.
- After that, you can carry out a fine finish of the ceiling with selected materials.
https://youtube.com/watch?v=e6okGLsNQoY
Fastening beams to the wall
Floor beams can be connected to walls in several ways.
In brick or timber houses, the ends of the beams are led into grooves ("nests"). If beams or logs are used, then the depth of the beams in the walls should be at least 150 mm, if the boards - at least 100 mm.
Parts of the beams in contact with the walls of the "nest" are waterproofed by wrapping them with two layers of roofing material. The ends of the beams are cut at 60° and left uninsulated. to ensure free "breathing" of wood.
When inserting into a "nest", between the beam and the wall (on all sides), ventilation gaps of 30-50 mm are left, which are filled with thermal insulation (tow, mineral wool). The beam is supported on the base of the groove through an antiseptic and waterproofed wooden plank 30-40 mm thick. The sides of the groove can be covered with crushed stone or covered with cement mortar by 4-6 cm. Every fifth beam is additionally fastened to the wall with an anchor.
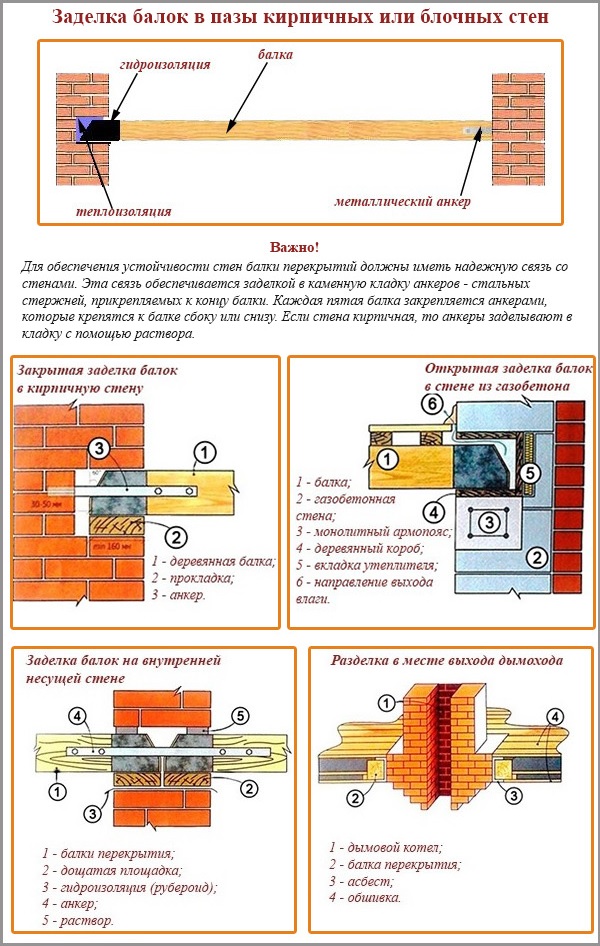
In wooden houses, beams are buried in the grooves of the walls by at least 70 mm. To prevent the appearance of squeaks, a waterproofing material is laid between the walls of the groove and the beam. In some cases, beams are cut into walls, making dovetail joints, etc.
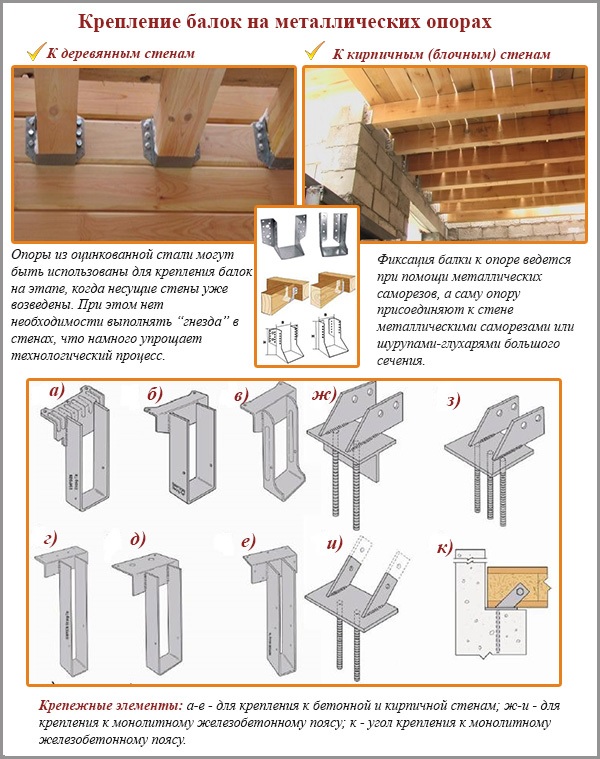
Also, the beams can be fixed on the wall using metal supports - steel corners, clamps, brackets. They are connected to walls and beams with self-tapping screws or screws. This mounting option is the fastest and most technologically advanced, but less reliable than when beams are inserted into the grooves of the walls.
Cold loft design
When building the roof of a house, many people think about making a cold attic or attic under it? The easiest way to organize a roof with a cold attic. Building an attic will cost several times more and will require more labor costs.. Although, it is undeniable that the attic will significantly expand the living space.
Cold loft roofs have the following main ingredients in their pie :
- roofing;
- attic outer walls (applicable for gabled roofs with gables);
- insulated ceiling between living space and attic.
Ventilation is provided by eaves and ridge ducts. The air passing through the cornice openings is called supply air, and the air exiting through the ridge is called exhaust air. Additionally, ventilation can be done through dormer windows on gables or roof slopes. Windows are equipped with louvered grilles for the possibility of adjusting the intensity of ventilation.
Dormer windows are located on opposite roof slopes so that there are no unventilated areas.
Dormer windows can be rectangular, triangular and semicircular. Their lower part should be at a height of no more than 0.8-1.0 m from the floor of the ceiling in the attic, and the upper part should not be lower than 1.75 m from the floor in the attic. They can also serve as an exit to the roof of the house to inspect the roof, ventilation and chimney elements.

Finishing the ends of a wooden floor beam
The ends of the beams in the walls are sealed in this sequence.The ends of the beams of interfloor and attic floors of wooden buildings are cut with a frying pan into the upper crowns for the entire thickness of the wall. In stone buildings, beams are placed on walls or led into nests specially left in them. In earthen walls, beams are placed on the strapping.
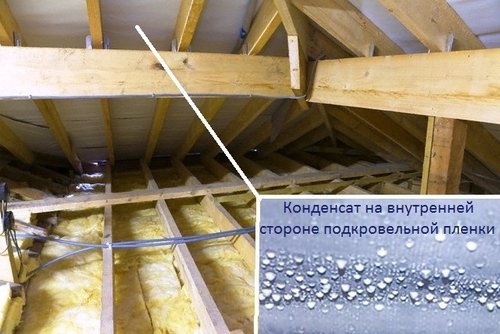
In interfloor ceilings, there are zones where conditions are created for the formation of condensate. Usually these are the places where the ceilings adjoin the outer walls, where freezing and blowing of structures is possible. To prevent these phenomena, the joints of floors with external walls must be made taking into account sufficient thermal protection and airtightness.
When resting a wooden beam on a stone wall, it is necessary to protect the joint cavity from the penetration of moist air from the premises into it. This necessity is caused by the fact that when warm air penetrates, the water vapor contained in it, when in contact with cold stone walls at the joint, will condense and moisten the end of the beam, embedded in the nest of the wall. Therefore, the ends of the beams resting on the wall should be antiseptic, their surface should be pasted over with 2 layers of roofing material.
The ends of the beams cannot be pasted over.
The beams rest on the wall to a depth of 12-15 cm. However, the nests are made 18 cm deep. Due to a gap of 3 cm, the wooden beam does not come into contact with the masonry, and water vapor through its unglued end exits through the masonry.
The size of the nests should be made 2-3 cm larger than the cross section of the beam. After installing the beams, they are sealed with mortar, thereby protecting the joint from the penetration of internal air into it and dampness.
To ensure rigidity, the beams are strengthened through one. To do this, a steel anchor is installed in the masonry. Its end should not reach the outer surface of the wall by 12 cm (to avoid the formation of cold bridges), the other end should protrude into the room by 20 cm. The anchor is attached to a wooden beam using a steel lining with a section of 50 × 6 mm and nails Ø5 6 mm.
Sometimes they perform open sealing of the ends of the floor beam, but this is possible only in rooms of normal humidity (no more than 60%) with good ventilation of the floor (with slotted skirting boards) and sufficient thermal insulation capacity of the back wall of the nest. With a brick wall, the nest wall thickness should be at least 46 cm. With a smaller thickness, it is necessary to insulate the nest, while providing heat transfer resistance of 0.57 m 2 °C / W in central Russia.
With a wall thickness of 2 bricks (0.51 m), the support unit of the wooden beam on the wall is solved in the following way. A nest is made in the wall with a depth of 25 cm (1 brick). At the vertical wall of the nest, a layer of heat-insulating material is arranged - antiseptic or mineral felt. 2 layers of roofing material are laid on the lower surface of the nest, and then a wooden box made of antiseptic wood is placed in the nest, pressing mineral felt with it. The floor beam is supported on the lower surface of the box to a depth of 15 cm so that an air gap forms between its surfaces and the beam. One option for this assembly is to install a wooden box that has 3 vertical sides and 1 horizontal top surface, but no bottom horizontal. In this case, the antiseptic end of the beam will rest in the nest on 2-3 layers of roofing material. There will be wooden boards on the sides, top and end of the beam.
With a wall thickness of 2½ bricks or more, the beam is supported in a nest 25 cm deep. In the lower part it is covered with bitumen, along which 2 layers of roofing material are laid, the upper and side surfaces are also covered with roofing material. Then, a heat-insulating layer of mineral felt is arranged near the rear surface of the nest, which is pressed against the wall with a wooden board 25 mm thick. The floor beam is laid in the nest so that an air gap of about 4 cm thick remains between it and the walls.
Fastening floor beams to the wall
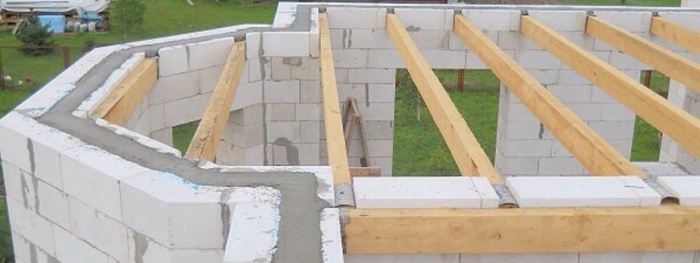
 In the article "Interfloor floors" we talked about how reinforced concrete and wooden floors should be mounted in a wall of aerated concrete blocks.
In this part, we will consider the knot of supporting a wooden beam on brick walls.
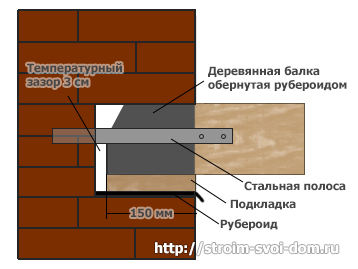
As we wrote above, the length of the support of the beam on the walls should be at least 15 cm.
Before laying the beam, it must be cut from the end at an angle of 60 0. Treat the entire beam with an antiseptic and wrap the ends in two layers of roofing material to prevent decay.
After that, a roofing material is laid on the wall, on which a lining board is laid. It serves to distribute point loads from beams to the entire surface of the wall.
A floor beam is placed on the lining, an anchor from a steel strip is nailed to it, which is subsequently embedded in brickwork.
When installing wooden beams, you must leave a temperature gap of at least 3 cm to compensate for the linear expansion of wood.
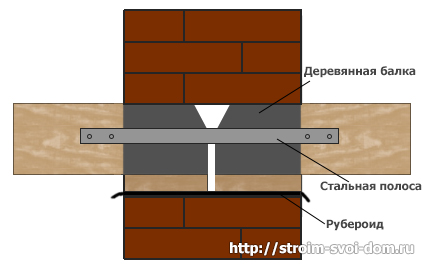 If the beams rest on an internal load-bearing wall, then the design is similar to the previous one, with the only difference being that the floor beams are connected to each other using a metal tape. More clearly, the whole scheme can be seen in the figure.
Laying wooden beams begins with the most extreme. First they are leveled, and then the rest are placed on them. To align the remaining beams in height, cut boards are placed under their ends.
Step 3. Rewind device
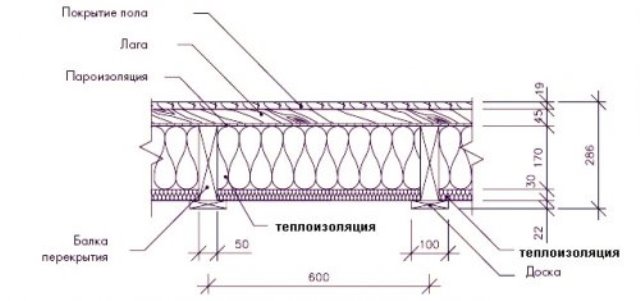
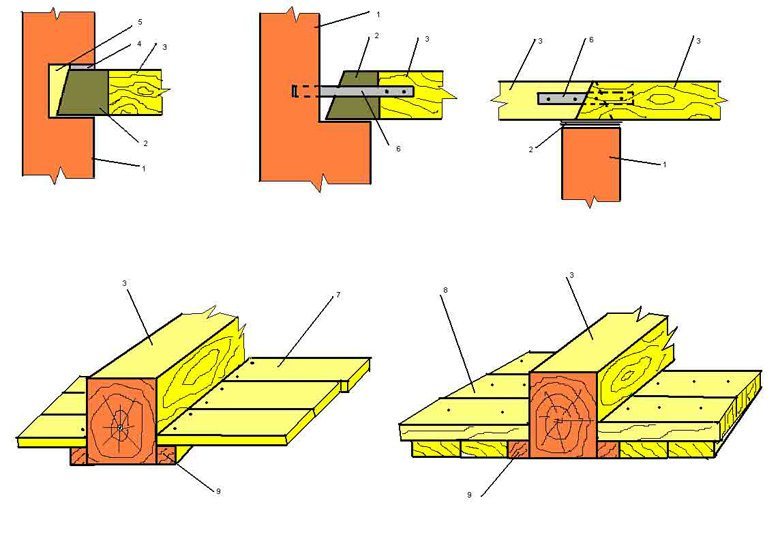 1 - Wall; 2 - Waterproofing; 3 - Beam; 4 - Mounting foam; 5 - Insulation; 6 - Anchor; 7.8 - Roll forward; 9 - Skull bar.
The roll-up of wooden floors is arranged either from an ordinary board, or from two boards (shields) knocked down perpendicular to each other next to each other
Starting the reel device, you should pay attention to the fact that the bottom of the reel is located in the same plane with the bottom surface of the beams. An exception can only be the case when you decide to make antique styling, and the beams in your house turned out to be somewhat protruding
Do not forget that any wooden elements that you use in the construction of your home must be carefully treated with antiseptic compounds. Next, the roll should be covered with a material for waterproofing, for example - roofing material. Its device is carried out in such a way that the waterproofing covers the beam at half the height. Then insulation is performed: a layer of thermal insulation - expanded clay, foam plastic, stone wool and other materials is laid on the waterproofing.
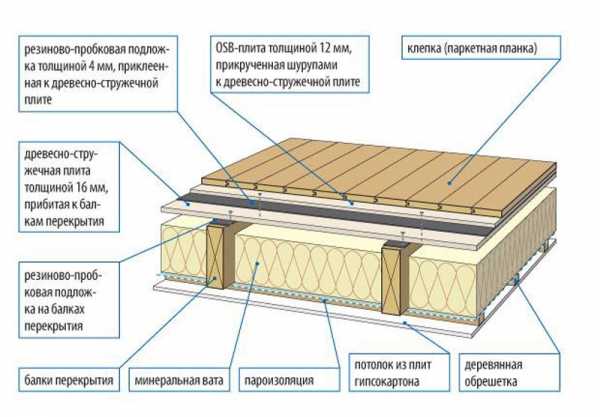
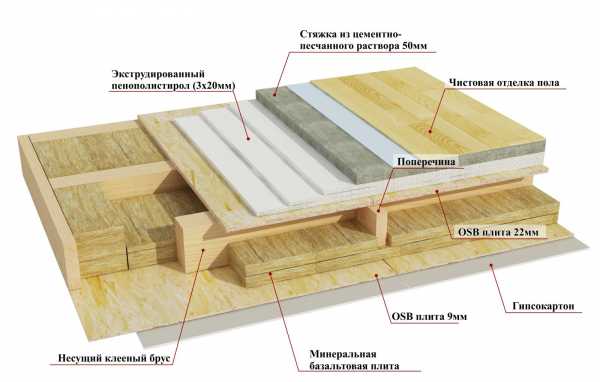
Layer cake floor over wooden beams
The floor in the room of a wooden house must be durable, reliable and carefully thought out. To make and fix the floor in a wooden house, you can use many different technologies, one of which is a pie, which is especially popular.
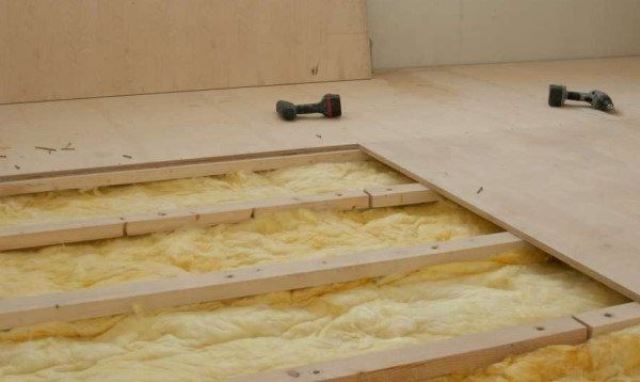
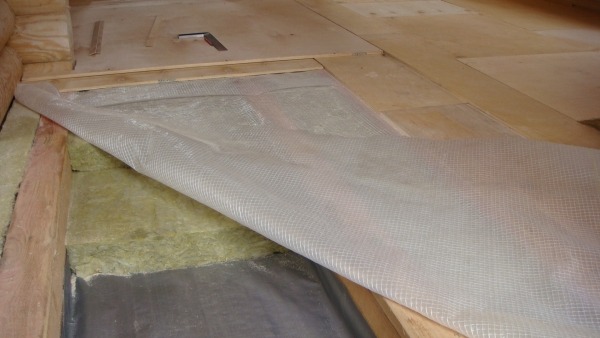
 It is recommended to lay heat-insulating material between wooden beams
Its peculiarity lies in the laying of layers in the following sequence:
- Vapor barrier;
- Waterproofing;
- Soundproofing;
- Thermal insulation;
- Screed or, in other words, a concrete canvas.
As for the insulation, the filling of the space on the second floor should be mineral wool, but expanded clay or slag with sawdust is suitable for arranging the floor on the first floor. Floor insulation in rooms where there will be high humidity should be done using a material such as fiberglass, since it has optimal waterproofing properties.
Advantages and disadvantages of wooden structures
Wooden structures are used both in private wooden and stone houses of all types. This versatility is not inherent in concrete structures. In addition, wooden structures have other advantageous properties:
- the arrangement of wooden structures is much cheaper than concrete;
- for the arrangement of monolithic concrete floors, special equipment and complex engineering work are required. And in the case of timber beams, you can do without the help of professional builders. The minimum required skills are to work with a hammer and a saw.
- concrete floors are heavy. Their heavy weight puts a lot of pressure on the foundation, which cannot be said about the light weight of wooden structures.
 The wooden floor on the second floor will put less pressure on the walls than concrete
- with a low density, they have sufficient bearing capacity to withstand heavy furniture.
- higher rates of sound insulation and thermal insulation compared to concrete structures;
Attention! The interfloor pie will be different because there is no need to use insulation. the decorative value of the beams can be used in the interior of the room, so it is not necessary to mask the logs and beams to cover the floor of the second floor with false ceilings
the decorative value of the beams can be used in the interior of the room, so it is not necessary to mask the logs and beams for covering the floor of the second floor with false ceilings.
 The use of beams on the second floor in the interior
There are also disadvantages that also need to be addressed:
- wood has a shorter lifespan than concrete. Therefore, to increase the service life, the beams are treated with antiseptic agents. Even so, under normal operating conditions, they can last more than 50 years.
- has the lowest refractory ability;
- floor construction on wooden beams is susceptible to moisture and rots under its influence.
But these shortcomings are indirectly related to the case, because with proper operation under normal conditions, the wooden floor structures of the first floor can last a good time.
Calculation of floor beams
When planning the construction of the floor, first you need to calculate the design of its base, that is, the length of the beams, their number, the optimal section and the spacing. This will determine how safe your floor will be and what load it can withstand during operation.
The length of the beams depends on the width of the span, as well as on the method of fastening the beams. If the beams are fixed on metal supports, their length will be equal to the width of the span. When embedding walls in the grooves, the length of the beams is calculated by summing up the span and the depth of inserting the two ends of the beam into the grooves.
Beam spacing
The distance between the axes of the beams is kept within 0.6-1 m.
The calculation of the number of beams is carried out as follows: they plan to place the extreme beams at a distance of at least 50 mm from the walls. The remaining beams are placed evenly in the span space, in accordance with the selected interval (pitch).
Beams can have a rectangular, square, round, I-section. But the classic option is still a rectangle. Frequently used parameters: height - 140-240 mm, width - 50-160 mm.
The choice of the beam section depends on its planned loading, the span width (along the short side of the room) and the spacing of the beams (step).
The load of the beam is calculated by summing the load of its own weight (for interfloor floors - 190-220 kg / m 2) with the temporary (operational) load (200 kg / m 2). Usually, for operated floors, the load is assumed to be 350-400 kg / m 2. For attic non-operated floors, you can take a smaller load, up to 200 kg / m 2. Special calculation is necessary if significant concentrated loads are expected (for example, from a massive bath , swimming pool, boiler, etc.).
Beams are laid along a short span, the maximum width of which is 6 m. On a larger span, sagging of the beam is inevitable, which will lead to deformation of the structure. However, in this situation there is a way out.To support the beams on a wide span, columns and supports are installed.
The cross section of the beam directly depends on the width of the span. The larger the span, the more powerful (and durable) the beam must be chosen for overlapping. The ideal span for overlapping with beams is up to 4 m. If the spans are wider (up to 6 m), then non-standard beams with an increased cross section must be used. The height of such beams should be at least 1/20-1/25 of the span. For example, with a span of 5 m, beams with a height of 200-225 mm should be used with a thickness of 80-150 mm.
Of course, it is not necessary to independently perform beam calculations. You can use ready-made tables and diagrams that indicate the dependence of the dimensions of the beams on the perceived load and the width of the span.
After performing the calculations, you can proceed to the overlap device. Consider the entire technological process, starting with fixing the beams on the walls and ending with the finishing sheathing.
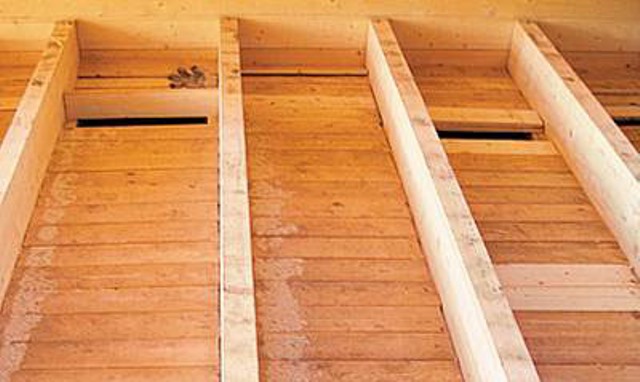
floor beams
To figure out how to make a wooden floor between floors, you need to know the features of the structure frame. Its basis is wooden beams. Most often, elements of 15-25 cm in height and 5-15 in thickness are used. A distance of up to 1 m is made between the beams, depending on the section of the elements.
Note! The greater the load on the floor, the greater the cross section of the beams should be. The supporting ends are made from 150 mm in length, they are laid in a "beacon" way
First, the installation of the extreme beams is carried out, and intermediate ones are laid between them. Evenness of laying is checked with a level. The middle beams are laid according to the template. For leveling, you can use various resin linings from scraps
The supporting ends are made from 150 mm in length, they are laid in a "beacon" way. First, the installation of the extreme beams is carried out, and intermediate ones are laid between them. Evenness of laying is checked with a level. The middle beams are laid according to the template. For leveling, you can use various resin linings from scraps.
Important! It is impossible to use hewn, pointed chips to level the beams. The bars are laid with the same pitch around the entire perimeter, strictly parallel
Before laying, they are treated with antiseptic impregnations and wrapped in 2-3 layers with roofing material. For brick and block buildings, floor beams are coated with bitumen from the ends. This technique protects the wood from moisture. For walls with a thickness of 2.5 bricks, air vents are left for ventilation. And at the junction of wood with walls, roofing material is laid under the beams
The bars are laid with the same step around the entire perimeter, strictly parallel. Before laying, they are treated with antiseptic impregnations and wrapped in 2-3 layers with roofing material. For brick and block buildings, floor beams are coated with bitumen from the ends. This technique protects the wood from moisture. For walls with a thickness of 2.5 bricks, air vents are left for ventilation. And at the junction of wood with walls, roofing material is laid under the beams.
Internal organization
When all the bearing parts are fixed in place, you can proceed directly to the assembly of the floor itself. Unlike the structural elements of the first floor and the attic, there will not be a thick layer of insulation here, since there is usually no difference in temperature between floors. However, soundproofing will take the place of the insulating material here.
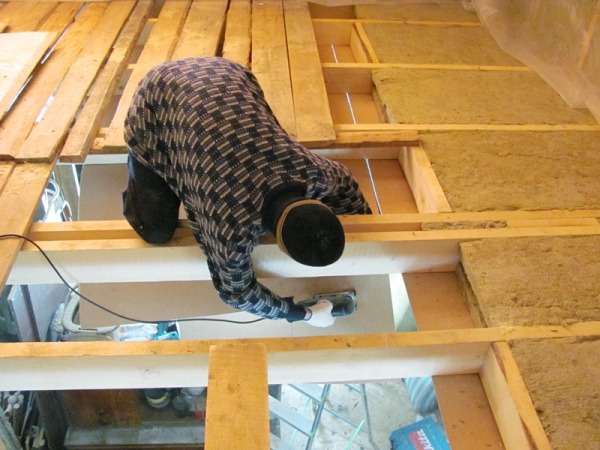
At the bottom of the installed beams, cranial bars are attached. Their main function is to serve as a supporting element for a layer of “rough” boards and as a basis for attaching a false ceiling from below. They are made of bars, with a section of 50x50 millimeters. Attach them with self-tapping screws. Subfloor boards are attached to the cranial bars. It is assembled from low-quality boards, often not planed, laying cut-to-size parts on cranial bars from above, perpendicular to the supporting beams.
Next, the installation of hydro and vapor barrier is carried out, gluing the joints of the film with adhesive tape. When the entire floor area is covered with a layer of vapor barrier, insulation or soundproofing material is laid on top of it. A universal solution will be mineral wool, which is equally good both as an insulating and as a soundproofing material.
Next comes the laying of the finished floor. Logs are laid on the beams across the direction of fastening of the beams. For these parts, boards or bars are used, with a thickness of at least 40 millimeters. They are attached to the supporting structures with self-tapping screws through metal corners.
After that, if necessary, another layer of sound or heat insulation is laid, as well as a film that prevents liquid from leaking into the structure in case of a spill. Plywood, gypsum floors or simply planed boards of the final floor are laid last, and on this, the interfloor overlapping on wooden beams can be considered complete.
Of course, only a general schematic description of the construction process is presented here. In reality, the process is not so simple and will require a lot of time and labor. However, if you carefully study the assembly technology in advance, it will become much easier to work and there will be fewer errors.
cake overlap
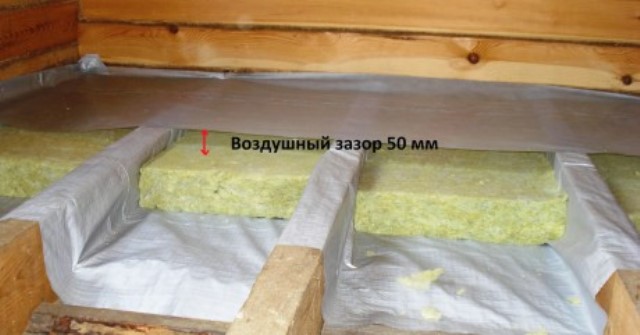
The design of the beam ceiling is different. Most often, the space between the beams is filled with insulation in the form of basalt fiber slabs, which perform a heat and sound insulation function. The thickness of the insulation layer is calculated based on the tasks assigned to it. So, for an interfloor overlap, where only noise protection is important, the insulation layer is from 50 to 150 mm. A thicker layer will more effectively isolate the room from noise from an adjacent room. A layer with a thickness of, for example, 100 mm is formed, as a rule, from 50 mm slabs laid in two layers with overlapping seams.
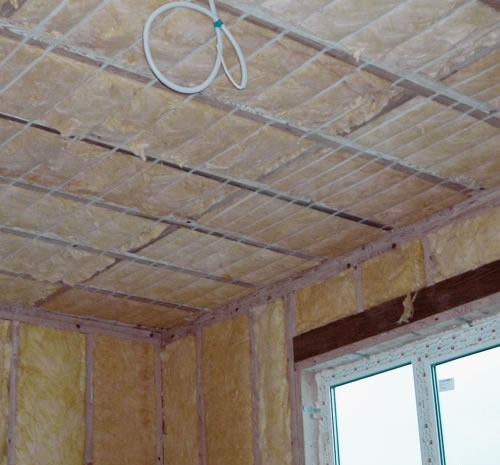
Floor insulation on wooden beams
Floor insulation on wooden beams
Usually, heat and sound insulating material is laid in the gap between the beams, protecting it from moisture from below with a vapor barrier film, and from above with a waterproofing film.
To ensure the durability of the insulation, it must be protected from moisture. To do this, it is closed from below with a vapor barrier (usually a film type), cutting off from water vapor rushing upwards from the lower rooms of the building. In addition, the vapor barrier prevents foreign odors from entering the room. The vapor barrier is laid either on the bottom surface of the beams, or so that it goes around the beams. It is laid without breaks, with overlapping of the seams of the rolls and gluing the joints with special tapes (at the same time, a number of experts recommend cutting it at the bending point so that the steam can freely escape from the beam).
Floor insulation on wooden beams
From above, the insulation is usually covered with a waterproofing film to protect it from moisture, which can get into it through the floor of the upper room, observing the same rules during installation as for the vapor barrier device. To the lower surface of the beams, either directly filing the ceiling of the lower floor (for example, lining), or one or another structure for the ceiling covering is attached. A crate (or logs) is mounted to the upper surface of the beams, along which a rough, and then a finishing floor or immediately a finishing floor (for example, a solid board) is arranged.