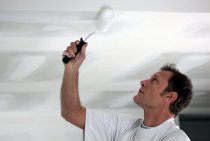
Painting the ceiling is an important step in finishing the room, since it is quite difficult to achieve a perfectly flat surface, any bulge or crack after applying a layer of paint becomes more noticeable, stains look extremely sloppy, air bubbles turn into a real problem. Among the most popular colorants for interior work is inexpensive, harmless "breathing" water-based paint, which will not cause difficulties when painting ceilings with your own hands. However, for people who do not have painting skills, the question often arises of how to paint the ceiling with water-based paint without streaks.

The painted surface will delight you with an impeccable look for a long time, if you choose the right paint, carefully studying its composition and properties, follow the instructions in the process of preparing the ceiling for applying the coloring layer, and do not apply a second layer on a wet surface.
How to choose water-based paint
There are many varieties of water-based and water-dispersion paints for ceilings from different manufacturers, designed for interior work. Types of paints:
- Mineral - the simplest dyes based on slaked lime or cement, the composition of which does not differ in the abundance of components for the strength, decorativeness and durability of the coloring layer. The paint will be cheap, but it is not recommended to wash the ceilings painted with a mineral water-based emulsion, and in a year the room will require a new repair.
- Acrylic paints, which include acrylic resins, create a beautiful, even surface and are durable.
- Acrylic paints with latex are durable, water-resistant and resistant to mechanical stress, which makes it possible to use them for ceilings in rooms with high air humidity - in the kitchen, bathroom, toilet. The high cost of paint pays off with a long service life and excellent appearance.

- Silicate paints based on liquid glass with a pigment dissolved in water can be used for painting ceilings in living rooms with normal air humidity and without sudden temperature changes. Not recommended for use in bathrooms and kitchens. Under these conditions, the ceilings will look great for decades.
- Gas- and vapor-permeable silicone are the most expensive, but extremely high-quality dyes, with which you can create the perfect surface in rooms with any microclimate, including bathrooms and kitchens. The painted ceiling withstands the tests of regular wet cleaning with brushes and alkaline detergents without compromising the integrity and excellent condition of the coating.

When choosing water-based paints for ceilings, you need to read the instructions and correlate the characteristics of the coloring compositions with the individual characteristics of your apartment and each room in which the ceiling will be painted. On the labels of cans or packages with a dry composition, the following characteristics must be indicated:
- type of work for which they are intended (internal or external);
- dye consumption per square meter;
- degree of concealment (the ability to evenly paint over a dark surface with a light dye);
- compatibility of paints with pigments, toners and colors;
- temperature conditions in which work can be carried out;
- drying time;
- abrasion resistance, etc.
Important! It is better to stock up on dyes of one brand, because if they run out during the repair process, it is undesirable to use analogues from other manufacturers.The paint will have to be removed and repainted.

Preparation for staining
Before you start applying paint, you need to prepare the surface of the ceiling.
- If drywall was used for leveling - putty the seams and the location of the screws, apply a primer layer and 2-3 layers of putty over the entire surface, sand.
- Painting ceilings with old paint is possible, but undesirable, especially if water-based dyes were used. The old layer should be removed with sharp spatulas or special solvents, wash off the dust with detergents, putty cracks, treat irregularities with sandpaper, apply a primer layer and several layers of putty, followed by grinding.
- The whitewashed ceiling must be completely cleaned of the old layer of whitewash and carry out the same steps as with removing old paint.

Materials and tools for preparing the ceiling:
- metal spatulas of different widths;
- solvent;
- soap solution;
- sponge;
- sandpaper of varying degrees of graininess;
- putty;
- reinforcing mesh for sealing wide cracks;
- primer;
- brushes for removing dust and debris;
- garbage containers.
Materials and tools for painting:
- water-based paint;
- trays or convenient containers for paint;
- masking tape for elements not intended for painting;
- wide and narrow, flat and round paint brushes;
- rollers of different widths.

Repair is not only laborious, but also dirty, so you should stock up on a set of clothes and shoes for these purposes. In addition, you will definitely need:
- ladder or strong building goats;
- construction gloves;
- a headdress to protect hair from fine dust and paint stains;
- protective glasses;
- respirator (for protection against dust during preparatory work).

How to paint the ceiling
It is especially important to know how to paint the ceiling so that the surface looks beautiful for beginners. Do not forget that the slightest flaw will hopelessly ruin the interior and nullify all efforts.
- Having opened a can of paint, it is necessary to thoroughly mix the contents with a long narrow object with a clean surface (sanded stick), as the heavy components of the dye settle to the bottom. At the same time, you can add toner or color to get the desired shade.
- It is undesirable to stir the paint with plastic or steel objects.
The paint can be thinned with water only if there is a corresponding recommendation on the packaging. Water should be added gradually, mixing thoroughly, in the proportions specified by the manufacturer. Do not add water during the dyeing process.
- It is impossible to wet a brush or roller directly in the jar, even with a wide neck, because the paint thickens in the process. Pour the paint into a tray or a convenient container that fully fits a wide brush or roller.
- It is recommended to start by painting with a narrow brush the ceiling plinths, if any, or the junctions of the ceiling with the walls.

- The first layer should be applied sequentially, in one direction, perpendicular to the window line, from the farthest corner of the room from the window opening. In rooms without windows - bathroom, toilet, hallway - you need to start from the corner opposite the entrance. The strokes should fit snugly against each other, without missing "slots" or overlaps.
When painting with water-based paint with a roller, it is necessary to completely moisten the entire surface of the tool so that stains do not form from dry areas.
- The entire ceiling must be painted over the entire area at a time, regardless of the size of the room. A surface painted in two or three steps will look uneven and sloppy.
- The second coloring layer in the opposite direction can be applied only after the first has completely dried - after a few hours or the next day.

- The third, final layer is applied in the same direction as the first. Drying time increases with each coloring layer, so the last layer can be applied in a day or two.
Experienced painters have at least two or three recipes for successful painting in their arsenal, but it is enough for a home craftsman to know how to properly paint the ceiling with water-based paint in one tried and tested way in order to make an excellent DIY repair every five to seven or even ten years.