Despite the emergence of new ways to finish the ceiling, painting it is still one of the simplest and most common options. For this purpose, water-based emulsion paint is most often used, largely due to its low cost, lack of toxic odor and quick drying. But in order to make repairs with high quality, and after some time to do without modifications, you will need to properly prepare your ceiling for painting with water-based paint.

All stages of work on preparing the ceiling surface for painting are described below in the form of step-by-step instructions.
Step 1. Preparing the room and the necessary tools
If the repair and painting of the ceiling will be carried out in a new apartment without interior decoration, this stage will be a little easier. In a habitable apartment, the owner must do the following:
- take out floor and wall carpets, paintings, small furniture;
- cover windows, doors, large furniture with foil;
- close the floor with newspapers;
- de-energize the room or the entire apartment;
- remove the chandelier, sconces and other electrical appliances.
With further preparation of the ceiling for painting, a lot of dust appears mixed with water. The remains of the old finish will fall, possibly touching the walls. All this requires mandatory protection of the repaired premises around the entire perimeter.

Preparing the ceiling and painting it is quite laborious, as you will have to be at a height all the time, raise your arms and head. The list of tools and personal protective equipment necessary at the stage of preparation for painting will be as follows:
- ladder, goats or table;
- goggles, gloves;
- respirator or gauze bandage;
- spatulas - narrow and wide;
- spray gun, sponge;
- narrow brush, roller with soft pile;
- grinding grater or grinder, sandpaper;
- capacity for kneading putty;
- putty and primer (specific types are selected depending on the type of ceiling and its condition).
In the process of work, this list may be changed and supplemented, but the above is necessary, as a rule, always.

Tip: if in the future it is planned to finish the walls and floor in the room, then you should start with the preparation and painting of the ceiling.
Step 2. Removing the old coating
When finishing from scratch, this step is not required, but if there is a durable coating in the process of preparing the ceiling for painting, sometimes you have to seriously sweat. Options for work depend on the type of previous finish:
- Wallpaper. The ceiling is wetted with water using a spray gun or roller, and when the moisture is absorbed and the glue weakens, the wallpaper should be removed with a spatula. To enhance the effect, the water should be warm and soapy. Sometimes the procedure in the same area must be repeated. Longer time is required when removing several layers of wallpaper. If there are modern “double” wallpapers on the surface, then they may not be afraid of water, but they should easily move away. The remains of glue are washed off with a sponge or a wet cloth.

- Water-based paint or whitewash. The removal technique is about the same as with wallpaper, but the paint and whitewash are often scraped off very slowly. It is necessary to wet the surface more often. An alternative way is to clean the ceiling dry with a grinder. But then there will be a lot of dust.
- Oil, acrylic and other types of moisture resistant paints. The fastest, but unhealthy paint removal method - Applying a chemical wash. A slower way is to work with a hammer and chisel. They also use a grinder, a drill with a special nozzle. Additionally, you can use a metal brush. The weak layer is scraped off with a spatula. Very resistant areas of paint are left as is.

- Ceiling tiles. The material breaks quite easily. A spatula is used to remove. They also remove the remnants of dried glue.
- Suspended plasterboard ceilings. If there are significant defects on the sheets, then they are completely or partially removed for replacement.
After removing the old finish, the concrete ceiling is thoroughly washed. To wash away stains and soot, a 2% soda solution is used, a primer is applied to the treated area.
Step 3. Leveling the base for painting
This is the most important stage of preparation for painting, since the appearance of the ceiling after applying the paint will depend on the correctness of its implementation. The leveling technology for painting will differ slightly depending on the type of ceiling.
Concrete ceiling treatment
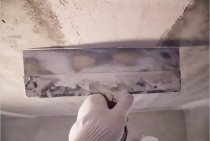
The condition of the ceiling is assessed for cracks and irregularities. If they are quite deep (over 10 mm) and the plaster crumbles, which often happens at the joints of the plates, then all falling off parts are completely removed. Next, these holes are sealed with mounting foam, the excess is cut off, and the seam itself is treated with cement mortar.
Small cracks are deepened with a knife, treated with a primer and puttied. The protruding parts on the ceiling are knocked down with a hammer. Then the entire surface of the ceiling is primed, it is advisable to use a deep penetration primer to improve adhesion (the ability to firmly adhere to subsequent materials) of the base. For hard-to-reach places, a narrow brush is suitable.

After the primer has dried, proceed to putty ceiling for painting. The first layer is applied perpendicular to the direction of the soil. The spatula is driven evenly, and at the end of each pass it is turned a little to avoid unevenness. The second time putty in a perpendicular direction from the first layer.
When the finishing material dries, all irregularities are eliminated with large sandpaper in a circular motion. Then apply the finishing putty in any direction.
Most of the effort will be required when deciding how to prepare a ceiling with a fungus for painting with water-based paint. In this case, it is necessary to clean the plaster to concrete with a perforator and spatula, apply an antiseptic primer and re-plaster. After that, proceed to the priming and puttying of the ceiling.

Preparing to paint a plasterboard ceiling
Preparation for painting drywall surfaces will include the following steps:
- A visual inspection of the screws is carried out. If they are very recessed, then it is better to unscrew them and screw new ones next to them.
- At the joints of the overlapping sheets, the seam is embroidered with a paint knife, cutting off 3-4 mm edges from each sheet of drywall.
- Next, the entire surface is primed, after drying, the heads of the self-tapping screws are covered with gypsum putty and the joints are sealed.
- The seams are pasted over with reinforcing tape (serpyanka) and carefully pressed in. Then they are plastered again.

- Finally getting started plastering the entire ceiling. In preparation for painting, you will need to apply at least 2 coats.
Step 4. Surface grinding and elimination of possible defects before painting
The ceiling for painting is polished in a circular motion from one edge to the other using special graters or grinders. The face must be protected from dust.
It is recommended to illuminate the ceiling with a light bulb or a flashlight: this will make it possible to see the slightest flaws, because any flaws after painting will be visible.

If significant defects are found, then you can go through the putty again and sand it again.
After reaching a flat surface, the ceiling is primed. Vacuum before painting to remove dust. Surface preparation for painting completed.