Despite the abundance of modern technologies for arranging and finishing ceilings, the usual painted top does not lose its relevance. However, painting involves one caveat: the quality of the surface should be close to ideal. After all, on the ceiling, covered with a layer of paint, all the flaws will be noticeable: cracks, depressions, bumps and differences in the plane. And if you can handle painting with your own hands, without having building skills, then before you putty the ceiling for painting, you should get at least theoretical knowledge about the process. Following all the recommendations, it is quite possible to repair the ceiling with your own hands, without resorting to the help of professionals.

Tools and materials for puttying the ceiling
In order to qualitatively putty the ceiling, you must first stock up on a set of tools, which should include:
- Spatula - at least 3 pieces: narrow (8–10 cm), medium (20–25 cm), wide (30–40 cm).
- A container for preparing the mixture, a bucket for water.
- Construction drill with a nozzle "mixer" for mixing the solution. In small areas it is possible to prepare the mixture manually.
- Paint brushes: large - for applying a primer to the surface of the ceiling, small - (flute) for priming deep narrow cracks, hard-to-reach places (column cutouts, areas behind pipes).
- Roller - will facilitate the process of applying light primers to the ceiling.
- Sandpaper for sanding putty surfaces.
- A construction table or any stable stand with a wide top, as it will be problematic to prepare the ceiling for painting while standing on a stepladder.

The amount of materials for work is purchased based on the area of \u200b\u200bthe ceiling, the consumption is usually indicated by the manufacturer on the package. You will need:
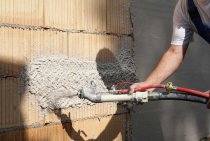
- Primer. For concrete floor slabs, a conventional acrylic primer designed for interior use is suitable. In the case of large irregularities in the relief of the ceiling, partial plastering will be required before puttying - applying a special solution 1–2 cm thick. For such mixtures, a different primer is needed. It has a denser adhesive base and an additive in the form of solid particles. This composition ensures reliable adhesion of the solution layer to the surface.

Note: if the differences and irregularities of the ceiling have significant depth (more than 2 cm) and area (more than 1 m), you should think about another, more reliable and simple way to level the plane. For example, drywall (GKL).
- Putty. Puttying the ceiling for painting should provide a flat and smooth surface, so two types of putty are needed: the main (non-shrinking) for leveling and finishing (for smoothness).
- Ceiling paint. In apartments, it is recommended to use a water-based composition.
- A color scheme will be needed if the design of the room involves the color scheme of the ceiling. It is necessary to choose the right color scheme so that it matches the type of paint or is universal. For example, color for water-based paints is not used for tinting oil and enamel compositions.
The prepared colored water-based paint is tested before use: several strokes are applied with a brush and allowed to dry. This makes it easier to determine the color saturation of the future ceiling - tinted paints of this type brighten by 2-3 tones when dried.
All materials must comply with the microclimate of the room: for rooms with high humidity (bathroom) it is better to purchase mixtures and compositions marked with water resistance.
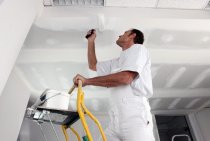
Ceiling surface preparation
Puttying the ceiling for painting begins with surface preparation, capturing the wall to the width of a spatula, removing layers of old finishes and priming.
- The surface of the ceiling is freed from old paint (whitewash, wallpaper). It is better to wet lime or water-based paint before removing. Wet the surface in small parts (1–2 sq.m.) and only after cleaning the wet fragment, they proceed to similar processing of the next one. Remove the paint with a medium spatula (20 cm), holding it at an angle of 30 ° to the plane of the ceiling. For wallpaper use a special liquid - it is commercially available. In the process of cleaning the surface of the ceiling, defects in deeper layers of the finish may occur. In apartments, these are usually the seams between the ceiling tiles and at the junction of the walls to the ceiling. They crack or the solution completely falls out of them. Thin cracks should be “embroidered”: using a spatula, a chisel with a hammer, or any improvised tool, beat off the edges of the crack, forming a V-shaped groove. All crumbling fragments must be removed.

Attention: a spatula used for removing paint and grouting seams cannot be used for puttying - after such a load, its blade will be curved and will not provide high-quality work.
- The cleaned ceiling and the adjoining part of the wall (8-10 cm strip) are primed with a roller or brush. Places that require a thick layer of putty or a special plaster mixture are treated with a primer for plaster (Concrete-Contact). It contains solid inclusions that form a rough surface.
It is possible to putty the ceiling after the complete drying of the soil (1-24 hours).
Puttying the ceiling: a sequence of work
The mixture is kneaded in small portions, following the instructions on the package and making sure that there are no lumps. High-quality preparation of the ceiling for painting involves at least 4 layers of putty (2 base and 2 finish), the number of layers depends on the size of the irregularities. Putty should not be applied in a thick layer, as it will crack when it dries and may subsequently fall off.

The maximum layer for a single application should not exceed 8 mm for the base and 2 mm for the finishing putty.
Sequence of work:
- Non-shrinking putty or gypsum-based plaster mixture close up deep seams, differences between plates, cracks at the junction of walls to the ceiling, potholes in concrete.
- Base putty align the entire ceiling. Using a small spatula, the mixture is applied to the edge of the blade of a wide tool, which, in turn, putty is applied to the ceiling, trying to maintain an even pressure. Movements with a large spatula - straight or slightly rounded, the blade should be at an angle of 30-45 °. It is correct to start puttying from the corner of the wall, perpendicular to the direction of the floor slabs. In this case, the depression or difference between the plates will be more noticeable and the surface will be easier to level.

Note: if the main putty has gypsum in the composition, then the amount of the mixture is prepared based on the output within 10–20 minutes, since the gypsum-based compositions quickly set. In the process of work, the amount of the prepared mixture can be adjusted based on the time of its viability (the setting speed of the solution is different for each manufacturer).
- The second layer of base putty is applied when the first leveling result is unsatisfactory.
- Before applying the finishing putty, the surface is primed, after removing the bumps and ridges with a spatula. Some masters grind the base layer with sandpaper. However, if the base application has been done correctly, then there is no particular need for this. Two finishing coats of putty will easily fill in minor flaws, so do not make unnecessary movements.In addition, the roughness of the base layer will ensure reliable adhesion to the finishing layers.
- The last layer of putty after drying is treated with fine sandpaper or a special mesh.

When grinding, it is advisable to use a carrying lamp. Periodically bringing it to the ceiling, you can see all the flaws that are hard to see even in daylight.
- Preparation for painting ends with priming. Since after all the manipulations with the surface it becomes even, it is easy to apply the primer with a roller on a long handle from the floor, without getting tired of climbing onto the table.
Preparing the ceiling for painting with your own hands will bring satisfaction due to the cost savings that would have to be paid to specialists. This money is better spent on an expensive chandelier that will add the final chic touch to the interior.