Finishing not insulated loggia
On an uninsulated loggia it will be cold and humid. Therefore, finishing materials must tolerate adverse factors well.
The walls on the uninsulated loggia are finished with plaster, plastic panels, wooden clapboard. Rough floor finish: screed, wooden floors.
Plaster
Plaster is a universal rough finish. On the loggia, cement-based plaster is used. Plaster based on gypsum is not used due to high humidity. As a final finish it can be: textured plaster, painting.
Plastered walls are convenient for insulation. Walls lined with plaster are easy to insulate. Therefore, plaster is the most versatile way to rough finish the loggia.
If the walls are plastered, then it is advisable to level the floor with a screed. The screed can be regular or insulated. With further insulation, the screed has advantages. Tiles can be laid on the screed and a cable underfloor heating can be built in. The screed is easy to insulate. Based on the screed, it is easy to make insulated wooden floors.
Finishing with plastic panels or clapboard
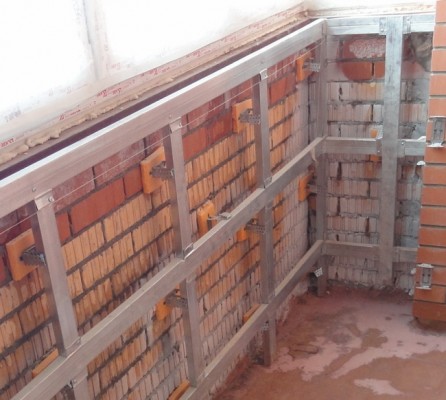
Plastic panels and lining is a frame method of wall decoration. The framework is very convenient for warming. With proper fastening of the panels, such a wall is easy to disassemble and insulate.
When finishing the loggia with plastic or clapboard, it is important: to correctly assemble the frame and fix the panels. On the loggia, the frame is assembled from wooden bars
The thickness of the bars should be at least 40 mm if the loggia is further insulated with polystyrene foam. If foam, then 50 mm
On the loggia, the frame is assembled from wooden bars. The thickness of the bars should be at least 40 mm if the loggia is further insulated with polystyrene foam. If foam, then 50 mm.
Panels and lining should be fixed with special clamps. Then the lining can be easily disassembled without damage.
On the floor you can arrange a screed. If lining is used for decoration, then a wooden floor is well suited. Both options lend themselves well to insulation. Investments of forces and means for warming are minimal.
Causes of condensation
Condensation is the transition of a substance from a gaseous to a liquid state. In this case, we are talking about water vapor, which is always present in the air in one quantity or another. At a certain ratio of air humidity and temperature (when it decreases), condensation occurs in the form of dew drops. The higher the humidity, the higher the dew point.

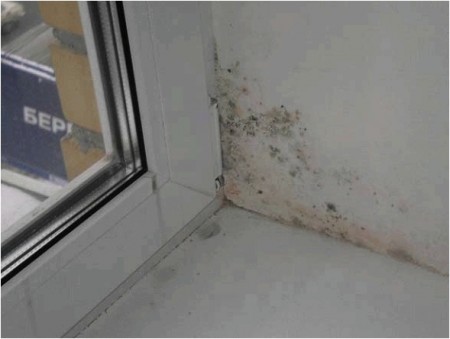
When a balcony is glazed for the purpose of its insulation, especially with the help of metal-plastic windows, the ventilation of this room is disturbed, which can lead to an increase in humidity.
Drying clothes or placing flowers that are regularly watered can be additional factors. In the cold season, surfaces in contact with the street cool down. Drops of water form at the boundary between moist air and a cold surface. As a rule, dew forms on glass, exterior walls or ceilings.
Why does condensation appear
The appearance of condensate on the balcony is due to physical processes. Warm air has a fairly high moisture content. It contains water vapor in fairly large quantities. When the air from the apartment enters the balcony, it comes into contact with cool surfaces, cools down, and its ability to retain water vapor decreases. As a result, excess moisture settles on surfaces.
Most often, condensation forms on window panes, because. they are the coldest surfaces. But if the balcony is not sufficiently insulated, then the walls, furniture and other structures turn out to be cold. Moisture also settles on these surfaces.
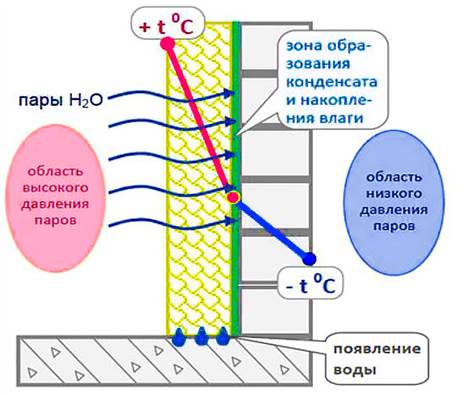 Rice. 2 The reason for the appearance of condensate on the loggia
wall decoration
We will consider the most popular materials used for wall decoration, the practical part, that is, we will not touch on measurements and installation details. Not because we want to keep this knowledge a secret from you, but because it will not be difficult for you.
Tree
Perhaps, wood is the most popular option for decorating the walls of a balcony and loggia, known to us since Soviet times. The most commonly used so-called "wooden lining". It has a rather "presentable" appearance and recreates the interior of suburban country houses.
But the choice of wood from which the lining consists should be approached responsibly. For example, coniferous trees (pine, spruce) are not particularly durable.
In addition, there is the so-called "euro lining", subdivided into classes "A", "B" and "C". Working with eurolining is somewhat easier than with “regular”, and, in turn, the class tells us about the direct quality of the material.
In order for such a finish to last as long as possible, which you are undoubtedly interested in, it should be qualitatively strengthened with self-tapping screws.
Of the significant advantages of this finishing material, we highlight the following:
- attractive appearance;
- ease of installation work;
- the ability to replace the damaged segment if necessary;
- a wide range of different types of wood.
"Vinyl lining"
"Siding" or "vinyl lining" is an equally common finishing material. This is a worthy alternative to lining made of wood. It is mounted according to the same principle as the previous version. Significant advantages of this finishing option are obvious. This:
- a wide range of colors and textures (including “under the tree”);
- ease of installation work;
- practicality and durability: the material does not care about fluctuations in temperature and humidity, which, by the way, cannot be said about natural wood;
- relatively low cost, availability.
GKL
Plasterboard sheets (GKL) are another widespread option for finishing balcony walls. In general, the alignment of walls with plasterboard sheets is generally accepted when repairing the entire apartment, and not just a balcony or loggia.
Yes, of course, if you do everything right, that is, build a solid wooden frame, on which the sheets will subsequently be fixed with self-tapping screws, then putty the joints and screwing points of these same fasteners, then perform a primer and, finally, finish (for example , paint or stick wallpaper), then the result will please you, no doubt.
In addition, drywall is also good because it does not limit your design decisions: you can recreate literally anything you want. If you want to make decorative niches or recesses that serve as, say, bookshelves - no question. If you want to recreate decorative elements in the form of geometric shapes, no problem.
OSB
OSB is a rather non-standard way of decorating walls. Yes, the material is quite common - and it is no coincidence. OSB sheets are strong, durable, practical, easy to install and relatively inexpensive when compared to natural wood.

After installing OSB, it is not at all necessary to carry out other finishing measures: it is enough just to cover the surface with a special varnish, but sometimes they do without it. This will be an element of the Loft design style, which is popular among creative people. Therefore, if you plan to create an office on the balcony, then this style will definitely suit you.
Open communications, some kind of negligence, "creative mess" and various metal structures will be in harmony with OSB panels. As a lighting device, the so-called Edison lamp can be used, which you can buy at any building hypermarket, in the Lighting department.
We express our gratitude to you for having mastered this long text. We hope that it was clear, informative and useful for you. Now you know how to expand your living space and turn your balcony not just into a renovated balcony where you can dry clothes, but into something more: a workshop, an office, a library - it all depends on your needs and creative imagination.
How to avoid condensation
This must be taken care of before the start of finishing work. This will save time and money on repairs. The following rules will help solve the problem:
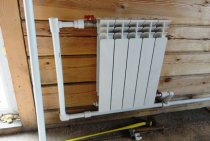
The boundary of warm and cold air, on which condensation occurs, should be shifted from the inside of the balcony to the outside. To do this, carry out high-quality insulation of the walls of the balcony in contact with the street, and if necessary, the floor and ceiling. The windows use double-glazed windows. For areas with cold winters, double-glazed windows are recommended. The most effective way to increase the temperature on the balcony is to place the heater near the outer wall.
The thermal insulation qualities of the insulating material deteriorate significantly when moisture gets on it, so special attention should be paid to its waterproofing. To protect against moist air, you need to make a layer of vapor barrier.
An important role is played by the ventilation of the balcony
Good air circulation avoids rising levels of humidity.
Balcony insulation sequence
To prevent condensation on the balcony, the laying of materials for insulation must be done in the correct sequence:
- The first step should be glazing the balcony, which will protect it from precipitation. High-quality plastic windows with double glazing will be a good barrier to cold and noise. Only after the windows are installed, you can proceed to the next stage of insulation.
- All surfaces should be carefully inspected for cracks, chips, rust on metal elements. Damage is eliminated, surfaces are treated with antiseptic and anti-corrosion agents.
- To protect against moisture, the surfaces are covered with a waterproofing layer. Film materials can be used, but for small balconies, a liquid composition that is applied with a brush or roller is optimal.
- An insulating layer is laid. This can be done in various ways depending on the chosen material. Roll materials are simply attached to surfaces. Styrofoam or mineral wool require the construction of a crate.
- To protect the insulation layer from moisture in the air, a vapor barrier layer is laid. Such materials remove moisture from the material, while not passing in the opposite direction.
- The final step after insulation will be finishing. It can be done using any available materials. If the balcony is planned to be used as a residential area, it is necessary to provide for the presence of heating devices.
The cause of condensation on the balcony is usually improperly insulated. If the work is carried out in accordance with the technological requirements and all the necessary layers are laid, wetting and subsequent damage to the finishing materials can be avoided.
Floor finish
If you want the balcony to be comfortable and suitable for use as an additional usable space of the apartment, it is necessary to insulate it. I must say that it makes sense to carry out thermal insulation even if you are not going to heat the balcony in winter, since as a result of this procedure you will insulate the room adjacent to the balcony.
Thermal insulation is required not only for walls, but also for ceiling and floor slabs. Therefore, further I will tell you how to finish the floor and insulate it at the same time.
The floor on the balcony, as a rule, is performed in the following ways:
Let's look at both options next.
Wooden floor on logs
To arrange a wooden floor on logs, you will need the following materials:
- waterproofing film;
- insulation - polystyrene foam, mineral wool or others;
- wooden bars;
- batten.
Do-it-yourself work is done in the following sequence:
- on the floor you need to lay a waterproofing film. Instead, you can also use bituminous mastic, roofing material or other materials;
- further along the balcony bars are laid, which will serve as lags. The cross section of the beam is chosen so that the wooden floor does not rise above the threshold located between the balcony and the main room. The logs must be level and relative to each other. To do this, you can put plywood scraps or other suitable material under them;
- further, a heater is laid in the space between the lags;
- then a waterproofing film is laid;
- at the end of the work, a floorboard is laid on the logs, which is interconnected into a spike / groove lock and attached to the logs with self-tapping screws or nails. Keep in mind that a distance of about a centimeter must be left between the walls and the flooring;
- at the end of the work, you can lay a floor covering, for example, linoleum, laminate, etc. You can also leave the floorboard as a finish coating, treating it with impregnation, or opening it with varnish.
This completes the process of installing the floor on the logs. I must say that some balconies have a fire hatch. In this case, the work will become somewhat more complicated, since according to the law it cannot be sealed.
Accordingly, you will have to complete the cover. To do this, make a frame from the rails and fix the boards on it. A bar should be laid along the perimeter of the hatch, as shown in the photo above.
Filling the screed
To perform the screed, you will need the following materials:
- insulation - foam, extruded polystyrene foam or mineral mats;
- cement mortar;
- fiber for reinforcement;
- waterproofing film;
- lighthouse profiles.
The work is carried out in the following sequence:
- cover the floor with waterproofing film. In addition, a damper tape should be laid along the perimeter of the walls;
- if there is a hatch on the balcony, formwork is installed along its perimeter;
- then thermal insulation is laid on the floor;
- then the thermal insulation is covered with another layer of waterproofing;
- then beacon profiles are installed, and the screed is poured according to the standard scheme. To reinforce the screed, add fiber to the solution.
You can learn more about how the screed is poured from other articles on our portal dedicated to this topic;
- after the concrete has hardened, tiles or other material are laid. In addition, it is necessary to make a hatch. For these purposes, you can make a shield and decorate it with the same material that covers the floor.