Do-it-yourself Kuznetsov's stove ordering drawings and a description of the laying of the furnace
I. V. Kuznetsov has been designing, manufacturing and improving furnaces since 1962. During this time, more than 150 different designs were invented, each of which strove for an absolute efficiency indicator - 95% efficiency. In this article we will tell you how to make a Kuznetsov oven with your own hands.
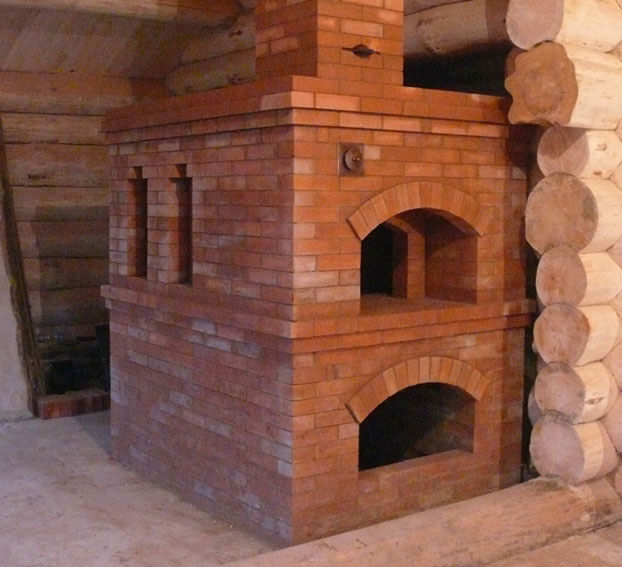
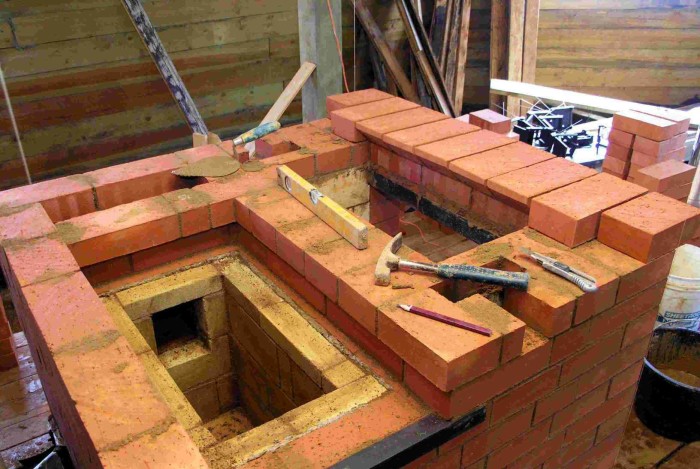
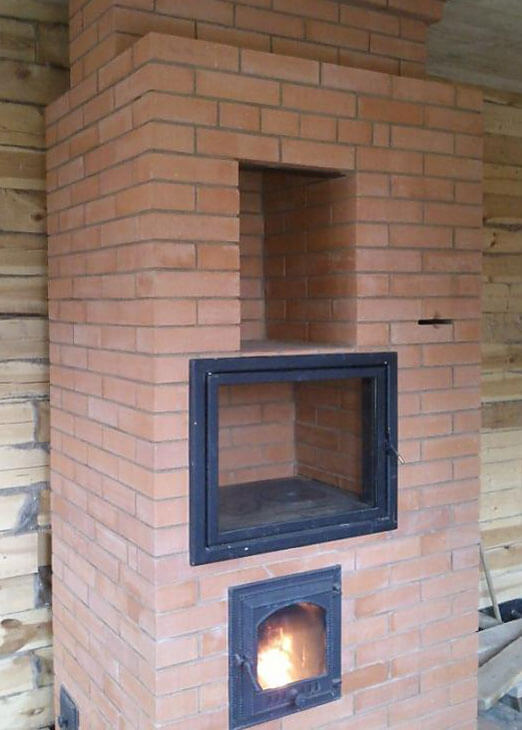
Photo 1 Kuznetsov oven
The principal feature of the development is the system for separating gases into cold and hot flows. Due to the unique bell-shaped structure of the furnace, hot air is retained inside, and cold air is discharged through a separate channel into the chimney. Given that a higher combustion temperature is maintained in the hood, and the heat is distributed evenly throughout the body, the efficiency reaches its peak. For comparison, the efficiency of conventional furnaces is 30-35%, solid fuel boilers - 80%, pyrolysis - 85%.
The low productivity of most solid fuel units is explained by the fact that warm air escapes along with the combustion products into the pipe. In addition to the fact that the remaining volume is not always enough for full heating, the rapidly escaping flue gases further reduce the thermal threshold. In some designs, they try to solve this problem by increasing (lengthening) the chimney, but then there is a risk of reducing the draft and, as a result, reducing the efficiency. The creation of such a unit, which would provide full-fledged traction and increase heat transfer, became the main goal of the designer Kuznetsov.
Video 1 Construction of a heating furnace according to the Kuznetsov system
Preparatory work
In order to assemble a brick corner fireplace, you need to make a detailed drawing and choose the best place for installation, and then calculate all building materials, fittings and fasteners. To assemble and build a corner structure, we need:
- Red brick brand M-100 (about 750 pieces, the material for assembling the chimney is calculated separately);
- Chamotte brick 50 pieces;
- A strip of steel measuring 600 by 300 by 3 millimeters;
- Steel corner measuring 100 by 100 millimeters, L = 750 millimeters;
- Two steel sheets measuring 300 by 300 by 3 and 530 by 400 and 3 millimeters;
- Sand and clay (0.5 and 0.8 cubic meters, excluding the chimney);
- Blower and firebox (140x250 and 210x250 millimeters);
- Two cleaning doors with dimensions of 140 by 130 millimeters;
- One burner and oven (410x410 and 300x280x510);
- Stove and fireplace valve (130 by 250 and 250 by 250 millimeters).
Foundation construction
Since the corner brick fireplace has a fairly large mass, for its installation, it is necessary to assemble a separate foundation. At this stage, we recommend using the following step-by-step guide and tips:
- The most reliable foundation is a monolithic reinforced one. The length of the foundation should be 8-13 centimeters longer than the fireplace on both sides;
- At the first stage, marking is performed, after which a hole of the appropriate size is dug;
- For a small house, the depth of the pit can be about 50 centimeters (tape);
- Sand is poured in the first layer, its layer is 8-12 centimeters, after which water is poured on top, and the layer is well compacted;
- Next is the formwork. For this, boards are used, the thickness of which is 20-25 millimeters. Alternatively, you can use plywood. The formwork can be either completely sealed or removable;
- Further, a lattice of fifteen by fifteen centimeters is laid with reinforcement from bars. The bars are connected with wire, in those places where they intersect with each other;
- If the height of the foundation is more than 18 centimeters, the reinforcement is laid twice - in the upper and lower parts;
- Next, a cement-based mortar is prepared. In a ratio of 1:2:2 (cement to crushed stone and river sand). Water is added so that the consistency is of medium density;
- The concrete mixture is poured into the formwork at one time (completely), in a large layer;
- The foundation itself should be below the floor level by an average of 9-18 centimeters.
SMALL FURNACE with dimensions of 2x3 bricks 510x760mm
HOME IDEAS > FURNACE, FIREPLACE, GRILL PROJECTS
Project of a small-sized heating furnace 2x3, very simple in design. Its size is 2 by 3 bricks (510x760 mm) at the base. Despite the apparent simplicity of the design, it has pretty good technical characteristics. With its, in general, small size, the oven allows heat a room up to 25m2. The design of the furnace is very convenient for placing it in the wall between two rooms. At the same time, it can easily cope with the total area of these premises up to 35m2. The above characteristics are valid for a one-time furnace fire in the spring-autumn period, when the average daily air temperature is positive. With significant cooling, as well as in winter, it is necessary to produce two fireboxes per day. Another feature of the stove is that it can use any type of fuel, from ordinary firewood to coal and anthracite. If ordinary firewood is used as fuel, only ordinary brick can be used to build a stove. However, the quality of the brick from which the furnace firebox and the firebox vault will be laid out must be high. The oven is very simple in design. The furnace does not have a traditional system of heating channels. The role of the channels is performed by a thermal cap.
MENU
×
-
PROJECTS: FIREPLACES, STOVES, GRILLS, BBQ
-
Brick oven for a bath
-
A simple sauna stove
-
Kamenka stove with water boiler
-
Do-it-yourself barbecue in the gazebo
-
Barbecue complex for summer cottage part 1
-
Barbecue complex for summer cottage part 2
-
Barbecue complex for summer cottage part 3
-
We make a barbecue with a stove
-
How to calculate the heat loss of a room
-
How to calculate the heat output of a furnace
-
Chimney schemes
-
Mini fireplace for a country house
-
Corner fireplace "Annushka"
-
double bell oven
-
Double bell oven with oven
-
Heating and cooking oven 2.5 x 6 bricks
-
Heating and cooking oven 1020 x 770
-
Heating and cooking oven for 65 70 m2
-
Furnace with water heating boiler
-
Oven with drying chamber
-
Heating and cooking stove "Swede"
-
Oven "Swede" on 2 floors
-
Stove "Swede" with a stove bench
-
Furnace "Swede" with three firing modes
-
Stove "Swede" with a fireplace
-
Baby oven options 1 and 2
-
Baby oven option 3
-
Small-sized heating stove 2x3
-
Heating stove 1880x640 “Ya.G. Porfiriev"
-
Heating stove 51x89 cm “V. Bykov"
-
Heating stove 51 x 140 cm “B. Bykov"
-
heat capacity oven
-
Compact stove with fireplace
-
Small oven with fireplace
-
Stove with a fireplace "E. Doktorova"
-
Furnace fireplace for giving
-
Homemade long-burning stove
LIKE THE OVEN PROJECT?YOU CAN BUY ITS DRAWING IN WORD and PDF FORMAT FOR ONLY 75 RUBLES!OR ALL 35 PROJECTS OF STOVES, FIREPLACES, GRILLS AND BBQ, DRAWINGS + REGULAR LAYOUT FOR ONLY 490 RUBLES!
BUY A FULL SET - 490 RUBLES (click - buy, then place an order)
BUY THIS PROJECT FOR 75 RUBLES (click - buy, then place an order)
Do you have any questions? Ask them boldly, we will solve!
Design features of corner brick fireplaces
Corner brick fireplaces, as well as metal hearths, have a number of their design features and advantages:
- Brick corner fireplaces require a lot of time to build a foundation, choose a suitable and professionally arranged order;
- Assembly and masonry may also vary;
- To assemble each structural element, it is necessary to use a certain type of brick;
- The finished unit is distinguished by its high heat capacity and no less good heat transfer;
- The fireplace cools down for a long time and continues to give off heat even after the end of the furnace;
- Brick corner fireplaces can have a different shape, size, and subsequently be lined with any refractory materials, coatings (tiles, ceramic tiles, artificial and natural stone, decorative plaster);
- The coating is distinguished by its environmental friendliness and durability. Such installations are not prone to burnout, abrasion, deformation;
- The power of the furnace is determined individually and depends on the size, area of \u200b\u200bthe house, its number of storeys;
- A corner brick fireplace, despite the high heating temperatures in the inside of the firebox, is distinguished by its safety, since its outer surfaces remain warm and it is simply impossible to get burned on them.
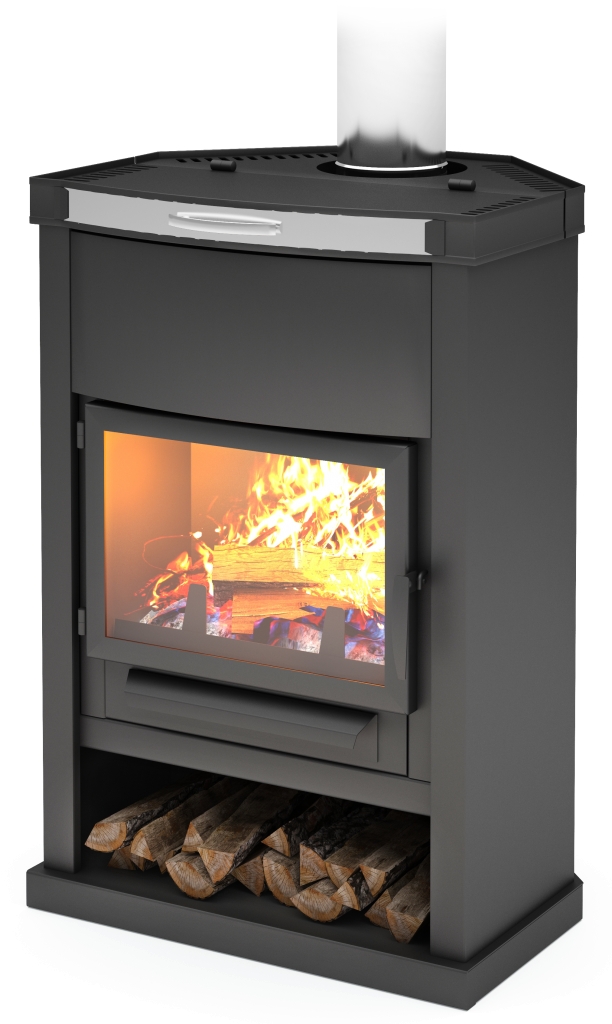
Rating of purchased metal hearths
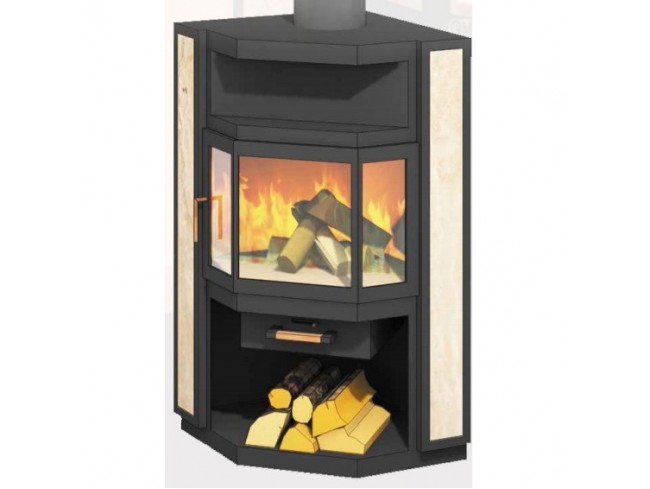
The corner fireplace stove made of bricks is distinguished by a rather complicated assembly and installation, the most simple are ready-made purchased metal hearths. In this table, you can learn more about the most inexpensive and popular models today:
|
Descriptions and specifications |
|
|
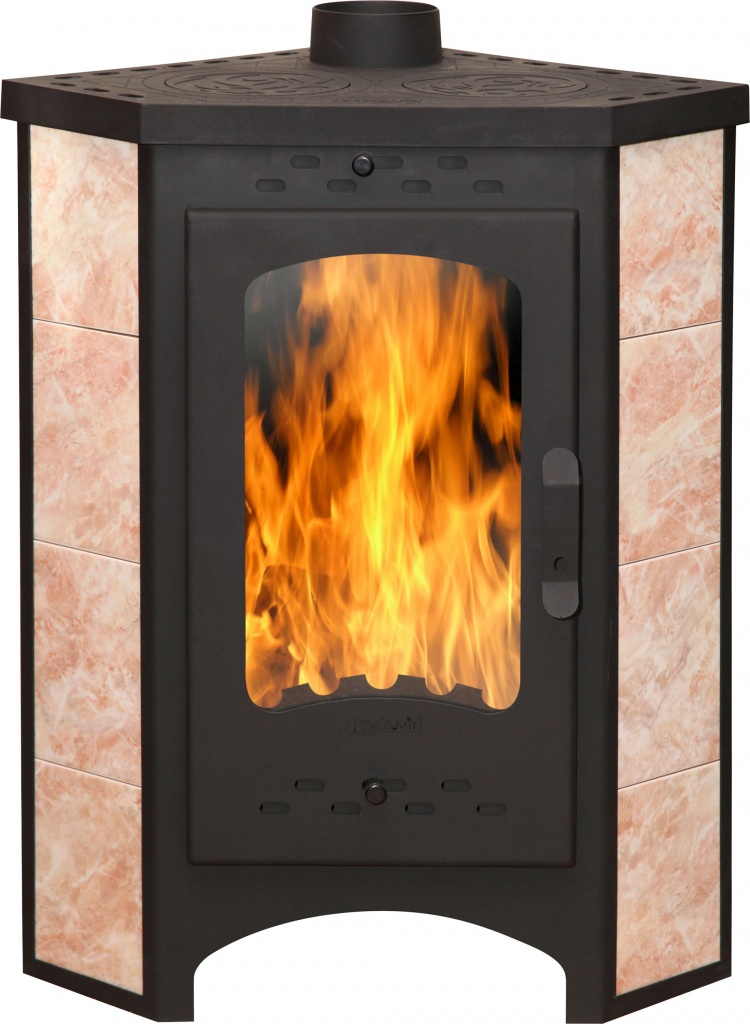
Bavaria corner
|
Installing such a hearth is quite possible with your own hands. The body of the fireplace is made of steel, the thickness of which is six millimeters. The interior of the installation is lined with fireclay bricks. The sidewalls are made of ceramics, and the power of the heating unit is 6 kilowatts, which allows you to heat a house with a total area of up to 50 square meters. |
|
|
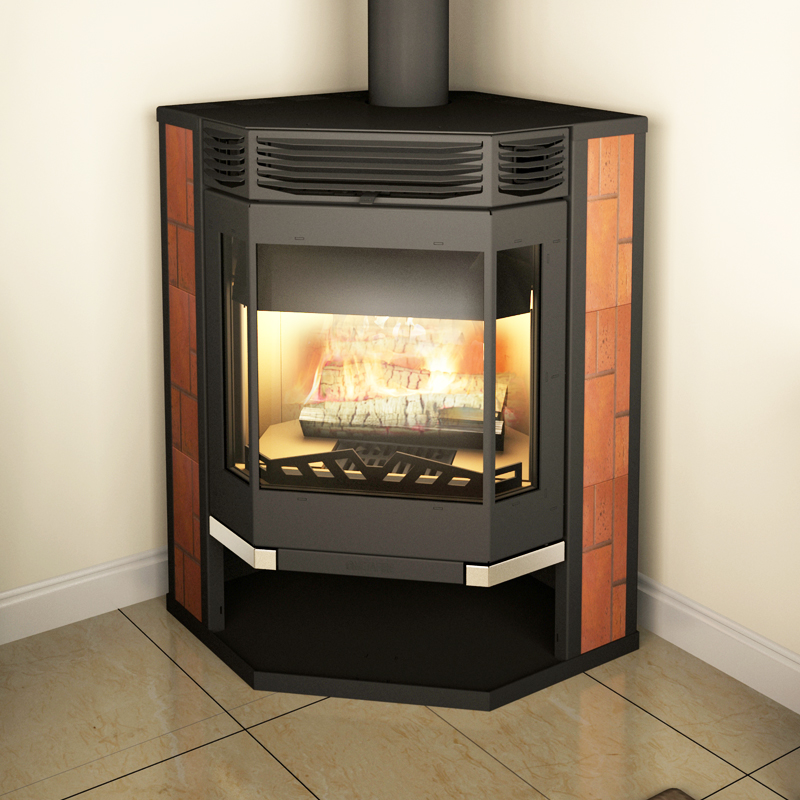
The model is based on a small refractory panoramic glass. The design itself is equipped with a small hob for cooking on two burners. A power of nine kilowatts allows heating a house, the footage of which is about 170 cubic meters. The sides of the model are also lined with refractory ceramic panels, which significantly increases the efficiency and heat transfer of the hearth. |
|
|
The instructions for this model indicate the possibility of simple use. Such a firebox has a power of 6 kilowatts, which allows you to evenly heat a space with a total area of up to 50 squares. Additionally, the fireplace is covered with heat-resistant paint, which significantly extends its service life and prevents rust and corrosion from forming. |
|
Teplodar
|
One of the most powerful combustion chambers is 12 kilowatts. Such a heating unit is suitable for buildings with a footage of up to 70-80 square meters. Refractory glass-ceramic is used to design the door. The main body of the structure is made of stainless steel. |
In order to learn more about the models presented in the table, we also recommend watching the video in this article.
The choice of location and type of foundation for the stove
Before starting the laying of the furnace, pay due attention to finding a place to place it. For example, if the unit is placed in the middle of the room, it will be able to give off much more heat, warming up from all sides and evenly heating the air around
If you place the stove against the wall (and this option is used most often), cold air will constantly “walk” near the floor. Therefore, in this regard, you need to make your own decision.
Pre-determine the installation location of the furnace door. This element must be installed so that in the future you can load fuel into the stove as conveniently and quickly as possible without spreading garbage from firewood or coal throughout the house. Usually the furnace door is located on the side of the kitchen or some little-visited room.
The finished brick stove will have a fairly impressive weight. In order for the device to stand as reliably and for a long time as possible, an individual concrete foundation must be prepared for it.
Do-it-yourself Kuznetsov furnace construction
The sequence of actions is as follows:
First, they study the plan of the room where the installation of the heater is planned.In the case when the house is not erected, it is necessary to ensure uniform heating of all rooms. It is undesirable to build a heat unit into a finished building, but if necessary, you can
But at the same time, the location of the supporting structures and beams should be taken into account when arranging the chimney.
Then prepare the foundation for the heating device. It is created from concrete, while the width should be 10 centimeters larger than the size of the device
It is advisable to design the foundation for the stove at the planning stage of the house.
It is easy to build such an oven with your own hands
The whole process can be divided into several stages:
- laying the first row, on the evenness and accuracy of which the accuracy of the entire masonry as a whole will depend;
- installation of the second row with a niche for an ash pan;
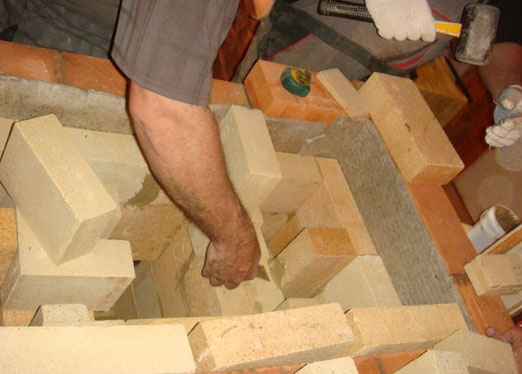
- laying the furnace zone using fireclay material;
- pipe creation.
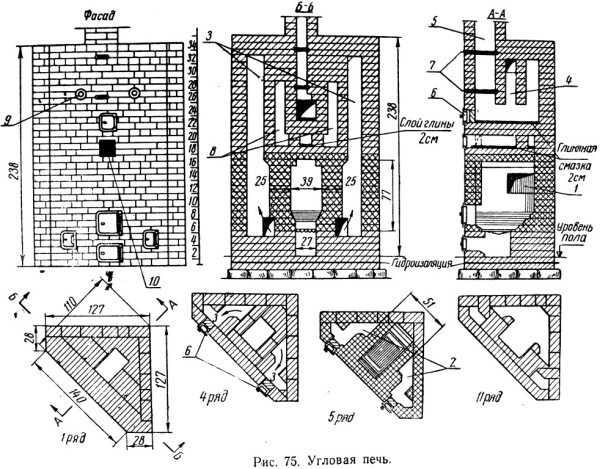
Corner oven designs are great for any layout. Due to its rather compact size, such a stove can be placed not only in the living room, but also in a small bedroom. Depending on the interior design and room parameters, you can choose a symmetrical or asymmetric model. The corner arrangement facilitates the overview of the furnace, does it by decoration and a highlight of any interior. This type of heating structure will be an excellent option for a private house or cottage.
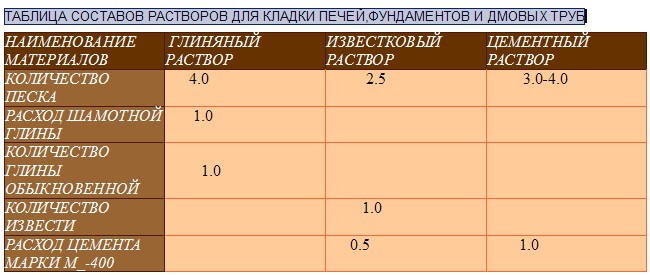
What mortar to use for masonry
The quality of the masonry mortar directly affects the reliability and durability of the finished furnace. Masonry will be carried out using a sand-clay mortar.
There is nothing difficult in preparing the solution. Take clay, fill it with water and soak it. Sift the mixture through a sieve and then stir into "clay milk". Finally, add some water to get a sufficiently viscous and plastic solution.
Remember, the reliability and strength of the furnace directly depends on the correct preparation of the masonry mortar. Do everything right - the stove will effectively heat your home for many years. Break the technology or decide to save a lot on materials - the thermal unit is unlikely to be able to fully reveal its potential and stand for at least a long time.
Varieties of brick ovens
One of the main advantages of a brick oven is its high thermal inertia, which allows it to give off heat for a very long time even after a short-term fire of just a few hours.
The choice of a suitable type of stove, first of all, depends on the mode of residence and the area of \u200b\u200bthe house. A brick oven is more relevant for a private house in which they live permanently.
According to their purpose, they are usually divided into:
- exclusively heating;
- heating and cooking, which are the well-known Russian stoves, the so-called Swedes, etc.;
- cooking;
- narrowly focused corner stoves for baths, greenhouses, garages, etc.
According to their shape, they are divided into rectangular, square, round, T-shaped and corner brick ovens.
Another important technical design parameter is heat transfer. According to this criterion, they are divided into thin-walled, thick-walled and combined. Depending on the method of external finishing, the stove can be divided into: brick “for jointing”, a plastered structure, tied with stove tiles or tiles, in a metal casing (round stove structures). Not the last place when choosing a suitable stove is the structure of the chimney channels, which can be direct-flow or counter-current, channelless or with bottom heating, with horizontal or vertical channels, etc.
Russian oven drawings of brick ovens
Previously, such designs were found in every home, but now they are already a rarity. Despite this, the Russian stove can successfully fit into the interior of the room. Also, Russian brick ovens are not only a heating device - they also have a hob.
For laying the furnace, the following materials will be required:
To work, you will need the following tools:
- trowel - for laying and leveling the solution;
- pickaxe - a multifunctional hammer with a blade located perpendicular to the axis of the handle. At its other end is a square windshield;
- bubble level for masonry and hydraulic for the first row;
- rule - serves to align the bricks of each row;
- plumb lines - one of them must be permanently attached to the axis of the chimney (overlap), and with the help of the second, the verticality of the corners is checked;
- brush - needed for grouting;
- cord - it is pulled over each row of masonry.
Drawings of brick ovens for any type of house are as follows:
- Cooking chamber. For masonry, a 3/4 ground corner brick with locks is used.
- Under. From the back there is a slope, for the purpose of which the space is covered with sand, on which the brick is laid.
- Covering the bottom. The structure is covered with bricks along bars, corners or sheet blanks.
- Vault with lock. In some cases, a central lock is used, in others, the last two symmetrical bricks.
- Rows to the lower vault. The laying of a brick oven is carried out in the usual way, in the future, a vault template assembled from chipboard or springs cut from wood is installed on top of it.
- Wells. They are tied rows, in which they leave a hole leading to the undercook.
- Underbay. Bricks are laid on foundation mortar, hollow stones are not allowed.
- Code VK. For convenience, the bricks are cut to a wedge shape.
- Covering the channel above the samovar. It is solid, only whole stones are used.
- Holes are reduced above the shestak. The brick is cut in accordance with the drawing.
- Wall alignment. At the same time, the overtube is reduced, the channel of the samovar is laid.
- Installation of a samovar. The structure is closed with a separate cover.
- View installation. To build in the structure, two rows are laid.
- Chimney. The height of the pipe from the bottom to the top must be at least 5 meters. The upper rows form a visor that prevents precipitation from entering the chimney.
Thanks to this stove, high-quality heating of the house is provided.
Swedish styling technology
A brick stove for a house should be installed strictly on a waterproofing foundation. Buslaev's oven weighs more than 750 kg, so it is impossible to assemble it directly on the concrete floor: over time, the surface is deformed, which can lead to malfunctions of the oven and even a fire. Therefore, the concrete foundation must be covered with a waterproofing material.
Projects of brick kilns provide for the penetration of groundwater into the lower layers of the foundation, which is why the brick will begin to dampen and eventually collapse. Therefore, it is better to protect the structure with roofing felt or roofing felt. Already immediately after the waterproofing work, marking and ordering begins.
First row
The first row is made of solid masonry, and the outer row is laid out only with solid bricks.
It is very important to control their integrity and strength - this moment can play a decisive role in the operation of furnaces. You can also use halves inside - the main thing is that there are no thick gaps left, and tightness is preserved
Second row
Similar brickwork, but this time it requires the installation of a blower door, which will be located under the firebox. The firebox is the space in the furnace where combustion takes place.
Third and fourth row
The third row is laid in half a brick with the obligatory preservation of openings for installing a blower and a cleaning department (120x120 mm). The fourth is going on the same principle.

But from this moment it is necessary to start forming a blower chamber measuring 200x300 mm. Usually it is located in the left and rear of the oven.
At this level, you need to mount the grate.It is installed in special openings that are made in bricks. A temperature gap of 10 mm should be left along the perimeter of the grate and lowered to the grate within 20-30 degrees of inclination. Then the furnace door is mounted.
6th to 9th row
Here begins laying out the oven. Bricks are stacked on an edge over the entire area of the stove. Steel sheets are fixed around the oven to protect against burning through. From the seventh to the ninth row, an increase in the width of the channel is formed, which is laid at the back wall on the right. A clay mixture is laid on top of the oven. The oven and furnace door are fixed in the structure.
Tenth row
The hob is mounted and the channel expands with a gradual rounding of the corners. With the help of a level, it is necessary to check that the cast-iron plate lies horizontally, without deviations.
The space between the stove and the wall of the stove is laid.
Eleventh row
Two brick walls are formed in a quarter, and their laying is carried out. This is where the cleaning and installation of the cooking chamber door takes place. With the help of a strong sheet of steel, beams for partitions of the flue are created. Channels 160x200 mm are formed from them.
Twelfth row
Support beams for a brick vault are erected from strip and angle steel, after which forced ventilation is created in the form of a 150x100 mm channel. Brick stoves are also formed here.
The brick is ground into a conical shape to narrow the ventilation duct, and the small stove must be covered with a steel sheet.
Thirteenth row
Outside the chimney (in front), cleaning is laid, and hinged partitions are installed. The masonry itself is carried out in half a brick, a valve and a cornice are mounted. At the same time, it is necessary to maintain indents of 30 mm on each side. Above the channels, the masonry is also ground into a cone.
Fourteenth row
The indents increase by another 30 mm, after which you can continue to form the cornice. Above the large stove, it is necessary to install metal corners and a strip that will block the small stove.
Next, an overlap is made, valves are installed, a ventilation duct is mounted at the furnace portal. It remains only to mount the chimney with fluff.
Which brick is more suitable for laying
Brick for laying the furnace must comply with a number of requirements and standards. Not only the durability of the structure, but the safety and life of those living in the house will depend on the correct choice of material. Modern manufacturers offer us a lot of varieties of special bricks. Their common distinguishing features are fire resistance and resistance to high temperatures. Bricks for kiln masonry are conditionally divided into two large groups: fireclay and full-bodied. The former have high fire resistance, therefore they are used for laying out fireboxes where the source of fire is located. They are intended for those stoves that use coal or gas as fuel - in the process of their combustion, the highest temperatures are formed.
If the stove is designed exclusively for heating with wood, then the use of this material is not so important.
Solid bricks are made from clay and fired using a special technology. They are moisture and heat resistant, as well as fireproof.
When choosing building materials, it is very important to purchase high-quality products and not forget about the aesthetic appearance. Using special curly materials - corner brick or round brick - the fireplace stove can be given a solid, elegant appearance without additional, external decoration, which will significantly save
Buslaev oven projects
The design has a built-in hood. The oven is small. It is ideal for any private home, as it allows not only to heat the premises, but also to cook food.Despite its compact size, the stove heats spacious rooms well, so there are ready-made projects of houses with a stove.
Special schemes for laying brick ovens will help you get the job done without complicated calculations.
For installation, you will need the following materials:
- doors - fireboxes (0.2x0.25 meters), VK (0.39x0.5 meters), blower (0.14x0.14 meters);
- refractory - 43 pieces;
- solid brick - 382 pieces;
- oven-cabinet 28x33x50 cm;
- cast iron stove 0.7x0.4 meters with burners (removable rings of different diameters);
- valves - steam exhaust (12x13 centimeters) and smoke (12x25 centimeters);
- grate - grate 30x20 centimeters;
- corner - three blanks of equal-shelf rolled products 1 meter long and 45x45 millimeters in size;
- steel - a piece of 0.3x0.28 meters;
- strip - 4 pieces of meter (4 millimeters), 0.25 meters (2 millimeters), 0.35 meters (3 millimeters);
- cast iron stove - 0.4 x0.25 meters; 40x15 centimeters.
Projects of brick ovens of this type are as follows:
- Complete row.
- The door blew.
- Window opening for cleaning.
- The bottom of the oven is laid out from refractory, three sides are lined with iron.
- Installation of the furnace door, grate, under the furnace - refractory, cleaning overlap, blower door.
- DS installation.
- Laying refractory on the edge around the LH.
- Laying according to the scheme.
- The upper coating of the oven with clay (1 centimeter) is carried out, the DT overlaps, a stove with burners is attached.
- Installation of smoke circulation with cleaning windows, the plate is not laid. In the future, the brick is placed on the edge.
- Cleaning is covered, channels are created, 25 cm strips are laid.
- The cleanings are finished, the fixing wire is embedded.
- The cap is installed.
- Installation of the ceiling VK, while the hoods remain.
- The stoves are laid out according to the scheme.
- The small stove ends with sheet iron, the masonry is carried out in the order of the brick oven.
- A cleaning hole of a large stove is laid out, the edges of the side walls of the channels are crimped.
- Protrusion masonry.
- The protrusions are duplicated and the corner is mounted.
- The chimney of the BP overlaps similarly to the 19th row.
- A three-row neck is made, the size of the chimney is reduced to a section of 26x13 centimeters for the top valve.
- A chimney with grooves is created on this and subsequent rows.
The dimensions of the structure increase when using clinker facing bricks, so it is not recommended to use them instead of solid material. When finishing with tiles, durability is ensured (the material lasts for decades), in addition, it can be dismantled for facing other heating structures.
Construction technology
The Russian brick oven is laid out exclusively on a solid foundation. In this case, there are three options: brick, monolithic reinforced and rubble concrete. The foundation must be covered with roofing material to protect against the influence of groundwater and other moisture.
Management
As already mentioned, the heating furnace is built from refractory bricks. For perfect brick joints, you can cut each block three-quarters and set them in the corners of the masonry - this will ensure the correct dressing. On the second and third rows, walls are erected. The fourth level is laid only with solid bricks, and at the base the corners must be grinded off to make arched supports.
For a large house, you can make a wide arch. The entire brick structure is assembled on a wooden form. To do this, with the help of 20 bricks beveled at an angle, a vault of the furnace is built. The thickness of the side walls should be 1 brick, the front and back - 2 bricks. Next, the laying of the vault begins, the stove is assembled, the level of fireclay. At the corners of the bars into 1/2 and 3/4 parts. Between the walls it is necessary to fill up the sand and cover it with solid masonry.
On the next row, a hearth is collected and under the stove. It is advisable to fill the cavities between fireclay with fine sand. On the left side of the hearth, a recess for coals is made.After that, the cooking chamber and the hearth are mounted. Between the hearth and the crucible, a perforated steel arc is installed, into which a copper wire is inserted. Subsequently, it is sunk into the solution.
Next, brick walls are built up, with the obligatory formation of a compartment for cleaning ash. A half-door is installed opposite the view. The chimney is constructed in identical rows of six bricks. After construction, the brick oven must dry out, and only then the finishing takes place.
Features of the orders of brick ovens
Furnaces often serve as interior decoration, so they are lined with clinker, tiles, tiles. The diagonals in the first row are carefully measured, and a plumb line is hung in the center of the chimney, which is removed on the last rows of the pipe. Also, the diagonals are controlled every 4 rows, and on each row a cord is pulled when laying, which is checked by the rule. Instead of a cement-sand mortar, it is recommended to use clay, regardless of the type of furnace being built. Ready-made dry mortars significantly save time spent on clay preparation. So that the composition does not dry quickly, the brick must be moistened with water before laying.
Operating costs will be less if there are no rectangular ledges inside the structure. To this end, when creating an overlap (ledge), the stone is tried on without mortar, the line of overlap is outlined, and the excess material is cut off with a grinder. Internal seams during laying are regularly monitored, and excess mortar is removed from time to time. The pipe is cleaned after completion of work.
Brick ovens are laid out from several materials:
- outer cladding;
- masonry bricks (main structure);
- fireclay - refractory material lays out places subjected to strong heat (furnace, under);
- brick with high density edges - located inside the furnace.
Clay bricks cannot be mixed with fireclay, and ovens, hobs, rods and grates of grates, water tanks are not embedded in the masonry - this is due to different expansion coefficients during heating. If the metal elements are rigidly embedded in the masonry, then the structure will soon collapse.