Seams in the oven
When applying the mortar to the masonry not with a hand, but with a trowel (21)
the surface of the brick is recommended to be moistened with water. Putting a hill on a brick
solution and level quickly. Wetted or soaked is placed on the solution
brick, tightly pressed, rubbed and remove excess. Solution for bonding
the edge is applied with a trowel or with the brick itself. Refractory brick only
rinse with water.
Seams in the oven masonry are performed in different ways.
If the masonry is supposed to be plastered, the seams are hollowed out, i.e. not
fill with mortar to a depth of 5 ... 10 mm. When plastering mortar
flows into the seams and adheres better to the surface of the furnace.
If the masonry is not plastered, the seams are completely filled with mortar.
and they remain in the same plane with the wall surface. Such masonry
called undercut. If the surfaces of the furnace with the help of seams want to give
more beautiful view, separating the bricks from each other with seams, then the seams are given
convex or concave shape, performing laying for jointing.
In this case, a tool is used - jointing, which
made of roofing steel, giving it the desired shape, having
reverse image of the seam.
The stitching technique is that the extruded
the solution is cut into a trim, the joint is attached to the seam and carried out along
solution (22).
The solution should be such that with slight pressure
on a brick during laying, its excess was easily squeezed out of the seams.
Figure 23 shows the main parts of a brick. Brick
lay flat in a half-brick or flush on an edge in a quarter of a brick and
stand up (24).
This suggests that the furnace walls and channels can
laid out in various thicknesses. Laying in half a brick is considered normal,
thin - a quarter of a brick or on an edge (25, a). The most common
laying flat or flush (25, b). The same masonry thickness can be obtained from two-fours,
placed on edge (25, c). Three-quarter brick laying is performed in
half a brick and a quarter of a brick, that is, on an edge (25, d).
When it is required to completely close the seams, the laying is carried out from two-four
on the edge, but so that one row of masonry is 5 ... 6 cm higher than the other (25,
e).
When laying the first row of the furnace, the shape and dimensions of its
check with a rule, a square, a meter or a cord pulled around the corners
masonry (26). The first row is first laid out dry and only after that on
solution, carefully observing the dressing of the seams. Each laid out row
be sure to check horizontally with a rule with a level, vertically with a rule
with a level or a plumb line, for squareness - with a square or a cord along
diagonals (27). Identified inaccuracies are corrected. Frequent checks take away
a lot of time, therefore, to increase labor productivity,
guide posts or mobile formwork posts that install
strictly vertical.
The box can be made for several rows of masonry. Wherein
the last row of masonry, for example the third, should be strictly flush with
top of the box.
Furnace designs
Technology of the masonry process
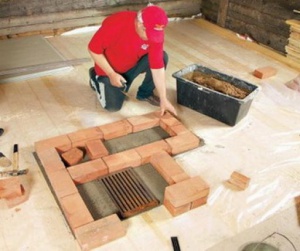 We lay the very first row first without applying mortar to the brick. Having reached the corner bricks and making sure that the real picture coincides with the outlined project, we proceed to the capital addition of the series. We do not let go of the level - the first rows should be laid out clearly horizontally. Using a construction tape measure, we compare the dimensions of the stove in width, length and diagonals. Both diagonal lines should be the same, if this is not the case, then you will have to knock out the corner bricks until the dimensions become equal. Then the inside of the oven is laid out for the first row.
We proceed to the second row with corner bricks, the position of which is constantly checked by a level. And then, as in the first row, lay out two lengths and two widths, then the inside. We constantly refer to the drawing and compare the calculation for correctness. Having already two rows, we drive nails, about 100 mm long, into the corner parts of the solution between the rows.
With the help of a plumb line, we transfer to the ceiling the location of the corners of the laid out second row. In these transferred points on the ceiling we hammer in a nail. We tie a nylon thread to each of them and fix it with the corners of the masonry. It turned out a good light formwork made of nylon thread. With this method, the calculation will go much faster, and will not take much time to check the level. If, when checking with a plumb line, any deviation becomes noticeable, then it is very easy to remove it by adjusting the nails in the ceiling.
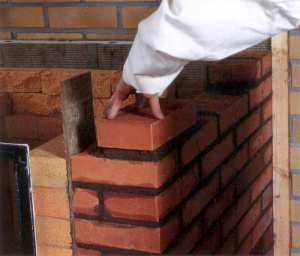 Now we lay out row after row, not forgetting to remove excess mortar. After laying out every five rows, we moisten the inner walls of the furnace with a damp sponge. We try to achieve the narrowest possible seams in the masonry. According to brick building technology, each vertical seam should be covered from above with a clear middle of the brick in the next row. This rule must be followed at all times. In order not to make a mistake, look at the drawing more often. Do not use even slightly damaged bricks. This will lead to the fact that heating the oven to the maximum temperature, such a brick, which does not have good integrity, will crack and fall apart into small pieces.
It is advisable to lay out the firebox itself from fireclay bricks, since it is more fire resistant. But the bricks of the firebox and the outer wall of the furnace should not touch each other. There should be a gap of at least 0.5 cm between them. This is due to the different degree of expansion of the material during heating.
We install the doors
In order to properly mount the furnace door or blower door, it is necessary to attach the cash part to the lined wall in advance and check how tightly it is in contact. If there are defects, they must be eliminated before applying the solution. Then we fasten a double wire to each corner, up to 60 cm long. The bricks are treated with mortar, and the mounted door is checked by the level for the correct position relative to two perpendicular axes. Twisted wire is wound inside the seams of brickwork on four sides.
The remains of the brick after laying the furnace can be used to build paths with your own hands.
You can make a formwork for the foundation of the furnace using the instructions.
Mounting the plate
 To install the slab, the bricks are first laid “on dry”. We find a brick that would have a gap of 5 mm, which is necessary for expansion when heated from all sides of the plate. And then we lay out capitally. We fill the solution into this gap, and lay an asbestos wire along the entire perimeter. The laid plate is compacted to the correct vertical position.
Laying a stove is a very interesting and exciting activity, but it requires good skill and a minimum amount of knowledge from the master. A do-it-yourself stove will bring coziness and warmth to the interior of your home, create a more homely atmosphere. And guests and visitors will tirelessly praise the owner of the home for such a handmade work.
Types of adhesives and solutions for lining furnaces
Facing adhesive can be one-component - for laying tiles without cutting joints, and two-component - respectively for laying with cutting joints. According to their properties, adhesives are divided into heat-resistant and heat-resistant.
The term "heat-resistant" characterizes compositions that can withstand thermal cycles with temperature fluctuations of at least 150 ° C. only compounds that can withstand prolonged heating at 500 ° C are called heat-resistant. Only heat-resistant adhesives are used for stove cladding, heat-resistant adhesives are acceptable for fireplaces.
For facings of fireplaces, compositions of domestic production have been tested by practice - Moment-Crystal, Vetonit Weber, Plitonit SuperFireplace and others. Of the recognizable imported brands - Ceresit-SM. For a decorative fireplace, which is heated only periodically, these compounds are quite suitable, but heat-resistant compounds are needed for stoves.For example, the two-component composition K-77 with the primer of the same name, which has a high bearing capacity. Complete curing of the composition occurs after three to four weeks, and it is unacceptable to do an accelerating furnace before the expiration of the glue hardening period. When this facing composition gains strength, the temperature in the room should be in the range of 18-28⁰С. There are special compositions for terracotta and majolica. The market offers a lot of heat-resistant and heat-resistant compounds, and you should carefully study the scope and follow the recommendations indicated on the package.

It is possible to lay tiles on clay mortars filled with quartz sand or sawdust
When using clays, it is important to choose the right proportion depending on the fat content of the clays so that the solution is plastic enough, but subsequently does not crack. Filler/clay ratio for oily clays 4:1, for normal clays 3:1, for lean clays 2.5:1
In addition to fillers, fireclay powders are added to clay solutions - to increase resistance to high temperatures and extremes, this is especially justified in the case of a coal stove. Some craftsmen make salt additives into the solution - up to one glass of table salt per bucket of water. Salt retains water in the mortar mixture, and the risk of cracking is less. The usual ratio of clay and water in a solution is 4:1, but the selection is carried out empirically and also depends on the fat content of the clays used. One of the recipes considered classic includes cement. One part clay, three parts sand, one part chalk and one part cement. The amount of water is selected according to the type of clay. This composition gives not only good adhesion to brick and tile, but also higher strength compared to clay mortar.
Types of ovens
Currently, the most popular options are heating and cooking stoves designed for space heating and cooking. The design of such an oven can have a hob or a full-fledged oven.
The heating furnace, which performs only one function - heating the room, has a simpler design and is built in a shorter time. The cash costs for laying such a furnace will be minimal.
Fireplaces stand out in a separate category of stoves. Fireplace configurations can be varied - from the simplest to the most complex design developments. As a rule, the high cost of fireplaces is due to the use of a large number of expensive finishing materials.
Readers find these materials useful:
- The Swede stove is a way of ordering with a bell-type furnace and a stove bench
- Self-construction of a Dutch oven according to diagrams and drawings
Types of tile layouts can be different
- The vertical seams match. This layout is for tiles of the same size. If rectangular tiles are mounted, then the layout can be both vertical and horizontal, while you can lay out colored contrasting zones and insert panels - it looks linear and neat
- Ligation, or displacement along vertical seams. They are used on complex geometric areas so that cropped fragments are not conspicuous
- Diagonally. Artistic and complex layout, allowing for rare drawings. Very original, but the tiles will need about 10-15% more, a lot of trimming and waste
- Tiles of different sizes are laid out in cages, carpet, with the selection of fragments and contrasting zones, panels and decorative elements are possible

Standard set of tools for making furnace linings
- For cutting and fitting - tile cutter or grinder
- For straightening tiles - hammers with a rubber head
- For drilling - drill
- The solutions are mixed with a construction mixer or a drill with a whisk attachment.
- Rubber and notched trowels for applying adhesives
- To control the verticality and horizontality of the cladding - a plumb line and a building level.More convenient rack levels with bubble ampoules, not only on the long sides, but also on the end
Consumables - dowels or staples, crosses for tiles (plastic crosses must be removed from the seams), special grouts for stove linings on a mineral or silicone basis, designed for high temperatures.
Grids for furnace lining are used only metal, fiberglass are unacceptable. The reason is that the mesh distributes not only the mechanical effect, but also the thermal one. Therefore, a reinforcing wire metal mesh with a cell of 25 * 25 mm - 50 * 50 mm and a steel section of 1.2-2 mm is used. For a standard 3 mm adhesive or primer layer, this is optimal. But even if the thickness of the application of glue according to the instructions is greater - 4 or 5 mm, it is not recommended to use wire meshes thicker than 2 mm, since the linear expansion of steel is significant, and this creates a danger that when the oven is heated, the tile lining may begin to peel off.

The tile installation technology is different
- With cutting joints - extracting mortar from masonry joints to a depth of about a centimeter
- Without cutting seams
Facing according to the method of cutting seams is considered the best - no metal elements, hardware and dowels are introduced into the masonry bricks, which give the risk of brick cracking during thermal expansion, because the walls of the furnace can heat up by more than + 500⁰С. The mesh is attached only with thin staples. In addition, when facing along cut seams, mechanical effects on the furnace body will be minimized. But the labor costs for this method are, on the contrary, maximum.
It is dangerous to get cracks in the masonry in the process of knocking out the mortar from the joints, especially in cases where the furnace has been heated many times and the mortar joints have sintered to a stone state. Carefully cut the seams to a depth of 8-10 mm - the work is not easy and painstaking and requires attention and experience.
The sequence of cutting seams:
- First, the mortar joints are slightly softened with water, without strong impregnation - they put a damp cloth (rags, burlap) on the oven walls and withstand such a “lotion” for an hour or two.
- The solution is knocked out of the seam with a narrow chisel (called a cross-cut), which is used to cut the groove. The hammer strikes easily, no force is used.
- When the softened layers are over, make new "gadgets" and repeat the whole process until the seam is released by at least 8 mm, and preferably by 1 cm.
- Remove all fragments and crumbs of the extracted solution, dedust the surfaces
- The first layer of soil is applied to the masonry surface. When facing with grooves, a two-component adhesive is used, and the primer component is applied first, with full filling of the joints. The thickness of the application depends on the composition used and is carried out according to the instructions for use or instructions.
- Next, the mesh is mounted on wet plastic soil, and at a pace until the soil has set. For this reason, they do not cover the entire stove with soil at once, but work with grips of 1-2 m2.
Mesh fastening at split seams:
- As soon as the soil is applied to the first grip with an area of about 1-1.6 m2, the mesh is pressed into it and temporary fixation is made into the pre-drilled holes, using dowels with plastic sleeves for this - three dowels at the top and three at the bottom. Dowels are driven not into a seam, but into a brick - this is a mandatory requirement. The holes in the bricks must be smaller than the length of the sleeves so that their edges protrude from the holes and can be removed with pliers.
- After tacking the mesh, permanent fasteners are installed - wire staples, sticking them into the seams filled with soil at intervals of 25-30 cm, through two or three rows of brickwork.
- After the soil has hardened, the dowels are removed and the holes in the brick remaining from them are filled with soil.
- Then you need to wait until the soil is completely dry, including the holes - during this time the layer in which the mesh is pressed will have the necessary strength for further work.

When the mesh is fixed on the masonry without cutting the seams, the fastening is possible only on steel dowels. Plastic for the outer walls of the furnace is not applicable, because it will melt from heating. In addition, hardware creates the risk of cracking brickwork due to a significant difference in thermal linear expansion of the metal compared to brick.

Tile installation
Surface preparation is standard - if the oven has old plaster or finish, it is knocked down with a chisel and cleaned with metal brushes, and then dusted.
Then they perform the jointing - if it is decided to mount the tiles on the grid with jointing
Prepare the adhesive composition according to the instructions. Pour dry mixtures into water, in portions, with constant stirring. The speed of the drill or mixer is adjusted so that the glue does not foam, air is not needed in the structure. Hold the glue for as many minutes as indicated in the instructions for preparation - usually up to 15 minutes.
Begin lining from the bottom. Apply glue or primer (in case the lining is done along the joint) for four tiles horizontally. Fix the reinforcing mesh. On cut seams - on wire staples, without cutting - on dowels.
The glue is applied with a notched trowel, the first tile is pressed down and slightly rotated to firmly fix it. Crosses are used to calibrate the seams, but not all masters recommend crosses, and some designs suggest the illusion of uneven seams - to imitate old masonry.
Verify the horizontality of the tile with a level, then the vertical. The first row is the most responsible
Deviations are corrected carefully, shifting the tiles with light blows with a rubber mallet. Seams for different types of tiles can be from 8 to 12 mm, except for clinker tiles, the thermal expansion of which is so small that a neat seam of just 3 mm is possible
All tiles of the first capture are leveled and plumb.
The first three rows of tiles after laying should be left until the adhesive has set. Plastic adhesive may not hold heavy tiles, and the finish will slide off from its own weight. Furnace linings do not imply high speeds. Pauses between grips are about three hours, depending on the properties of the adhesive or mortar used.
For fitting and trimming, use tile cutters or a grinder. They usually try to hide the cut tiles to the junctions with the wall or in other inconspicuous areas.
After the glue has completely set - after 24 hours, the crosses are removed and the seams are cleaned of glue influxes.
The seams are rubbed only after the adhesive has completely cured, according to the instructions for the composition, otherwise you can get microcracks in the grout or peel off the tiles. Mineral grout is done manually - with a spatula, or with a mounting gun, if the seam is convex. Grouts with silicone compounds are very sticky, and are only possible with the use of mounting guns.

The first furnace is possible only after the adhesive has completely cured, from a week to a month, depending on the composition used.
Preparatory process
 Each stove, especially laid out on its own, is unique. Therefore, before you start laying bricks, study the structure of your house well and create your project. If in doubt, you can resort to a ready-made drawing suitable for a specific house layout. The main thing is that the furnace should be built exactly in the place where the greatest heat transfer is achieved. When creating a project, one should take into account how correctly the chimney will exit through the roof and whether it will damage the roof structures.
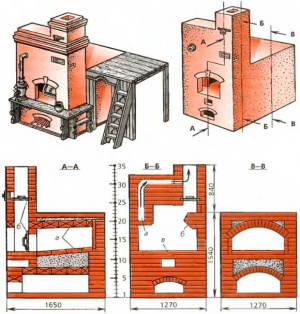
Having sketched out your drawing, you will confidently imagine the device of the future furnace from the inside, you will be able to peep at the scheme of adding bricks.The created project will help to more realistically visualize the future structure, and therefore will be able to provide complete information about how this stove will harmoniously fit into the overall design of the room.
Before laying the stove, take care of calculating the heating of a private house.
Take a break from laying the stove by reading about the most unusual houses in the world in the article.
Furnace masonry materials
In no case should you lay the same foundation for the walls and for the stove. Since the load on the foundation is different, this can lead to cracks, splits. In the worst case, a fire may result.
The foundation for the furnace is laid from gravel, small brick chips or rubble stone. In size, the foundation should protrude beyond the boundaries of the stove itself by 5-7 cm along each side. The most important thing in the brick used is its correct geometric shape. In other words, all corners must be clear and even, maintain a right angle from all sides. Each brick should be carefully checked for cracks, and it is best to use a well-burnt brick. For interior masonry, only red brick is suitable.
Fasten the brick with cement mortar. Before adding the furnace with mortar, it is recommended to lay the entire brick as it will lie already bonded without mortar. For clearer boundaries, it is advisable to use formwork - this way you can insure yourself against bumps and distortions. The very first few rows should be laid out perfectly even and smooth. The quality of the laying of the rest of the furnace will depend on them. After laying out the first two rows, a waterproofing measure is carried out by laying two layers of roofing material.
The solution for the main furnace is made from sand and clay. From the cement mortar, only the foundation and the pipe are laid out from the outside. Of course, it is better to take a fatter clay, and use a cleaner sand.
 Advice. it is impossible to accurately determine the proportions of clay and sand, since the fat content of clay and the purity of sand are different everywhere. But before mixing the solution, try to sift the sand and leave the clay for a couple of days in a plywood box. Mix the solution by constant trials. If the sand is more than it should be, then the seam will quickly crumble. And with an excess of clay, greasy seams will crack in speed and shrink heavily.
The solution should reach the consistency of sour cream. To check if the ratio of ingredients is correct, fashion a small ball and throw it from a height of one meter. Also, try to burn it well. If in both cases the ball remained intact and intact, then the proportions are observed correctly. The density of the mortar should also differ in its plasticity, which allows you to remove excess mortar between the bricks. The level of plasticity is affected by the water content in the solution.
Types of stoves
Folding the oven is a simple matter, but before you start, you need to decide on the type of structure. It is selected depending on the required options, the availability of free space in the house, as well as other parameters. After that, a scheme of the stove is created with the required dimensions and notes - it is according to this scheme that the subsequent laying of the stove will take place.
Heating. Its name fully describes the purpose. This is an ordinary stove, which is the easiest to fold. It is characterized by the simplest construction compared to the following subtypes. Often equipped with a bed.
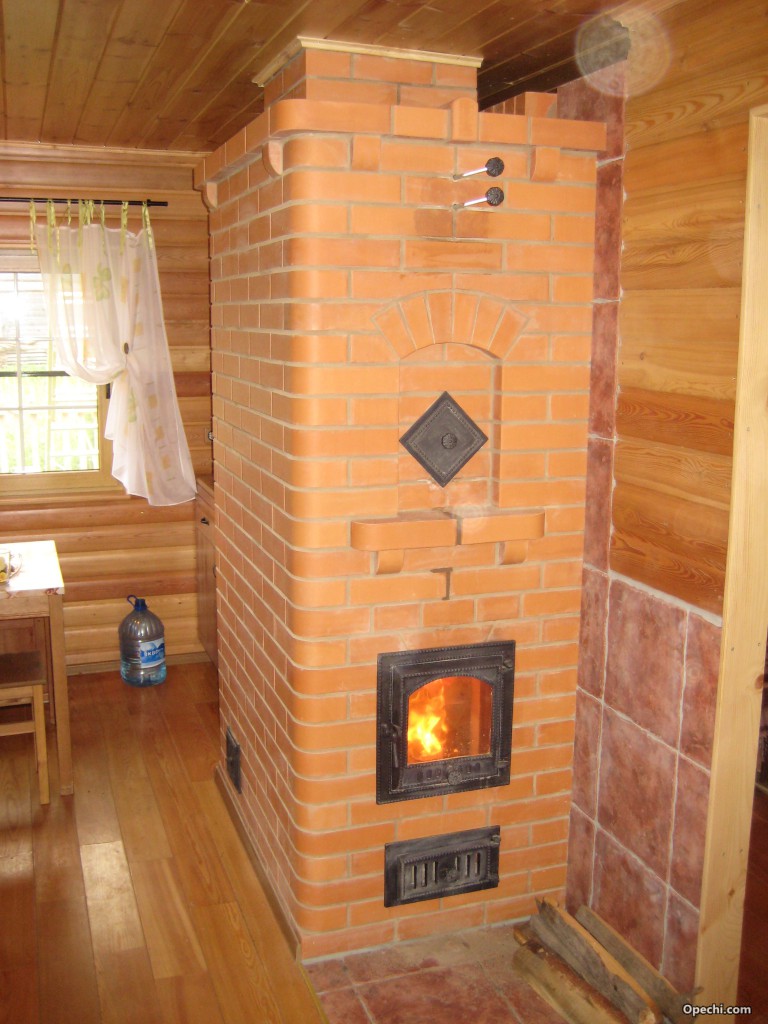 Heating stove for a summer residence
Heating and cooking. In this category of stoves for the home, a secondary option is added - cooking in pots or pans. Such a design will not replace a full-fledged stove, but it will quite cope with the task of saving gas. Heating and cooking stove
Combined. This is a multifunctional unit, which is located in the kitchen of the house, and is equipped with an oven or a fully working stove for cooking. Projects of furnaces of this type are quite complex and are recommended for construction only by craftsmen.
Furnaces-fireplaces.Folding such a stove with your own hands is also not difficult, but there are certain requirements for its appearance. The facade should be beautiful and neat, its task, in addition to heating, is to decorate the house. Fireplaces take up much less space and are easy to light, so their popularity is growing.
Brick stove
These are not all types of stoves, but the most common ones are listed. Next, we will talk about how to fold the heating discharge furnace.
Rehearsal of the future oven
Getting experience in this craft is quite easy. To do this, you will have to make small bricks yourself, for example, five times smaller than standard ones, and fold a furnace that is five times smaller. Wait until the solution sets and try to melt.
Thus, you can check the level of acquired skills. Then the stove can be disassembled and try to fold another model, thereby training the hand on various models and their features.
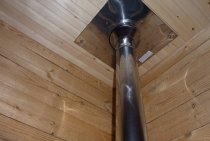
The main attribute of any furnace is a pipe. Folding the pipe is one of the main points in the laying of the entire furnace, so all instructions must be strictly followed.