The main difficulties of installing a chimney
The chimney is used to discharge the products of combustion of various types of fuel (gas, coal, firewood, oil products, etc.). Its laying through the roof of the house should be carried out in accordance with the requirements of SNiP 41-01-2003, which are partially outdated. Nevertheless, this document is guided by the supervisory authorities, therefore, it is necessary to follow the standards specified in it.
A chimney outlet through the roof may be required in the following cases :
- when building a new house;
- in the process of reconstruction of the roofing system in the presence of a heating unit;
- when installing an autonomous source of heat supply in an already operated building.
If the construction of a building or the reconstruction of the roof allows you to design a chimney outlet taking into account all the requirements, then installing a chimney through a finished roof will create many problems. Usually this situation arises when the owners of the house want to install a fireplace or stove in an already finished building. If we are talking about an automatic boiler, it is recommended to create a separate extension for the boiler room, or to lead the chimney through the wall of the building.
The main difficulty in installing a chimney is that the roofing cake through which the pipe passes is largely composed of materials that are not designed for close contact with very hot objects. The composition of the roofing pie includes :
- roofing;
- crate;
- counterlattice;
- waterproofing;
- rafters;
- insulation;
- vapor barrier layer;
- inner lining.
Wood, bituminous and polymeric materials are sensitive to high temperatures, therefore, according to SNiP, the gap between the brick, concrete or ceramic chimney pipe in insulation and the elements of the roofing pie should be at least 130 mm. If the ceramic pipe is not provided with insulation, the clearance must be at least 250 mm. It should also be noted that at the point of passage through the roof, the pipe must have a special thickening - a retreat. Accordingly, in the roofing cake, it is required to make a hole of considerable size. The gap between the pipe and the roof after the installation of the flue must somehow be reliably thermally and waterproofed.
Negative consequences
A through hole in the roofing pie significantly reduces its performance and durability, since :
- violation of the integrity of the waterproofing and vapor barrier layers leads to wetting of the insulation, while the thermal insulation characteristics of cotton materials deteriorate significantly;
- due to the rupture of the thermal insulation layer, the heat losses of the house increase;
- in the under-roof space, air exchange may be disturbed, which provokes the accumulation of moisture and further decay of the wooden elements of the roof structure;
- the resulting gap not only contributes to the penetration of rainwater into the building, but also the formation of snow pockets in winter;
- if the truss system is broken in the process of making the hole, then this largely affects the strength of the roof.
To avoid problems, the passage of the chimney through the roof should be equipped by erecting its own rafter system (box) around it or by installing a standard modular chimney .
Rules for installing pipes on the roof
To install the chimney through the roof surface, you must follow a few simple rules that will allow you to do this work correctly:

For the chimney, it is necessary to provide a foundation or a so-called concrete pad, since the chimney is a very massive structure.
since the chimney is a fairly massive and heavy structure, like the stove itself, when building a house, it is necessary to provide for a separate foundation, the so-called concrete pad;
it is believed that a long pipe provides better traction, but there is one “but” here - the efficiency of the furnace drops dramatically. Therefore, it is necessary to find a golden mean. Therefore, when installing the pipe, it is not necessary to look for long paths, it is best to lay it directly;
it is recommended to make the pipe exit not far from the ridge if the roof is pitched. Calculating the place is quite simple: you need to draw an angle of 10 degrees from the line horizontal to the ridge, going down. The upper part of the pipe should be 30-50 cm above this line.
Many believe that the location of the chimney is optimal on the roof ridge itself;
it is important to install a special spark arrester at the top of the pipe, which will prevent the ignition of roofing materials and other elements. The design of such an extinguisher can be very different, often it is made of ordinary steel mesh, which prevents burning sparks from leaving the pipe.
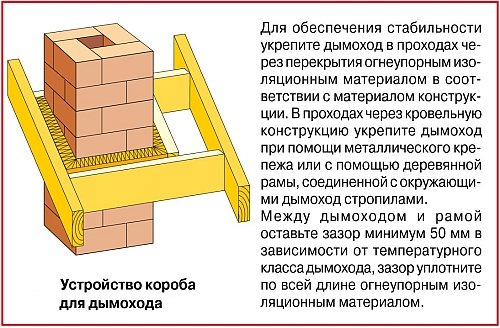
Chimney box
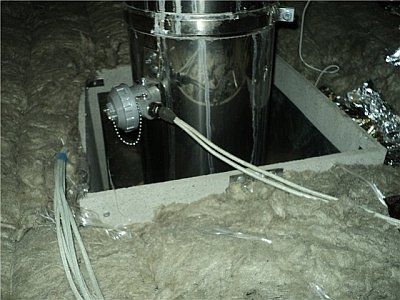
To properly bring the chimney through the roofing pie, you should equip your own truss system around the pipe. It must be separated from the chimney at a distance specified in SNiP. The design consists of lateral rafter legs and horizontal transverse beams from below and above, which are made of a bar of the same section as the rafters.
To insulate the structure, it is necessary to use non-combustible heat-insulating materials, such as glass wool or stone wool - it is stuffed between the pipe and the wooden structural elements.
When passing the chimney through the roofing pie of the operated roof, the vapor and waterproofing is cut crosswise, like an envelope, the edges should be tucked up and attached with nails or brackets to the rafter system.
Waterproofing the chimney on the roof requires special attention. When installing a duct for a pitched roof chimney, the vapor barrier and waterproofing membrane are fastened as follows: the edges of the films are folded over and tightly fixed with staples to the duct, in addition, the attachment points should be additionally sealed with a sealing tape or some other adhesive material. From the outside, protective elements are mounted on top of the roofing that do not allow moisture to pass into the joints of the box with the roofing pie.
It is important to consider that the installation of the box can adversely affect the air exchange in the under-roof space. To avoid deterioration of moisture removal, you can install additional ventilation systems, for example, ventilation tiles, roof aeration grilles, etc.
 If the width of the chimney exceeds 800 mm (perpendicular to the rafters, according to the outer dimension), then a slope must be performed higher up the slope.
Razuklonka is a small private roof that drains water and snow from the pipe. Its installation is quite complicated, since all layers of insulation are part of the ramp, in addition, it should be qualitatively combined with the main roof using curly elements. To avoid mounting a slope, it is worth making a smaller pipe.
Using ready-made kits
Standard modular chimneys ("sandwich") can greatly simplify the process of passing the pipe through the roof. A wide range of materials are used for the manufacture of structures, including :
The choice of a modular chimney depends on the fuel used, as they differ significantly in their technical characteristics. The advantage of such systems is the ability to install the pipe at a non-right angle. This is especially true when installing a chimney in an existing building and allows you to choose almost any place for installing a fireplace, stove or automatic boiler.
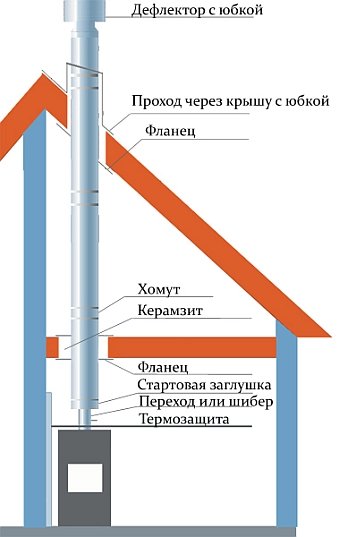
A modular chimney passes directly through the roof, consisting of such parts as :
- deflector (a device that enhances draft in the chimney by using a stream of hot air);
- clamp for stretch marks (allows you to additionally fix a high pipe on the roof);
- skirt (an element that protects the exit point of the pipe through the roof);
- roof passage (element with a fixed apron, which is directly mounted in the roofing pie).
Modular chimneys have an attractive appearance.
Steel chimneys can be installed if the temperature of the exhaust gases is not more than 500 °C. Prohibited for installation on coal-fired stoves. For asbestos-cement pipes, this parameter is 300 degrees; for coal-fired ovens, such chimneys are also unsuitable.
If the chimney is made of concrete or brick, or a prefabricated passage is installed, the structure should not be rigidly attached to the roof system. Under the influence of external factors, the roof may be deformed, and these forces will be transferred to the chimney, which may lead to its destruction. When the chimney exits through the roof, all connections between the chimney and the roof are made using flexible elements.
How to arrange a pipe outlet
Consider how the pipe should be led through the metal tile so that the risk of leaks in the junction areas is minimized.
Rectangular outlet
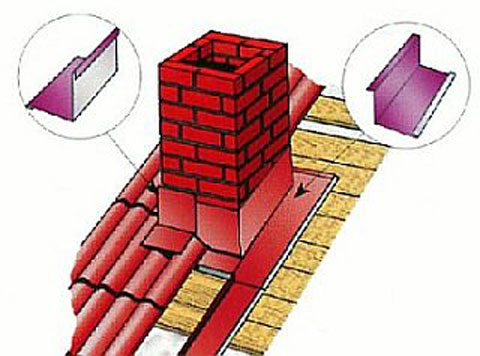
The organization of a rectangular, in particular, and a square outlet is carried out in two stages:
- installation of an internal apron before the installation of the coating;
- the device of an external decorative and protective element after the completion of the laying of the roofing.
Schematically, the installation of the output can be reduced to the sequential execution of the following steps.
- Find out the location of the upper edge of the inner junction bar by attaching it to the chimney wall.
- On the marked marking line, for example, a grinder makes a groove with a depth of at least 150 mm. The strobe should turn out with a slight upward slope. In the end, it is well cleaned, preferably even rinsed with water.
Attention
It is imperative to examine the truss system, because due to leakage, the wood may begin to rot or a fungus will form on it, but, say, a new roofing material will weigh quite a lot.
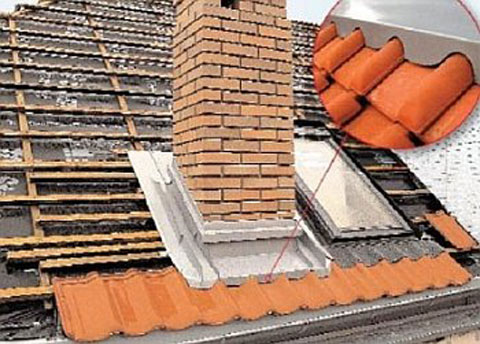
- The abutment bar is first installed on the side of the chimney, from the side of the eaves, then the other three are mounted: on the sides and at the top.
- The planks are laid with an overlap of 150 mm and the edges are filled with silicone sealant. Fix them using roofing screws.
- To form a "tie" through which water will flow, a metal sheet is brought under the bottom of the apron. It is sent either immediately to the gutter, or to the valley.
- The waterproofing is removed and, having raised it by about 50 mm to the wall of the chimney, it is fixed with a special heat-resistant adhesive tape. Thus, additional reliability of the junction node is provided.
- After the installation of the coating, an external apron is equipped, which is more necessary for decoration than protection.
- Install it in the same way as the internal one, only to fix the outer strips, the pipe walls are not shredded. In fact, the lower apron, bypassing the pipe with a metal tile, is sandwiched between its layers, eliminating the ingress of moisture under the roof.
Round (oval) outlet
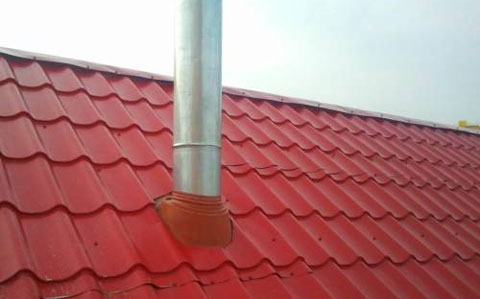
Ensuring reliable abutment protection for a round exit is a more difficult task. Therefore, a special element was developed - the chimney passage. This is a combined element, which includes a flat steel base and an elastic cap for the chimney pipe. Transitional diameters are marked on it. The components of the passage are hermetically connected to each other.
In addition, we recommend to study: The passage of the chimney through the wall.
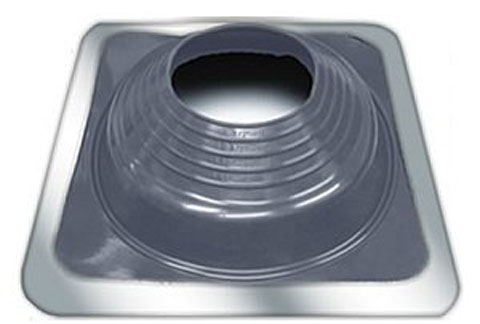 In the manufacture of caps, EPDM rubber or silicone is used, which have increased heat resistance.Silicone can be used at temperatures from minus 75°C to plus 260°C, from EPDM - minus 55°C to plus 135°C. Due to their elasticity, the abutment is reliably insulated. For a greater effect, it is recommended to choose a ring on the passage cap that is smaller than the diameter of the pipe section by about 20%, and cut it at this level.
Advice
Pass-through elements are also suitable for arranging any part of a circular section that is displayed on the roof, say, ventilation.
The process of installing the passage is performed in the following order:
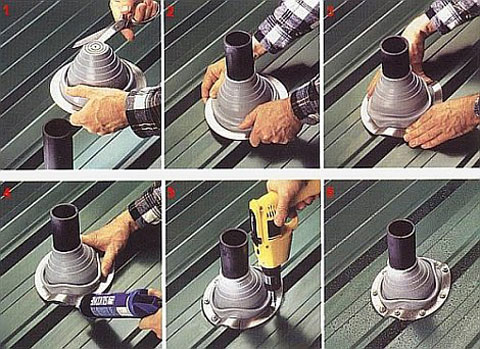
- On the roofing it is necessary to cut a hole of the appropriate diameter.
- Having moistened the element with liquid soap, it is pulled onto the pipe.
- The sealing element is pressed to the base to form a metal tile.
- To fix the element, self-tapping screws are used, having previously applied a sealant under its edges. The screws are spaced 35 cm apart.
Advice
If desired, the passage element for metal tiles can be made by yourself. However, it must be taken into account that the cutting of the roof made in this way must comply with all building codes and regulations.
https://youtube.com/watch?v=O4asQV68dpM%3F
General characteristics of tiles as a roof
The use of metal for arranging the roof allows you to get a reliable and durable roof that can stand without additional investments for many years. Today, metal tiles, as a roofing material, are preferable for roofing than a roof made of slate or euroroofing material.
The metal tile is produced from metal with a thickness of 0.5 to 1.2 mm. The length of the metal strip of a metal tile can vary from the standard 1.2 meters to 6 meters or even larger if the order is made to order. Metal painting is usually done with UV-resistant paints. According to manufacturers, without mechanical damage, the paintwork can withstand a 50-year service life.
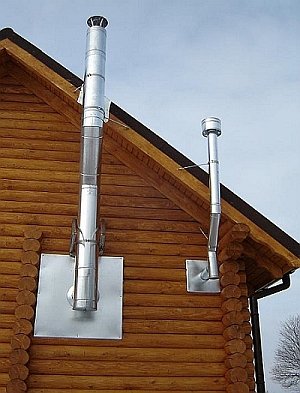
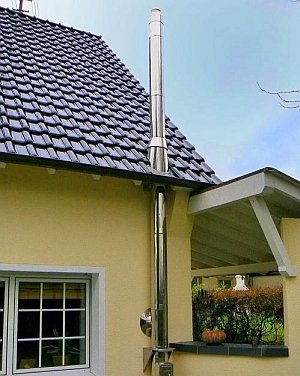
 What does an installed chimney look like through a metal tile
In addition, a metal tile is not only sheets of profiled metal, it is also a whole set of different additional elements that allow you to assemble a roof that meets all regulations and standards. These additional elements include several specific details intended for arranging roof transitions of internal communications and systems through the roof. These elements include:
- Antenna outputs;
- Conclusions of ventilation ducts;
- Dormer windows;
- Windows of light tunnels;
And of course, such additional elements include a set of parts for arranging the passage of the chimney through the metal tile.
What can a bad installation lead to?
Often, the list of works of a master stove-maker or installer of a gas or electric heating boiler does not include work on arranging a chimney. It is understood that the passage of the chimney through the roof is laid at the construction stage, or the homeowner will mount the chimney on his own. The apparent simplicity of such work provokes the owners to refuse to use professional roofers. They do not think about what serious negative consequences a poor-quality outlet of the chimney to the roof can lead to. Frequently occurring problems:
- through a poorly sealed pipe passage, dampness can enter the masonry, eventually destroying bricks and cement joints;
- the increased humidity of the chimney pipe itself or the elements in contact with it provokes an increased spread of various microorganisms, mold, and fungus. The spores of some of them can pose a danger to health, and even human life. If traces of infection are visible on the pipe, it is not recommended to use it, and in special cases it is necessary to completely replace the entire smoke exhaust system;
- water seepage in the places where the chimney passes through the roof elements, leads to a decrease in the thermal insulation properties of the insulation by half. It must be understood that after the drying of such a layer, the insulating characteristics will no longer be able to return to their previous level;
- a poorly installed chimney affects the durability of the materials of the roofing elements and the truss system. Penetrating moisture accelerates the processes of wood decay, which will lead to the destruction of the power frame;
- large gaps near the passage of pipes lead to the termination of the normal circulation of warm and cold air in the room under the roof. This leads to additional energy losses, and hence to unnecessary heating costs;
- poor-quality chimney lining significantly spoils the appearance of the entire building.
Not only chimneys from stoves, fireplaces and other solid fuel devices are raised above the roof. Exhaust pipes from gas heaters, as well as ventilation pipes, are also taken out there. When installing them, exactly the same methods are used as for chimneys.
Pipe cutting on a metal tile
Pass-through elements differ depending on the shape of the pipe section. For a rectangular pipe, a complete waterproofing assembly is required, with internal and external aprons. Aprons are mounted in a certain sequence and insulated around the perimeter of the chimney, ensuring complete tightness of the passage. The elements are prefabricated and designed specifically for the insulation of adjoining brick structures and frames with rectangular cross-sections.

The pass-through assembly for sandwich pipes is made from a part that is attached to the roofing material, the second part of the kit for adjoining round pipes is a water seal. The passage is assembled so that the water seal funnel in the upper part, with the sealing ring, is in direct contact with the sandwich pipe, the material of the ring must be heat-resistant and elastic. Attach the water seal to the roofing material on self-tapping screws, screwing them around the perimeter of the bottom of the funnel. The rubber material of the part is reinforced along the contour with aluminum tapes. In the same way, ventilation shafts are brought to the roof.

The adjoining of rectangular chimneys through the roofing metal tile is performed by laying heat-insulating non-combustible material with an asbestos layer in the gaps between the heating surfaces and wooden elements. The thickness of non-combustible thermal insulation of 5-10 cm is sufficient to prevent heating of the wooden elements of the rafters and battens and their ignition. Safe designs for bypassing round chimneys include metal restrictors made with oval holes and designed for installation on inclined slopes. The limiter is attached to the crate, a pipe is passed through the hole. The thickness of the metal sheet of the limiter is not enough for the wood of the crate to receive enough heat to ignite. But despite this, non-combustible insulating materials are laid between the chimney and the limiting part.

Features of adjoining to a coaxial round pipe:
- Penetrations for coaxial pipes are made of ethylene propylene microporous rubber (EPDM). Rubber parts are attached with fixing screws by means of flanges. Pass-through parts can only be designed for certain diameters, but they can also be universal with the ability to adjust to the desired diameter;
- During installation, the penetration part is put on the pipe, a heat-resistant sealant is applied along the contour to the flange connection. The flange is fixed on the roofing metal tile using self-tapping screws, then the penetration part is slightly bent along the upper edge to fill the gap with sealant. Additional protection against water flowing down the roof - clamps tightened along the top of the penetration. Thus, it is possible to lead the chimney through metal tiles and other roofing materials, excluding slate and ceramic tiles.

Adjacencies to frame square pipes: fastening of adjoining strips is carried out on self-tapping screws, but not directly to the surface, but through bends made along the edges of the metal roofing material. Not a very common type of smooth tiles, but installation is carried out in the same way as all metal roofs - the lower adjoining part is brought under the upper one. Under the apron, the tiles are mounted in such a way that the top tile relative to the pipe goes onto the apron, blocking the path of flowing water. With precise installation, tightness is practically guaranteed without waterproofing material and sealant. Frame pipes are the most difficult to finish, and this method of installation is used infrequently, and for penetrations through the more common embossed metal roofs, such installation is not possible.

Connections to brick pipes begin with markings. Templates are used, you can make such a template from a wooden slat. Applying the template along the contour in the direction from the crate, the height will be equal to the height of the apron. With the help of a grinder, a cut is made for the bends of the apron, the cut is made according to the marking by 1 cm, then the gap is dedusted with brushes or blown with a compressor.

After cutting the apron parts with fitting, the side and lower parts are fixed, the bend is made and the structure is disassembled in order to fix the waterproofing and apply silicone sealant to the gaps. Fasten the planks to the crate with nails, applying silicone under each hat. The outer apron is installed last, completing the assembly, while the gap between the metal tile and the pipe will be closed, while the lower bar is flush with the pipe.

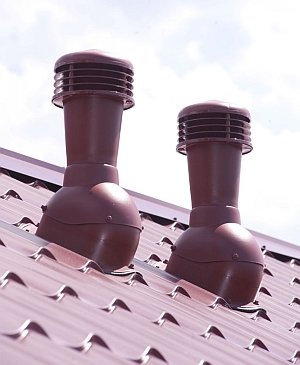
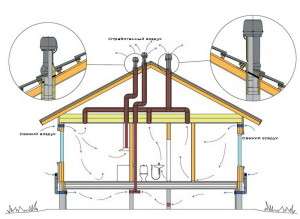
Where to mount the ventilation pipe
The location of these elements must be determined at the planning stage. To ensure good ventilation, you will need to consider the following:
- spot ventilation pipes should be located at a distance of 60 square meters. mfriendfriend;
- the number of ventilation pipes is determined based on the complexity of the design;
- the location of several pipes should line up in one line;
- the places where the ventilation pipes are removed must be tightly insulated;
- the pipe should not be located further than 60 cm of the ridge.
 Marks for a place for installing ventilation pipes must be marked by tracing the template with a pencil. It is included in the kit with the purchased material.
It is desirable to place ventilation pipes under the riser, since this method can provide maximum air circulation. In some cases, corrugated adapters are used for this. During installation, the base of the corrugation is warm, so that minimal wind resistance will be obtained. The height of the ventilation pipe riser plays a significant role, since with a small pipe the draft will turn out to be poor, and if it is too long, fastening devices will be needed. Building codes provide for clear indicators of the height of ventilation elements:
- for a flat roof - the height of the ventilation pipes should not exceed 30 cm;
- for a roof with slopes - no more than 50 cm.
If the roof provides additional areas for recreation, then the height of the ventilation pipe will reach 2 meters.
Conclusion through the metal tile of a round pipe
Roof passage units with a circular cross section are equipped with roof penetrations, which makes it possible to achieve good sealing of the chimney on a metal roof. Antennas, masts, ventilation ducts and electrical communications can also be led through roof penetrations. They are used on various roofing materials. The foundation of the roof penetration is a steel sheet, hermetically connected to the cap. A special hole in the cap allows you to bring a sandwich pipe through the metal tile, you just have to learn how to assemble the chimney with your own hands..
For the manufacture of penetrations, silicone or EPDM rubber is used: both of these materials comfortably tolerate temperature fluctuations from -74 to +260 degrees.Before installing the pipe, the penetration is equipped with a hole, the diameter of which should be 20% smaller than the pipe diameter. The process of pulling the adapter onto the pipe can be facilitated with a soapy solution. After joining the sealant and the roofing surface, it completely repeats the texture of the roofing material. The area under the flange is smeared with roofing sealant. Roofing self-tapping screws are used as fasteners (installation step - 35 mm).

In most cases, a sandwich chimney is recommended instead of a brick chimney. It consists of two liners with different diameters, separated by a layer of thermal insulation (usually it is basalt wool). With good performance, easy installation and long service life, the sandwich pipe chimney is far superior to brick or concrete elements. Such a chimney channel does not overheat and does not accumulate condensate.
When independently equipping a chimney and cutting a pipe on a metal roof, it is necessary to strictly comply with all existing building codes and regulations: they can be found in the relevant documentation. It is best to carry out such work during the construction of the house. However, sometimes this has to be done on an already built building.
This usually happens in such cases:
- The roof is undergoing a major overhaul.
- The roof structure is being replaced.
- Installing or replacing a home heating system.
If there is no self-confidence, it is better to invite professional roofers to carry out the work.