Components of a well-flower bed
Country craftsmen always use various improvised materials to make their masterpieces.
In progress are:
- exotic snags;
- trimming sleepers;
- old bathtubs;
- trough;
- wooden crafts;
- obsolete building materials.
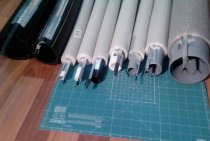
To build a decorative well for a garden or a summer residence, the following elements must be prepared in advance:
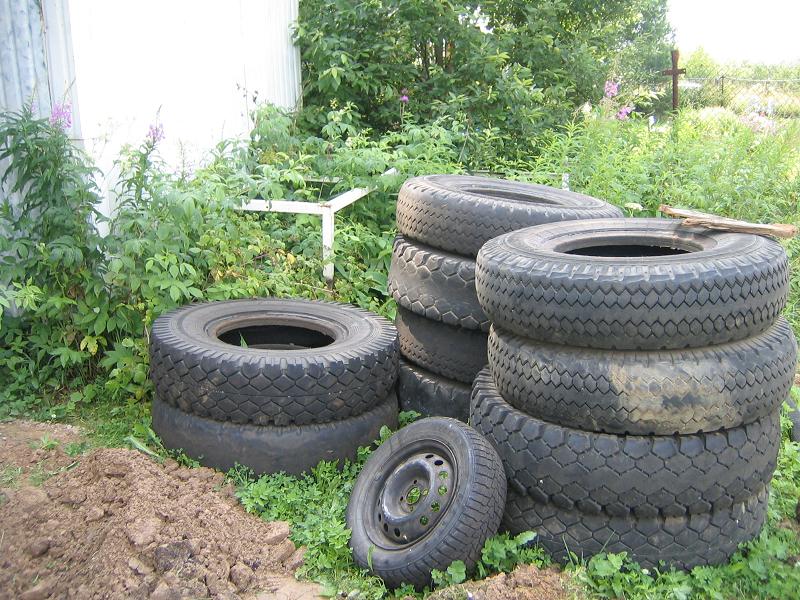
- a set of old tires - four tires of the same diameter;
- two small round logs, sleepers or pieces of timber;
- four smaller wooden blocks, for erecting a roof on top of the well;
- roof covering: slate, tiles, sheet metal, rubber plates, multi-colored plastic - whatever comes to hand;
- fasteners: screws, steel corners, nails, self-tapping screws;
- paint that is suitable for rubber;
- container for planting flowers and climbing plants.
When the preparation is completed and all the materials are collected, you can begin to build the well itself.
It is good to involve all your relatives, children, neighbors in this exciting process. Friendly and fun all the work can be overcome in one day.
Paint selection
The most crucial moment is the selection of dyes. Oil dyes adhere well to rubber, but such a coating will not last long. External factors are affected:
- temperature fluctuations;
- exposure to bright sun;
- severe frost;
- snow, rain, wind, hail.
In a maximum of a year, a well covered with oil paint will have to be repainted.
For greater stability of the coating on tires, other colorants should be selected: bituminous, acrylic or enamel.
A great option is rubber paint.
This substance does not consist of rubber in the usual sense, as the name says. But the paint is designed in such a way that, along with the surface of the tires, it is able to stretch and shrink.
In winter, frost affects the wheels, in summer - the scorching sun, but the rubber paint does not crack or deform.
In addition to washing and drying rubber surfaces, oil stains should be carefully removed. It is better to do this with the help of special chemical solvents.
Making a decorative well from tires for the garden
Having shown a bit of imagination, you can create a masterpiece of landscape architecture from your used tires. It is extremely simple to do this, such work is within the power of any not very experienced home master and even an active housewife.
A tire well can be installed not only in the garden, but also on the playground
This will require:
- several (from 2 to 4) used tires of the same size and with the same tread pattern;
- blanks for support posts supporting the roof (bars, thin logs, pipes or metal profiles, etc.);
- boards for the roof frame (6-8 pieces);
- roofing (profiled sheet, slate, boards, tiles, etc.);
- fasteners (bolts, nails, screws, self-tapping screws, ties, corners, etc.);
- file, knife or jigsaw;
- spray gun or paint brushes;
- dye.
You can make a lot of interesting things out of old tires.
First you need to decide on the method of fastening the supports (racks):
- outside of the tire surface;
- inside the structure;
- directly in the tires with the cutting of the corresponding holes (the preferred option, since the whole structure will be more stable and reliable).
The well construction algorithm is as follows:
- Having previously measured the outer diameter of the tires, they dig a shallow (about 7-10 cm) groove in a circle at the chosen place.
- They mark the location of the supports, where they are later buried to a depth of at least 40–50 cm (if desired, they can be poured with concrete mortar).
-
In tires with a saw, a jigsaw or a sharp knife, holes are made for the racks.
Using a jigsaw, make holes in the tires for the racks
- In the prepared hole, the tires are stacked sequentially on top of each other, while the slots must exactly match.
- Supports are inserted into the holes dug in advance through the slots in the tires, their height should be the same. The upper ends are connected with a wooden block.
- For stability, several large stones, construction debris, gravel are laid at the bottom of the well.
-
Assemble the frame of the canopy from the bars. The roof can be a simple shed; for this, the lattice flooring is knocked down in the shape of a rectangle. For a gable roof, you will need two of these elements, connected at an angle to each other.
From the bars and boards collect the roof
-
Then the roofing material is laid. The ridge (the joint at the top) is covered with a metal corner or a piece of rubber.
The roof of the well can be made of wood
- Nail the crossbar between the vertical posts for hanging decorative planters.
The roof of the well is sometimes covered with rubber from car tires.
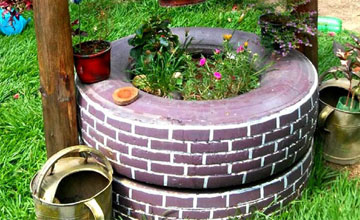
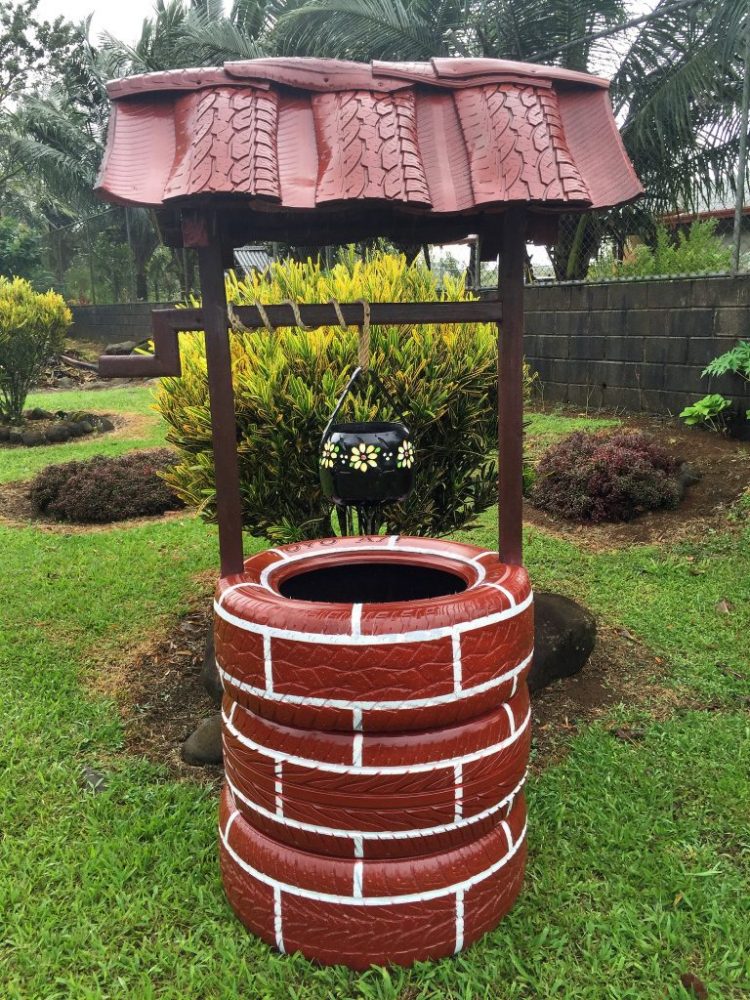
The resulting design is not particularly decorative. In order for the well to harmoniously fit into the surrounding landscape, it needs to be properly decorated. Imitation of natural materials looks best (stone or brickwork, wooden beams, etc.). You can use various ornaments (eclecticism, turtle shell, reptile skin, etc.).
Looks best imitation under brick or stone
The easiest option is coloring. Enamel based on bitumen or acrylic is suitable for this. You can use ordinary oil paint, but it will not last long. This coverage will need to be renewed annually. Experienced experts advise special rubber paint, which has greater elasticity. The ink layer expands and contracts with temperature changes along with the rubber base.
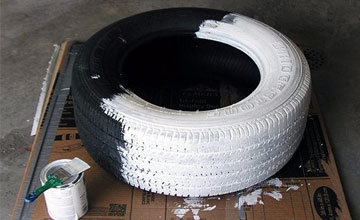
The easiest way to just paint the tires
Painting instructions:
- First, the tires must be thoroughly washed using soapy detergents.
- Then they are dried.
- Degrease using chemicals (solvent, alcohol, acetone, etc.). Carefully remove all oil and grease stains (if they are not washed off with soapy water).
- Apply the base coat of paint. It is more convenient to use a spray gun or spray paint.
- Dry for 3-4 days.
- Then a drawing is applied with a thin brush or through a stencil.
Do-it-yourself septic tank from tires make a well from wheels and tires with your own hands, sewage is different from a cesspool
If things are not going very well with finances, folk craftsmen help out, who came up with the idea of making a septic tank from tires with their own hands. Often, the problem of many summer residents, as well as those who are just building their house, is the lack of sewerage on the site. A tire septic tank is not just a cesspool, but also an excellent analogue of a city sewer. The main good news is that you can do everything yourself, without resorting to large cash costs and calling specialists with large construction equipment.
-
- Tire septic tank: DIY
- Do-it-yourself tire well
- Sewerage from tires
- How is a septic tank different from a cesspool
- How to make a septic tank from tires with your own hands (video)
Do-it-yourself septic tank from tires
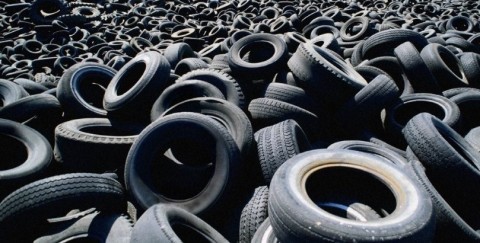
Due to the unhealthy ecology in the world, there is a need to take care of the disposal of waste that will outlive us. This also applies to old car tires. Citizens in recent years are increasingly buying houses away from civilization in order to enjoy nature. But life in a private house makes its own adjustments. Not every private house has sewerage, but it makes life much easier.
You can build an effective septic tank from tires with your own hands, which, with the right approach to business, will be no worse than more expensive analogues
But you can use old tires, because:
- They can be found on the street, and this saves you money.
- They are durable and will last you for many years.
- Tires will not be crushed when the soil swells.
- Each tire has correctly calculated shapes and sizes, which will allow you to quickly make the necessary calculations for their number.
- To create a septic tank from tires, you do not have to use large equipment.
A septic tank is created for the accumulation of human waste with their subsequent pumping. To make a septic tank out of tires, you need to know the volume of drains. According to the norms of SNiP, the volume of the septic tank should be three times the volume of wastewater discharged per day.
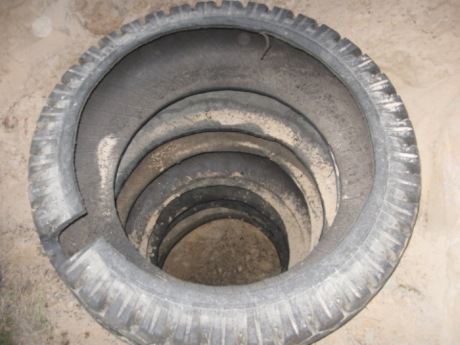
Drainage well homemade tire receiver
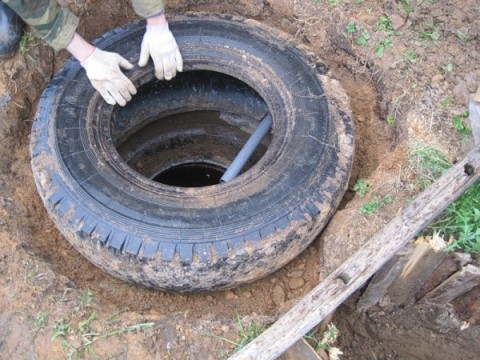
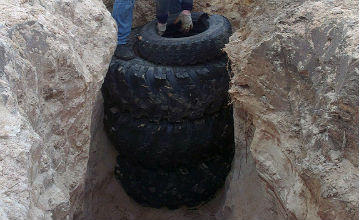
To assemble a receiving well for drainage with your own hands, you will need old tires of large diameter. The best option is durable tractor or truck tires. The number of products is calculated according to the height of the planned reservoir, taking into account the height of the drainage cushion. Wells equipped with a cast iron cover are installed as point drainage systems in places of constant accumulation of water.
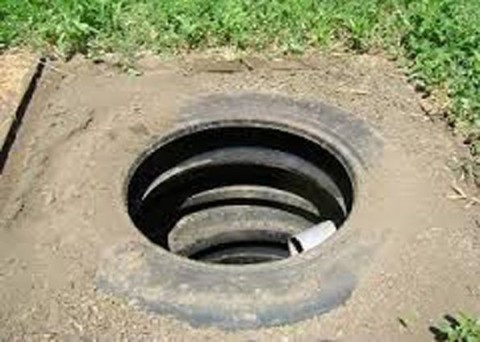
Tires: sealed material for well walls
The recess should be in a natural depression or at the lowest point on the edge of the site.
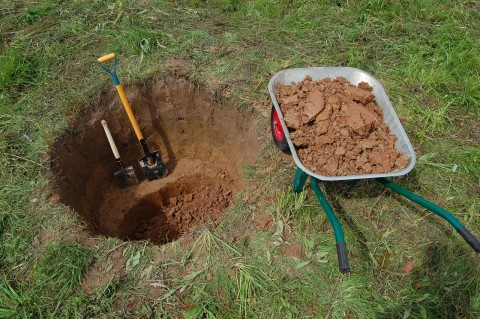
Digging a pit for a receiver
Pit dimensions:
The depth is determined based on the characteristics of the soil and the water level in it. It is desirable that the discharge occurs to a depth of 1.5 - 2 m. With such a deepening, there is no risk of liquid freezing.
The diameter of the pit is equal to the diameter of the tire with the addition of up to 30 cm around the circumference for insulation and backfilling.
The center line entry must be in the upper third of the receiver.
The excavated recess must be checked for the verticality of the walls: the tires must be installed strictly vertically on top of each other. The bottom must be level.
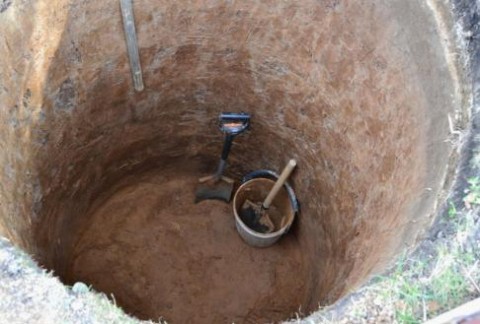
Sand cushion at the bottom
Sand is poured onto the compacted soil and compacted. The thickness of the sandy layer is 15 - 20 cm. Above - a layer of coarse gravel. So that the bedding does not erode, it is advisable to install several large stones, and crushed stone on top. Instead of crushed stone, laying river pebbles or stone is allowed.
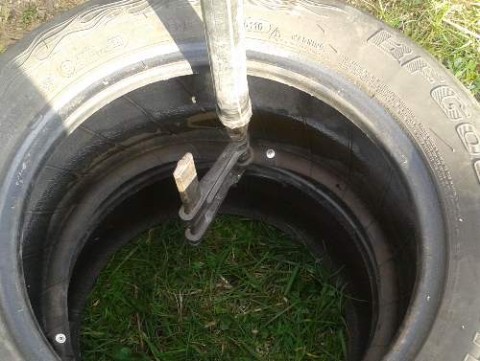
The first tire is laid on the prepared base. Select a connection method. For hermetic fixation, cement mortar is used.
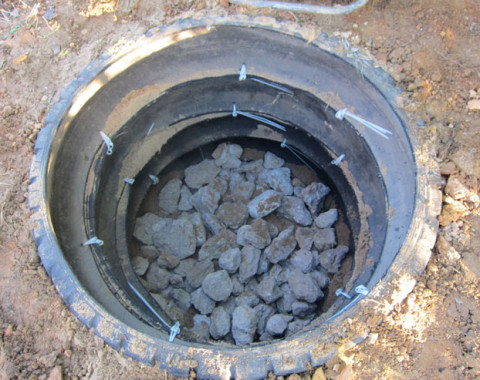
Connecting tires with plastic clamps
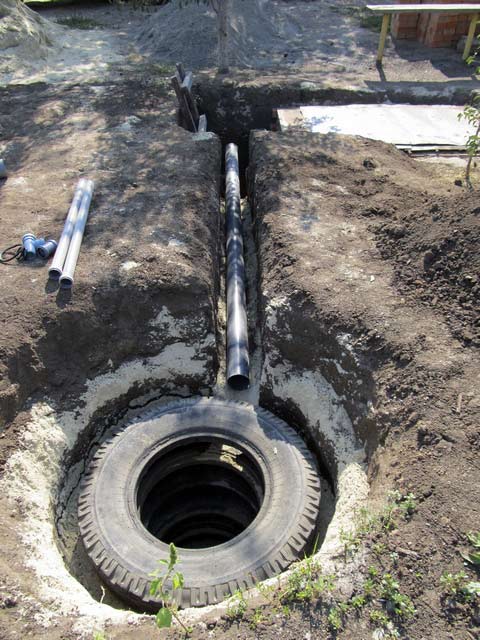
By installing tires in turn, they bring the height to the planned level. In the lower part, on the first tire, narrow rectangular slots can be made in advance to drain water to the bedding.
Inset at the top of the well
In the upper ring, a hole is made for the pipe from the center line. Around the walls make a sprinkling of rubble, pieces of foam. Clay is compacted along the outer diameter or a solution is poured.
Surface receiver
This is how not only receiving drainage tanks are equipped, but also point receivers in places where there is no natural outflow of water, and the drainage line is not planned. When installing a point drainage drain on the top tire, it is necessary to install a protective grate: buy ready-made or weld from metal rods, fittings.

Point receiver with cover
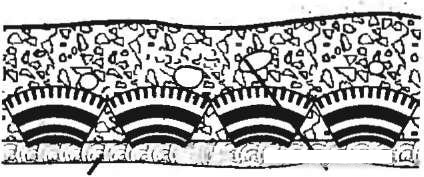
From tires, you can make not only linear drainage or a receiver, but also equip a full-fledged filtration field. This method of drainage is arranged in areas where the elevated level of groundwater and the complex composition of the rock make it impossible to organize a discharge into the well.
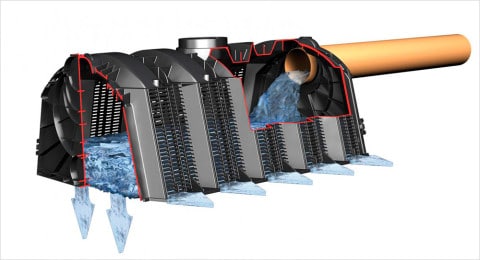
Tunnel scheme: ready-made plastic structures can be replaced with cut tires
The field is a platform, deepened by half a meter, with crushed stone backfill. Instead of wells, there is a pipe of halves of tires stacked close to each other in the form of a tunnel. The water coming from the line seeps through the crushed stone backfill into the ground.
A visual instruction on how to drain a difficult area using the simplest tire drainage.
The organization of home-made drainage clips and wells is a temporary solution to the problem. In this way, you can remove moisture from the garden or from the summer cottage. If construction is planned, and the soil is oversaturated with moisture, the site is with difficult terrain, a serious drainage system will need to be designed. Integrated protection consists of several separate networks: near-wall, deep, reservoir drainage, and, of course, a surface drainage system. Drainage construction is planned before work begins and installation is carried out during construction.
Drainage system at their summer cottage rules of organization
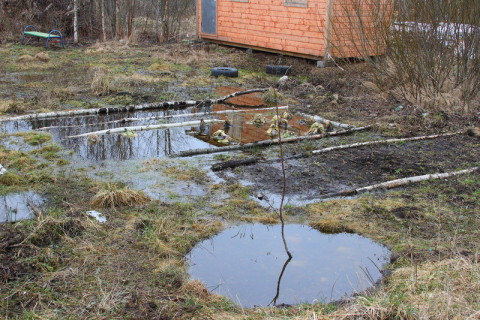
Need drainage: instead of beds - a lake
The easiest way to remove excess moisture is to make several drainage branches from improvised materials with an output to the receiver. For work, it is better to choose a period when the amount of precipitation and the level of groundwater are at a minimum: in summer or early autumn. And it is necessary to plan a drainage layout during the season of heavy rains or snowmelt - in the spring.
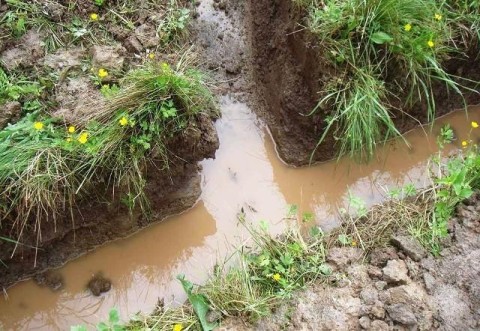
Wrong timing: work stopped due to rain
In addition to draining the soil, well-placed drainage from old tires can solve several problems:
Stop the process of erosion of the top fertile soil layer.
Reduce the level of moisture in the deep layers of the soil.
Divert rainwater from garden beds.
Prevent diseases of trees, ornamental plants.
In order for the system to work properly, it is necessary to correctly select the trajectories of drainage lines, determine the depth, and place of the drain. The simplest method is observation
During a rainstorm, pay attention to the direction of the streams - the natural lines of water flow will help determine the correct lines for drainage channels

A simple diagram of the distribution of country drainage
When planning the system, the relief of the site is taken into account: the branches are arranged in such a way that the beginning of the trench is at the top point, and the drain is at the lowest point. In addition to linear branches, it makes sense to equip point water inlets. It is rational to install collection points in small natural depressions where water stagnates - the arrangement of point drainage from tires will take less time.
To correctly determine the depth, you need a simple analysis of the condition of the soil. If the groundwater level is constantly high, and the rock is heavy, with poor permeability, you will have to dig deep trenches:
Up to 1 meter deep in the fruit tree planting area.
Up to 70 cm - in places where beds are arranged.
Up to 50 cm - along the perimeter of the site, along the paths.
Channels dug to a depth of more than half a meter are considered deep. Trenches for adjusting the groundwater level are equipped with a drainage clip: a perforated pipe in crushed stone sprinkling and a geotextile wrapper. You can replace purchased materials with improvised means:

Instead of finished pipes - tires
Old tires of different diameters will serve as a drainage pipe.
Instead of crushed stone, broken old bricks, pebbles, expanded clay, pieces of foam sheets are used.
It is advisable not to save on geotextiles: the canvas will protect the drainage from silting and destruction by dense clay.
Surface channels, up to 50 cm deep, are left open, or equipped with a clip in the same way as deep trenches. Instead of solid wheels, pieces (segments) of tires are installed as a pipe. Backfill materials that are needed for drainage are sand and gravel.
The moisture flowing down the drainage channels must be diverted from the drained area and a drain point should be organized. If there is a pond nearby, a roadside ditch, then the water is discharged without the construction of a drainage well. Drainage receivers are equipped on the site itself - containers without a bottom, installed on a gravel or crushed stone pillow. Water from the channels after draining into the well is additionally cleaned by a backfill filter and discharged into the ground.
There are several options for arranging the walls of a drainage well:
Finished plastic or concrete products.
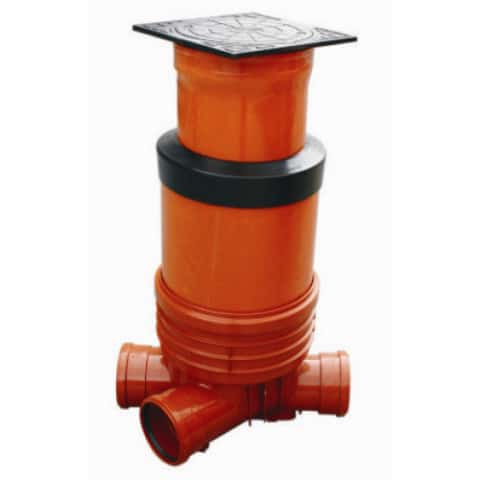
Factory plastic tank
Homemade drainage wells. Assembly materials - tires or old plastic barrels, bricks.
Homemade drainage receiver
On oversaturated rocks, one drainage reservoir is not enough. To discharge large volumes of water, especially if there is a septic tank on the site, a drainage field is equipped: a platform with a drainage tunnel for draining. Tunnels are made of plastic in the form of hemispherical channels, resembling a pipe cut along the length. The channel itself can also be made from large diameter tires.
We make a network of channels for draining the site from tires
How to make drainage trenches from tires? Prepare tires: you will need old wheels of different diameters from 13-inch. In addition to tires, you will have to buy sand for backfilling and geotextiles. For a surface ditch, crushed stone is additionally needed. The fraction of backfill materials is large or medium. Fine sand and crushed stone are not suitable for drainage: small particles clog the openings of the canvas.
Tires: fit any size
Auxiliary tools and materials:
Connecting elements: plastic clamps, self-tapping screws.
Pieces of dense rubber for sealing joints.
Drill - for quickly punching holes in rubber.
Shovels, pick, wheelbarrow, level, film, pegs and construction tape (fishing line) - for earthworks.
To make drainage from tires with your own hands, you first need to mark the path, length, plan the depth and width of the branches. Choose a line for arranging the central channel. To the sides of the main line, branches are marked: side branches at an angle to the central one.
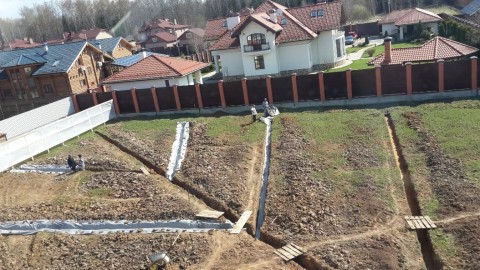
Branch layout
At the upper points of the bends, the width of the ditches should correspond to the diameter of the tire with a margin of up to 20 cm. Depth - the diameter of the tire plus up to 30 cm for backfilling.

line dug out
Considering that larger diameter tires will be used as you approach the connection point with the center line, the depth and width of the trench is gradually increased towards the main line. In order for the water to drain quickly, a slope is formed: for side branches, a difference of 1–2 cm per meter is sufficient.
In the same order, they dig a central trench. The height difference in the main line must be greater than in the side branches. The optimal slope of the bottom is up to 3 cm per meter.
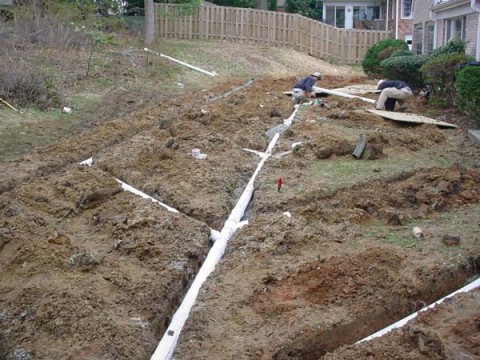
Slope along the natural slope of the site
The bottom of the dug channels is leveled, the observance of the slope is checked. A sand cushion up to 15 cm thick is made from sand.
Geotextiles are laid on the sand cushion. Leave free edges, taking into account the height of the tires in the drainage. For additional filtration, a layer of crushed stone up to 15 cm high can be poured onto the canvas.
Finished drainage sleeve
Assembling a pipe from tires:
- Tires are stacked on top of each other. Start the connection with wheels of small diameter.
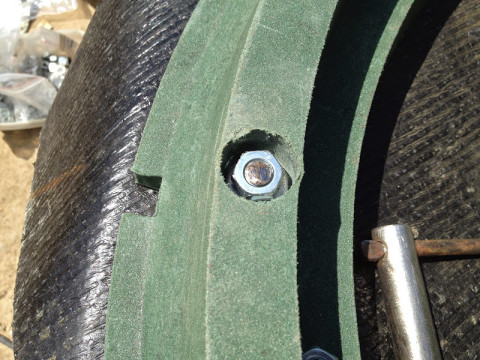
Connection with bolts and nuts
- The side walls of the two tires are connected with clamps through previously drilled holes. Self-tapping screws, or nuts with bolts, are used as fasteners. With this method of connection, gaskets made of a dense film or rubber are placed under the holes: the old rubber crumbles, the thread breaks.
Sidewall connection
- The pipe is assembled vertically, after installing the last tire, the finished drainage pipe is laid in a trench. Due to the large weight, several segments are formed, which are then connected directly in the channel.
To strengthen the structure from above and firmly connect the segments, metal strips with drilled holes are used. Self-tapping screws attach the strip to adjacent tires.
Connection of segments in the channel
The finished pipe is wrapped in geotextile. The edges of the canvas in several places are connected with electrical tape, staples.
Laying a pipe in a ditch
A layer of sand is poured over the finished clip. Top - backfilling with soil.It is advisable to make a ledge above the finished channel of sand and soil to a height of up to 10 cm: over time, the sand will sink, and the ledge will be level with the ground surface.
Surface drainage outlets are also made from tires. Tires cut into segments are used to improve outflow.
Scheme of installation of surface drainage
The arrangement of the surface line begins with the laying of geotextiles and the backfilling of crushed stone. The height of the crushed stone cushion is up to 25 cm. Parts of the tire are laid on the backfill with an internal cavity to the bottom of the trench. Holes expanding downwards will perform the function of perforation in the factory pipe: through the cracks, water freely seeps into the crushed stone.
Another layer of rubble is poured on top. Wrap and fix the edges of the canvas with an overlap. Ready clip fall asleep.
Choosing where to dig a hole
The well accumulates water not only from the lower layers, but also from shallow horizons. Water enters the soil from the surface, passing through natural filtration. Before digging, think about whether there are harmful industries nearby? Chemicals and waste products get into the water and you should not drink it. You can pre-take a water sample and conduct research in the sanitary-epidemiological station. Price for analysis from 700 rubles.
Next, we turn to the local geological exploration station. Maps are stored there, which show the features of the geodesy of your area or city. Finding water on the site will be easier.
The second important point is that you need to position the structure so that there is at least 20 m to the restroom and the place where animals are kept. You can find a good place on the site using the grandfather method. Take willow twigs and cross them in the form of a frame - a triangle. Walk around the site, the willow will show where the best place is.
How to choose a seat
 The wastewater tank should not be located near the source of water supply: a well, a well, a deep pump.
The infection from it will seep into the groundwater and infect the drinking source with pathogenic bacteria.
Also, you can not equip it in the immediate vicinity of the foundation of the house, bath, barn.
The soil will settle, the foundation will sink and lead to the destruction of the structure.
Too far from the house to have a pit is also not worth it. This will lead to a significant increase in the cost of the entire system. Along the entire length of the sewer pipe, it will be necessary to install at least two manholes with hatches. Laying too long a pipeline from the house to the septic tank is fraught with blockages.
The optimal length of the drain pipe should be considered 5-10 meters. In this case, the slope should be 0.5 meters per 10 meters of the length of the pipeline.
The diameter of the pipe, preferably made of plastic, must be at least 50 cm.
When connecting a drain pipe to a house sewer, it should not be laid under the foundation. It is best to punch a special niche in the upper part of the foundation with the help of a crowbar, a perforator, a jackhammer, into which to insert the pipeline, filling the gaps with cement mortar.
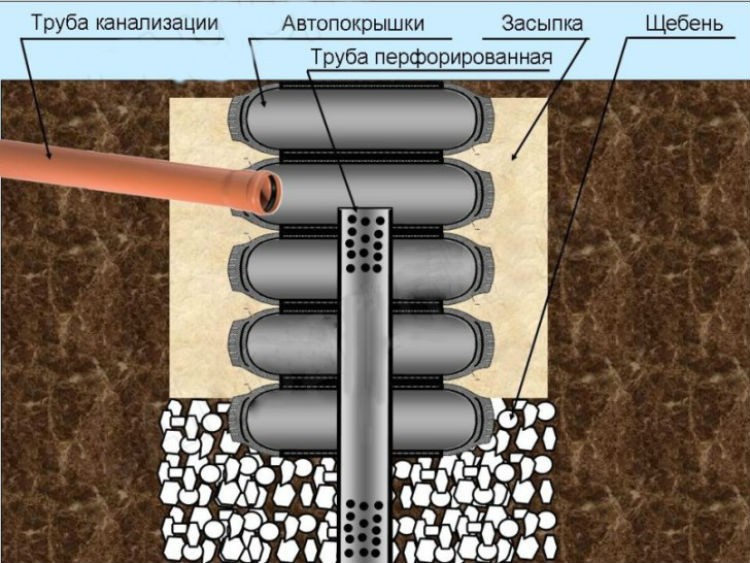
There are three options for the design of the septic tank:
- with a filtration system;
- with a sump and absorption well;
- with filter system and piping for drainage.
We choose a budget option - with a filter system.
Shaft and shed construction
Install the first tire on the ground, measure and fix the places for the support pegs. A small hole is dug in the marked place to install the posts. For additional fixation of the tires, the base for the pegs can be reinforced with bricks or concreted.
After making sure that the first tire lies tightly in the pit, they lay 2-3 from above to the ground level so that the support pegs fix the straightness of the structure. For the strength of the building, it is recommended to glue the tires together with a moisture-resistant glue for rubber. Then the remaining distance of the mine on the sides of the tires is covered with soil, stones or expanded clay.
Usually 2-3 tires are laid on top above ground level.The amount depends on the design of the well and the size of the canopy. Installing more than three tires above the ground is not recommended.
Level the ground and remove any grass or rocks around the tires. Create a support as a guide with bricks/stones around the well. This will strengthen the structure, because the building will store water.
The last step is the construction of the roof / canopy. In order for the well to have an attractive appearance, it is first necessary to cut the driven columns in height. It is better to make a canopy from special roofing material or wooden boards, since the rubber material of the tires tends to bend and become flexible at high temperatures.
Stages of roof construction:
- installation of supports for a canopy. The design is created like the roof of a drinking well. Vertical posts hold the roof frame;
- flooring of roofing material or boards, slate, metal tiles, roofing material.
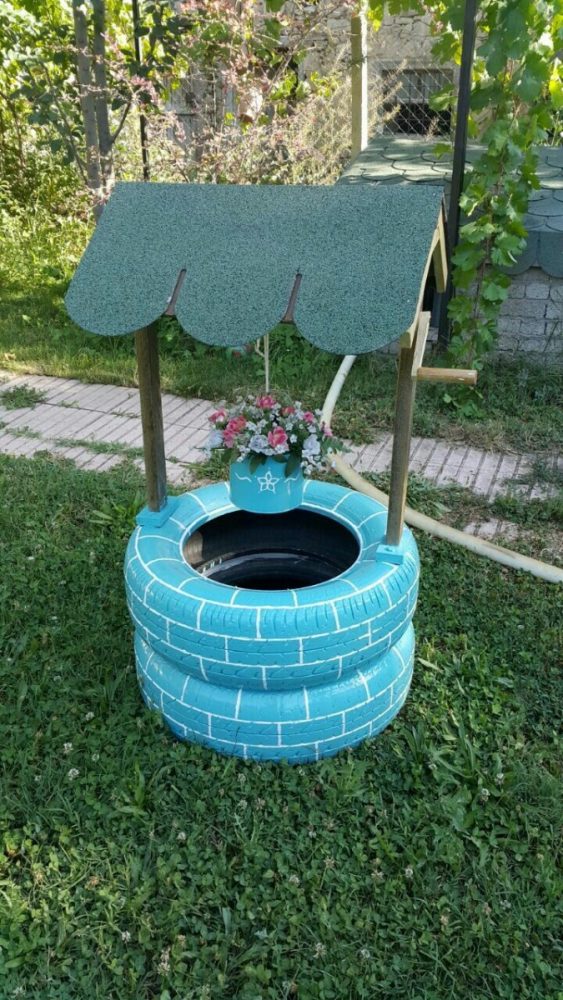
The canopy model can be of any shape: one pitched or two-pitched. For the roof, it is necessary to think over the fastening of the bucket and the mechanism for raising it. On the gate you can hang a bucket in which to plant flowers.
If you decide to abandon the look of a classic well, then a crane well will become an interesting decor. To do this, you need to attach a bucket to a pole and secure it against the walls. And so that the well does not become clogged, make or find a simple removable cover.
Step-by-step instructions for making crafts from old tires
In order not to suffer with painting after the construction of the object, it is better to do it at the very beginning. Tires must be clean and dry.
You need to choose a paint and evenly apply it to the entire outer surface of the wheels. After drying all the tires, apply a pattern or pattern (if it is implied) with a thin brush.
In each of the four tires, cut diagonally with a sharp knife or a hacksaw semicircular slots to insert two pillars that will hold the roof.
Next, you need to fold the wheels one on top of the other so that the cut out cells are aligned.
After that, insert wooden posts into the slots. First, you should dig holes in the ground and install posts in them, then fill them with earth and tamp the soil.
At the top, both pillars should be at the same horizontal level so that the roof is smooth and beautiful.
The poles can be set so that they only touch the outer surface of the wheels.
DIY decorative well ideas
A decorative well is easy to purchase in specialized stores ready-made. But it's still more interesting to do it yourself. You can come up with the design of the well yourself, but you can use ready-made models. To implement the idea, the following most interesting models are offered:
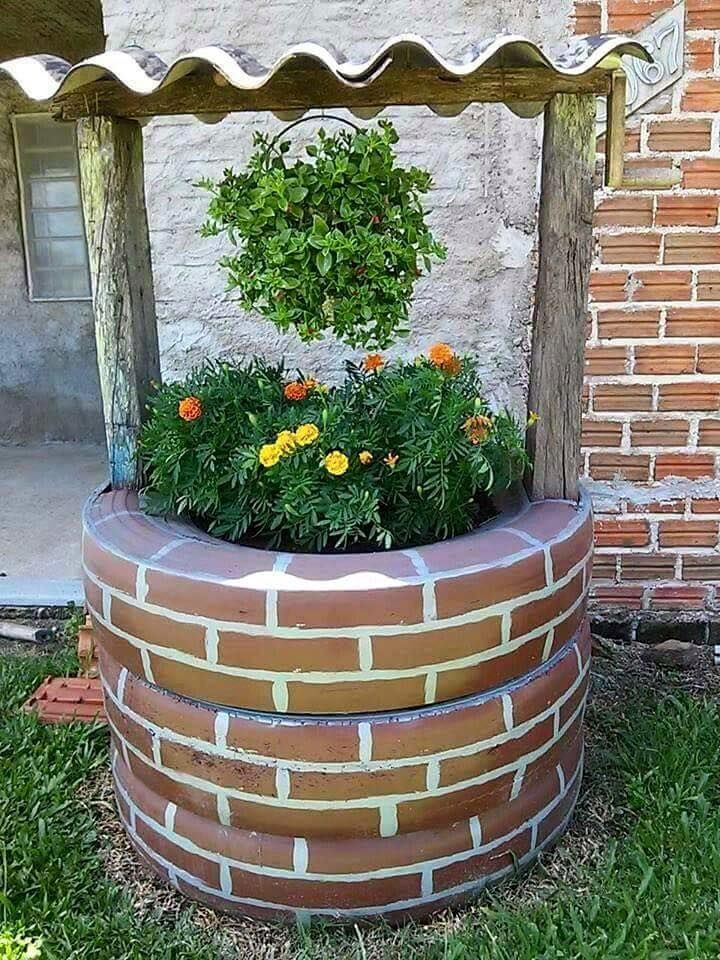
- A flowerbed-well is the same imitation of a log house, only in the “house” itself a planter or some other container for growing flowers is installed.
- A house made of a concrete ring and a tile roof - it is easy and simple to build the presented structure on your own. A concrete ring is used as the base for the well, and a characteristic roof is attached to the top, pre-decorated with tiles.
- A log house is a standard and more common decor option. You can decorate the log house as you wish. Often, a “foundation” is laid out under a mini-log house with a stone or brick lining. Mini-logs are river boulders or strong branches, cylindrical stakes can be used.
- Stylization as a wooden bucket - the structure is built from old boards, a small "house" of the same material is installed on top. Interesting similar models, painted white. Similarly, a font is built, covered with metal clamps.
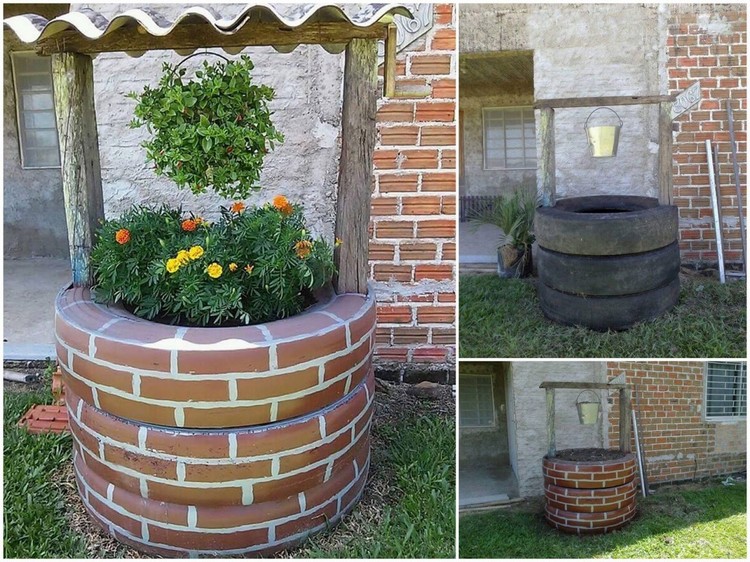
- An extensive flower bed is a laying of bricks in a certain shape (circle or hexagon) and a house installed on top. Flowers are planted in a brick mold.You can make a multi-tiered flower bed, which also looks attractive and noble.
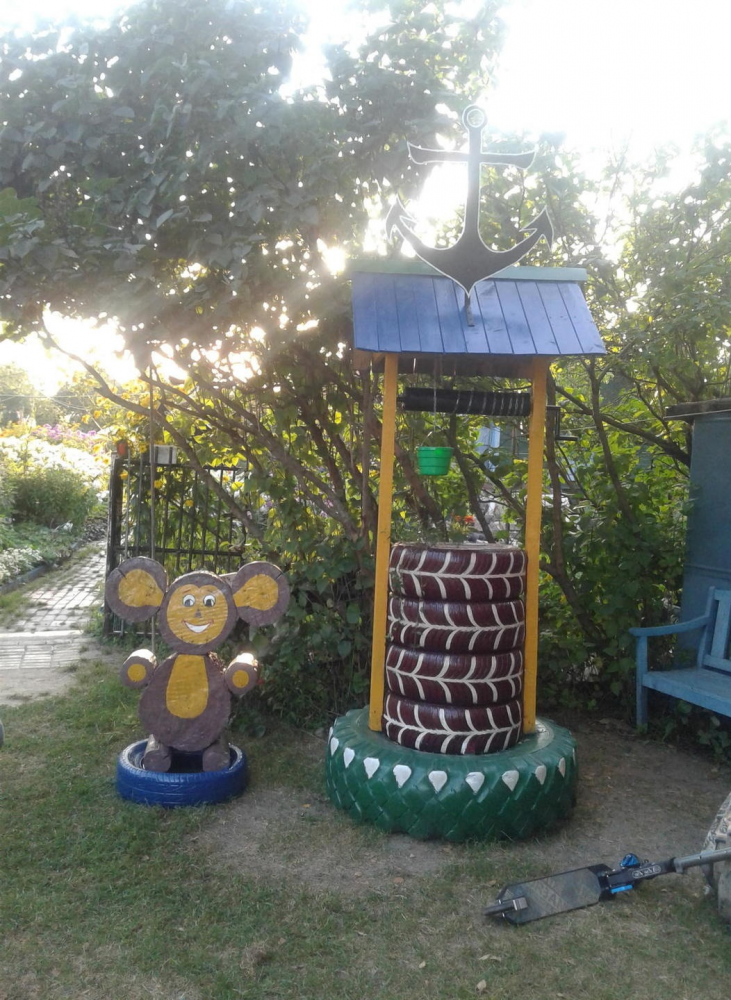
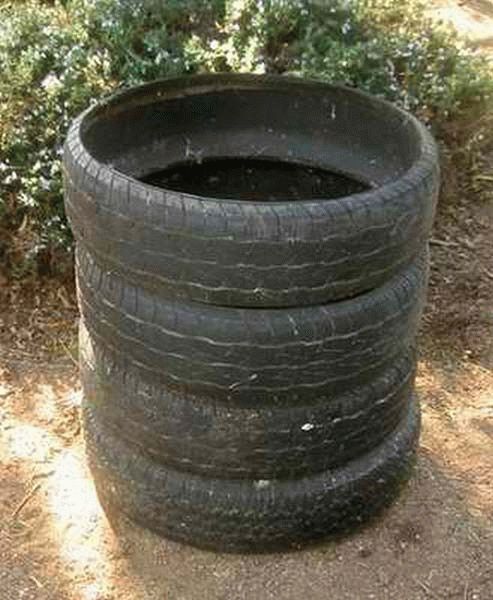
- Well of tires - tires are laid out on top of each other, and a small wooden house is also installed on top. The advantage of tires is that they retain their original appearance for a long time. True, it is better to paint them - you can imitate the layout of bricks or masonry.
Beautiful wells are obtained with various additional elements. For example, a decorative structure in the form of a log house is decorated with a fence installed around or only in a semicircle.
A prepared wooden bucket that hangs on a chain on a shaft looks great. In a bucket, as a rule, a vessel with earth and planted flowers is installed.
In this case, be sure to remember the necessary regular watering of flowers.