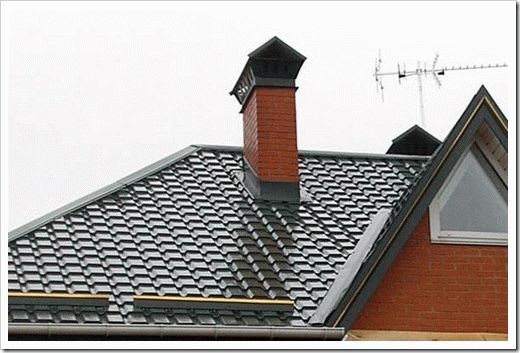
Passage through the roof of a round pipe
The node of the passage through the roof of round pipes can be either metal or soft - made of rubber or silicone. Metal penetrations of the roof are made of galvanized iron, sometimes a protective coating is applied to them, similar in color and composition to the metal tile coating.
Often, metal tile manufacturers offer special penetrations: this is the same sheet of roofing material to which an elastic rubber cap is attached, which serves as an excellent insulator.
For other roofing materials, flexible penetrations can be used as a roof penetration. There are many of them on the market today. Different colors, compositions, at different angles of the roof, straight penetrations, with different types of fastening (for self-tapping screws, with adhesive, etc.).
Of all flexible penetrations Master Flash (Master Flash) has the best recommendations. It is quite easy to distinguish it: in addition to the applied company name, there are additional corrugated grooves on the back of the roof penetration, which increase the degree of adhesion to any roofing material. From the outside, the base along the edge has a metallized coating, with which it is easy to achieve any desired relief.
Roof penetrations for round pipes
To install a flexible penetration, cut off part of the outer cap - the diameter of the resulting hole must be less than the diameter of the pipe. The penetration is pulled onto the pipe with force. To reduce the resistance, you can smear the surface of the pipe with soapy water. After the penetration is tensioned, the lower flange is given the desired configuration. On the back side, it is smeared with sealant, then pressed against the roof and fixed with self-tapping screws. This method of sealing a round pipe is not very laborious, but reliable enough.
Silicone and rubber penetrations are used at pipe temperatures up to 100 ° C. If the temperature of the chimney is higher, you will either have to make an additional layer of insulation between the penetration and the pipe, or, more likely, use a metal skirt and a glass. How they look and how to fix them is shown in the following video. Everything is done there not quite correctly, then the principle of installation is clear.
Fighting joint leaks
To create the maximum possible tightness of the abutment of the roofing material to the pipe at the points of contact, using the lower strips, an internal apron is made.
Installation of a chimney passage through the roof.
To make an inner apron, you need the following tools:
- marker;
- long metal ruler;
- grinder with a disc 2 mm thick;
- pliers;
- hammer.
In order to do this, the bar is applied to the walls of the chimney pipe, making marks on the top of the bar. The next step along the previously marked line is a strobe.
Installation of the inner apron should start from the bottom wall. The edge of the apron is wound into a strobe, after which it is installed on the remaining walls. The overlap should be 15 cm. Then the edge of the film inserted into the strobe is sealed. Having cut the lower strips, they are installed, and then fixed with self-tapping screws.
After installing the bottom apron, you can proceed to install the tie, which is a sheet of waterproofing material wound under the elements of the inner apron from below. The main function of a tie is to drain water.
After finishing work on the device of a tie and an apron that protect the joints, the roofing material is laid. Then the outer apron is mounted. To do this, use the upper junction bars.
The installation of the apron from the outside is carried out similarly to the device of the apron inside.The difference is the absence of a strobe and the upper edge is fixed directly to the chimney wall.
Important: today the building materials market offers products that are designed specifically for chimneys with a circular cross section. They are roof passages, which consist of a base (flat steel sheet) and an apron cap.
Inside the passage there is a round chimney.
The final stage of installation
The device of the unit is completed with the following steps:
- Remove the protective film from the sandwich pipes. It is highly undesirable to release parts from polyethylene earlier - they can be damaged during transportation or installation.
- Seal the joints properly. Ideally, the composition should withstand temperatures within 1000 degrees.
What areas need to be coated with sealant:
- seams at the junctions of the inner sandwich pipes - a plane located on the outer part from above;
- joints of external pipes - the entire area of \u200b\u200bthe outer surface;
- junctions of sandwich pipes with other components of the system - the entire area or diameter, if we are talking about round pipes.
Do not rush to immediately operate the new chimney, first check the correct operation of it:
- Turn on the heating device (boiler, stove or fireplace) at low power.
- Now inspect the device to see if it leaks smoke in the wrong places.
- Make sure that there is no excessive heating of the components of the complete system, especially in the area of the transition through the wall or roof.
What is the advantage of a sandwich chimney? It looks aesthetically appealing and provides a modern style to the fireplace, even a beginner can assemble it. And also, with proper installation, it will last a long time and will delight the owners with uninterrupted operation.
Passing a pipe through a chimney without a factory outlet
It is possible to remove the chimney without a passage device. In this case, the edges of the hole in the ceiling are also sealed with a fire-resistant heat insulator, and metal strips are stuffed on top of it. A protective plate made of non-combustible material is put on the sandwich coming from the oven, in which a hole of a suitable diameter is cut, and holes for fasteners are drilled along the edges. Traditionally, this is a sheet of metal. Next, the sandwich is passed into the hole in the ceiling, fixed there with the help of any non-combustible guides. For example, you can use drywall profiles or something similar. The main thing is to securely fix the pipe and observe the basic fire safety rule: there must be a distance of at least 36 cm from the edge of the pipe to combustible material.
You can make a passage through the ceiling with your own hands
Important! When installing and fixing the chimney, keep in mind that the pipe changes its dimensions due to thermal expansion. It must be fixed so that it can move relative to the roof
Then from below (from the ceiling) the pipe is hemmed with non-combustible material. From the side of the attic or the second floor, the voids formed in the cutting are filled with a heat insulator. The requirements for it are the same: tolerance to high temperatures. Expanded clay may be the most budgetary. Actually, this is the end of the chimney pipe through the ceiling.
You can make a passage through the ceiling with your own hands
Chimney passage through a flat roof
When installing a chimney on a flat roof, it is important to remember that its height above the roof surface should be 500 mm in accordance with SNiP standards. A round pipe, a rectangular chimney box or a brick chimney can be led through a concrete floor slab
The round pipe passage assembly will be considered separately, and for other cases, two basic installation principles are used.
Features of the arrangement of the passage through the pitched roof
How to fix the chimney on the roof? On the chimney, on the inside of the roof, it is required to mount a flange that is rigid enough to take the loads from the crate - the chimney outlet forces the dismantling of some of the girders, and without installing the flange, the structure will remain in limbo.
The flange is usually a steel sheet with stiffeners welded to it. The thickness of the sheet should be at least 2-3 mm. A non-combustible heat insulator - basalt cardboard - should be laid on the flange. This will prevent the transfer of heat from the chimney to the crate. If the design of the chimney is not reliable enough to take on part of the load on the roof, a truss structure or additional racks are mounted around the perimeter of the hole so that the load is transferred to the attic floor.
Around the pipe, all layers of the roof must be cut to a gap corresponding to the standards specified in SNiP (depending on the type of pipe and the degree of its heating). The resulting gap must be filled with a non-combustible heat insulator - basalt or glass wool, basalt cardboard.
The principle of sealing the junction of the roofing material to the chimney depends on factors such as:
To prevent damage to the chimney through the pitched roof when snow melts, it is recommended to install snow retainers higher up the slope. With a chimney width (across the slope) of more than 800 mm, a special structure should be mounted on the slope above it to drain the water flow.
Conclusion through the roof of a pipe with a circular cross section
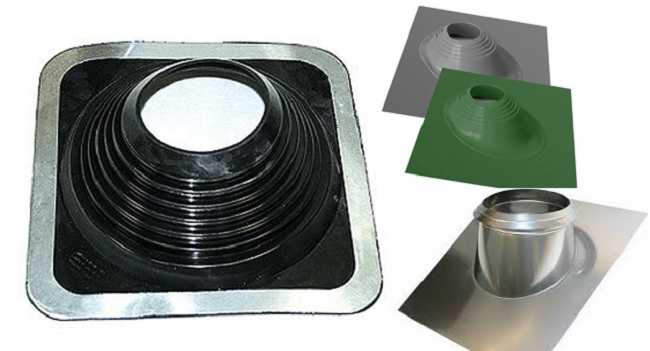
It is very difficult to perform waterproofing of the junction of the roof to the round pipe without the use of special roof penetrations. The construction market offers a wide selection of pipe assemblies that differ in diameter and material of manufacture.
A universal option is an aluminum flange equipped with a silicone or rubber corrugation. Several standard sizes of these elements are produced, thanks to which it is possible to choose a penetration for a chimney pipe of any popular diameter. The working surface of the flange is covered with a material similar to the material of the corrugation, and is provided with grooves for filling with sealant. The top of the corrugation cone is cut to the required diameter, after which the penetration must be pulled onto the chimney. The flange must be smeared with sealant and attached to the roof with self-tapping screws that are included in the kit. If the roofing is not made of metal, the flange is attached with dowels or long self-tapping screws directly to the crate.
For roofs with different slope slopes, penetrations are offered in which the corrugation is located at different angles to the flange. You can purchase a detachable design, which is used if it is not possible to pull the corrugation onto the pipe due to the presence of protruding parts or the high height of the mounted chimney. Such a penetration is equipped with clamps, thanks to which the corrugation is tightly pressed around the pipe.
Mounting the chimney on the roof can be done using penetrations, in which a hinged segment is used instead of a corrugation. This is a universal option for roofs with any slope angle: the surfaces of the connecting elements are spherical in shape and can be fixed relative to each other at any angle.
It is not uncommon for manufacturers of roofing materials to offer prefabricated chimney penetrations with a flange preformed to match the appropriate roof covering. Such a penetration is attached to the roof lathing with the necessary overlap. To match the diameters, the apron cone is cut off. Penetrations from roofing manufacturers have several standard angles of inclination. To seal the joint, a second conical apron is mounted overlapping with the first.
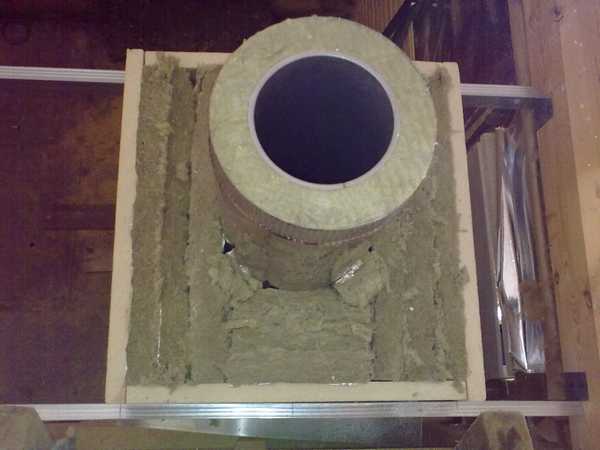
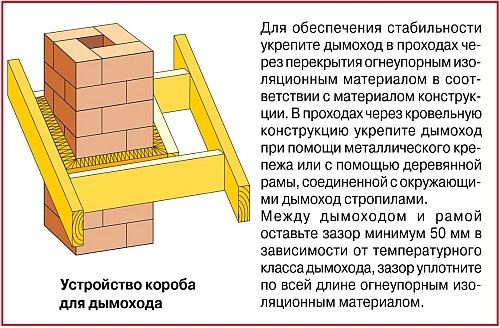
Chimney box
To properly bring the chimney through the roofing pie, you should equip your own truss system around the pipe.It must be separated from the chimney at a distance specified in SNiP. The design consists of lateral rafter legs and horizontal transverse beams from below and above, which are made of a bar of the same section as the rafters.
To insulate the structure, it is necessary to use non-combustible heat-insulating materials, such as glass wool or stone wool - it is stuffed between the pipe and the wooden structural elements.
When passing the chimney through the roofing pie of the operated roof, the vapor and waterproofing is cut crosswise, like an envelope, the edges should be tucked up and attached with nails or brackets to the rafter system.
Waterproofing the chimney on the roof requires special attention. When installing a duct for a pitched roof chimney, the vapor barrier and waterproofing membrane are fastened as follows: the edges of the films are folded over and tightly fixed with staples to the duct, in addition, the attachment points should be additionally sealed with a sealing tape or some other adhesive material. From the outside, protective elements are mounted on top of the roofing that do not allow moisture to pass into the joints of the box with the roofing pie.
It is important to consider that the installation of the box can adversely affect the air exchange in the under-roof space. To avoid deterioration of moisture removal, you can install additional ventilation systems, for example, ventilation tiles, roof aeration grilles, etc.
 If the width of the chimney exceeds 800 mm (perpendicular to the rafters, according to the outer dimension), then a slope must be performed higher up the slope.
Razuklonka is a small private roof that drains water and snow from the pipe. Its installation is quite complicated, since all layers of insulation are part of the ramp, in addition, it should be qualitatively combined with the main roof using curly elements. To avoid mounting a slope, it is worth making a smaller pipe.
Using ready-made kits
Standard modular chimneys ("sandwich") can greatly simplify the process of passing the pipe through the roof. A wide range of materials are used for the manufacture of structures, including :
The choice of a modular chimney depends on the fuel used, as they differ significantly in their technical characteristics. The advantage of such systems is the ability to install the pipe at a non-right angle. This is especially true when installing a chimney in an existing building and allows you to choose almost any place for installing a fireplace, stove or automatic boiler.
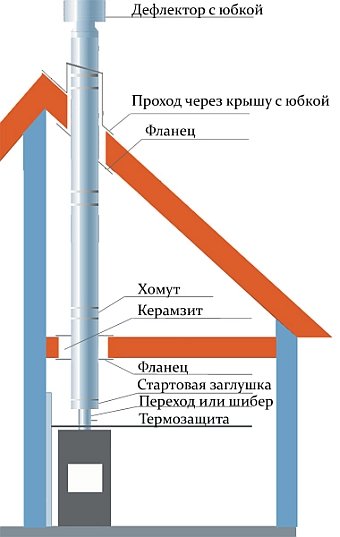
A modular chimney passes directly through the roof, consisting of such parts as :
- deflector (a device that enhances draft in the chimney by using a stream of hot air);
- clamp for stretch marks (allows you to additionally fix a high pipe on the roof);
- skirt (an element that protects the exit point of the pipe through the roof);
- roof passage (element with a fixed apron, which is directly mounted in the roofing pie).
Modular chimneys have an attractive appearance.
Steel chimneys can be installed if the temperature of the exhaust gases is not more than 500 °C. Prohibited for installation on coal-fired stoves. For asbestos-cement pipes, this parameter is 300 degrees; for coal-fired ovens, such chimneys are also unsuitable.
If the chimney is made of concrete or brick, or a prefabricated passage is installed, the structure should not be rigidly attached to the roof system. Under the influence of external factors, the roof may be deformed, and these forces will be transferred to the chimney, which may lead to its destruction. When the chimney exits through the roof, all connections between the chimney and the roof are made using flexible elements.
Master flash
Such penetration can be applied to any type of roofing - slate, shingles, metal roofing, bitumen pouring or tiles.
Ideal for sealing chimneys in stoves and fireplaces.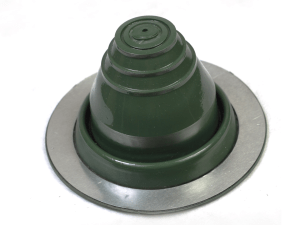 Used for straight roofs and sloped roofs.
This type of product is an excellent combination of price and quality.
Master Flash is distinguished by high professional reliability and functionality - this is achieved through the use of high-quality materials for application.
The main feature of this penetration is the use of reinforced polymer rubber, which is able to withstand heavy loads (temperatures up to 138 degrees).
Polymer rubber does not soften with heat.
How to cover the roof with ondulin installation subtleties
A lot has already been written about how to cover the roof with ondulin.
There is nothing complicated here, it is only important to follow the rules, fasten according to the instructions and have a little skill in construction
But often after the roof there are problems associated with improper coverage. Understanding such issues, it can be noted that the problem lies in the incorrect fastening of additional elements and other nuances.
You should pay no less attention to the subtleties, because small mistakes can then result in big problems.
The passage of a ventilation or chimney through ondulin
Of course, in any house there is an elementary kitchen hood in the kitchen. Also, a private house is equipped with a ventilation system, which is taken out through the roof on the roof.
“Cutting” holes for such pipes is laborious. Moreover, at the point of contact of the ventilation pipe with the ondulin, a gap will appear through which moisture will enter. In the future, this can lead to flooding of the room.
Ondulin manufacturers took care of their customers. They offer customers a special ready-made ventilation pipe. It is attached to the roof with nails and leakage will not occur.
Sometimes people, trying to save money, do not resort to such additional elements. They lead an ordinary ventilation pipe through the roof and leave it in such a state that it is strictly forbidden to do so.
In this case, it is necessary to use a covering apron. But fixing it is much more difficult than a finished ventilation pipe.
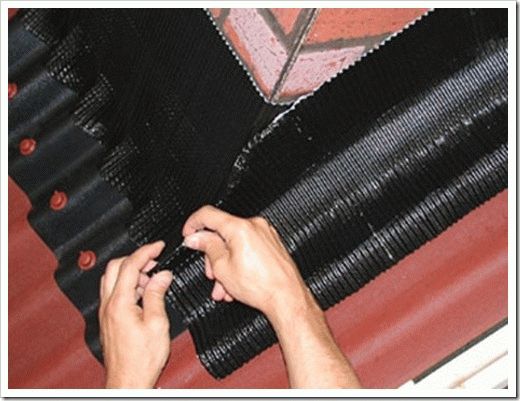
When there is a fireplace or stove in the house or bath, it also becomes necessary to bring the pipe to the roof through the ondulin. To do this, according to the usual technology, they lay out a brick pipe and cover the roof with the given roofing material.
In order to avoid leakage, it is necessary to use the same covering apron. It is attached to the ondulin with special nails.
Mounting and dimensions of an ondulin ridge
The ridge is an important detail in the roofing of the roof with ondulin. It is designed to decorate the edge of the roof, as well as to protect against the ingress of excess moisture.
Skates are purchased ready-made, among other additional elements. Before mounting, it is worth finding out from which side the winds prevail. Installation begins on the opposite side of the direction of such winds.
The skates are also overlapped with a width not exceeding 1.5 cm. The skate is nailed with special nails to the upper wave of the ondulin sheet lying under it. In this case, the nail must be of such length that it is fixed into the bars of the crate.
Covering apron for ondulin
Other additional elements that are necessary to cover the roof with ondulin include a covering apron. With its help, sealing of joints is achieved.
It is used at the point of contact of the sheets with the chimney, for aesthetic design, as well as protection from moisture of the junction between the ondulin sheet and the vertical wall.
In the case of a pipe, a covering apron is attached at the bottom and nailed to each wave of the ondulin sheet. Next, with the help of a sealed tape, the joint with the wall, the side joints and the upper part of the pipe are sealed.
To do this, the tape must be laid at least 10-15 cm higher to the vertical surface. The covering apron and tape are attached with a metal bar.
In addition to sealing pipes and vertical walls, a covering apron must be used for mounting the ridge element. To do this, it is installed with an overlap of 4 cm on both slopes.
In this case, the upper edges of the apron should be at least 2 cm apart. This measure is necessary for better air outlet. Skates are mounted on top of the attached aprons.
How to seal pipes with protective aprons
In addition to rubber caps, aprons made from other materials are often used. When waterproofing pipes with a circular cross section, products made of galvanized steel are often used. In this case, a steel clamp is installed at the place where the passage is adjacent to the roof, and the gap is covered with sealants and adhesive tape with metal reinforcement.
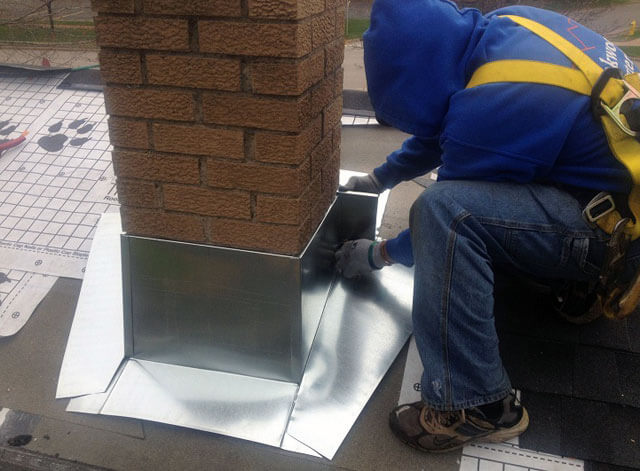
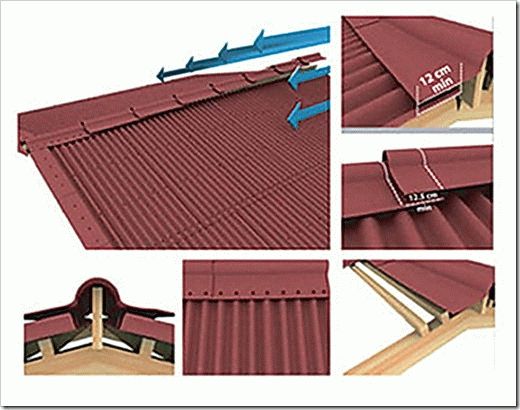
The pipe is sealed on the roof from corrugated board using an apron, which consists of several elements:
- The material of steam and waterproofing of the roof, which remains after the passage to the roof is brought out, is fixed with construction tape to all sides of the apron.
- Using a machine, a strobe (small groove) is made around the perimeter of the pipe.
- The upper edge of the abutment bar is fixed in the groove with silicone sealant.
- The apron consists of 4 parts - for each side of the rectangle. The lower part is tightly attached to the passage, observing a 10-centimeter overlap, using self-tapping screws for working with a profiled sheet.
- A waterproofing element such as a tie is placed under the bottom apron, which prevents water from entering the house.
- Similarly, the top and side aprons are fixed and, as a result, a one-piece protection structure is equipped.
The process of waterproofing pipes on the roof of a household is not as complicated as it is important. It is necessary to properly seal the joints in order to create a quality roof.
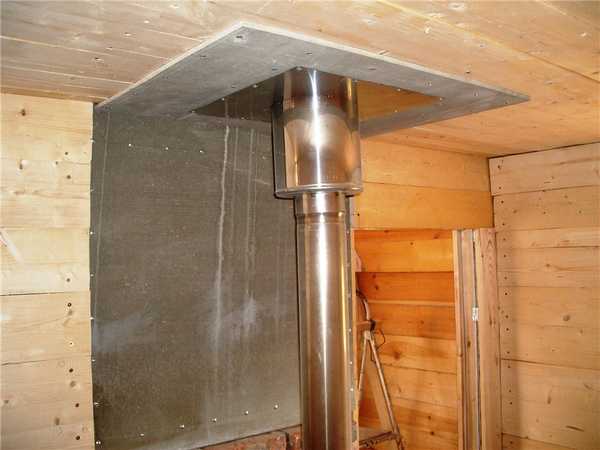
Sandwich pipe design
Everything related to heating equipment is associated with the risk of fires, especially in wooden houses. Statistics say that more than half of fires happen because homeowners did their own chimney installation incorrectly. To facilitate this task and protect the house from fire, use a sandwich pipe for the chimney. At first glance, they look like ordinary stainless steel products, but in fact they have a three-layer structure:
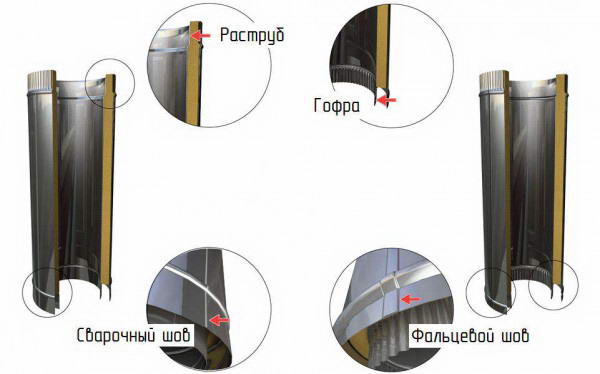
Sandwich pipe design
- Inner contour. Cylinder of round section made of high-strength stainless steel with a thickness of at least 1 mm with the addition of zinc or molybdenum. The inner pipe is made from a sheet of metal, by welding to obtain a sealed seam. Due to its high anti-corrosion properties, alloy steel is not damaged by interaction with water.
- insulating layer. Between the inner and outer circuits there is an insulating layer that performs two important functions: it "locks" the heat inside the pipe, preventing it from heating the surrounding materials and does not allow the smoke to cool down while passing through the pipe so that soot does not settle on its walls. As thermal insulation, fibrous materials with the highest fire resistance class with a working temperature of up to 700 degrees are used, for example, basalt-based mineral wool. The insulation layer between the contours is 40-60 mm, and the density of the insulation is 12o kg per cubic meter.
- External casing. The outer shell of a sandwich pipe made of stainless steel or another type of metal. The seam of the casing is performed using laser welding, which does not damage the galvanic layer of stainless steel, which protects it from corrosion. The cost of brass and copper pipes greatly increases the cost of laying a chimney, and the installation is justified by a spectacular appearance.
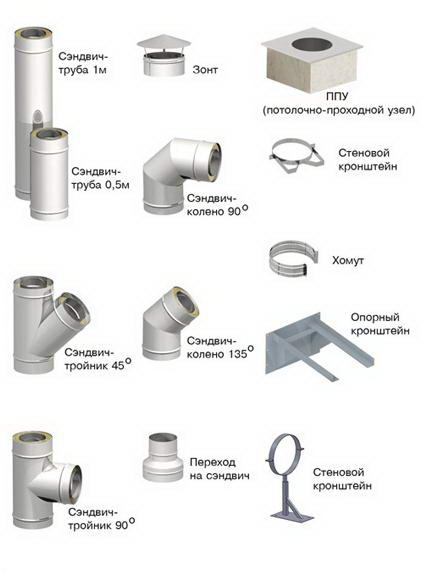 Additional elements of a double-circuit chimney
Sandwich pipes consist of additional elements: straight sections, bends, tees. The diameter of the products depends on the manufacturer, so it is necessary to buy all parts of the chimney of the same company, ideally suited to each other.
Features of this design
Sandwich is a good option for a chimney with insulation. Insulation provides you with the following advantages:
- the possibility of the functionality of the chimney pipe when in the zone of low temperature conditions;
- endows the pipe with the necessary fireproof properties (inside the building).
Standard versions of such chimneys have an external galvanized coating. Stainless steel options are also available, as well as painted in any color that suits you.
Existing versions of sandwiches made of stainless steel are pasted over with a special protective film on the outside. The main thing - do not forget to remove it before using the chimney for its intended purpose. There are also special adapters on sale that you will need when connecting the boiler and pipe. Be careful when choosing elements for a sandwich chimney.
Scheme of the device of a sandwich pipe.
Necessary tools for work are:
How to assemble a chimney from sandwich pipes
 In order not to be interrupted during the installation process, it is necessary to prepare all the constituent components for subsequent assembly into a single device in advance. The advantage of the sandwich construction is that technology is used in its manufacture, which greatly facilitates the process of installing a complete unit. The edges of sandwich pipes are processed with a smaller diameter compared to the main component.
The narrowed part is brought to another pipe, the connection is secured by a clamp. Masters advise treating the seam area with a sealant that copes well with temperature loads.
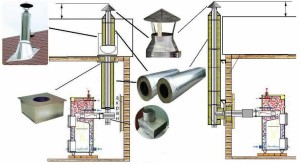
Pipe exit through the roof
Before starting the installation of the chimney. prepare the tools:
The layout of the chimney relative to the roof ridge.
- drill;
- set of drills;
- Bulgarian;
- heat-resistant sealant;
- riveter;
- aluminum tape;
- clamps;
- corners for fixing the pipe.
When carrying out work on the removal of the pipe, it is necessary to solve the following issues:
- The passage through the roof must meet all fire safety requirements, given that the pipe crosses the ceiling and roof, which may have combustible properties.
- The interior space of the house must be protected from moisture and wind entering through the pipes.
Removing the pipe through the ridge has the following advantages:
- Simplicity of work associated with the adjoining of the pipe to the roofing.
- There are no snow pockets on the ridge, which reduces the risk of leaks.
The disadvantages of this method include:
- there is no load-bearing ridge beam in the roof frame;
- rupture of the bearing ridge beam at the point where the chimney pipe passes through the roof;
- additional installation of truss supports is required, which is very inconvenient when planning an attic.
As a result of this, the chimney passage is usually led to a slope near the ridge, where a snow bag is also not collected. The execution scheme of such a node is also quite simple.
Scheme of the arrangement of permissible gaps during the installation of the chimney.
Tip: you should not make a chimney in the valley (the place where two roof slopes intersect at an angle from the inside), because this point is very difficult in the quality execution of the area where the pipe adjoins the roof. Rain water will penetrate here, and in winter a snow pocket will form in the valley, which will eventually lead to constant leaks.
It is very important to observe the gap between the rafters and the roof. Ideally, it should be about 25-30 cm
If the roof is made of combustible material, for example, from standard roofing felt, in order to avoid fire hazard situations, the minimum gap should be 13-25 cm.
In the case of a roof made of non-combustible materials, the distance can be reduced to a few centimeters. It is only required to remove the pipe from the crate.
When the roof looks like a roofing cake. which consists of heat, steam and waterproofing, during installation work on the installation of a chimney assembly through the roof, some difficulties arise due to the violation of the integrity of the insulation layers, which in turn leads to a decrease in the level of protection of the insulation layers.
The most acceptable way for this case is to isolate the space near the pipe from the roof. The method consists in the execution of a special box for the chimney, which can be made from rafters and beams. A gap of 13-15 cm should be left between the walls of the box and the pipe. The space around the chimney is filled with insulating non-combustible materials, for example, stone wool is suitable.
Chimney waterproofing scheme.
Steam and waterproofing is brought to the box in the usual way: the film is cut like an envelope. Then, leading to the transverse beams and rafters, they are fixed with staples or nails.
The waterproofing layer is pressed with crate bars, and the vapor barrier layer is pressed against the frame of the attic finishing material. After that, the joints of the box and the film are sealed with specially designed compounds or tapes that improve tightness.